How to set the time and date. How to set the date and time on your computer
The date and time can be configured both through Bios and through the operating system. IN in this case we will look at setting up through the operating system.
So, in order to set the date and time on your computer, follow these steps:
Step 1. On the taskbar, in the lower right corner, click once on date and time. In the window that appears, click on Changing date and time settings...

There is another way to access date and time settings. Click Start select Control Panel and click on date and time.
Step 2 . In the window that opens date and time Press Change Date and Time.
This procedure requires administrator permissions if you regular user You cannot change anything without knowing the password and special permissions.
it will succeed.
Step 3 . In the window Setting the time and date use the arrows or manually installtoday's date and time.
Finally, click OK.

Also, in the window date and time in the tab date and time, you can select the time zone you are in. To do this, click Change time zone.
In the window, click on the drop-down list and from the list of time zones, select your time zone and click OK.

Also, you can set up synchronization with any time server. For this in the Date and Time window go to the tabInternet timeand press Change settings(Requires administrator permission).
In the window that appears, check the box Synchronize with an Internet time server. In field Server click on the arrow and select any time server from the list and click Update now after that click OK.

That's all. The setup is complete.
On Windows operating systems, the time is displayed in the lower right corner of the screen. All Windows users Already accustomed to these hours. And I think that this is indeed a very convenient tool.
At some point you will have to change the numbers on the clock. This will need to be done for absolutely any reason. The most common reason: The time has moved to a different hour or a parameter error has occurred.
As you understand, what I’m getting at is that I’m going to talk about how to change the time on a computer, and at the same time we’ll change the date.
On a note! If you change the date and time to the wrong one, then in some browsers it will not be possible to open the web page due to the “Security Certificate” error.
How to change the time on your computer
Changing the time on Windows 10
All! Now the date and time are set and you can accurately navigate the day.
The main thing is not to confuse the time zone. Install the one where you live. When we opened the settings, in the “Date and Time” tab, just below the setting for changing the date and time, there is a “Time Zone” item. In the drop-down list, select your city, country, or whatever is required. 
We've sorted out Windows 10, now let's move on to the seventh version of the OS.
Changing the time and date on Windows 7
Click on the clock in the lower right corner of the monitor. A calendar will appear with pointer clock on the right side.
The interface is different from Windows 10, but the settings are the same: in the window that opens, change the date and time, set the time zone.
It is quite possible that the hour will be wrong and the numbers that should not be displayed will be displayed.
In Windows 7, the system clock is synchronized with the Internet time. You can see the “Internet Time” tab above.
You can change the synchronization setting with the time of a specific site by clicking on “Change settings”. It is also possible to disable synchronization altogether - to do this, uncheck the box in the open window. 
Such problems most often arise on the seventh and eighth Windows versions. On the tenth I didn’t notice this nonsense. If there is confusion on Windows 10, then experiment with the settings automatic installation time should help.
And now as for the seven: the “Additional Clock” tab allows you to set the time in a different time zone. This may be necessary when you need to be on time for online auctions, online webinars, etc.
Remember one thing, the system’s tools should help you, not bother you.
To set the date and time in Windows XP, use special utility. To call it, open the control panel and click on the date and time icon. An additional window will be displayed on the screen, consisting of three tabs: date and time - this is the first tab on which you can set the date and time. In order to change the date, you must select a month. Open the drop-down list and click on one of its items. Next, set the year and click on one of the days of the month. Changing the time can be done as follows. Set the rates to any position in the time entry line. And after that, click on the arrows to the right of the line to either increase or decrease the value.

Timezone
On this tab you can set the time zone. Open the drop-down list by left-clicking on the arrow images on the right side of the list. Next, select one of the values in the list and left-click on it. At the bottom of the tab there is an icon that specifies the mode of automatic transition to summer and winter time.

Internet time
If the computer is a member of a domain, its clock is probably automatically synchronized with network server time. If the computer is not part of a domain, the computer's clock can be synchronized with an Internet time server. In order to synchronize, select a server; to do this, open the drop-down list by left-clicking on the arrow images on the right side of the list. Next, select one of the values in the list and left-click on it. Next, click the update now button and the synchronization will take place. If synchronization is enabled, the computer clock is synchronized with an Internet time server once a week.
Without accurate time, the computer will not be able to perform all its functions fully. That is why every computer is equipped with built-in electronic watch. This clock works very accurately and is not dependent on power supply. Thanks to the battery located on motherboard, Digital Watch The computer continues to work even when the computer is completely disconnected from the power supply. Thus, after every time you turn on the computer, the clock shows correct date and time.
It is very important that the date and time in Windows XP show correct values. After all, the operation of many computer functions depends on this. For example, exact time used for encryption, as well as to set the modification and creation time of files.
But, in some cases, it becomes necessary to change the date in Windows XP. For example, the date gets lost after replacing the battery on the motherboard or after resetting the BIOS settings. In such cases, the time and date are not correct and must be changed manually. IN this material we will talk about how to change the date in Windows XP using the usual GUI Windows.
How to change the date in Windows XP via GUI
If you need XP, then you need to double-click on the system clock, which is located in the lower right corner of the screen.
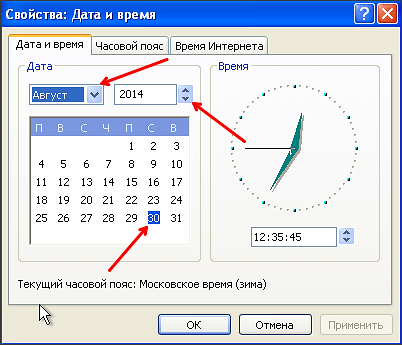
After double clicking on the system clock, you will see small window called "Properties: Date and Time".
It should be noted that the “Properties: Date and Time” window can be used. To do this, open the control panel and switch to classic look. After that, open the “Date and Time” section.

So, we opened the “Properties: Date and Time” window. In this window you can change the time and date in Windows XP. To change the date select desired year and a month above the calendar, after which you can select the desired date in the calendar, for this it will be enough to simply select the desired day.
After selecting the date you need in the calendar, simply close the window by clicking on the “Ok” button. All these simple actions enough to change the date in Windows XP.
Also in the “Properties: Date and Time” window, you can change other settings that relate to the system clock. For example, in order to change the time zone, you need to go to the “Time Zone” tab and select the desired time zone from the drop-down list. And at the bottom of the window on the time zone tab you can enable or disable automatic transition on summer time and back.

You can also enable or disable date and time synchronization over the Internet here. To do this, go to the “Internet Time” tab and check or uncheck the corresponding function.

To save changes made The window must be closed by clicking on the “OK” button.
How to change the date in Windows XP via the command line
Also, if necessary, you can change the date using the command line. To do this, press the Windows + R key combination and enter the command “ ” in the window that opens.

After this, a command window will open in front of you Windows string XP. To change the date via command line you need to use the "DATE" command. This command accepts a date in the format "day-month-year". So, to set the date to September 15, 2014, you need to enter the command “date 09/15/2014”.

If there is a need to change not only the date, but also the time through the command line, then you will need the “TIME” command.

In order to change the time using the TIME command, you need to set the time in the format “hours:minutes:seconds”.
Although the time and date on your computer are set during installation operating system and synchronized over the Internet, there may be times when these parameters must be set manually.
There are two ways to get to the date and time settings: using the control panel and using the time indicator located in the .
Let's look at these two methods Windows example 7, as the most common system at the time of writing. Setting the time and/or date in Windows systems 8 and Windows 10 happens similarly.
Set the time and date on your computer using the Windows Control Panel
Left-click on the " Start"call , in which we select the item " Control Panel».
In the panel that opens, switch the viewing mode to the “ Large icons» for easier searching desired item settings.

In the control panel on the left we find what we need “ date and time"and left-click on it to open the settings window.

In the window that opens, you can set your time zone or proceed to setting the time by clicking on the " Change date and time" In the next window, you can set the time by direct input from or using the up or down arrows. Set the date in the calendar field by selecting the day and month with the cursor. After completing the installation, close the installation windows by clicking on the buttons " OK" And " Apply».

Set the date and time on your computer using the clock in the notification panel
It's more quick way installations. Here, to open the settings window, you only need two mouse clicks. The first click on the clock indicator in the notification panel will open a calendar window with a clock, in which you need to click on the line “ Changing date and time settings».

As a result, we will be taken to the previously discussed settings window, where we will set the time and date according to the instructions given above.
Additional date and time settings on your computer
Settings windows have tabs for additional installations, where you can set the time display for different time zones. To do this, click on the tab “ Additional hours", check the box next to " Show these hours", select time zones and confirm with the buttons " Apply" And " OK" Now, when you click on the clock indicator, a window will be shown with the time in the time zones you have set.

Tab " Internet time» allows you to enable or disable clock reconciliation with the exact time server. Click on the button " Change settings"We will open the time setting window via the Internet. Checked checkbox shows that the time on the computer is being checked with the exact time server. It is recommended not to disable this function.

As you can see, there is nothing complicated about setting the time and date on a computer.
Share.