Why is the disk increasing? How to increase the capacity of drive C? How to increase the size of drive C at the expense of drive D
If the system gives an error when downloading new files, then you should worry about the capacity of the system storage. There is no need to panic and clear everything stored on your computer. There is no need to remove installed components. It is enough to understand the methods of increasing the capacity of the system drive C without losing data.
When is it necessary to increase the disk size?
It happens that the system storage medium (often this is C) becomes full. New programs won't install, the system constantly reminds you of low memory, and the color of the local storage turns annoyingly red.
The reason for this may be:
- very small amount of allocated memory. When installing an operating system, the HDD must be rationally divided into partitions. It is on drive C that, according to the standard, all programs and games are installed, which are becoming more and more numerous over time. Desktop documents are also stored on the system storage;
- Even if most of the memory is allocated to system media, it can fill up very quickly. Unnecessary components, countless installed games and simply irrational use lead to the fact that the fullness indicator turns red.
Due to the overload of information, the computer stops functioning normally and refuses to install anything new. Therefore, it is worth increasing the system memory partition.
Video: C drive enlarged
Methods
Expanding system storage capacity is sometimes very simple. But in some cases, it is enough to simply clean the computer by reviewing the information on it. This does not require installation of additional components. Most often, an ordinary user can simply clean the desktop, delete temporary files, or use the command diskmgmt.msc.
Clean desktop
The desktop is best used to simply place shortcuts to your most used programs. But many users create countless folders in which a lot of information is stored. Most often, this information is multimedia in nature, which means it takes up a lot of memory.

To clear a little (or often a lot) of memory, you just need to tidy up your desktop. To do this, move all folders with movies, music and photos to the designated media (D, E). Each HDD section must be used rationally.
Clearing temporary files
Temporary data can also take up the lion's share of system memory.
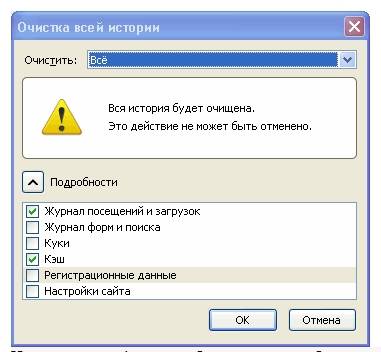
Therefore, it is worth getting rid of them. Temporary files include information saved by the browser when viewing web pages, namely:
- visit log;
- files Cookie;
- download log;
- World Wide Web temporary files;
- site settings;
- saved passwords;
- autocomplete.
Such information speeds up the launch of many sites. This is convenient for personal use. But if the computer is a family one, it is better to get rid of them.
There are three simple and convenient ways to clean them:


- manual deletion of temporary data. To do this, you need to empty the trash can and independently delete the saved information from the browser you are using. Each of them does this in their own way.
- Internet Explorer. You need to clear the log in the window "Internet Options". The section is located in the browser itself in Service;


- Opera. You need to get to deleting personal data by Menu – Tools – Delete personal data.

To select the desired items, you should open Detailed settings;

- Firefox. You need to go here Tools – Settings – Privacy.

- using the function "Disk Cleanup". It helps you get rid of a lot of unused data stored on your drive.
To do this, do the following:
- run the program by pressing the keys WIN+ R;
- enter the command cleanmgr and click OK;
- select the device that requires cleaning;

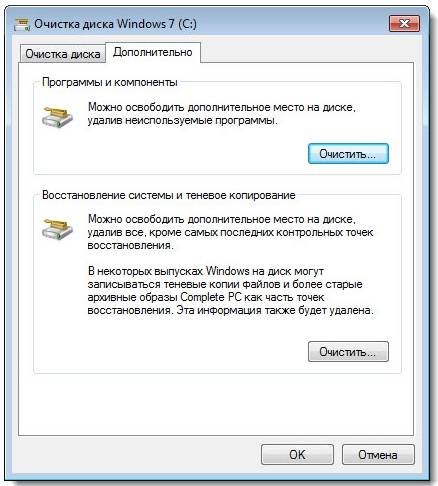
- in the window that opens, select "Clean up system files";
- Select the drive that requires cleaning again, then click OK;
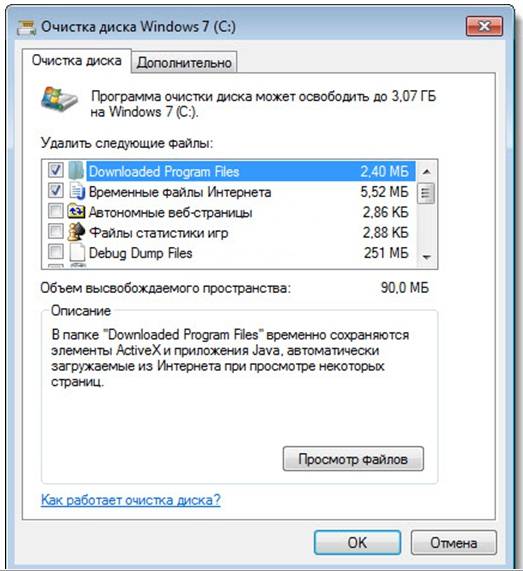
- mark the types of files that need to be deleted;

- press the button "Delete".
Diskmgmt.msc utility
Using this utility, you can partition, create a new one, delete an unnecessary one, or format the HDD.
Further actions depend on the required task. The storage capacity on the computer can be achieved using another medium:
- First you need to start the control. The easiest way to do this is with a combination of buttons WIN+R;
- in the “Run” line you need to enter "diskmgmt.msc";

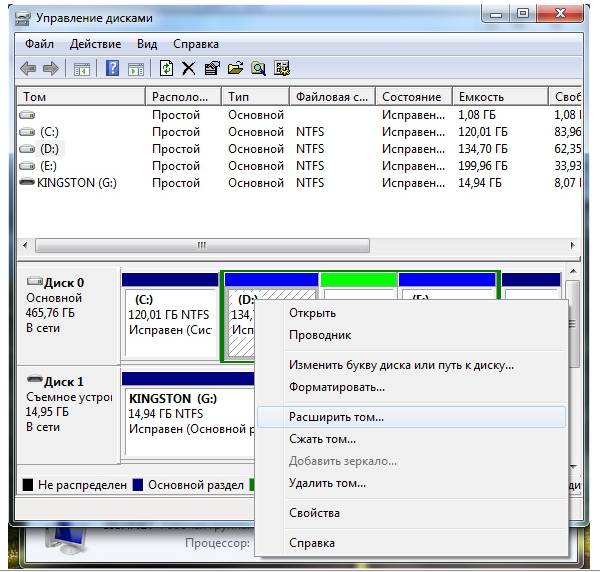
- in the window "Disk Management" you need to select media D and select "Delete Volume";

- On volume C, right-click. Choose "Extend volume";
- in the extension wizard that opens, click "Further";
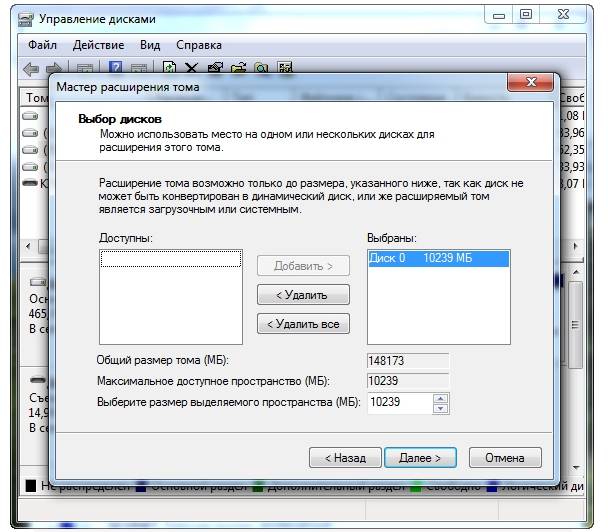
- specify the capacity by which you want to increase the system disk;
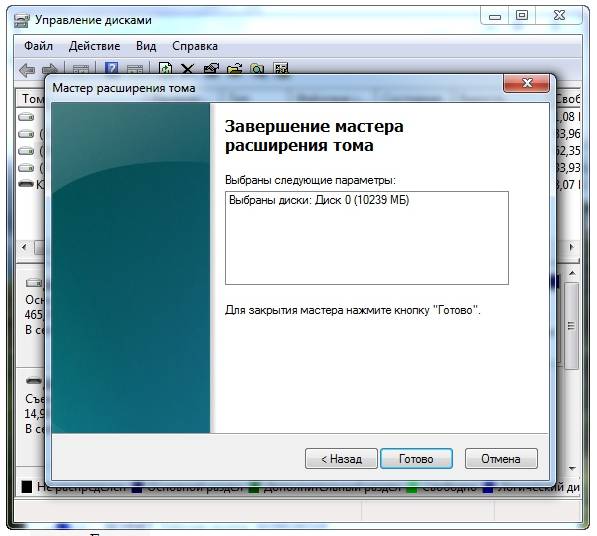
- press "Ready".
How to increase the amount of memory on drive C
You can increase the storage capacity of the media with the operating system installed using special programs. Acronis Disk Director is considered the most popular and frequently used for these purposes.
Acronis Disk Director
It does not require special skills and works both from the boot disk and from the installed software. Acronis Disk Director refers to disk partition managers. Therefore, you need to be careful with it, otherwise there is a chance that absolutely all HDD partitions will be deleted.
To enlarge the media, do the following:
- create unoccupied space.
To do this, you need to reduce the partition of another drive (for example, D):
- open Acronis Disk Director;

- hover the mouse over the media, select it;

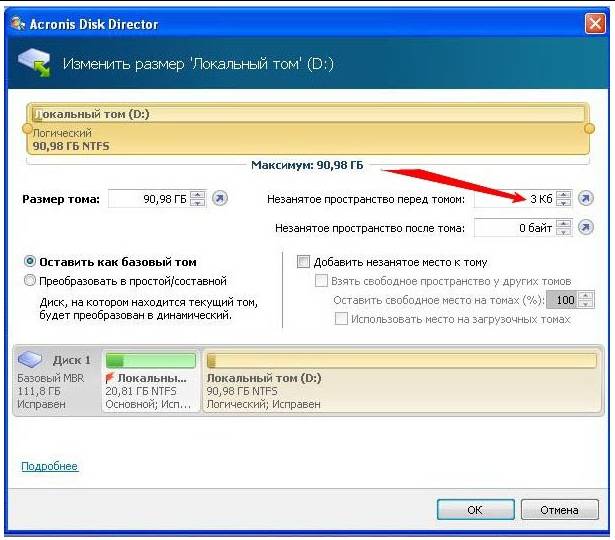
- resize the volume downward.

- press the button "Apply Operations"(works in deferred operation mode);

- reboot run Acronis Disk Director again, select drive C, press "Resize volume";

- we increase the size to the maximum due to the freed up space;
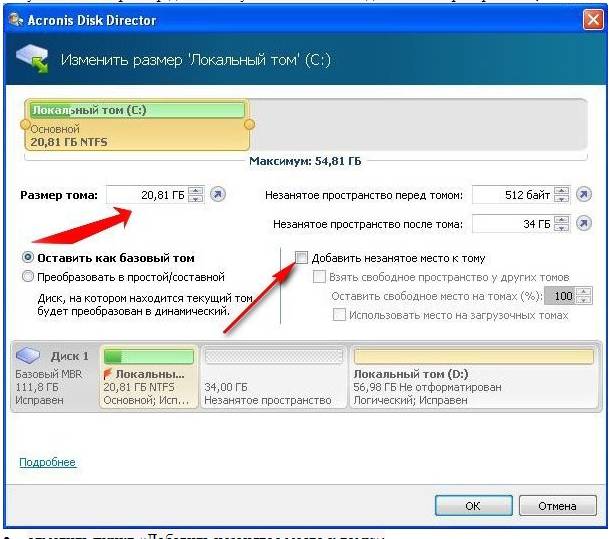
- check the box "Add unallocated space to volume";

- press again "Apply Operations" and restart your computer.
In this simple way you can significantly change the memory capacity of any media.
These methods are very simple to use. They are available to every user who can press a mouse button. Most of them don't even require the use of additional programs. Such simple operations increase the capacity of drive C without losing data. This will require a little time, desire and effort. Try it yourself.
The editors of our portal have more than once received questions like how to increase the space on disk c or how to increase the volume of disk c at the expense of d and so on. In today’s article, we will try to answer these questions in as much detail as possible and make some instructions for you, with the help of which everyone can painlessly and without losing data increase the size of the desired local disk.
Why am I running out of disk space?
Operating systems of the Microsoft Windows family have one unpleasant property: over time, the size they occupy grows and increases, thereby filling up the free space on the disk. Both temporary and system files can take up space, and they grow depending on the needs of the system. Sooner or later, there comes a time when there is simply not enough space on the system disk and the operating system begins to “glitch” and work slowly. You can clean and delete unnecessary files, configure the swap file, but what to do when there is nothing left to delete. In this article we will tell you how to increase the space of the System disk at the expense of other logical volumes.
Two methods to painlessly transfer free space from one drive to another
- Method 1- if you are using an operating system Windows 7 or 8 , then you have the opportunity to use a standard utility to view and change hard drive partitions.
- Method 2- otherwise you will have to use programs such as Acronis Disk Director or Partition Magic.
How to increase the size of the system disk with Windows 7 or another OS - Method 1
We need the utility “To launch this utility, right-click on the “Computer” icon and select “Manage.”

In the window that opens, find and launch the Disk Management utility. This component of the operating system allows you to manage all storage devices, be it a hard drive, flash memory or disk.
In order to increase the space on drive C at the expense of local drive D or any other, we need to transfer the available free space from one local drive to the system drive (that is, the one where the Windows 7 or other operating system is installed). Before doing this, check your local disk for free space and calculate how much you would like to transfer.

To free up space, right-click on it and select “Shrink Volume”.

In the next window we will need to specify the size of the space that we want to transfer to another volume. Set it to the “Size of compressed space (MB)” field.

After completing the steps, free space should appear on our hard drive, which we can transfer to the system drive.
In order to add free space to the system disk, right-click on it and select “Extend volume” in the context menu.

After this, a wizard will launch that will help you resize our volume. In the wizard window, you will need to select the volume to expand and the amount of space to add.

Having done this, click “Next” and after a short wait you will receive a system disk with a large amount of free space. After this, you should restart your computer.
Increasing space on drive C using Acronis Disk Director - Method 2
Acronis Disk Director is a very powerful product for working with computer hard drives and local drives. You should read the system messages very carefully so as not to accidentally make a mistake and destroy data.
When entering the program, we are greeted by an intuitive interface in which we can select disks and perform operations with it. To increase the volume size, select the disk and click “Change Volume Size”.

In the window that opens, check the boxes next to “Add unallocated space to a volume” and “Take free space from other volumes.” By clicking on the button next to the percentage window, select how much space you want to take from other drives. Once you have freed up space, change the Volume Size.
After making all the changes, click “Ok” and apply the actions. The system will ask you to reboot and after reboot you will have a disk with a large amount of free space.
Sometimes there is a need to increase the size of drive C at the expense of another partition. Most likely you need this because there is almost no space on it, but you need to expand it. In this article I will analyze two programs that will help you do this and some instructions.
We will talk specifically about increasing drive C at the expense of another partition, for example, drive D, and they must be on the same hard drive or SSD. If you have Windows 7, 8 or 10, then these instructions will suit you.
How to increase the capacity of C drive using Aomei Partition Assistant
A wonderful program that will allow you to expand the C partition of your hard drive or solid state drive is called Aomei Partition Assistant. This program does not install with it various junk that some programs are famous for. Also, the program is in Russian with a completely understandable interface. Works on all operating systems starting from Windows 7.
The most important thing to pay attention to is that incorrect work with partitions can lead to data loss. If they are important to you, I recommend keeping them in a safe place.
Download and install the program, I think there will be no problems with this. After launch, you will see a nice interface, although it depends on who you are. All your disks and partitions are displayed there.
In our case, as I said, we will increase section C at the expense of section D. Now let's do this.
Right-click on drive D and select "Resize partition".
A window will open where we can use the slider and thereby change the size, or enter it manually. You need to make sure that the unallocated space of the partition after selecting the size is in front of it, as shown in the screenshot. Then click OK.

Now, in the same way, we change section C, only now we increase the size on the right. It will increase due to the free space that we took from drive D. Click OK again.

After the work has been done, at the top of the program, on the left, there is a button "Apply", press it.

Now the computer should be rebooted, usually you need to do two of them. As a result, the size of the C drive will increase.
This is not the only function of the program. With her help we can. Also, you can create a bootable flash drive in the program and resize the partitions there.
How to Enlarge C Drive Using MiniTool Partition Wizard Free
So, there is another good program called MiniTool Partition Wizard Free. It is free, does not install third-party software, but its disadvantage is that it is not in Russian, it may be difficult for some, but thanks to this article you will understand everything.
The program interface is somewhat similar to the previous one. In principle, there are almost no differences from the first option. We will enlarge the system disk in the same way.

First, click on drive D, and then click "Move/Resize Partition" up. Now take the desired size of disk D, highlight it on the left and click OK.


That's all, after the completed operation in Explorer you can already see the increased size of the system partition. Now you know how to do it.
You can download the program from here.
How to increase the size of the system disk as standard
Standard means using standard Windows tools. You can do this, fortunately, like Windows 7, Windows 8 and Windows 10, there is such a function. But this method has a drawback: the data located on the D drive will be erased, therefore, you will need to first transfer it somewhere. Perhaps you have decided to use this method, then first press the combination Win+R, a window will open in which you need to enter the command:
| diskmgmt.msc |
This will open the tool "Disk Management". There you will see all connected disks and partitions. If there are additional sections, also called hidden, then I do not recommend touching them.
So, right click on partition D and select "Delete Volume". Subsequently, the data on the disk will be deleted, and free, unpartitioned space will be created to the right of the C drive.

To increase the volume of the system disk, right-click on it and select "Extend volume". Next, the volume expansion wizard will open, where we need to specify the volume by which we will expand the disk. You shouldn't choose too much if you still need section D.

We have enlarged the system disk, now we need to use the unoccupied space that we have left. To do this, click on what is not distributed with the right mouse button and click "Create Simple Volume". The drive will be assigned the letter you selected and will be formatted. That's all.

Now you can return all your important data back to the D drive.
Good afternoon. Most people buy computers ready-made, that is, the system, all the components and components of the computer are installed on it, the BIOS is configured, etc. This is, of course, good. But sellers very often sell PCs whose hard drive has only one partition.
Should the hard drive be partitioned?
In other words, there is a system on one partition, and on this same partition people download movies, install programs, games, etc. Then, wanting to learn to better understand computers and their programs, people look at installed programs, files, and so on.
Some of them are deleted, some are edited, etc. But, since Windows is installed on the same partition, it is quite difficult for a person to distinguish between the program that he himself installed and where the system software is.
But, if the user accidentally deletes one of the system files, then it is very possible that the computer simply will not start. Hence, it is very bad and inconvenient when the hard drive is not divided into sections. Therefore, when you buy a computer, ask the seller to have the hard drive divided into a couple (or three) partitions. At least two. Although, in my opinion, three is more convenient. On one the system is installed, on the other there is working software, on the third there are various videos and games.
In my opinion, this is the most convenient option. But, if you already bought a computer with a single partition, it doesn’t matter! The Winchester can be broken down into three parts (or more if you like). Of course, this can be done during OS installation.
But, this is not very convenient, especially if your OS is functioning perfectly. And I don’t want to bother with reinstalling the system. In this case, all that remains is to divide the hard drive into partitions with a working system.
This is quite possible, as strange as it may seem to many users. There are a number of programs that can partition a disk. But the most convenient of them, in my opinion, is Acronis.
Acronis Disk Director 12 description
This program is specifically designed to work with hard drives. She can quite professionally divide your hard drive into parts, and select a specific size for each section. You can also connect several sections together if you have a lot of them. Among other things, Acronis gives us the opportunity to move or copy the system to any disk partition, and even to another hard drive.
It is very comfortable. For example, you bought a new computer and want to copy the system from the old system unit to the new one. To do this, you simply remove the hard drive from the new system unit of the new computer, insert it into the old one, and copy the system. You can select the Move command. But, there is a threat that something will go wrong and you will lose the system. If you are copying the system, then if there is a problem, you will simply start copying the system again.
How to increase the size of the Windows system disk
In addition, it often happens that your system partition is small. For example, only 40 GB. It would seem like a decent size, but by modern standards it’s not much! I would even say not enough (especially during the latest Windows 10 updates, which took up a lot of space).
Since modern programs have a decent weight, over time, due to their number, and from constant updates, the volume of the C drive increases greatly.
What should be done in this case? The most reasonable thing is to increase its size. And, better yet, in abundance. I advise you to set the system disk size to at least 100 GB, and preferably 120 GB, as I will do. For this, we need Acronis Disk. This program is paid. In general, its cost, considering all its functions (and there are a lot of them), is low. In addition, it has a Demo version with limited features.
Download Acronis Disk Director 12 for free from the official website (demo version). Install the program. I recommend installing Acronis on drive C, because... We will work with disk D (we will take some space from it). After installing the program, the Acronis window opens.
Cut off some volume from drive D
From this window we see how many partitions we have and how much space they occupy from the hard drive. So, our task is to increase the system partition. It has a capacity of 88.48 GB. The D drive has 360.3 GB. To increase the system disk, we must first cut off a small part from another disk, in particular from D, and add it to the system one.
Therefore, before separating part of disk D, I recommend copying the most important information from this disk to another disk (just in case). Then, the disk needs to be defragmented. The best option is if drive D is completely free.
To do this, we select drive D, and right-click and select “Resize volume” from the context menu.
In the new window we see how much space is occupied and how much is free. In disk space, brown color indicates the space occupied by information. Free space is shown in yellow. Then, we use the mouse to grab the disk strip by the left side and drag it to the right, up to about 30 GB. Please note that the disk capacity is currently 360.3 GB.

After dragging and dropping, the volume became 330 GB. At the same time, in the “Unallocated space in front of the volume” column, we have the number 30.29 GB. Also, to change the volume size, you can simply enter 30 GB in the “Unallocated space in front of volume” column. Please note that in the lower menu that shows our disks, a new disk has been created called “Unallocated Space”. Click OK.
![]()
And nothing happens for us because we didn’t click “Apply pending operations” at the top of the menu. Let's click on this command.

The “Pending Operations” window appears. Where we also learn that a reboot will be performed. Click “Continue”.

You must confirm the reboot. We agree.

After the reboot, turn on Acronis Disk Director 12.
How to Attach Unallocated Space to Drive C
So, having turned on Disk Director 12, note that now our D drive is 330 GB, and next to it there is unallocated space of 30.29 GB. Right-click on drive C and select “Resize Volume”.

A window appears where we see that so far our C drive occupies 88.48 GB. This is followed by unallocated space of 30.29 GB. So, we take the right edge of the strip, and with the mouse we drag out the space of drive C to cover the entire period of unallocated space. Or, in the “Unallocated space after volume” column, you can simply enter 0 GB (this will even be better). Next, be sure to check the box next to the “Add unallocated space to volume” command.

Click OK. After that, click “Apply pending operations”. The OS tells us that a reboot is required. We agree. Click OK.

In the next window, click “Continue”.

We are recording transactions

After rebooting, open Acronis and look at the program window. We see that the system disk now takes up 118 GB, and disk D 330 GB. That's what we needed to do. Now the system disk has a decent size, and you can install small programs directly on it (I still recommend installing large ones on another partition of the hard drive).

How to partition a hard drive in Windows 10 if there is only one partition
Your situation may be different. For example, you installed a system, you started working with it, installing programs, downloading music, movies, games, etc. Then, you realized that your friends’ hard drives have several sizes, but your store only installed one large section. What can be done in this case? How to split a disk into parts?
You can split the disk into parts while reinstalling the system, but then you will completely lose all information from the disk. First of all, you need to defragment the disk. Transfer special information to removable media.
Next, launch Disk Director 12. Select “Resize volume” (I will show it on my C drive). Then, take the right edge of our disk and drag it closer to the center. Let me remind you that the dark green stripe is space on the disk occupied by information. Light green, free disk space. Set OK.
If you don't like the volume letter, you can change it. Also, it is advisable to format the new disk in NTFS format. We select the cluster size as 4096 bytes.

Other program features
In addition, Acronis can move volumes, merge volumes, split volumes, change the cluster size, format, and defragment the desired partition. Also, it has an interesting “Check” function.
That is, if you select this command and in the new window check the boxes “Fix found errors” and “Repair bad sectors”, the program will begin to scan and disinfect system files.

This program function works better than the built-in one, which fixes system errors.
Conclusion: Acronis Disk Director 12 is one of the best programs to increase the capacity of the local disk C. combining these partitions, adding space to the system disk. It has a convenient design, Russian language, is easy to use and has many other additional functions. Even a beginner can handle it. Good luck!
PS Three years after the article, I rolled back the system using . The backup was made before the disk was enlarged. So, during the rollback, the system returned to its previous state. Including drive C. That is, its volume was again 88.6 GB. A disk with unallocated space has formed next to it. I used the Acronis program again.
The disk was restored to its previous size quickly and efficiently. Why am I saying this? In addition, if you restore the system from a backup, most likely the disk will become smaller again. But, Disk Director 12 will return the previous size without much effort!
If the operating system does not have enough memory, it’s time to think about how to increase the size of the disk (C:). Over time, the OS “grows” - new programs appear in it, updates are downloaded. There is less and less free space on the partition, even if you install all the utilities on another volume. You can clean your system disk of junk files or change its size. And you don’t need to format your hard drive or reinstall Windows to do this.
The characteristics of the HDD itself do not change. You are only redistributing existing resources between logical drives. Physical memory remains the same. If you want to expand it, you will have to purchase a new hard drive.
You should not expand the partition if there is still free space on it. If something goes wrong when resizing, you will lose all your data.
During operation, unnecessary information “settles” in the system. These are files left over from deleted applications, outdated cache, registry entries that lead nowhere and do not relate to anything. Separated from each other, they don't weigh that much. But in total they clog up the system and take up a large amount of memory. You can clean the OS of garbage and free up space for Windows needs.
- Right-click on the disk icon.
- “Properties” item.
- General tab.
- Clean button.

Click on "Cleanup"
- Check the boxes next to the required items. It's better to delete "Temporary Files". You can also erase “Thumbnails” - these are previews (“thumbnails”) of images and videos. With them you see not an ordinary icon, but a picture or frame. But the cache may store thumbnails of drawings that you no longer need. Therefore, feel free to erase all the previews if they take up extra space. As soon as you open a folder with drawings or photos, new thumbnails for icons will be loaded into the cache.

Place a checkmark next to the required files
- You can also use junk removal programs. For example, CCleaner is suitable.
And a few more tips:
- Do not install resource-intensive programs on the system drive. Use other sections to download games, editors, and multimedia programs.
- Do not put videos, photos, archives in subdirectories (C:). Transfer your personal information to another location.
- Don't clutter your desktop with shortcuts and folders.
Cleaning the OS does not change the size of the system disk. But this will increase the amount of data that can theoretically fit on it.
In what cases is it necessary to expand the disk?
If Windows has enough resources to run, you don't need to touch anything. Manually expanding logical partitions involves certain risks. If you do something wrong, the system will stop booting. Change the size of the system directory only as a last resort. For example:
- Windows was initially allocated little space. When “slicing” the volumes, they did not calculate how much memory was needed for stable operation.
- You cleaned the OS of garbage, deleted unnecessary data, moved your files to another partition, but this did not help. The free space in the system partition fills up too quickly, because various updates, extensions, and add-ons are constantly installed.
Computer management
Here's how to increase memory on C drive without third-party utilities:
- Right-click on the “My Computer” icon.
- Item "Management". To open this menu, you need administrator rights.
- Expand the "Storage Devices" list. It's on the left side of the window.
- Select the "Disk Management" sub-item.

Find and launch Disk Management
- Right-click on the system partition.
- You need the "Expand volume" line to increase the size. If this item is not active, then additional volume is needed.
- To get it, right-click on any other drive that has free space.
- Select Shrink Volume.
- Specify the number of megabytes you want to “transfer” to (C:).
- Confirm the action and wait until the system shrinks the partition.
- Now you have unallocated memory. And the “Extend volume” option will be active.
- The computer may restart several times to complete the operation. Do not interrupt the process or turn off the PC.
Do not touch the System Reserved object. Do not change drive labels (“letters”) or paths to them. Do not make active a partition that does not have an OS installed.
Third party utilities
You can change the size of volumes using special programs. They are called "Partition Managers". They have a simple interface. You don't need any special skills to work with them. But you still need to use such utilities carefully. If you do something wrong, you can actually remove all volumes and erase data.
Almost all of these applications have a similar interface. Therefore, for other programs the algorithm of actions will be the same.

Acronis Disk Director window
Here's how to increase disk space (C:) using Acronis Disk Director:
- Install this utility. You can download it from the official Acronis website. It's paid, but a demo version is available to download. There are also “hacked” versions of the program on the World Wide Web.
- Launch it. A window will open with a list of logical partitions.
- Right-click on the volume whose volume you want to increase.
- “Resize” item. It is the first one in the context menu list.
- Check the “Add unallocated space” and “Take from other volumes” checkboxes.
- In the “Leave free space on volume (%)” counter, indicate what percentage of memory to leave in the partition. This value depends on the general parameters of the hard drive and the local disk that you are compressing. If you set it to 80%, 20% of the volume (D:) will be added to the system partition. Don't overdo it. You should not “drag” all free resources to (C:). This way you will have nowhere to put your personal data.
- In the “Size” field, specify the desired size of the system volume.
- Click OK. The settings window will close.
- In the program itself, click on “Apply pending operations”.
- The utility will prepare and check everything. After you click Continue, your computer will restart (possibly more than once). During system startup, disk space will be redistributed. Do not turn off the PC or unplug the cord from the outlet, otherwise you will lose data from the partitions.
After the download is complete, you will see that the volume (C:) has increased.
You can also do this: free up space by compressing one volume and add this “orphan” memory to another.
Aomei Partition Assistant
Here's how to increase disk size (C:) using Aomei Partition Assistant:
- Download and install the program. You can find it at aomeitech.com. Open the main page of the global network resource and go to the “DOWNLOAD” tab. The standard (“Standard”) license of the utility is distributed free of charge.
- Launch it. A list of available volumes will open.
- First, you need to shrink the drive (D:) to free up space. Right-click on it and select “Edit”.

- Reduce the volume of the section. To do this, enter a numeric value or move the slider that shows how much memory is allocated.

Resizing disk (C:)
- Now change the drive (C:) exactly the same as (D:). Just don't shrink, but expand the volume.
- After setting up and allocating memory, you need to click the “Apply” button in the main window of the utility.
- The computer may restart several times. Don't turn it off, even if the process takes a while.
The program does not have Russian (although you can find versions with amateur translations online). But it’s just as easy to use as previous utilities. It works on both Windows and Linux.

MiniTool Partition Wizard window
- Download the application from partitionwizard.com, install and run. A list of volumes appears.
- Free up memory first. Right-click on the drive (D:) (or any other one if it is not reserved by the system).
- “Move/Resize” item. A window for changing the volume will open.
- You can manually enter values or adjust the slider.

- In the “Unallocated Space After” field, indicate what size of the disk you want to end up with (if you shrink the volume, the number of megabytes will be less than the original).
- Confirm the action.
- Do the same for the (C:) drive. Allocate free memory to it.
- The slider should be adjacent to the left side of the window. If there is a “space” between it and the border, problems will arise with loading the OS.
- Confirm again.
- Click the "Apply" button. It is located in the upper left corner of the main application window.
- Wait while the program redistributes resources between volumes. Don't turn off your computer.
How to change disk size when installing Windows?
If you install or reinstall Windows, you can change the size of the system disk directly during initialization. But this will not save system parameters, design, programs and other data. Better back up your important information.
- Start Windows from a CD or flash drive.
- When it comes to selecting the installation type, click on “Full installation”. A list of sections will open.

Select “Full installation”
- Don't touch volumes you know nothing about. Most likely, there is important system data there. Work only with people you know (C:) and (D:).
- Select the one whose size you want to change.
- Click on the Disk Setup link.
- And then click on the “Expand” button.
- To use it, you must have unallocated memory. To create it, you can delete one of the partitions that does not belong to the OS. Then add the required volume to the system disk. And from the remaining resources to form a new top.
The option will be relevant:
- If this is your first Windows installation.
- If you decide to “start over” and format the hard drive.
In the first case, there is no unrecoverable data on the computer, in the second, there shouldn’t be any.
You've learned several ways to make your drive (C:) larger. But don't do it without a reason. If the system needs free space for virtualization, paging file, storage of backups and recovery points, then it makes sense to change the size of the main volume. But if everything works fine, and there is still enough memory in the partition, it is better not to touch anything.
What partition manager would you recommend?