Assembling and connecting a computer. How to build a gaming computer
Imagine that you cannot live a day without playing computer games, but you do not understand computer hardware. Either you don’t have time to delve into this, or you’re just lazy, although most likely it’s the latter, or you’ll be lying by saying the former. For users here, we will help you select modern spare parts according to reasonable price, as of March 2014. Thanks to this article you will be able build a gaming computer and don't overpay.
Armed with the Internet and necessary knowledge, we are moving forward in search of not expensive, but most importantly high-quality components.
Shopping plan
First of all, we need to assemble the system unit, why assemble it? The fact is that in any finished computer there will always be 2-3 spare parts that can negate performance or break down prematurely due to quality. Don't be afraid, no one is forcing you assemble the computer yourself. Usually, when you purchase computer parts, you can use the services of our service center ITcom in Kharkov by .
Let's start with the selection of components for the system unit. First, I will list it:
- CPU
- Motherboard
- RAM
- Video card
- System unit case
- power unit
- DVD drive
- Hard drive
- CPU cooling system (cooler)
Let's start choosing components for a gaming PC
System unit
The appearance does not affect the performance of a gaming computer, so we take a case without bells and whistles, entry level. The case must be of medium size so that everything fits and extra space did not occupy, that is, with the ATX marking. For example, body AeroCool V3X Black Edition Black. As a rule, the case is sold with a power supply, but this is not our method because the power in standard units is not suitable for us, so we choose without power.
power unit
Let’s not chase after brand names, but choose a good one based on reviews 600 Watt power supply, enough for a gaming computer. After looking and reading reviews, we choose FSP Group ATX-600PNR 600W the average cost of which is about 700 UAH. Quite a decent power supply, especially since the 12 cm fan in its case will dissipate heat well.

Processor CPU
For stable operation and choose processors with less heat generation Intel. Many AMD fans will argue that AMD is cheaper and more powerful, but I’d rather pay a little extra and be sure that the gaming computer will not overheat and will work stably for many years. Choosing a processor Intel Core i5-4670 Haswell(3400MHz, LGA1150, L3 6144Kb) average price about 2600 UAH. Expensive, but for games this is the very extreme price line, because further it only gets more expensive. Intel i5-4670— the processor is quite cold, so there will be no overheating, however, just in case you will equip it good fan to prevent overheating. Core processors i7 is still an unjustified luxury, without which games will fly well anyway. Now, starting from the processor model, you can choose a suitable motherboard.

Motherboard
Considering that we have a processor with LGA socket 1150, you can choose a motherboard, I won’t bend my heart, I confess to you that almost since childhood I have been a fan of high-quality equipment and hardware, so the choice fell on the product Asus(I hope many will agree with me). And now to be more specific. Nothing extra, 4 slots for RAM (for expansion), 6 USB slots on the rear panel (4 of them USB 3.0), the ability to connect two video cards (if you suddenly want something more). For overclockers (lovers of overclocking hardware) there is also where to go for a walk. The name of the “leopard” is ASUS Z87M-PLUS and this joy costs an average of 1330 UAH.

RAM.
Everything is simple here, we choose a normal brand, choose a frequency of 1600 and a memory capacity of 8GB (it’s better to have two 4 GB dies so that the RAM works in parallel mode). There’s no point in more, there’s no point in less, so to speak, the golden mean. The classic Kingston never It didn’t let me down, so to the fanfare of a lifetime warranty and additional heat sinks, I chose the Kingston KHX1600C9D3K2/8G model (the kit comes with two 4 GB boards).

Tip: when Windows installation be sure to select 64 bit operating system, since in 32 Bit 8 GB the system simply will not see it.
Video card
One of the most subtle and scrupulous choices, since we are not building an office calculator, but a decent gaming computer. I’ll say right away that I trust my hardware only to GeForce products, so AMD Radeon is again on the side. Yes, I understand that AMD is cheaper and all that, but if you build a computer on this architecture, then you will not need a heater in the winter, but in turn you will need an air conditioner in the summer. So, what do we have on the sweet market? We always choose cards with the suffix Ti, which means increased power. I won’t bore you, but I’ll introduce you to a cheap but angry little bear called Palit GeForce GTX 750 Ti 1202Mhz PCI-E 3.0 2048Mb 6008Mhz 128 bit DVI Mini-HDMI HDCP is still a new product on the market for budget gaming video cards, but judging by the game tests, it will be a great success. The cost is on average 1800 rubles.

DVD drive
Everything is very complicated here, we close our eyes and poke at any black CD (since we chose a black body). The lottery was won for an optical drive ASUS DRW-24F1ST Black costing 180 UAH.

Hard drive.
We choose Western Digital with an interface SATA connections 6 Gb/s with a capacity of 1000GB and a buffer memory size of 64 MB. All other parameters are standard. Model Western Digital WD10EZEX cost 700 UAH. Why didn't I choose Seagate? Because in all my work in engineering, only hard drives This company gave me the most trouble and gray hair on... well, you get the idea.

CPU cooling system (cooler)
Everything is simple here, for good and quiet cooling We take a cooler with a 12 cm fan, it will quietly and efficiently cool your processor, which is what we need. This little Zalman CNPS10X Optima will suit us, it looks impressive and in fact will work the same. The cost is only 360 UAH.

Let's sum it up
- System unit AeroCool V3X Black Edition Black - 500 UAH.
- Power supply FSP Group ATX-600PNR 600W - 630 UAH.
- Processor Intel Core i5-4670 Haswell (3400MHz, LGA1150, L3 6144Kb) - 2600 UAH
- Maternal ASUS board Z87M-PLUS - 1330 UAH
- RAM Kingston KHX1600C9D3K2/8G - 1200 UAH
- Video card Palit GeForce GTX 750 Ti 1202Mhz PCI-E 3.0 2048Mb 6008Mhz 128 bit DVI Mini-HDMI HDCP - 1800 UAH
- DVD drive ASUS DRW-24F1ST Black - 180 UAH
- Hard Western drive Digital WD10EZEX - 700 UAH
- CPU cooling system (cooler) Zalman CNPS10X Optima - 360 UAH
Total: 9300 UAH.
At a minimum, this is how much a system unit for a gaming computer will cost, the hardware of which will be enough for you to play games for at least 2-3 years. Let's continue with the selection. What else do we have left?
- Monitor
- Keyboard
- Mouse
- Mouse pad
- Validol tablets (this is for those who are bothered by the price of the system unit)
Monitor
For comfortable game and a good picture, we choose Philips monitors model 226V4LAB price 1400 UAH. Good color rendering, response time, resolution and of course the company. Only before the game will it be necessary to adjust the color, Philips has a jamb with the factory settings, you always need to adjust it yourself. And the price for 22 inches is quite reasonable.

Keyboard
We choose a gaming keyboard with a backlight for night gaming and a small fan to cool your fingers. Model Tt eSPORTS by Thermaltake Challenger price 450 UAH.

Mouse
It’s more complicated here, for a gamer the mouse is everything!!! Therefore, her choice must be taken responsibly. An inexpensive and fairly competent solution is called Mad Catz R.A.T.3 Matte Black. Cost 700 UAH. Good indicators of accuracy and stability. This mouse was created by people who specialize in computer games and I know what it takes to play well. The most budget option of good gaming rodents. There is also a braided cord that prevents kinks and chafing.

Rug
We take the mouse pad STEELSERIES QcK+, the connection with the mouse will be excellent and the dimensions are quite acceptable for gaming (400x450x2 mm.) price 150 UAH.

Let's summarize our selection.
- System unit – 9300 UAH
- Monitor – 1400 UAH
- Keyboard – 450 UAH
- Mouse – 700 UAH
- Mouse pad – 150 UAH
- Total: 12,000 UAH for the entire set
In conclusion, I can say that this rocket will be enough for you to play all modern games, and I think there will be no problems with quality and performance.
In addition to the fact that there are countless computer stores themselves, in addition, in the stores themselves, the choice of both ready-made computers and individual components for them is simply incredible. For an uninitiated user, it will be unclear what is responsible for what and what to choose. Often, people focus on prices, the number of gigabytes, gigahertz, cores, or simply listen to what sales managers tell them.
I, in turn, in this field, as they say, “ate the dog” and know not only what goes together with what, but also about more serious and important details, without knowledge of which one can commit gross mistakes. In this post, I will briefly try to talk about some of the details of choosing system components and will give 3 examples of the configuration of gaming computers that you can order and assemble, both independently and in a store.
The first thing to consider when choosing a gaming computer is that you should never buy them ready-made! Those people who are involved in the selection of components in no way want to select the appropriate components for a gaming computer; moreover, ready-made PCs themselves, as a rule, cost much more than the computer you chose yourself, or rather its components, for subsequent assembly, and even taking into account that some stores charge money for assembly, all the same, the kit you choose will be more powerful and cheaper than ready-made analogues. That's why we forget about ready-made solutions and move on to the selection of components.
When choosing components for a gaming PC, you need to consider the following factors:
1) And most importantly! The performance of a computer and its individual components cannot be measured by comparison with other models based on the amount of memory in gigabytes, or based on frequencies, number of cores, etc. Real Performance measured in terms of specific programs, in real tests that are carried out on popular, authoritative publications dedicated to computers and components, you can easily find information on individual components by typing a query into Google, like - " Intel Review i5-4590k", or for example "GTX980Ti review". To verify the veracity of the information, go directly to 3-4 different reviews and check the information, if it roughly matches everywhere, then everything is correct.
2) Intel processors almost always turn out to be more powerful processors AMD in games, and it doesn’t matter at all that the same Intel i3 has only 2 physical cores, and the same AMD FX-8300 has as many as 8, and even on high frequency. But the point is that intel processors have strikingly greater performance per core and this performance gives them an advantage over AMD processors in games, because games are rather reluctant to optimize for multi-threading (multi-core). Therefore, when choosing a processor, you need to focus on real tests in real games, and not on synthetic tests such as SuperPi. Most optimal processor for games, this is almost any intel i5 with a frequency above 3.2 GHz, and if you need more performance, then pay attention to processors with the letter “K” at the end, such processors can be overclocked, which adds performance and sometimes very much! Also, it is worth maintaining a balance between the processor and the video card, it is completely useless to install an intel i5 in combination with, say, a GTX750Ti, but also, it would be too illogical to install an i3 and a GTX980Ti, it will not be enough. It should be remembered that the processor should not cost more than the video card!
3) A video card is the main component of a gaming computer; a gaming computer needs to be built on the basis of this component, and the power of a video card is not measured in gigabytes, or simply in megahertz; in fact, there is no power measurement at all. There are individual indicators, such as the amount of memory, which is not so important if you have over 3 gigabytes on a video card from 15,000 rubles, or from 2 gigabytes on cheaper cards, or frequency GPU, which may vary between different models, the same product (the same chip model, say GTX970, can be produced by a dozen companies and each video card will be different), etc. Also, it is worth considering that there are reference and non-reference designs, what does this mean? Reference design is the standard design provided by the manufacturer for this video card model; reference design video cards heat up and make more noise, so purchasing them is not recommended. Video cards of non-reference design heat up less and make less noise, since they have a better cooling system, with several large and quiet fans, and sometimes have a different component base, which allows them to be overclocked more efficiently, so I recommend purchasing video cards just not reference design.
4) Volume and frequency RAM- in fact, the amount of RAM for games is only 8 gigabytes; in fact, more is not needed, and frequencies do not play a special role, so best choice, these are 2 memory sticks of 4 gigabytes each with a frequency of 1600 MHz, preferably Samsung Original, or HYNIX Original. Planks without the word "Original" are fakes on these chips and are of worse quality.
5) Hard drive and SSD - for most games you only need an acceptable one hard drive, for example Western Digital Black and no positive reaction from SSD installation, will not be used in games, but installing the same SSD allows the system itself to work much faster and speeds up the loading of games.
6) Motherboards - the biggest misconception is that expensive, cool motherboards give an increase in performance. This, alas, is not so! The motherboard is the link between the processor, memory, video card and other system components; in fact, the motherboard is the wires between the system components. But it’s also worth considering that motherboards may have functions that are important to you and you should choose a motherboard based on your needs. When choosing a motherboard, in addition to the obvious things, such as choosing a socket (processor connector) and checking compatibility with the selected processor, you need to look at the number of connectors you need - SATA for hard drives and drives, USB 2.0 and 3.0, etc. However, look for the presence of functions such as SLI, Crossfire, which allow you to install several video cards at the same time, but if you do not need such a function now, then it is better to refuse to buy such motherboards; you are overpaying huge sums for these functions. Best option, this is a motherboard costing 4-5 thousand rubles, ATX form factor with an 8-pin processor power connector and 4 connectors for memory modules, as well as 5-6 connectors for connecting audio devices.
7) Power Supplies - The biggest misconception about power supplies is that the more watts the better. Nothing of the kind! There will be no difference between a 65 and 1500 watt power supply for your system, if it is built on one processor and one video card. The power supply must be selected based on the system consumption. The most powerful video card cannot consume more than 350 watts, the processor, no more than 250 (rare copies, overclocked, without overclocking, powerful CPUs consume about 80-100 watts), everything else consumes about 70 watts. Therefore, for systems around 30,000 rubles, 500-550 watts is enough, for powerful PCs, with one video card, “for overclocking”, 650 watts, and for the rest, it depends on the number of video cards, but the rule is simple - +1 video card = +300 watts.
8) Do not forget about cooling systems; if the processor is overclocked, then you need to select a processor “cooler” based on tests, the most best option, for example Coolermaster S200. If the same processor does not race, then you can choose a simpler cooler, up to 500 rubles, based on reviews on the same Yandex market.
This is how the components are selected, and now I will give 3 examples of decent assemblies with a certain price category, these assemblies are intended only for games and do not meet certain requirements, but this does not mean that you cannot, say, do work on them, or rendering / audio processing. Also keep in mind that theoretically it is possible to select even more optimal components, but for this you need to look at the stores and the availability of certain components in them; these components were selected in one store, which delivers goods throughout Russia and has its representative offices in many cities. (prices are taken from one popular store, its name cannot be indicated according to the chip rules).
And so here are 3 configurations from me:
The configurations themselves with links to the store:
30.000R:
Processor (CPU) - AMD Athlon X4 860K Black Edition, OEM 4170r
CPU cooler - Cooler Master S200
Motherboard - ASUS A88XM-A 3340r
RAM - DIMM DDR3 1600Mhz 8GB Hynix Original 3750r
Video card - MSI R9 270 GAMING 2G, R9 270, 2048MB, GDDR5, Retail 9430r
Case - InWin IW-EAR007 500W4290r
Result - 30300 rub.
This configuration has a price of around 30,000 rubles and is intended to replace game consoles, you can play all modern and upcoming games on it at settings close to high. If you have the money, then it’s worth replacing the motherboard with an AM3+ with an AMD970 chipset, for example from MSI, and replacing the processor with an AMD FX-8300, it will cost about 3-3.5 thousand rubles, but it will be worth it.
55.000RUR, timecode on video 15:55:
Processor (CPU) - Intel Core i5-4590, OEM 13860r
CPU cooler - Cooler Master CP6-9HDSA-0L-GP 530r
Motherboard - ASUS B85M-G 3640r
Hard drive - 1TB, Seagate SV 35.5, ST1000VX000 3750rub
Video card - Palit PA-GTX970 JetStream 4G, GTX 970, 4096MB, GDDR5, Retail 22170rub
Case - InWin IW-EAR007 4290rub
Result - 52310 rub.
This system unit is designed for high and ultra settings in all modern games, like the previous system unit, it has exactly the same case, with a built-in 500-watt power supply, mATX motherboard, and the same 1TB hard drive. But this configuration is not intended for overclocking, at least processor, and the power of the video card and processor allows you to play all games comfortably.
80.000R:
Processor (CPU) - Intel Core i5-4690K, OEM 16620r
CPU cooler - Cooler Master S200 940r
Motherboard - MSI Z97S SLI KRAIT EDITION 7520r
RAM - DIMM DDR3, 8GB (2x4GB), Kingston HyperX FURY blue, HX316C10FK2/8 3970 RUR
SSD - SSD 128GB, Plextor M6S, PX-128M6S 4500r
Hard drive - 1TB, Seagate SV 35.5, ST1000VX000 3750rub
Video card - MSI GTX 980 GAMING 4G, GTX 980, 4096MB, GDDR5, Retail 33450rub
Case - Corsair Carbide Series SPEC-01, CC-9011050-WW 3790r
Power supply - ATX Corsair CX 750, CP-9020015-EU, 750W 5930r
Result - 80470rub
This system unit is at the cutting edge of technology. A motherboard with SLI support, an overclockable processor, a power supply and a case are designed to accommodate two video cards, and the existing video card is pre-top and provides consistently high FPS in all games. This configuration is intended for a narrow circle of people who crave high FPS and juicy pictures.
Of course, not everything is selected ideally, but ideal selection can only be made according to specific person and its tasks.
That's all, I hope you found it interesting to read this ton of text and it will be useful to you. And remember - under no circumstances buy ready-made computers, they cost you more and work much worse. IN modern world, there are stores that will assemble and help you select components for the system!
Before you start assembling the computer yourself, let's look at the picture below. It presents all the main components from which the computer will be assembled with your own hands (our own hands) :)
When you click on a picture, it will open in modal window in improved quality.
Let’s briefly go through the individual components of our “experimental subject” so that assembling a computer with our own hands will present itself to us more holistically. Using the link below, open a new window with the top image, which will contain numbers (from 1 to 10), and on this page below we will give brief description each of the components.
- At number “1” we have -
- number "2" - standard PCI Express
- “3” - cooling system (aluminum radiator and cooler for heat dissipation)
- “4” - itself for the socket (connector) LGA 775
- “5” - two DDR2 modules
- “6” - IDE cable (for connecting or CD-DVD of the old standard)
- "7" - DVD-ROM
- "8" - computer
- “9” - hard drive (hard drive) standard SATA
- “10” - cable (for connecting a hard drive or CD-DVD standard SATA)
- “11” - floppy disk (disk drive) and its data cable
Naturally, all this “stuff” needs to be packed somewhere. For this we need a good one.
Assembling a computer with our own hands occurs in the following sequence: first we install (actually screw) the motherboard into our case, install the processor and its cooling system into it, and then we connect and secure the remaining necessary elements to this “foundation”.
Another link that is in separate window schematically shows the sequence in which the computer should be assembled.
So, at the initial stage of self-assembling a computer, we need to install the motherboard into the case. Regarding it, there may be the following recommendations: the case should be spacious enough so that we can easily install all the components we need into it.
The board is attached to it using screws that are screwed into special mounting sleeves (metal hexagons). They come complete with the case.

The bushings are screwed into special holes on the back wall of the computer (on the inside of its right side wall), the motherboard is placed on top of them and tightened with screws.
Hexagons are needed in order to create a gap between the board itself and the metal surface of the system unit (to exclude the possibility of electrical contact between the soldering of elements from the rear surface of the board and the case). Such contact may well cause a short circuit () and damage the electronics. The more bushings you manage to use, the more secure the fixation will be (look at the number of mounting holes on the case and the board itself).
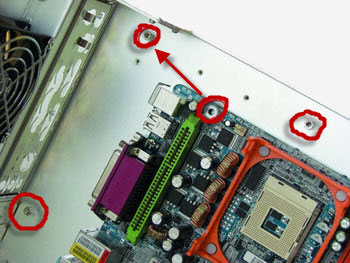
Tip 1: remember, mounting sleeves for the motherboard must go complete with computer case . If you buy a case, then only with them. This is important because these fastening elements vary in height and differ in the width of the thread at the base. With others you simply cannot install the fee!
Tip 2: If you plan to change the motherboard (you buy it secondhand or in a store), then be sure to make sure that it comes with a panel with holes for connectors? When assembling the computer with your own hands, you will need to install the socket on the back wall of the system unit. Pay attention to the photo below:
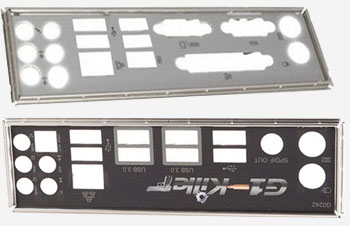
Please note that the location of the connector holes is different for each batch of boards and unless they sell you the correct one motherboard panel immediately, then later it will be very difficult to get it separately.
The panel is installed in a specially designated place. This needs to be done before placing the motherboard in the case.
Orient it correctly in relation to the main connectors and install it by pressing firmly with your fingers. The plug should fit tightly and lock into place with a characteristic click.
Below you can watch a video that clearly demonstrates the entire process:
We continue assembling the computer with our own hands. After we have secured the motherboard in the case, we need to install the central processor in the slot (connector) of the board. Let's look at the picture below and comment on some points.

The installation procedure in the slot is as follows: press down and bend the clamping latch to the side (indicated in the photo above as number 2). To do this: we snap it out from under the special hook (number 1 in the photo), lift the metal frame (number 3), which secures the processor in the socket. After this, all we have to do is install the CPU itself (indicated by the number 4).
Attention! Take a good look at the processor and determine on which side the “key” is located (a corner specially cut off on one side or two small indentations on the sides). The socket has the same corner or protrusions in the appropriate places. When installing the processor into the socket, they must be aligned with each other.
When the installation is complete, we repeat all the steps in the reverse order: place the fixing cover (No. 3) on the processor, lower (with a certain force) the pressing metal rod (No. 2), move it slightly to the side at the lowest point and thread it under a special hook on the side No. 1.
To learn how to install an old PGA processor (believe me, you need to know this), watch the video below:
In the process of assembling a computer ourselves, we need to be able to install a cooling system (radiator with fan). It should be noted that now we are installing a cooling system for a product from Intel; in the case of AMD, it looks a little different.

In theory, it looks like this: at the four corners of the processor slot there are special holes in the motherboard, and it is through them that the entire air cooling system is attached.
Accordingly, there are four special plastic clips on the radiator, which, when pressed, press the radiator against the processor and, at the same time, fix the entire structure on the motherboard.
Here's how close up The cooling system for our processor that we just installed looks like:

And this is one of its latches on the board, close-up, and we snap it into place.

Pay attention to the photo below:

Do you see the slots (grooved indentations) on each of the four plastic clips? The position when the recesses are located perpendicular to the radiator fins corresponds to the closed state of the latch-clamp (in the photo above all the latches are closed). This is exactly the position they should all be in before installing them on the board! Remember this!
The arrows indicate the direction in which you need to turn (you can do this with a screwdriver) the latch in order to move it to the open position.
Advice: After placing the radiator clamps strictly above the holes around the mounting slot (you need to ensure that the plastic tips of the fasteners “fall into them” a little), you need to simultaneously smoothly but firmly press two clamps located diagonally from each other (until they click and are securely fixed in the board ). Then we carry out the same procedure for the two remaining clamps. All! Cooling system installed!
It is much easier to show the entire process once short video than to describe in words, so watch the video below:
If the need arises to remove the cooling system, then simply move all four latches to the “open” position and pull the structure towards you (it can be removed quite easily).
Advice: Some people find it more convenient to install a computer cooling system before that How the motherboard will be secured in the case. This makes it possible to clearly see what snaps where and where, and to measure the force applied to securely fix the elements.
The design for mounting the cooling system on processors from AMD is somewhat different from what we can see in products from Intel. It consists of two components: a plastic base frame that is securely fixed around processor socket, and a radiator with a fan, which are attached (snapped) onto this frame. Here, for example, is what it looks like for the AM3 processor socket:
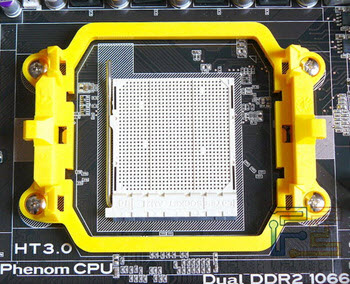
As you can see, with this approach, the pressing pressure force from the radiator is first transferred directly to the plastic base (frame) and only then is evenly distributed over the PCB of the motherboard itself.
By the way, when removing cooling systems from motherboards running Intel processors, quite often you have to observe how the very base of the motherboard (textolite) has a visually noticeable curvature (from the constant pressure on it of the cooling system radiator), which is attached directly to the board itself . This is bad and could potentially lead to micro-cracks in the very core of the motherboard.
Assembling a computer with your own hands, in particular, installing a processor and motherboard, is often associated with installing cooling systems on the processor third party manufacturers, which can have a mass of half a kilogram, or even more! In this regard, to prevent the motherboard from deflecting at the mounting location, they come with a special metal cross, which is located on the back side of the board (under the processor).

This additional mount is called the word “Backplate” and, as we have already said, it serves to remove unnecessary physical stress from the motherboard. The only caveat of this design is that it must be installed to fixing the board in the computer case.
Don't forget: right installed system Cooling can be avoided in the future!
When assembling a computer ourselves, we need to remember to do one more thing: from the cooling system fan there is a small (3 or 4) pin wire that supplies power from the motherboard to the fan so that it spins and dissipates heat. We need to find the corresponding connector on the board (usually 3-4 pins next to the processor socket) next to which there is the inscription “CPU_FAN” and connect our power cord to it.
The most important components and cooling system installed. Now we need to install all the remaining devices. And since assembling a computer with your own hands is quite a responsible and painstaking task, then, for the general readability of the text, let's continue our description on the next page.
In conclusion (to better secure the material), you can watch a video on how to install a processor and cooling system on products from Intel:
- Video card;
- processor, cooler and thermal paste;
- RAM;
- motherboard;
- case with power supply;
- set of screwdrivers.
Instructions for assembling a personal computer from components
1 Prepare complete set
Let’s prepare all the components and take another look at them to make sure we haven’t forgotten anything. I will build a computer from this.
2 Preparation motherboard
Let's open the box with motherboard and take her out. The box usually contains instructions, a driver disk, a back panel, and cables for the drive and hard drive.
It is important not to damage the motherboard from static electricity. So first get rid of yourself static charge, “ground yourself” before picking it up. It is advisable not to wear synthetic clothing, and your hands should not be excessively dry.
 Taking the motherboard out of the factory box
 3 Installation central processor
The first step is to install the central processing unit (CPU) into the slot on the board. One corner of the processor is usually marked with a triangle. The same triangle is also on the board. We place the processor so that the marks match. And then we press it with a special lever located on one of the edges of the processor seat (socket).

4 Installation radiator and cooler
Now you need to install a radiator with a cooler and connect it to the power connector on the board. If thermal paste has already been applied to the radiator, then it is ready for installation. If there is no thermal paste, it must be applied in an even, thin, neat layer to the surface that will be adjacent directly to the processor. Then place the radiator on the processor and rub it in thoroughly so that the paste is evenly distributed in the space between the radiator and the processor. Then close the locking latches. Well, the final touch is to connect the fan wire to the power connector on the motherboard, usually it is designated as “CPU FAN”.

Depending on the processor family, radiator installation options may differ slightly from those described. Usually the technique is described in detail in the motherboard datasheet; read it before starting work.
5 Installing modules RAM
The next step is installing RAM modules. If you have one module, then place it in the first slot. It is usually marked as "DIMM_A1" or simply "DIMM_1". If there are more than two memory slots, and there are several memory modules, then place them first in slots of the same color: this way the RAM will work faster.

6 Installation rear panel
Now we install into the case a shiny metal back panel with holes for all connectors. It is installed from the inside by simply pressing it outwards.

7 Installation motherboard
The board has holes for mounting, and the case has holes and a number of metal stands, usually at least 6 pieces. Depending on the size of your board, you need to place the racks in the case so that they are under the board's mounting holes. Now we place the motherboard in the case. There should be posts underneath all the holes. The motherboard connectors must fit neatly into the holes in the back panel. We fasten the motherboard with screws to the stands.

8 Installation video cards
It's the video card's turn. Modern video cards usually have a PCI-Express connector. We place it in the slot until it clicks and secure it to the back wall with a screw.

9 Installation and connection power supply
Now we connect the power supply to the motherboard. First, connect the large 20-pin double-row connector ("8" in the picture) to the motherboard. Then connect the 4-pin connector "7". It can be placed either nearby or in another location on the board. A modern hard drive and DVD drive are connected using type “3” connectors, old ones - using type “2” connectors. If you have a powerful video card, then it requires additional food- connectors “5” and “6”. Type "1" connector is used to power an older floppy drive.

10 Connecting ports and indicators
Connecting USB ports, additional audio jacks, internal speaker and front panel buttons: power and reboot buttons, hard drive and computer power indicators. Usually these connectors are located side by side and labeled on the motherboard like this: USB, PWR_SW, RST_SW, SPEAKER, HDD_LED, POWER_LED.

To avoid mistakes, carefully read the instructions for your motherboard model and follow them when connecting the front panel, buttons and LED indicators.
11 Connecting HDD hard drives, CD and DVD drives

12 Turning on the computer and installation of device drivers
Let's check everything again and then turn on the computer. If you have previously installed the operating system, it should boot immediately. Naturally, when you turn it on for the first time, you will need to install all the drivers: first on the motherboard and all its devices, and then on the video card.
When you turn it on for the first time, it is advisable to connect the monitor to the built-in video adapter of the motherboard, and not to discrete video card V PCI-Express slot. Then, when all the drivers are installed, switch the monitor to a discrete video card.

Read the manual (instructions) for the motherboard before starting work.
If possible, after assembly, twist all the wires into one bundle using wire so that nothing unnecessary dangles, sticks out, or interferes with the free circulation of air inside the case.
After installing the drivers on the motherboard, restart the computer and only then install the drivers on the video card.
Please note
Make sure you are not electrified before handling any computer components. If you experience static discharge, wet your hands, touch the computer case or the central heating pipe.
Today the world of computer technology is so diverse that it is very difficult to make a choice. For example, when many people decide to get a computer, they often think that it is better to have ready-made equipment or to assemble it at home. with my own hands. Of course, young people who understand at least a little technology and quickly figure out what’s what are trying to assemble a computer with their own hands. Moreover, this option is much more economical than buying ready-made equipment.
But still, if you are going to start assembling your PC personally, you should understand what advantages there are in this option. The first thing you need to do is purchase components that meet your requirements and needs, taking into account their compatibility. Above all, you need to decide which computer to build for gaming or work. Since today's youth are obsessed with various games, we will try to assemble the optimal version of a gaming computer.
What is the most important thing in a computer? Of course, the system unit. As a rule, when buying it in a store and asking the seller about the prices and configuration of the unit, it is difficult to find out, since no one in the store will open it for you important information. It's classified. Only by disassembling the block of the house can you find out whether all the components and components have been selected correctly.
Very often, store sellers claim that the system has 4 gigabytes of RAM and there is gaming video card, but do not mention the names of the manufacturing companies. This is because it is not profitable for them, since usually stores try to sell a system unit assembled from components from unknown or little-known manufacturers. As a result, when you bring it home, connect it, connect all the wires correctly and put the computer into operation, after a couple of months you will feel that there are malfunctions in its operation. And after a short time it may completely fail. All this is because unknown manufacturers do not try very hard with the quality of components; they believe that if they are not visible, since they are hidden inside the block, then it will do just fine, and as a rule, the result of such negligence does not take long to arrive. That's why important rule: all components of the block must be produced by a well-established manufacturer.
Also an undeniable disadvantage of the purchase finished assembly system unit in the store is that in the future you may not even think about making any changes to its configuration. So, you will not be able to change its design, nor add or remove a set of functions. As a result, before purchasing, think about whether to buy in a store or start your own assembly.
Independent selection of components will allow you to choose them taking into account your requirements and wishes. In addition, remember that the price of the finished system unit is greatly influenced by the software part of the PC. You probably noticed that when buying a computer in a store, sellers at their own request, in addition to the main Windows systems install additional ones, the existence of which you did not even know and are unlikely to ever use. But they don’t pay attention to it, because the more installed programs, the higher the cost of the system.
In addition, many sellers tell customers that they install only licensed programs, and therefore the cost is high. But you shouldn't believe everything they say. After all, if you are familiar with software, you probably know that one copy of the license software is intended for only one user. In addition, it is very expensive. Therefore there arises logical question: will stores be able to buy, how much? licensed programs how much do they have in stock? computer systems. Of course not. In fact, they install such a program on all computers, and tell customers false stories.

Some nuances
Remember self-assembly will allow you to assemble a system unit with components that you really need and are worth. Moreover, in the future you will be able to upgrade it. Moreover, the computer industry is developing at a rapid pace these days; you just need to keep up with it. If today it seems to you that you have assembled modern and powerful equipment, then in a couple of months it may be considered obsolete.
Also remember, sellers often offer system units with “cut” versions of motherboards to mislead the buyer, but at the same time make good money. They are cheaper, and the functionality of these components is limited. It will be very difficult to modernize such systems in the future.
Assembling the block with your own hands will give you freedom of action. You can install different components at your own discretion.
Components of a full-fledged computer
We will help you and tell you what to do at each stage of component assembly.

First of all, you need to know what a computer consists of, and this is:
- frame;
- hard drive or SSD drive;
- monitor;
- keyboard;
- mouse;
- motherboard;
- CPU;
- RAM;
- power unit;
- video card.
When choosing components, remember that you do not need to buy too expensive spare parts, but very economical options will not suit you. It’s better to first get acquainted with prices and manufacturers, and only then choose a middle ground. Pay enough special attention to the processor to be able to add RAM to the video card in the future.
How to properly connect components
Once you have decided on the configuration of your future computer and bought the components necessary for assembly, you can begin work. It is worth saying that in fact, such work is not difficult only for those people who have more than once encountered assembling a PC and are well aware of all the components, some features, nuances and assembly diagrams. People who have not encountered this kind of work will have to sweat a little, since it primarily requires attention and patience. Therefore, if you are ready to start, we provide you detailed instructions on assembling a system unit, which will help you avoid mistakes and do everything right.

So, first you need to check the presence of all components and ensure their integrity. You will need:
- case and power supply;
- motherboard, plug, which is included in the kit, for the back of the unit;
- CPU;
- hard HDD drive or SSD;
- video card;
- cable for connecting spare parts;
- cooling system;
- RAM;
- if necessary, an optical drive.
Lay out all the spare parts on the mat in front of you and double-check their availability again, after which you can begin installing the power supply.
power unit
Before we talk about installing the power supply, let's talk about its power. It is known that computers are used for different purposes. Some people need them purely for working with graphics or office applications, some will work on it at home on the Internet, others want to enjoy a high-quality game. Depending on the area of use, a case with a power supply is selected. So for working with graphics and high-quality games would be better suited a power supply that has a power of 500-600 W. The fact is that a lower power unit will not be compatible with a powerful video card, since the power supply must always be compatible with the video card. The approximate cost of such a block is between 50-60 dollars.
For a computer that will be used at home, working on the Internet or office applications, a unit with a power of 350-400 W will do. Its cost is usually about 30-40 dollars.
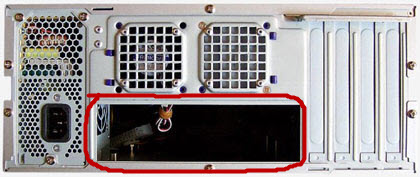
Before you begin installing the unit, you must remove the side cover from the housing. In some models the power supply is mounted at the top, and in others at the bottom. Therefore, pay attention to this detail when installing it. In addition, many wires with appropriate connectors must come from the unit to connect other equipment.

Therefore, you need to make sure that the block has the necessary connectors, so that later you do not need to purchase missing adapters. The block is secured with screws using a Phillips screwdriver. So, having considered where in the case the block is mounted, we install it and secure it firmly with screws. The first stage is completed.
Motherboard
So, we have already installed the power supply in the case, now it’s the turn of the motherboard. First, we check whether this part is damaged; if everything is in order, you can begin installing it.
First of all, you will have to install the plug that comes with the motherboard. It is worth saying that it has special holes with which it is attached to the body. In addition, very often the motherboard comes with special spare parts in the form of supports, which are designed to place the motherboard on them. If they are, then install them first, and then the main part. After all, the supports are supplied so that the motherboard is firmly and securely located in its place. In addition, sometimes the methods of mounting the board may differ; this depends on the design of the case itself.
So, if the case is universal and does not have special frills, the motherboard is mounted as follows:

It is very difficult to make a mistake here, since there is only one suitable connector.
CPU
Step three - installing the central processor. When installing a processor, you must remember that the motherboard is equipped with a connector for it, which is called a socket. The characteristics of the processor and motherboard must be similar, the sockets must be the same.
The processor is installed in a special place, which is very noticeable. It is presented in the form of a rectangular connector with a clamp and is no larger than a box.

We press the small lever, move it to the side, then open the cover as far as possible and begin installing the processor. This is where the worst comes in important point which requires a lot of attention. The processor must be installed correctly. How to do this?
There is a triangle-shaped mark on the processor, and there is a similar mark in the place to which it should be attached. During installation, you need to align these two marks with millimeter accuracy. The installation should be performed as follows: we take the processor by the ribs and gently place it in its location; the landing should be light and soft, without effort or pressing. In addition, do not touch the contacts under any circumstances, so as not to damage it. When the processor is installed, carefully fix it with a clamp, returning it to old place. At the end, we connect the power cable to the connector located nearby.

Cooling system
There are many types of cooling systems; let’s consider installing a standard cooler with snaps. First you need to prepare the cooler, use the latch to open it and remove it protective film. If there is no thermal paste on the edge, be sure to apply it to improve the thermal conduction process between the fan heatsink and the processor. It is applied in a thin and even layer.
Next, we install the cooler on the processor, and it does not matter which side will be installed. However, the installation must be done in such a way that the power cable can be connected to the connector on the motherboard.
Since the cooler has four latches, all of them must coincide with the motherboard connectors when installing it.

We place the cooler on the board, aligning the connectors, and click the latches two at a time, diagonally. Correct fixation is done if you hear clicks and the fan does not wobble or move. If you feel even slight movements, then perform the fixation again. Next, we connect the power to the fan using a cable that has a connector; it must be installed in the connector on the motherboard, which is located close to the processor.
Hard drive
Installation hard drive performed in the front part of the body. If there is only one hard drive, then it is better to install it in the lower compartment. To attach the hard drive, remove the second side cover from the unit.

We place the disk in the compartment and secure it with screws. The fastening must be made firmly and reliably. Next, connect the power and data cables to the hard drive. Consider connecting via SATA interface– a flat cable, wide, intended for power supply, and a narrow one, in turn, for transmitting information. We connect the power cable to the HDD, and connect the information transfer cable in the same way. In this case, there should be no problems, since the connection system is very simple.
Optical drive
To install optical drives remove the plugs on the outer part of the case, then install the device in a special compartment and securely fasten it using fasteners.

RAM
Installing RAM is not difficult. The connectors have latches that will need to be bent to the side before installing the RAM. Then we put the RAM stick into the slot and press it lightly. The latches return to their original place. All! We installed RAM. Important detail. Remember, there is a small connector on the RAM stick; it is not located in the middle, but slightly offset to the side. Therefore, if the memory is not in its place, then you need to try to unfold it and install it on the opposite side.

Video card
To install the video card, you will need to remove one metal plug, which is located on system unit behind. Next we repeat similar actions, that with the installation of RAM, additionally securing the video card to the case with a screw.

Wires
The most difficult assembly stage of all those described above is connecting the wires. The work is much simpler if the manufacturer has prudently labeled all the wires, so it is clear what needs to be connected to what, and it is almost impossible to make a mistake. Therefore, when purchasing wires, we recommend that you pay attention to the inscriptions on them, this will make it much easier to finish last stage assemblies.
We check the performance of our own computer. If everything is done correctly, then when you press the button on the unit body, you will hear a single squeak. Hurray we did it! Next, we install the operating system, and you can happily enjoy powerful and modern computer games.