Tips for working with Word. A detailed guide to using Microsoft Word
Microsoft Word- the most important and necessary tool for any office work. And the number of functions it possesses will shock any person. We have selected 20 tips that will help simplify your work with Word and automate some routine tasks. You can check out similar material for Excel.
Inserting date and time
You can quickly insert a date using the combination Shift keys+ Alt + D. The date will be inserted in the format DD.MM.YY. The same operation can be done over time using the combination Shift + Alt + T.
Quick case change

If you do not yet know touch typing, then CAPS LOCK can play a cruel joke on you. By accidentally turning it on and not looking at the screen, you can type a mountain of text that will have to be deleted and rewritten from scratch because of one pressed button. But highlighting required text and pressing Shift + F3 will change the case from uppercase to lowercase.
Cursor acceleration
Typically, if you move the cursor using the arrows, it moves one letter at a time. To speed up its movement, hold down the Ctrl key together with the arrow.
Selecting text fragments located in different places

Very useful feature, which allows you to highlight inconsistent text fragments. Hold Ctrl and select the pieces of text you need.
Clipboard

If you use copy and paste (and you probably do), then you most likely know about the advanced clipboard in Word. If not, then it is called by clicking on the button of the same name and shows everything that you copied to the buffer while working.
Quickly take screenshots

If you are making a manual, a review of a service, or you just need to insert a screenshot into Word, you can do this very simply using the appropriate tool. Click on the "Snapshot" button and Word will show everything active windows. By clicking on any of them, you will receive a screenshot of this window.
Hyphenation

Including hyphens can improve the readability of your text and also eliminate long empty spaces between words. You can arrange them yourself or entrust it to the computer. The button is located in the “Page Layout” - “Hyphenation” menu.
Watermark

You can add a watermark to your document for added protection. To do this, go to the “Design” menu and select “Background”. Word has four standard template, you can also create your own.
Repeat previous command
A very useful function that allows you to duplicate last command. If you press F4, Word will repeat the last command you made. This can be entering text, sequentially deleting several lines, applying styles for different sections of text, and much more.
Setting the accent

Put emphasis on Word is easier simple. To do this, place the cursor after the letter on which the accent should be placed and hold down the combination Alt keys+ 769. Important: numbers must be pressed numeric keypad on right.
Customize the Ribbon

The top ribbon with buttons can be highly customized. To do this, go to the menu “File” - “Options” - “Customize Ribbon”. Here you can add features that were not there before and remove those that are not needed. Moreover, you can delete or create your own tabs with functions.
Quickly select a large piece of text
To quickly select a large piece of text, place the cursor at its beginning and Shift-click at the end of the fragment. It will save time and nerves in situations where you have to select several sheets at once.
Quickly move through a document
There are several combinations that greatly speed up document navigation:
- Ctrl + Alt + Page Down - next page;
- Ctrl + Alt + Page Up - previous page;
- Ctrl + Home - move to the top of the document;
- Ctrl + End - guess for yourself. :)
Inserting a new page
How I hate myself for not knowing this combination before. Ctrl + Enter allows you to instantly create new leaf, rather than holding Enter with one hand while brewing tea with the other.
Changing the default save folder

By default, Word saves all files in the Documents folder. To change this, go to the menu "File" - "Options" - "Save". In the line "Location local files Default" select the folder you need. In the same menu, you can configure the default document format, autosave, and much more.
Source formatting

In order to return the text to its original formatting, you need to press the combination Ctrl keys+ Spacebar.
Word as a task manager

If you're a big fan of Microsoft and Word in particular, you can even use it as a task manager. True, first you have to try a little. Click right click on the Features Ribbon at the top and select Customize Ribbon. In the right column, enable the only disabled tab “Developer”.
Go to the “Developer” tab that appears and find the “Checkbox” element, which shows a check mark (why not). Now, by clicking on the checkbox, you can create lists of tasks and mark them as completed.
Vertical text selection

If you accidentally mess up your list, you can highlight the text vertically. To do this, hold Alt and use the mouse cursor to select.
Protect a document with a password

There is no need to even say why this is needed. In our age, when information has become the main weapon, having additional protection never hurts. To protect a document with a password, go to the "File" tab and select the "Document Protection" option. Now feel free to create a password, but remember that if you forget it, you will not be able to recover it.
The fastest way to open Word

Rounding out our list is an incredible hacking trick. If previously, in order to open Word, you created new document or looked for it in the Start menu, then this is now a thing of the past. Press combination Windows keys+ R and enter in the window that appears winword. If you don't use command line for other commands, the next time you press Windows + R, the command to launch Word will automatically load and all you have to do is press Enter.
Do you have any ways to make Word easier? I'm sure there is. Share them in the comments!
A user who wants to learn something new, in particular Word, first of all wants to learn how to work in Word. It’s good if there is a teacher who can and has the desire to give advice and give lessons computer literacy. What if he is not there? You can also rely on tutorials, of which there are many today, and learn lessons from them. However best choice is to study Word on your own.
How they work in Word
So, when working with the Word program, an ordinary user without special skills performs the following operations:
- creates a document;
- prints letters and numbers;
- deals with its editing or formatting depending on the need;
- saves the document;
- prints it out.
Development office application begins with the creation of a document. Every inexperienced user wants to know how to create a document in a program. There is nothing complicated. To do this, click on the corresponding icon in the desktop panel. Typically, it looks like the letter W on a white background. We can assume that the document has been created. Now you need to start filling it.
Typing takes the most time. An inexperienced user, or user, immediately wonders how to print. There are a lot of techniques, as well as lessons that are ready to help you master the basics of typing letters. Again, the tutorial is ready to help. But the best method yet recognized as practical. That is, you need to open a new one Word document using the corresponding icon on the toolbar and start typing. It's not easy at first if you've never done typing before. However, over time it will become easier, typing speed will increase, and your fingers will remember the location of the keys on the keyboard. And you won’t have to wonder how to do this or that operation faster. Just don’t stop training, since a systematic approach is important in mastering any application.
Have you learned to type? It's time to start formatting the document. True, this can be done during the printing process, but it’s better after. All kinds of program tools help the user: increasing or decreasing the size of letters, color scheme, centering the typed text. If desired, you can add a table, a drawing and any figure to the text of the user’s choice, who strives day by day to become confident user personal computer.
The result can be saved to any location on your computer or external media. To do this, open “File”, then “Save As”, and then select a location for your first Word document. For example, this could be “Desktop”. If there is a need for a printer, then finished document can be printed using the “File” command, then “Print”. This is what the tutorial recommends.
Here are the basics of working with a Word text document. Thus, in order to learn something, including mastering a text application, you need to practice, you can read a tutorial.
Let's start learning to work with Microsoft Word 2003. If you are not yet familiar with the basics of this program, go check them out in the article. And if you need Microsoft Word 2007 program, then go to .
First of all, we need to note the following - Microsoft Word program allows not only typing And edit it , but it also allows format text : make some words larger, others smaller, color them in different colors, use various fonts, and even insert pictures into the text.
In a word, do beautiful design . This is what distinguishes the Word program from various notepads in which you cannot do all this.
Working with text in Word itself consists oftwo stages. First, we type the text and edit it, that is, we correct errors in the typed text and change phrases. Then we format the text - we arrange the text the way we need it, change the size, color and font of individual parts of the text, and insert pictures if necessary.
Create a new Microsoft Word document
To work with a document, you first need to create it. It is best to create a document using context menu desktop, that is, by right-clicking on the desktop. Click and select New - Microsoft Word Document .

You can also create a new document from the main menu open program by selecting File - New .
Only in the second case will you need to save it later on your computer by selecting File - Save As so that the file on the computer receives a registration.
You can immediately give the document the desired name, just remember to leave required extension- what is written in the title after the period. Text Document Microsoft Word has an extension doc. It is the extension that classifies a file as a specific type of information and allows it to be opened by default the desired program. That's why extension must be in the file.
Opening a document
To open an existing document, select from the main menu File - Open , after which a dialog box will open Opening a document.
Choose required document And double click open it.
You can simply drag the document file onto the open workspace Microsoft programs Word, after which the document will open.
Saving a document
After you work with the document, you need to save it. To save the document you need to call the command Save file .
If you are saving a document for the first time, it is better to use the option Save as , a dialog box will appear
in which you will select the location on your computer where you will save this file. I advise you, after you have worked with a document, not to leave it desktop, that is, on drive C, and transfer to drive D in which not located Windows operating system.
However, this wish applies to all data you work with: to documents, videos, books, music . Because there is a high probability that when reinstalling Windows data will be lost if you store it on the same disk where the operating system is located.
Selecting part of text
Selection by itself does not perform any actions on the text, but is intended to designate a fragment on which some operations will subsequently be performed. For example, before you copy part of the text somewhere else, you need to select it. Before you turn text red or change its font, you need to highlight it.
There are, however, operations that do not require text selection because they are performed on an entire paragraph, for example, aligning text to the center or along some edge.
Part of the text is selected as follows: you need to place the mouse pointer at the beginning of the fragment, click left key mouse and, without releasing the key, move the pointer to the end of the fragment.
Double click the word is highlighted in the text, triple- a whole paragraph. To deselect, you need to click anywhere in the text. Also, the previous selection is removed when a new fragment is selected.
Creating a new paragraph
The text, when it reaches the right edge of the page, moves to new line. But if we need to force it to a new line, we press the button Enter. Thus, we create a separate paragraph of text.Deleting text
Place the cursor in the middle of some text. Characters to the right of the input cursor are deleted with the key Delete, symbols on the left - key Backspace. Key Backspace it’s good to edit the text - I wrote a mistake and immediately pressed the key Backspace deleted it.
To delete a piece of text: highlight it and press Delete .
Copy text
To copy part of the text, you need to select this part, then click on the button Copy on the toolbar or select from the main menu Edit - Copy . In addition, for this you can use context menu— right-click on the selected text.
After this, we place the cursor in the place where the fragment should be inserted, click the button Insert on the toolbar. You can also select from the main menu Edit - Paste or use context menu.
For cutting text in all these ways instead Copy choose Cut .
Copying differs from cutting in that when copying the text remains in the old place, but when cutting- No.
In addition, you can use hotkeys:
- Ctrl+C- copy;
- Ctrl+X- cut out;
- Ctrl+V- insert.
This is done as follows: for example, when copying You press the button Ctrl, and while holding it down, press English key WITH. Keyboard layout, that is, the letters of which alphabet are active, does not play a role in this.
The commands are executed in the same way Cut And Insert .
Text formatting
Text formatting determines its appearance: location, font size and name, color and so on. Before changing parameters, the required text fragment should be highlight.
To place text, use a ruler and sliders on it.
Before changing the borders of the text, and to align the text if we are in this moment We format only one paragraph, there is no need to select it - just place the cursor anywhere in the paragraph.
Used to format text Format panel
or menu Format. The most commonly used menus in this menu are: Format - Font And Format - Paragraph .
Inserting Graphic Objects
Microsoft Word 2003 allows you to insert into a document drawings and other graphics , which was created in other documents and programs. IN Microsoft documents Word can also be drawn using the built-in program drawing panels. Activate panel Drawing can be done through the main menu item Insert - Toolbars .
Using the panel Drawing you can make simple drawings. You can also use this panel to insert beautiful text inserts.
Using the main menu Insert you can insert it into the text drawing from a file on your computer, diagram and even text link.
Video on working in Microsoft Word
You can get more detailed information in the “All courses” and “Utilities” sections, which can be accessed through Top Menu site. In these sections, articles are grouped by topic into blocks containing the most detailed (as far as possible) information on various topics.
You can also subscribe to the blog and learn about all new articles.
It does not take a lot of time. Just click on the link below:
This article introduces the basic concepts used in Microsoft Word to help new users get started creating complex, professional-looking documents.

Heading 1
On the panel quick access 2 Preservation, Cancel, And Return
File tab 3 New, Open, Preservation, Seal And Close.
Ribbon 4
Edit window 5
Scroll bar 6
Status bar 7
8
In Word, you need to save the document in order to exit the program without losing data. When you save a document, it is stored as a file on local computer or in network folder. With a later version, you can open the file, edit it, and print it.
Open File Explorer and select documentation. A list of documents will appear.
If the document you want to work on is in the list, click the file name to open the document. If the document is not listed, navigate to the location where the file is stored and double-click the file. The Word splash screen appears, and then the document displays.
Advice: file and selecting the command Open. To open a recently saved document, click latest.
Most text formatting tools can be found by clicking on the tab home, and then selecting in the group “ Font ».

1 this is on the tab home.
2 this group " Font"on tab" home ".
3 Font ».
|
Changing the font. |
||
|
Font size |
Change text size. |
|
|
Font enlargement |
Increase text size. |
|
|
Reducing the font |
Reduce text size. |
|
|
Change case |
Change selected text to uppercase, lowercase, or other common word styles. |
|
|
Removes all formatting from selected text, leaving only plain text. |
||
|
Bold |
Changes the selected text to bold. |
|
|
Italicizes the selected text. |
||
|
Stressed |
Draws a line under the selected text. Click the drop-down arrow to select an underline type. |
|
|
Crossed out |
Draws a centered line over the selected text. |
|
|
Interlinear |
Creates subscript characters. |
|
|
Superscript |
Creates superscript characters. |
|
|
Text effects |
Apply visual effects such as shadows, glows, and reflections to selected text. |
|
|
Text highlight color |
Turning text marked with a marker into an attractive one. |
|
|
Font color |
Change text color. |
Using Styles
Styles let you quickly format key elements in your document, such as headings, headings, and subheadings. Follow these steps to apply styles to text in your document.
Select the text you want to change.
On the tab home in Group Styles Hover over any style to view dynamically directly in the document. To view full list styles, click the arrow Additionally to open the area styles.
To apply the style that best suits the text, click it.
When everything is ready, apply styles to individual elements Word allows you to use a set of styles to simultaneously change the appearance of your entire document.
On the "tab" Constructor" in Group Formatting a Document select one of the predefined style sets, for example Regular authentication or ordinary. Hover over any style assigned to view it dynamically directly in the document. To view ready style sets, click the down arrow to the right of the group Formatting a Document.
To apply a style set that best suits the text, click it.
Change line spacing in the document
WITH using Word You can easily change the spacing between lines and paragraphs in your document.
On the "tab" Constructor" select Paragraph spacing to view a drop-down list of paragraph spacing options. Hover over any paragraph spacing style to view dynamically directly in the document.
When you find the right type, click it.
Advice: To set your own paragraph spacing, select Custom spacing between paragraphs.
Preview and printing
Short review user interface Word

Heading 1 : Displays the file name of the document being edited and the name of the program you are using. It also includes the standard minimize, restore, and close buttons.
On the Quick Access Toolbar 2 : commands that are often used, e.g. Preservation, Cancel, And Return They are here. At the end of the Quick Access Toolbar is a drop-down menu where you can add other commonly used or commonly used commands.
File tab 3 : Click this button to find commands that are executed by the document itself instead of the document content, such as New, Open, Preservation, Seal And Close.
Ribbon 4 : The commands that are needed to work are located here. The appearance on the tape will vary depending on the size on your monitor. Word will compress the ribbons by rearranging their control order to fit smaller monitors.
Edit window 5 : Shows the contents of the document you are editing.
Scroll bar 6 : Allows you to change the position of the screen you are editing a document.
Status bar 7 : You change the display of document information.
View buttons 8 : Allows you to change the display mode you edit the document according to your needs.
Slide zoom control 9 : Allows you to change the zoom settings of the document you are resizing.
Saving and opening a document
Specify a location to save the document in the field Save to. When you save a document for the first time, it is pre-filled as the file name in the field file name Enter the first line of text in the document. To change the file name, enter a new file name.
The document is saved in . Change the file name in the title bar to match the name of the saved file.
You can open a Word document to continue working. To open a document, do the following:
Click the Start button and select documentation.
Browse to the location where the file is stored and double-click the file. The Word splash screen appears, and then the document displays.
Advice: You can also open the document in Word by going to the tab file and selecting the command Open. To open a recently saved document, select Recent
Editing and formatting text
Before you can edit or format text, you must first select the text. Follow the steps below to select text.
Place the cursor at the beginning of the text you want to edit or format and click the left mouse button.
While holding down the left mouse button, move it to the right (called "dragging") to select text. A background color will be added at the location to indicate the selection range of the selected text.
Most text formatting tools are found by clicking on the tab home, and then selecting in the group “ Font ».
1 this is on the tab home.
2 this group " Font"on tab" home ".
3 This is the Bold button. In the table below for the names and functions of the buttons "" in the "" group Font ».
|
Changing the font. |
||
|
Font size |
Change text size. |
|
Microsoft Office Word is software tool for writing and processing text. This program very common in everyday life office work. Often, employees who have to work with text are required to have minimal Office skills. There is nothing complicated in printing text, but to process it and correct design certain knowledge is required.
Microsoft Word Basics
You can create texts using Word different types: abstracts, term papers, documents and more. It is possible to customize the text by changing appearance, adding pictures, tables and other necessary elements.
Typing text into a document
By opening the program from the desktop or menu "Start", we will be met by a clean one White list A4 size paper. The sheet format can be changed to any other standard, more on that a little later.

You can scroll through pages using a special slider to the right of the A4 sheet, or with the wheel of a computer mouse.
To start printing text, using the left mouse button, position the cursor at the beginning of the intended text at the top of the page.
If you accidentally did something wrong or deleted a piece of text, you can return the action back. To do this, use the key combination "Ctrl+Z".
Saving the finished document
To preserve your works written in clean slate electronic “paper”, into a full-fledged file for him further use or processing, there are several options:


Microsoft Word sets the option by default automatic saving document. You can disable this option using the following path: "File" — "Options" — "Preservation". In this menu, you can select both the ability to disable autosave and the time interval after which this function will save the modified file automatically. A very useful feature for people who forget to save their documents manually.

When working with documents that are important to you, do not disable the automatic saving function to avoid data loss. The cause of a program crash can be anything: accidental closing of the program, crash computer operation due to weather conditions, etc.
Working with the font
Visual perception of the text is very important for the reader. Sometimes, due to incorrect formatting, the person reading the text loses any desire to finish reading it, no matter how interesting it may be. To make the typed stream of letters and symbols look presentable, there are tools built into the program.
The more complex the text design looks, the less desire users of the document will have to read it. It is customary to use a font when choosing the appearance of text "Times New Roman" Size 14. For headings size 16 is used.
If you still decide to use a different font at your discretion, Word offers its users a ready-made list of fonts pre-installed with operating system. If the amount provided to you is not enough, you can install additional fonts downloaded or purchased on the Internet.
A font has two main parameters: the font type and its size. Besides these, there are also others Extra options for a more original text design. To apply any of the parameters, you first need to select a specific fragment of the document for processing. To do this, left-click on the beginning of the fragment and drag to its end. To select all documents at once, press the key combination "Ctrl + A".

- To change a type, just click on its name on the panel and select from the list new font. When you hover over the option you want, you'll be able to preview what the text will look like before making your final choice. You can scroll through the list using the mouse wheel or by clicking the slider that appears on the right in the open window.

- To change the font size, click on digital value to the right of the font name and in the same way you can select the size of letters and symbols.

Additionally, you can change the font size without selecting digital parameter, but only by pressing the two buttons responsible for this. Left button increases the size of letters by one step, and the right one, accordingly, decreases it.


Aligning document content
There are four functions for aligning content in a document to a sheet:
- Align Left (keyboard shortcut "Ctrl + L");
- Center alignment (keyboard shortcut "Ctrl+E");
- Align right (keyboard shortcut "Ctrl + R");
- Justify (keyboard shortcut "Ctrl+E").
If everything is clear with the first three functions, then what is the essence of width alignment? Everything is extremely simple. This parameter is mandatory when accepting documents in some organizations, since after its use the text regularly fills the sheet on both sides. To understand this, let's look at its action using an example:
- Left alignment:

- Width alignment:

The example shows that in the second version the text on the right side is placed more neatly, closer to the edge. This is exactly what the format of official material should be when it comes to alignment.
Changing the text style
Almost any editor has the ability to change the text style, and this function, of course, did not bypass the legendary Word. These options also have keyboard shortcuts for quickly designing materials.
The Word editor provides three main functions for changing the style. Access to them is available in top panel controls, in the same window as the font selection.

- Bold (keyboard shortcut "Ctrl+B");

- Italic (key combination "Ctrl + I");

- Underlined (key combination "Ctrl + U").

These parameters can be combined with each other. This is what the text will look like with the three style options mentioned above applied to it:

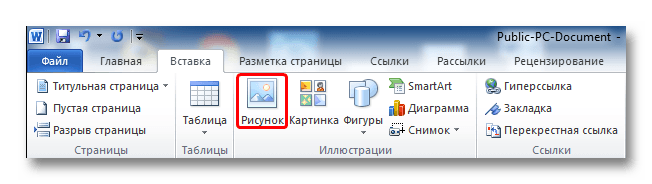
Insert an image into a Word document
- To insert an element into a document, you must first open the submenu "Insert" in the top panel of the program.

- The Word gallery already has a certain set of images for inserting into a document. To view these files, click the button "Picture".


In the window that appears, look for the desired image among the files on your computer.

As you can see, do the main work in office program Word is not difficult, the main thing is to get used to the interface and get used to the functions to understand their purpose.