Gmail outgoing. Two Important Gmail Email Settings
Hello, dear readers of the blog site. Today I want to talk about free service Email Gmail.com. The main feature of this mailbox is its incredibly convenient and functional web interface.
It is, perhaps, in no way inferior to desktop email programs, but at the same time it will be accessible from absolutely any device capable of accessing the Internet. Therefore, using the Gmail box, you can safely forget about such a thing as synchronization.
Besides, Google mail has one of the best (if not the best) spam cutter in the world (it is because of it that I collect correspondence in this mailbox with, and other services that do not fight spam in any way), allows you to automatically sort correspondence by dozens different ways, mark letters, import them from any , and also knows how to remove and send correspondence from dozens of mailboxes you already have, and in such a way that your opponent will not suspect a substitution.
Plus, working using a secure protocol and warnings about access to your mailbox from other IPs - what could be cooler. Probably nothing, so in this article I will try to take Gmail apart and show all its capabilities with examples. Don't switch.
By the way, quite recently it came out on top in the world, overtaking another popular Post service entitled . However, in Russia the undisputed leader is, although it does not have any outstanding functionality (it just appeared earlier).
Registering and creating a mailbox in Gmail
Let's start with the trivial, but in need of some comments, registering a mailbox on Gmail. Addresses must be distinguished Gmail.com and Gmail.ru. Historically, the s.ru service at the end appeared before the Jimail mail service, and Google could not get this domain (although last year they seemed to succeed). For example, about ten years ago I almost fell for this incident, because gmail.ru also had a free email service.
How to create an account in Google Mail
Actually, receiving a mailbox is a nice bonus when creating an account. If you are now go to the Jimail page If you don’t have an account in Google, you will be asked to correct this misunderstanding:
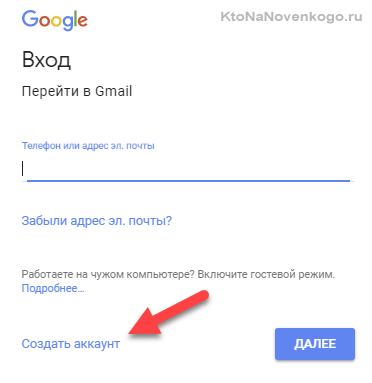
Clicking the button "Create an account", you will be taken to a page with a web form that you will need to fill out very carefully. Due to the enormous popularity of Gmail, it can be quite difficult to use it, but still, if you show your imagination, you can choose something suitable.
For example, you can insert dots in the name, which means it is acceptable to use the domain name of your site, which with a high degree of probability will not be taken:

Please note that the reliability of the information you provide must correspond to the tasks that you will assign to this particular mailbox. Of course, Gmail.com is very well protected from hacking (work is carried out through an encrypted https protocol), but no one canceled the human factor.
For example, the simplicity of the password I once came up with for my mailbox on Gmail became the reason for its hacking and subsequent theft of money from my own account. electronic wallet in the WebMoney system. I registered this email in time immemorial, when I didn’t even think about it, so I chose it surprisingly complex password QWERTY. Now, which gives a certain amount of peace of mind.
You also need to understand that the unrealistic alternative Email address or the phone can play a cruel joke on you, because they could help you restore access to your account in case you lose your password or your mailbox is hacked by various geeks:

IN SMS message You will receive a confirmation code on the mobile phone specified during registration, which you will need to enter to complete the registration (unfortunately, you won’t be able to create a Zhmail.com account without a phone).


Next, fill out all the fields, click on the “I Accept” button to agree to the terms of the box and send the data. You will be asked to scroll through a small “Course” slider young fighter from G Mile", and on last step A button will appear to enter the web interface for managing your mailbox - “Go to Gmail”.
Login and get acquainted with the Jimail interface
If you already have a Google account, then you will receive you can always log in from any page of any Google service simply clicked on the button next to your name in the right top corner:

Well, or just by typing in address bar your browser gmail.com and clicking on Enter.
Gmail interface quite understandable and familiar (it has not undergone significant changes for quite some time, which, in my opinion, is a good thing, because there is no need to solve another puzzle on the topic - “where is it now?”):

It appeared quite a long time ago separation of correspondence to Unsorted, Social Media, and Promotions (at the top of your inbox). If you click on the plus sign next to it, you can also add “Alerts” and “Forums”.

If you don’t need this sorting (like me), then simply uncheck the unnecessary checkboxes in the settings (six in the upper right corner - “Settings”) on the “Inbox” tab:

When you first log into G-Mail, you will immediately be told that although your account has been created, there is still something to add and configure to it. In particular, you will be offered to quickly set up the import of mail from your existing mailboxes (both in G-mail and in other similar services). We will talk about this in detail below.
You will also be prompted to quickly add a photo to your account and, if desired, choose a different design theme. You can really do this right now, because everything is implemented in literally two clicks (don’t get lost).
A new mail interface is already available in Google Mail for everyone
Lately, Google Mail has been actively promoting its new interface . You can try it by clicking on the settings button (gear in the upper right corner) and selecting the first item “Try new version of G-mail”.

It is currently in testing and is not used by default. There aren’t really many striking differences, but you still have to get used to it.

If you wish, you can return back to old interface, and you can also customize the location of letters in the new Gmail by clicking on the “Interface” button in the settings drop-down menu. Three options are offered, differing from each other mainly in compactness and clarity:

I am still using the old interface (and I will show everything using its example), but you are free to choose for yourself (I think you can figure it out by analogy in my screenshots).
When loading the mailbox web interface, your browser is checked to see if it supports all this beauty, and if a discrepancy is detected, the good old HTML version. Although you yourself, in case of a long loading of the new frame, can switch to the retro interface:

By default, you are offered a mailbox approximately 15 GB in size(although this is not only for one email, but also for yours, and), but if you wish, for a fee you can increase this limit.

Those few letters that will already be present in your mailbox tell about some Gmail features(for example, importing contacts and letters from any email service you previously used) and about the delights of .
Pros and cons of Gmail, security settings
What’s noteworthy is that by registering a mailbox on Gmail, you are not obliged to give up all the others that you have received over your long life on the Internet. It is possible to configure the reception and sending of mail to them from the Google mail interface. It’s very convenient, and I’ve been using it successfully for a long time (read more about necessary settings Let's talk a little later).
Gmail is an online service that is as convenient as email programs
Also, one of the default messages will talk about the ease of using Gmail on mobile phones using a proprietary application. In general, use for working with mail using the web interface, rather than a desktop program, has one huge advantage - you no longer need to synchronize your various mailers on various devices(desktop PC, laptop, phone, tablet, etc.).
The web interface will be great universal solution, but only if it allows you to implement all the goodies that abound in email programs. Well, of course, Google, together with its wonderful Jimail, is striving with all its might to become this ideal option, and, frankly speaking, they are doing it very well.
At the beginning of its journey, Google Mail found itself at the epicenter of a scandal precisely because of ads that appeared with contextual advertising(having your own website, by the way, you can too) and not due to the irritation caused by its display. No. It’s just that the theme of contextual ads in its ideology corresponds to the text that takes place in this message. This meant that the system was reading our letters, which caused a storm of indignation.
But over time, all the goodies that Google threw at users of its free email outweighed the negative from the invasion of their personal space. In short, we were bought. Sometimes the thought still comes to mind that this corporation is gradually becoming an “empire of good”, and besides, how beautifully it all began (read my account). However, let's return to our sheep.
Let's talk now about security of working with your mailbox. I advise you to immediately go into the settings for this purpose (find the gear in the right upper area and select from it context menu Settings item):

Immediately pay attention to the link located in the footer (bottom) of the Gmail web interface called “ Additional Information" There you can monitor or set up an alert for suspicious calls to your mailbox.

Protecting your email login
If the data stored or received in your mail account is extremely important, then you can sacrifice the simplicity of working with the mailbox and configure it (using a password and confirmation code sent to your mobile phone). You can do this on the page " Security and entry" your Google account:

There is never too much security, and the main thing is to take care of it before, and not after the thunder strikes (learn from my mistakes). Well, I’ll still briefly describe all the possibilities that this double security system provides. So, two-factor authentication in Gmail allows you to do the following:

Passwords for applications to access your mail from any device
If you use any email reading apps on your desktop computer or mobile phone(tablet), then after activation two-step authentication these same applications will not be able to access your mailbox. What to do?
There is a way out and it is quite simple. You will need in the area "Application Passwords"(see screenshot above - located on the “Security and Login” page) click on the spoiler. The page that opens will list the applications that already have access to your Gmail account (by the way, you can disable them if necessary).

And at the very bottom there will be an opportunity to set a password for any application to access Jimail mail (it doesn’t matter, mobile or desktop, for example, an email client).
First select from the drop-down list Google app, which you want to log in to (mail, YouTube or others), then from the second list, select the device from which you want to log in, and click on the “Create” button. As a result, you will receive a password for this application and instructions for using it:

All you have to do is go to the settings of your mobile or desktop application to change the Gmail access password there to the one you just generated.
In my opinion, everything is very simple and convenient. Personally, I am very happy about this opportunity make your mailbox as secure as possible from the encroachments of all sorts of radishes seeking to steal money, websites and other material and virtual values. Respect to the developers for this.
Okay, now let's understand the features of Jimail mail and configure this miracle of programming thought to suit ourselves and our habits.
Shortcuts (folders) and their configuration in Gmail
To sort correspondence in Gmail, use shortcuts and filters. The latter allow automatic mode according to given criteria, distribute letters into different folders (labels). A shortcut, in fact, is very close to the usual concept of a folder, but has more ample opportunities. By Google default offers you a specific set of shortcuts and folders, which are located in the left column. But we are free to customize everything to suit our needs.
How to create a shortcut in Google Mail
First, you will probably need to go to the settings (Gear - Settings) and on the second tab, using the “yes” or “no” activation, configure the display of left menu items (some shortcuts can not only be disabled, but also deleted).

There will also be an opportunity to create a new one using the corresponding button. Create a shortcut in Gmail you can also when viewing a letter (from the context menu of the icon called “Shortcuts” on top panel):

In general, I don’t really understand these icons, so for more information and clarity, you can check the “Text” option in the settings on the “General” tab in the “Button Labels” area.

After this, instead of mysterious icons, clear inscriptions will appear on the top panel of G-Mile:

As you can see from the above screenshot, in fact, even the Inbox folder is a shortcut. In Gmail, shortcuts can be nested (previously this required installing an add-on from the Laboratory), which gives even more opportunities for targeting.

How to customize appearance and use shortcuts
The created shortcuts should be observed in the left menu(additional directories with the names of shortcuts will appear), and their configuration or deletion can be easily done by clicking on the arrow button that appears on the right (the left arrow reveals a list of nested shortcuts, if any) when you hover the mouse cursor over any of them in your mailbox:

A context menu will open where you will be asked to select a color for this shortcut, as well as make a number of additional settings:

Now, after assigning a unique color, when viewing incoming messages in Jimail, you can very easily see what labels they are marked with.
Although, in my opinion, it is best to configure the filters automatic removal messages from the inbox, if they meet any condition for moving under the label (there is no need to clutter the inbox - only unfiltered messages will be there):

While viewing of this letter You will also have the opportunity to remove unnecessary cross labels if necessary:

Removing an Inbox shortcut sends the letter to the archive, but it will still be available in other existing shortcuts (folders, in other words). And, of course, in the “All Mail” folder you can always find them safe and sound. Okay, at first it’s difficult to figure it out, but you can imagine all this shamanism as creating the folders you need in the future. There is a possibility if necessary, but this is a last resort.
It is clear that when reading messages you will be able manually assign them to one or another shortcut (in other words, place them in folders) using the button of the same name located at the top and its context menu. In fact, in this way you can manually distribute the letters from your mailbox in Jimail into the folders you need and pre-created. However, this is a tedious task and, if possible, I would like to automate the routine.
Filters in Jimail and a detailed example of their use
How to do it? Using a second tool codenamed Google Mail filters. These wonderful filters are available in the settings (from the gear menu) on the corresponding tab. There you will see the filters you have already created (if any) and a link that allows you to create a new impeccable example of indestructible logic (called Create a new filter).

In the window that opens, you need to enable logic and try to set a unique algorithm by which Gmail will filter the correspondence you need. If someone has used desktop email programs before, then there will be no problems with this.

If the filter doesn't work, you can always correct it. You can filter, for example, by the subject of the letter, by specific terms found in it, by the address of the sender or recipient (if the message is sent to Jimail from another mailbox of yours).
At the next step of the filter creation wizard, you will be asked to assign the fate of those unfortunate letters that are filtered in accordance with the algorithm you specified. For the example given with filtering mailings coming from the left mailbox, you need to check the boxes in accordance with the screenshot:

Let's Let's look at an example of this Gmail filter:
All. Create a filter, test its suitability, correct shortcomings and enjoy cleanliness and order in your correspondence on the most wonderful web-based email client.
Importing addresses and letters into Gmail, collecting mail from other mailboxes
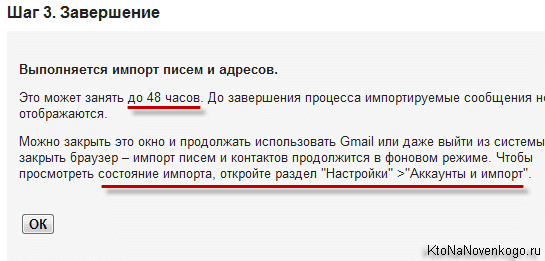
Now let's assume that my agitation for Soviet power had an effect and you were inspired by the idea moving to Gmail with all his belongings, i.e. with accumulated contacts and tons of letters. It won’t be that difficult to do this, although not very quickly (even with Google’s unlimited power, transferring an array of correspondence can take up to two days). However, all this will be done automatically, and you will only need a little patience in making the necessary settings.
In addition to, in fact, a complete move with all your property to Jimail, this email service will allow you to use all your accumulated for a long time mailboxes are fully operational, and your opponents who will send messages to them will not even notice that you no longer live there (responses to their letters will come with the same return address to which they wrote). It's actually a wonderful thing that also works great.
Import contacts into Jmail from your other mailboxes
All settings are made on the tab "Accounts and import". In the “Import mail and contacts” area, you need to click on the link shown in the screenshot:

Import from huge number mail services, a list of which you can see on this page. In the first step, the wizard will ask you where Google will collect contacts and messages, and in the second step you will be asked to enter the password for that mailbox.

After clicking the “Import” button, you will be notified that this is not a quick process. You can verify that the process is complete in the Google mail settings using the path indicated in the screenshot:
You can teach Google to pull chestnuts out of the fire (letters to Gmail from your other mail services), but the collection will not be carried out in real time, but sporadically with an interval of one hour. If the speed of collecting correspondence is critical for you, then it’s better do the reverse operation— go to the settings of those same third-party accounts and add to them the forwarding of all mail to Google.
Forwarding mail from other mailboxes to Jemail

Well, it’s probably worth mentioning that in the Gmail settings on the tab Forwarding and POP/IMAP you can set all incoming correspondence to be forwarded from your new Google mailbox to your current main mail account.
And if you are used to using a desktop program to work with mail, you can, if necessary, disable the POP protocol and enable a more advanced one IMAP to pick up correspondence and read it on your computer.
Useful Settings and Gmail Lab
Among all the possible settings of Gmail (Gear - Settings), we have not considered the “chat” tabs (which I don’t use and don’t know what to say about them), as well as the settings for enabling the smart mode for separating inboxes into important and unimportant on the “Inbox” tab ", and a tab "Themes", where you can put the most pleasing skin on the web interface:

By and large, there is nothing interesting there.
Let's see if there's anything left that we haven't covered "General" tab of Jimail settings:

- The interface language - well, there’s nothing to talk about here.
- Maximum page size - the number of letters (chains, which, by the way, are an amazing invention of Google - all correspondence with the same user reduced into one chain, where you can remember the essence of the matter) and contacts (available from the drop-down list of the Gmail button located above the left list - I advise you to add photos to all your contacts in the settings or for style).
- Chains of letters - you can disable the wonderful function described just above, but I assure you, it’s not worth it.
- Shortcut Keys - Off by default, but may be Full time job With mail it will become more convenient when it is activated. A list of hotkeys can be seen on this page.
- Desktop notifications - if you work with Gmail from Chrome, you can enable this function, and when new messages arrive, a pop-up window with information about this extraordinary event will appear in the lower right corner of the screen.
- Signature - if you don’t want to write “With respect, Dmitry Petrovich!” at the end every time, then just fill it out once per general settings And this template will be automatically inserted into all letters you send.
- Autoresponder - you probably received an almost instant reply with general words in response to your letters (I’m not here right now, but I’ll definitely answer). This is what an answering machine is. This kind of stuff just pisses me off.
All other settings have either already been discussed above or do not deserve to be said anything more about them. So, trifles, which, however, may seem useful to someone.
Laboratory and advanced settings in Jmail
Let's move on to a tab that has not yet been touched upon by us, but nevertheless, probably the most interesting tab from settings – Laboratory.

It is, however, only present in the settings of the old interface, and in the new one there is a tab instead "Advanced". Some of what could be enabled in Labs is now available there (in the new interface).

But in the new interface there is also an opportunity on the “General” tab to check the “Enable access to experimental functions” field and after saving the settings, they should, in theory, appear on this very “General” tab. But I have not yet noticed any changes from checking this box.
In general, Google mail was born in 2004 and was in the beta stage until 2009. During this time, "Lab" took root and became the main source of innovation in this by far the best online email client.
I have repeatedly observed that additions from the “Lab” over time took up space in the main settings. Apparently, Gmail, therefore, tests out new features and makes a verdict on their implementation based on the collected statistics of their popularity (this is similar to a test browser, the successful developments in which are then implemented into the main project -). Well done, what can I say.
But let’s see what interesting things are being tested in the “lab” now, although if you read this article after a while, you won’t find much there. I will only review what I use in my account (please don’t kick me too hard for this). So, what useful little things can you do? attach to your Gmail.com mailbox:
- Icon unread messages
- a small but pleasant trifle. After activating this function, the number of newly received messages will be displayed in the tab of your browser where Google mail is open. It probably won't be superfluous.

View area— this cartoon seemed extremely convenient to me, because I’m slowly switching to Gmail from an email client integrated into Opera, where everything is organized exactly like this. Now you can close the window for viewing the list of messages and view the contents of the selected letter in the freed-up area. Comfortable.
Mail is the most important means of communication between work colleagues, distant acquaintances, relatives, friends and other people with whom you would like to maintain relationships. Some people still prefer to write letters the old fashioned way, on paper, but this:
- uncomfortable;
- expensive;
- prevents conservation environment and ecology.
Using email on a mobile phone is no less simple than on a computer, and today we have prepared for you detailed manual about how it is carried out setting up mail on Android in the Gmail email application.
On Google's mobile OS there are 2 applications with which you can simply and easily exchange electronic messages both between users of the Gmail service and those available by default. The first is the Email program. It is simple, has an absolutely uncomplicated interface and allows you to connect boxes of any services.
Perhaps soon we will prepare a review of this pleasant application that certainly deserves its rightful place in the hearts of users. But today we'll talk O proprietary utility from Google - program Gmail. Unlike Email, it has much more advanced settings and allows you to fine-tune synchronization parameters to suit your needs, has support for push notifications, and contains a flexible system for sorting and filtering correspondence. For the application itself Gmail Android fits perfectly, since it was here that the developers managed to fully reveal their potential and capabilities. This will be discussed further.
We would like to warn you right away that in the presented material we will talk about the version of Gmail for Android with the number 5.10.1128x. If you have a newer version, all the operations described below will probably be available to you.
The latest versions of Gmail for Android have much more extensive functionality (for example, only in the updated package can you connect Outlook mailboxes, yandex.ru and other mail services). So it's worth upgrading.
How to find out the version of the Gmail app available on your smartphone before updating?
— launch Gmail;
— click on the button for calling the context menu on the smartphone, located on the left. A menu should appear additional options. Select the “Settings” item. This menu item contains all the main aspects of setting up mail on Android;


— a mini-form will appear showing the number of the active version of Gmail.

How to find out the Gmail version after updating?
IN new version The email program's interface has been completely redesigned, so here the method for determining the version is different:
- V running utility press the button with three horizontal lines in the upper left corner;

— select the last field “Help/feedback”;


Gmail app update procedure
We launch the OS and wait until an icon appears in the notification panel notifying about available new versions of programs. This requires a reliable network (Wi-Fi or fast mobile). This usually happens a minute or two after loading Android (possibly earlier). So please be patient.
Sometimes such an icon is not among the notifications at all, but the update is still available.
How to check for an update if there is no push notification?
— go to the Play Market. Click on the button with three horizontal lines;

— select the item “My applications and games” in the menu that opens;

- here we see that there is an update. New versions available applications in this menu are displayed above the list of already installed programs. If you know that there is a new version in the Play Store, but it still does not appear in the list, you have probably already updated Gmail to the maximum available version, or your operating system requires an update. Consider upgrading to official firmware new version, if it is on the server, or should you install custom firmware for your smartphone model (CyanogenMod, MIUI, Paranoid Android).
So, the update is in the list, and you want to install it.
— click on the “Update” button, and “Update” again on the update profile page;


— confirm the appropriate permissions and click “Accept”;

— after downloading the package, the program is ready for use.
So that's it preliminary preparations finished, and we can start working with the program.
The very first thing we would like to tell you about is basic principles mail settings on Android, namely adding a mailbox. You can add not only Google mailboxes to Gmail, but also any other accounts that support POP3/IMAP for receiving and SMTP protocols for sending letters.
How to add a service mailbox from Google (Gmail)?
To attach your Gmail email account, you only need to do a few things: simple steps:
- V running application in the main menu (again, called up by clicking the button with three horizontal lines in the upper left corner) select the “Settings” field;


- on new form select the option “Google - Gmail or Google Apps” and click on “Next”;


— enter the name email box and the password for it;

— when you first log in, mark whether you want to receive newsletters about new programs and updates from the Play Market;

— if everything went well, a message appears about logging into your account and a proposal to synchronize its various components. We tick the boxes we need and go to account;

— the new mailbox appears in the list of connected email addresses, which confirms the success of our actions.

Setting up mail on Android - how to add a personal mailbox from another web service (all except Google)?
Gmail is pretty flexible program, and in addition to mailboxes from Google (which, by the way, have the same domain name as the name of the presented mobile program, - Gmail. Don’t let this confuse you, you can add email accounts of any other mail services here. How to do it?
— in the “Settings” menu, select the “Add account” field. Check the “Personal (IMAP/POP)” option;

— enter the email address (necessarily with the domain name);

— select the type of account that will be used to receive messages.
Used on different web services different accounts. To find out which one you need, use search engine. For example, for the email service yandex.ru the settings will be as follows: link.
The addresses of the POP3/IMAP and SMTP servers and the numbers of the ports used are also indicated here, so this information is vital for connecting such a box.

— enter the password for the mailbox;

— in the next form, enter the name of the server for receiving letters, port number and type of protection. If you also connect a mailbox from Yandex, all these parameters can be viewed at the link above;

Setting up IMAP is painless for the operating environment and quick for the user, so there is no need to be afraid of new terminology and conventions.
— if the settings are entered correctly, we do the same for the SMTP server, namely for outgoing messages;

— finally, in the final phase we are asked to configure several parameters.
Clock frequency– this is the period after which the phone account will be synchronized with the Google server, as a result of which all new letters will arrive on your smartphone.
Notify about new emails– a function for configuring the appearance of push notifications at the top of the working window about the receipt of new correspondence.
Sync email from this account– whether mail for this account will be synchronized with the remote Google web server.
Download attached files if available Wi-Fi connections – if a reliable and fast Wi-Fi connection, then when a connection is established, attached attachments will be copied to the phone along with the letters.

- final phase - entering the optional abbreviated name of the accounting service and your name, which will be displayed in sent letters.

Finally, everything is ready - the account is added and ready to go.
Results
In the article presented to your attention, we described only initial settings for work mobile application Gmail for Android. Next week, our editors will prepare for you a guide with more in-depth techniques for customizing this flexible and incredibly functional software tool (the article " " has already been published), after which you will be convinced that setting up mail on Android is a fun and interesting activity.
Now I don't know a single person who doesn't have email. Many even have more than one box.
But since there is demand, there is also a lot of supply. What to choose? My answer is clear - this is mail from Google gmail.com.
As it turned out, choosing an email service is not enough; you also need to configure the mailbox so that it is convenient to work with it.
In this article I just want to tell you how to carry out initial settings in your gmail mailbox to make working with it more convenient. And the most important thing is that it’s not some complicated global settings, but elementary ones, which will take you no more than 2 minutes. I will talk about more subtle settings in the following articles.
By the way, if you now have mail on Yandex, mail.ru or somewhere else, then I advise you to switch to gmail as quickly as possible. You will understand later why only a Gmail account is suitable for an MLM business. In the beginning, gmail may not seem very convenient to you, this is simply because you have changed your habit. But in a week, maximum two, you won’t understand how you used other email services before. In one of the next articles, I will tell you how to make the transition from another email address to gmail absolutely painlessly, with the preservation of all letters and contacts. And you can even send letters from gmail from your previous address.
There I will also tell you how to combine all your mailboxes into one gmail account.
So, Let's start setting up your mailbox. Go to gmail.com and register. Next, we find ourselves in the mail interface of our email. The view is shown in the picture (the username and chat name are blurred out in the screenshot):

Gmail mailbox after registration - without settings
Let's start setting up.
The first thing we do is click on the gear at the top right and making the mail interface compact. Let's see what happened:

Now let's change the subject. Click on the gear again, select “Themes”, and select the “High Contrast” theme.
- replacing icons with text buttons:
Settings – General – Button labels: select “text”, click “Save changes”.
- turn off the display the necessary shortcuts in the left menu:
Settings – Shortcuts:
put “no” on following lines: Important, Circles, Personal, Travel
set “yes, if there are unread” – Flagged
As a result, the left menu should look like this: Inbox, Starred, Sent
The labels Personal, Receipts, Travel, Work can be completely removed so that they don’t get in the way.
- disable Chat
Settings – Chat: check the “Disable chat” box
- remove advertising
Settings – Web collections: uncheck “Show my web collections above inboxes”
Let's look at our intermediate changes:

- disable importance markers And:
Settings – Inbox – Severity markers: check the “Disable” box, click “Save changes”
- remove chat notifications and enable notifications about new messages(if pop-up windows are annoying, or you receive a lot of emails, then you don’t need to enable):
Settings – General – Desktop notifications: Check the boxes “Disable chat notifications” and “Enable notifications about new messages”
- set the function to cancel sending a letter
Settings – General – Cancel sending.
I have 20 seconds.
After making changes, don’t forget to click “Save Changes” at the bottom.
- make a note to read the letter without delay
Settings – General – Viewing area: set “immediately”, click “Save changes”.
- include useful features:
Setup – Laboratory:
— “Inbox”: preview
— Unread messages icon
— Setting the location of the signature
— View area
— Cancel sending a letter
— Sending letters to background
— Preview Google Docs in the mail
- Preview Google Maps in the mail
— Message preview
We see that another button has appeared, to the left of the gear (circled in red in the screenshot)

Click it and select “ Vertical division”, and now we read the letters without going to another page
As a result, after all the settings of our gmail mailbox, this is what we got:

Also, if you are not hiding from anyone, then I recommend add your photo:
Settings – General – My picture
Google is constantly adding new features and making the interface more convenient, so some of the points that I talked about in this article may no longer be relevant after some time.
The “good corporation” Google is known not only for its highly accurate search, it also offers many other services. Among them is Gmail email. Moreover, it seems to “dominate” over all other services of the “good corporation” - happy owner account can leave comments on YouTube, use social network Google+ and download apps from Play Market without any additional registrations.However, postal Gmail service and itself is quite advanced. Letters are sorted automatically, so you can forget about the jumble in the mailbox; alerts about important messages come instantly; integration with Google Calendar will allow you not to forget about events and meetings. The functionality can also be expanded with various add-ons. The main thing is to configure Gmail correctly.
Setting up Gmail on PC
Gmail itself has a very good web application (browser version), which is both functional and beautiful - there is nothing superfluous in the interface, but everything important buttons catch your eye. However, it is not suitable for offline work, since it requires a constant connection to the Internet and does not cache email data.
If you need to use mail on Gmail without an Internet connection, it is recommended to use appropriate clients: for example, Thunderbird or Outlook (well, or any other at the user’s request).
Another important advantage of Google mail is that setting up Gmail in an offline client is very, very simple. This service is one of the three largest and most popular in the world. That’s why many programs have pre-installed settings for collecting emails from Gmail, and the user just needs to provide their email address and password. Such clients include, for example, Mozilla Thunderbird.
However, some clients, such as Microsoft Outlook, do not have preset settings for collecting mail from Gmail.
Important! For all email clients to work, you must first enable IMAP protocol in service! You can do this in your account settings. Open the mail web interface, click the “Settings” button, select “Settings” there, open the “Forwarding and POP/IMAP” tab, check the “Enable IMAP” radio button at the bottom of the page and click “Save changes”.
After this, you can begin setting up your email client.
In fact, most modern email clients, including MS Outlook versions older than 2007 or Apple Mail, will only require you to specify the protocol (IMAP), email address and password. Otherwise, you can use the following settings:
- Incoming mail server IMAP:
- SSL required;
- Server address – imap.gmail.com;
- Port – 993.
- Outgoing SMTP mail server:
- Requires TLS (or Requires authentication);
- SSL required;
- Server address – smtp.gmail.com;
- Port – 465 or 587;
- The remaining parameters correspond to the IMAP (incoming mail) server.
These settings must be specified or entered in the appropriate windows of the Add Mailbox Wizard on the client. However, it is much easier to download the latest version of the corresponding program (Outlook, Thunderbird, any other), which does not require these “dances with a tambourine”.
Setting up Gmail on Android
Only Gmail account holders will be able to take advantage of all the features operating system Android, starting from installing applications from Play Store and ending with instant notifications of new emails.
How to set up Gmail on Android? This is much easier to do than with computer email clients! To do this, just open the Settings application, select Accounts – Add, select Google, then “Existing” and enter your login (address) and password. After this, the Gmail application will start working and can be used as a full-fledged email client.
Third party email clients downloaded from the Play Store also support quick setup Gmail. They also just need to enter your username and password.
For third-party email clients to work on Android, you also need to enable the IMAP protocol in your Google Account settings.
For sending email messages on business networks and the Internet. SMTP was developed in the early 1980s and remains one of the most popular protocols used throughout the world. The reason for its popularity is also that this moment time there is no worthy alternative technology.
SMTP is a TCP/IP protocol used when sending and receiving email. Typically operates with one of two other protocols, POP3 or IMAP, which allow the user to store messages in a mailbox and periodically download them from a server. In other words, users typically use a program that uses SMTP to send and POP3 or IMAP to receive email.
Gmail SMTP settings will be required if you want to send an email from your Gmail account using email. Below are specific details. What is needed to set up SMTP for Gmail?
Network settings
Default Gmail SMTP settings:
- server address: smtp.gmail.com;
- login: email address;
- password: your Gmail password;
- port (TLS): 587;
- port (SSL): 465;
- Gmail SMTP TLS/SSL required: yes.
Important. In addition to these SMTP settings Gmail (ipb 3.4.6) you must allow your email client to receive/download mail from your Gmail account.
Default POP3 and IMAP settings
Downloading/receiving mail is done via POP3 or IMAP servers. You can enable this type of access via Gmail settings on the Settings screen - Forwarding and POP/IMAP. Server settings for sending data via Gmail are required when using an email client. You don't have to manually enter settings when sending emails through a browser, such as Gmail.com.
Because Gmail is extremely popular, some email programs provide server details automatically when you set up your account.

Having trouble sending email via Gmail?
Some email applications use old, less safe technologies to log into your email account, and Google blocks these requests by default. If you cannot send mail using your account Gmail entry for this reason, it is unlikely that you enter incorrect settings. IN in this case you will receive a message related to the security of your email client.
To resolve this issue, sign in to your account. Google entry via a web browser and enable access through secure applications using the link.
Gmail SMTP server settings - how does it work?
All modern postal client programs support SMTP. Settings supported in the mail client include the IP address of the SMTP server (along with addresses POP server or IMAP). Web clients implement the server address in their configuration, and PC clients provide SMTP options that allow users to define their own server.
A physical SMTP server may be dedicated to serving mail traffic only, but is often combined with POP3 and sometimes other proxy server functions.
SMTP uses 25 for standard communication. To improve the protocol and help combat Internet spam, standards groups developed TCP port 587 to support certain aspects of the protocol. Several web email services, such as Gmail, use the unofficial TCP port 465 for SMTP.

Teams
The SMTP standard defines a set of commands - the names of certain types of messages that mail clients send to the server when requesting information.
The most important commands:
- HELO and EHLO - initiate a new protocol session between the client and server. EHLO requests responses to any additional SMTP extensions.
- MAIL - initiates sending a letter.
- RCPT - Provides one address for the recipient of the current message.
- DATA is a command indicating the start of message transmission. Initiates a series of one or more subsequent messages, each containing part of the message.
- RSET - When sending e-mail (after issuing the MAIL command), SMTP may reset the connection if it encounters a protocol error.
- NOOP - empty message(“no operation”), designed as a kind of ping to test the responsiveness of the other end of the session.
- QUIT—end the protocol session.

The recipient of these commands responds with either successful or unsuccessful code numbers.
Problems
SMTP lacks built-in security features. Internet spammers actively used SNMP (Network Management Protocol) on initial stage technology development, generating great amount spam emails and delivering them through open SMTP servers. Spam protection has improved over time, but security is still an issue. Additionally, SMTP does not prevent spammers from setting up (via the MAIL command) fake email addresses.