You can insert an MTS SIM card into the Beeline modem. If you insert an MTS SIM card into the megaphone modem
Android is an operating system. This program is used for tablets and phones. Android firmware makes it possible to install the system on the device so that the gadget functions normally. However, like any other program, it may experience glitches or become outdated. To restore system functions or install a new version, a flashing is performed. Even a beginner can carry out this manipulation. How to reflash Android?
What is firmware?
Android firmware – installation of the program on the device microchip. This manipulation is performed at the manufacturing plant. Based on this, it’s easy to guess that flashing is a program update. The manipulation is performed in the following situations:
- if the operating system version is outdated and you need to install a new version;
- if there are any malfunctions in the operation of the program;
- if it is necessary to change the system language to Russian;
- if you need to hack the program's security when the gadget is locked.
How to reflash Android?
If we talk about how to reflash an Android phone yourself, then the success of the event largely depends on proper preparation. The first thing we recommend doing is charging the device. Next, through the menu you should find out the exact name of the device and software.
Before performing the manipulation, you need to understand what software will be installed - official or third-party.
Before you start, you need to do the following:
- find a file on the Internet with firmware suitable for a specific type of device;
- download the program to your computer in order to update the software and prepare a USB cable if the manipulation is performed via a personal computer;
- if the firmware is installed through third-party software, then you should download the Recovery program to the gadget;
- perform a backup copy of the software installed on the device.
Only after this is the firmware of the smartphone or any other gadget re-flashed.
Flashing your phone using CWM Recovery
If we talk about how to flash Android using CWM Recovery, then you first need to install the appropriate utility on the device. The following manipulation is performed:
- Entering R To perform this manipulation, the device is turned off. Next, press some keys to enter the program. The combination depends on the gadget manufacturer. Which set is suitable for a particular device can be determined experimentally. To do this, you should perform one combination, and if this does not give a result, then try another option. You can press the following keys:
- increase volume and turn off;
- volume down and mute;
- increase or decrease volume and mute, as well as “home”;
- both volume and mute keys.
If everything is done correctly, the system will display the program menu. To control it, use the Volume Up and Down keys to move up and down, and the Mute key to select an action.
- All settings are reset to those that were originally set at the factory. In the menu, select the “wipe data/factory reset” item and confirm the completed action. Usually the system displays a line in which one of the options is yes or ok;
- Next, the following menu items are selected sequentially: “Install zip” is the first action and “Choose zip from /sdcard” is the second action. After this, you should select the file in which the original firmware was saved. Next, the action is confirmed.
- The previous action starts the process of flashing the system. Upon completion, Install from sdcard complete will appear on the screen.
- You are logged into the CWM R program. After this, it is recommended to reboot the gadget. However, this can be done not using the power button, but by selecting the “reboot system now” item in the menu.
When all actions are completed, the gadget reboots and reflashes. This usually takes 10 minutes, but may take longer or less depending on the brand of device.
How to flash an Android phone using TWRP Recovery?
Re-flashing the phone using this program is carried out as follows:
- The file in which the gadget’s firmware data is saved is moved to the phone’s memory so that it can later be retrieved and the update started;
- you enter the program in the same way as in the case of CWM, that is, use various key combinations for this: decrease and/or increase volume + mute, increase or decrease volume and mute, as well as “home”, both volume keys and mute ;
- The programs are reset to their original settings, and upon completion of the action, the user goes to the main menu of TWRP Recovery;
- select the “Install” item and launch the file with the original firmware, which was initially saved in the device’s memory.
After this, the gadget is flashed. When the process is completed, it is recommended to restart your phone or tablet.
Installing updates using ROM Manager
ROM Manager allows you to update your system and save all installed applications, downloaded files and other system data. After the operation is completed, you can quickly restore all gadget data.
To perform flashing using this method, the device must have root access. Thanks to this, the system gains access to the internal files of the device.
You need to download the file with the device firmware. After this, the following manipulations are performed:
- The firmware archive is transferred to the gadget’s memory using a ZIP extension;
- log in to utilities;
- select the action install ROM from SD card;
- find the firmware archive and select this file;
- in the menu, select an item to install a new program and automatically reboot the gadget.
After confirming the action, the process of flashing the device starts.

How to flash Android via computer?
Firmware for an Android phone using a personal computer is done through a utility called Fastboot. It is suitable for most devices with rare exceptions.
Before performing the manipulation, you must gain access to the system kernel. In most cases, developers specifically block this access so that users cannot flash the device themselves. To remove the lock, you can use the Bootloader operating system loader. Such manipulation requires careful study of the instructions for working in the program.
Before you start flashing, you need to connect the gadget to your computer using a USB cable and enable device debugging. It is important to use a quality cable. If there is damage to the wire, the connection may be interrupted at any time and the procedure will have to be started again.
Brief instructions for installing ZIP firmware using Fastboot
- The ZIP archive with the initial firmware file is copied at the factory, and it is moved to the folder with ADB;
- The Fastboot utility is activated and the following values are entered in the corresponding line: fastbooflash zip file_name.zip.
After this, flashing of the device starts. After completing the process, it is recommended to restart the gadget.

Reflashing the system is an opportunity to upgrade the program to an improved version, as well as get rid of some problems in the system. You can perform the manipulation yourself if you follow some flashing rules. If the procedure is carried out incorrectly, the gadget can completely block access to any programs and applications. As a result, the user receives a useless piece of hardware. To prevent this from happening, it is recommended that you carefully study all the recommendations for flashing the device yourself. If we are talking about a Chinese device, then any such manipulations are unacceptable. In this case, it is recommended to contact a service center.
Reaches 80%. They attract buyers with their low cost, since Android is installed even on the most budget models, as well as the ability to customize everything to your taste and even change the firmware if desired. It is the latter that today’s material will be about. We will answer the question of how to flash a tablet without a computer via a flash drive.
Many users, some time after purchasing a gadget, think about a new model with more functionality.
Despite the fact that tablet manufacturers do not encourage independent flashing, in addition to the official possibility using a computer, craftsmen have developed several ways to do without it: through a custom recovery or using a special mobile application. Let's take a closer look at how to do it without a computer: let's find out what is needed for this, as well as the firmware process itself.
Preparatory stage
In order for the process of flashing your tablet to be successful, you need to stock up on the necessary files for this. What do you need to pre-load?
- Firmware. Surely this point does not need explanation. Usually, without a computer, you can only flash custom firmware, since the official ones are flashed through a computer. If you don’t know exactly what firmware you need, but are sure that the standard one doesn’t work the way you want, read specialized forums, for example, w3bsit3-dns.com or others, and pay attention to reviews from owners of the same tablet as yours. You can also check it out for your device. At worst, download and test several options in practice.
- Program for getting root. Without it, you simply will not be able to complete all the necessary steps, because at a certain stage significant intervention in the system is expected, which is only possible if you have superuser rights. The most popular application for obtaining root is KingRoot, which allows you to complete the procedure in just a few clicks. You can download the application at the bottom of the page.
- Custom recovery. Absolutely every device is equipped with a special recovery mode, with which you can reset settings, clear the cache and some other operations. But the default recoveries are quite limited in their capabilities, so custom ones have been developed. At the moment, the most popular are TWRP Recovery and CWM Recovery. The first has an interface tailored for use on a touch screen, and the second is very similar to the default one, only with a larger set of functions. Recently, there has been a tendency to prioritize the use of TWRP. You can download them either through special applications automatically, or manually on specialized sites. The main condition is compatibility with your tablet model.
- Application for installing recovery. The most popular are Flashify or ROM Manager. It is preferable to use the first one, since the program has a more intuitive interface and is also regularly updated.
To use all the software, move the files to the root of the memory card. Programs must have an APK extension, recovery - IMG, and firmware - ZIP.
The easiest way without a computer is to use a special utility for Android. The most popular and at the same time the most compatible program with most devices is KingRoot.
- At the very beginning, allow installation from unknown sources so that you can install the program not from the Play Store: Settings - Security and check the box for “Unknown sources”.
- Install the KingRoot program and run it.
- In the main program window, click the big blue button in the middle of the screen.
- Wait for the procedure to complete and reboot the device.
In rare cases, the program may be incompatible with your device model, so you will have to use another option, for example, Baidu Root or 360 Root, the principle of which is completely identical.

Installing third-party recovery
Having received root rights, you can begin installing custom recovery. Use one of the two most popular programs: Flashify or ROM Manager. Let's look at each of them in more detail.
Flashify

ROM Manager
Since the program is semi-Russian and has not been updated for several years, be careful what exactly you click, especially if you do not speak English.
- Install the program and run it.
- In the main menu, click Recovery Setup - Install or update Recovery and select the recovery you need.
- Next, the program will determine. If she did it correctly, confirm your choice and click on the recovery installation button. The download will begin immediately. With a stable and fast connection, the file will be downloaded in a few seconds.
- Grant the utility superuser rights so that it can complete the installation. After a few seconds, you will see a success notification.
Having prepared everything, it’s time to move directly to the firmware of the device. Let's consider the procedure using several types of recovery.

Firmware via CWM Recovery
We would like to immediately draw your attention to the fact that moving between items is done by pressing the volume buttons, and selection is done by pressing the power button.
- Put the device into recovery mode. To do this, you need to hold down a certain combination of tablet buttons. They may differ depending on the model:
- volume up + power button;
- Volume down + power button;
- one of the volume buttons + power button + mechanical Home button;
- both volume buttons + power button.
- First of all, perform a complete reset of the tablet. To do this, go to wipe data/factory reset - Yes – Wipe all user data, then return to the main menu.
- Go to install zip - choose zip from /sdcard and select the firmware file previously saved to the memory card. Confirm the request with the Yes – Install command.
- After the firmware process is completed, return to the main menu and reboot the tablet using the reboot system now command.
Attention! The first switching on will take quite a long time.
Firmware via TWRP Recovery
In this recovery, selecting items is done by clicking on the screen, and confirming operations is done by swiping at the bottom of the screen.
- Go to recovery mode (see previous point).
- Go to Cleaning - Advanced and check all the boxes except the memory card. Swipe the bar at the bottom of the screen to delete all data recorded on your tablet. After this, do not try to reboot, as nothing will work, since you simply deleted the system.
- Click on the button in the form of a house to go to the main Recovery menu.
- Click "Install" to go to the firmware file selection menu. Since the necessary data is stored on the memory card, click on the “Memory Selection” button, find the firmware file, click on it and confirm the operation by swiping at the bottom of the screen.
- At the end of the process, you will see a notification indicating its successful completion. After that, click the “Reboot” button. Please note that the first system startup may take up to 10 minutes.
 A backup made in time can save your nerves and save you from unnecessary headaches if you “messed up” the system when installing the firmware
 or other operation.
Firmware via ROM Manager
With this application, your interaction with recovery mode is minimized, since you mainly work through a convenient graphical interface. At the right time, you will only need to confirm the start of the recovery mode to continue the procedure. Since all the preparatory work has been completed, you can proceed with the firmware.
The desire to change the firmware on the tablet can be caused either by the fact that something is wrong with the tablet, it freezes, glitches or turns off involuntarily, or by the fact that there is a desire to install a newer version to improve the efficiency of the device itself. Now on the Internet and on official websites you can find official factory firmware (or stock) or custom (or modified).
If the tablet does not work correctly, then this may be a problem both in the hardware and software of the device; for this we recommend installing a new firmware version.
What are the benefits
when installing a new version of the software, you can get new functions for your device;
a more recent version ensures more correct operation of the tablet;
When a new version is released, all errors from the previous version are taken into account and removed;
The tablet, depending on the version, may become more functional.
Before you start flashing your tablet at home, you need to follow a few recommendations:
make sure that your device is fully charged and there is enough battery power until all updates, drivers, etc. are installed;
completely disable the antivirus, as it may begin to block the installation of new software and perceive it as a virus;
save all the data you need, since after installation they will all be deleted.
Stages of tablet firmware:
1. Connect the tablet via the UBS port to the computer and wait until it recognizes it;
2. On the official website (or through an Internet search engine) finds the necessary new software and all the drivers for your device, install the program on your computer. Let's launch it.
3. After the window with all the data opens, you must select “Firmware Update” and click on it.
4. Afterwards a window with the rules appears, we agree with them and confirm the desire to reflash the tablet.
6. After all updates are installed, confirm its completion.
There are several ways to install a new version of the software on your tablet:
via computer;
from ZIP archives via CWM or TWRP Recovery;
using the ROM Manager application (from a flash drive).
The last option will allow you to reflash your tablet faster and better.
When all the updates are installed, the tablet is running, check if everything is working correctly. If any difficulties arise, it is best to take your device to service center, where our technicians will help you professionally solve the problem, since partial or poor installation can lead to complete failure of your device.
For each smartphone or tablet, there are both official and custom firmware. Their installation is carried out in different ways: OTA updates come over the air, firmware in ZIP archives are installed manually via CWM, TWRP Recovery or the ROM Manager application, using a computer, you can flash Android using the Fastboot and SP Flash Tool utilities.
After updating Android firmware, all data from the internal memory will be erased, so to save contacts, settings and applications, first.
Android firmware via Recovery
Unofficial firmware in ZIP format, such as CyanogenMod, can be installed through custom Recovery: CWM or TWRP, as well as applications that use Recovery, for example, ROM Manager. Cores and patches are sewn in the same way. To download the official “Update.zip”, the capabilities of the standard recovery mode are enough, for more details, see the article at the link above.
Install the ZIP file in CWM
All devices out of the box have stock Recovery from the manufacturer; instead, you need to install CWM using . Then find and download the ZIP archive with the firmware. Please note that firmware of other formats cannot be installed via CWM.
1. Now go to Recovery. To do this, turn off the device and press a certain combination of buttons. Depending on the manufacturer, the key combination differs; below are all possible options (the new one says how to enter Recovery on specific models):
- Volume up + power button
- Volume down + power button
- Volume up/down + power button + “Home”
- Volume up + volume down + power button
Great, you are in Recovery. Movement is carried out using the volume buttons, and confirmation of the choice is done with the power button.
2. Before installing the firmware, you must first reset the settings: select “wipe data/factory reset”.


4. Great! Return to the main menu and select "install zip".

5. After that “Choose zip from /sdcard”.

6. Navigate to the folder where you saved the firmware and select it.

7. A confirmation message will appear. Click “Yes – Install...”.

8. The firmware installation process will go through and at the end the message “Install from sdcard complete” will appear at the bottom of the screen.
Great, Android is flashed. We return to the main menu of CWM Recovery and reboot the system. To do this, select “reboot system now”.

How to install firmware via TWRP Recovery
If you prefer TWRP Recovery rather than CWM, flash it using . You can also install firmware from a ZIP archive through it:
1. Download the firmware and place it in any convenient location in your smartphone’s memory.
2. Go to TWRP. This is done in the same way as CWM.
3. Now you need to reset the system. To do this, select "Wipe" from the main menu.

4. To initiate a factory reset, drag the slider to the right.

5. When you finish cleaning your smartphone or tablet, press the “Back” button.

6. You will be returned to the main TWRP Recovery menu. Now let's move directly to the firmware itself. To do this, select “Install”.

7. Navigate to the location in memory where the firmware is saved. Click on it.

8. Drag the slider to the right to begin installing the firmware.

9. The process will begin. It usually lasts 2-3 minutes.

10. At the end, a message indicating the successful completion of the firmware will appear. Click on "Reboot System" to boot into Android.

Considered another way to flash Android using a ZIP update. You can also use a special application. More on this below.
Using ROM Manager
The ROM Manager application allows . By the way, I advise you to make a backup of the internal memory before flashing the firmware in order to restore the data later. Now we will use another function of the program: flashing the phone using ROM Manager.
To operate the utility you need root rights - they are obtained using exploits: , or .
Custom Recovery must be installed (essentially, using ROM Manager you flash the device through it, but at the same time you work with a simple and clear application interface, not Recovery). Links to instructions are in the previous paragraphs.
So, install ROM Manager, find and download the required firmware for your device. Open the application and follow the instructions:
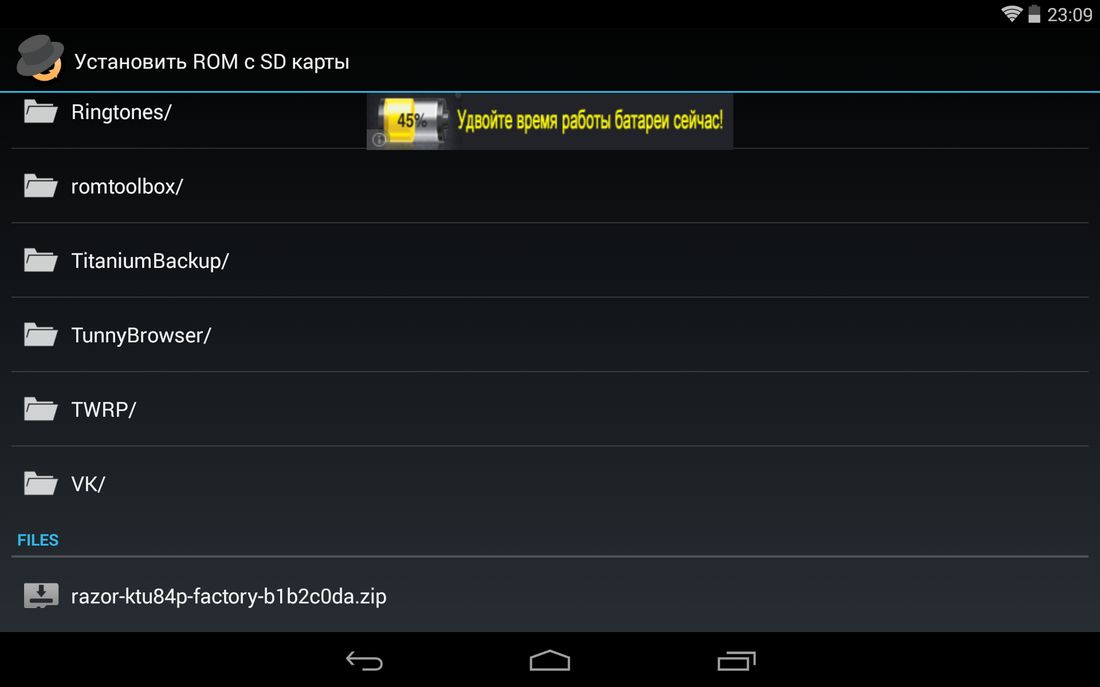
1. Place the .zip archive of the firmware in the memory of your Android phone or tablet.
2. In the ROM Manager menu, open the “Install ROM from SD card” item.
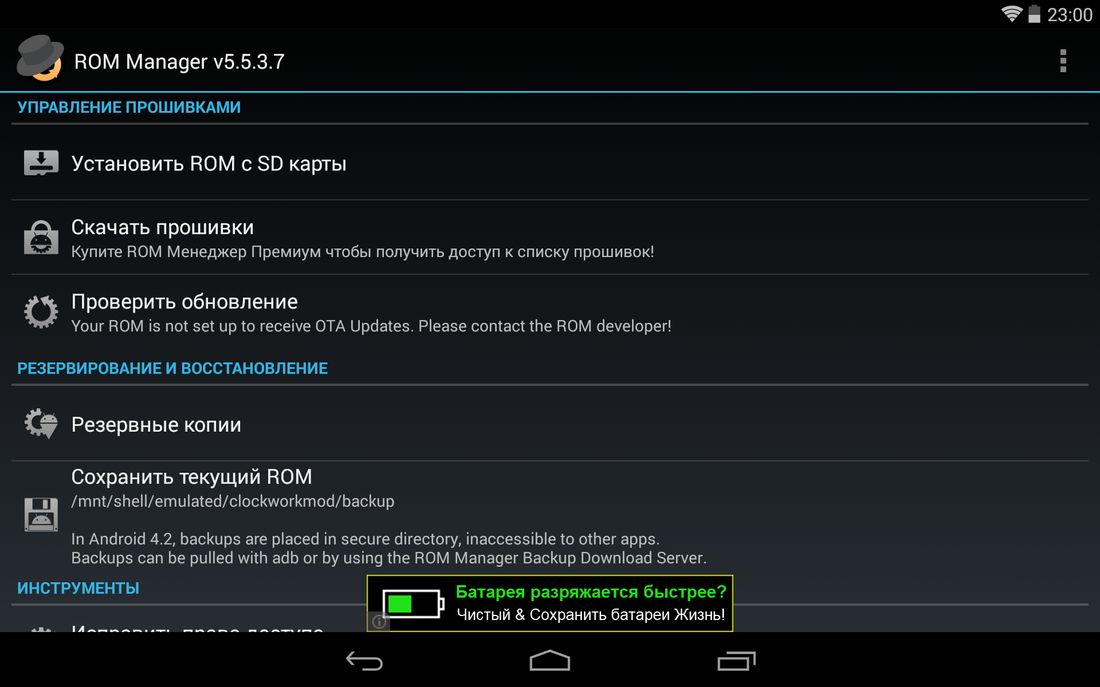
3. Find the archive and click on it.
4. In the menu that opens, select “Reboot and Install”. I advise you to check the box next to “Save current ROM” so that you can restore the system if necessary.

5. In the next window, click “OK”, after which the device will boot into Recovery mode and the firmware process will begin.

ROM Manager also has a function to search for ROMs for a device. In the main menu of the program, select “Download firmware”. Some of them are only available in the premium version of the program.

Above, I talked about three ways to install firmware from ZIP archives on the device itself. Next will be information about updating Android firmware using a PC.
How to flash Android via computer
Many mobile devices are flashed using special PC utilities: below are instructions for working with Fastboot and SP Flash Tool. Through the second program various manipulations with Chinese phones are performed based on Mediatek processors.
Fastboot: instructions for flashing phone firmware
Many firmwares must be installed from a computer using the Fastboot utility, rebooting the mobile device into the mode of the same name. The program is included in the Android SDK Platform Tools, the installation of which is described in. In addition, you will need drivers (all information is available at the link).
Also, on devices from some manufacturers, you must first unlock the Bootloader:
- How to do it on HTC:
Next, download the archive with the required firmware and unzip it in the “platform-tools” folder, which contains “ADB” and “fastboot”. It should turn out something like this (I have the necessary components in a separate “adb” folder).

Then we connect Android to the computer via USB and put the smartphone or tablet into fastboot mode. The easiest way to do this is as follows:
- Turn on
- On the computer go to the command line
- We enter the commands sequentially and after each press “Enter”:
CD path to the "adb" file
For example, it is located in "C:\Program Files (x86)\Android\android-sdk\platform-tools". Then the path will look like this:
cd Program Files (x86)\Android\android-sdk\platform-tools

Then the Android gadget will reboot into fastboot mode.

Before flashing any partition of the system, you first need to format it so that there are no problems with operation. To do this, use the commands (after entering each one, press “Enter”):
fastboot erase boot
fastboot erase userdata
fastboot erase system
fastboot erase recovery
fastboot erase cache
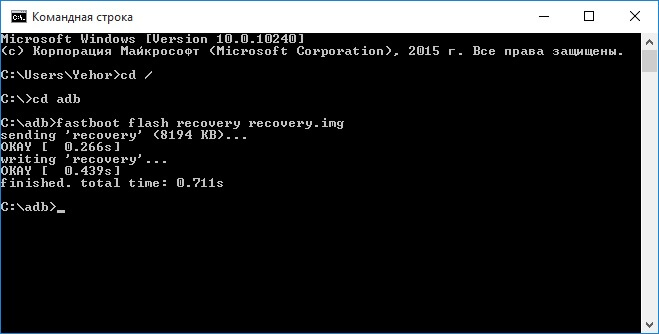
After cleaning the partitions, you can flash them. Enter the commands (there may be more of them - it all depends on the presence of certain files in a particular firmware; below is a set of basic ones):
fastboot flash boot imya-fayla.img
fastboot flash userdata imya-fayla.img
fastboot flash system imya-fayla.img
fastboot flash recovery imya-fayla.img
fastboot flash cache imya-fayla.img
“Imya-fayla.img” is the name of the corresponding firmware file. For example, since in my case Recovery is being created and its image is called “recovery.img”, I enter:
fastboot flash recovery recovery.img
Usually the firmware can be installed in its entirety, that is, flashing all the files at once. To do this, “flash-all.bat” must be located in the folder with the firmware files. If it is, then simply enter this command and the firmware installation process will begin:

As a result, at the end a message indicating the successful completion of the firmware will appear.

You can boot the system. To do this, you need to exit fastboot mode on the device itself or using a computer. In the second case, you need to enter another command:
Installing ZIP updates in Fastboot
Using Fastboot you can install ZIP firmware. To do this, download and place the firmware in the folder where “ADB” is located. Put your smartphone or tablet into fastboot mode and enter the command:
fastboot flash zip imya-fayla.zip
“Imya-fayla.zip” is the name of your firmware, replace it with your own.
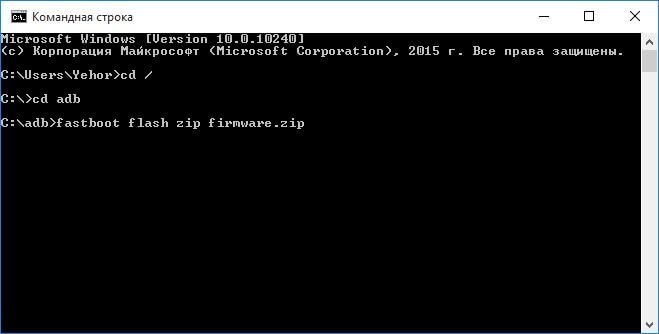
Wait for Android installation to complete and reboot your device.
SP Flash Tool: flashing Chinese Android smartphones on MTK
Chinese smartphones Fly, Lenovo, Xiaomi, Meizu, ZTE, Doogee, Bluboo, UMI, Elephone, Oukitel, Blackview and others running on MTK processors are flashed with a special SP Flash Tool utility. She can sew individual partitions, format the system and create backup copies. Models based on MT6572, MT6577, MT6580, MT6582, MT6589, MT6592, MT6750, MT6737, Helio P10, Helio P20, Helio X10, Helio X20 and other less popular chips are supported.
The current version of the program is available on the website: http://spflashtool.com/. Before starting the process, install USB drivers for the MTK processor (the link to the FAQ is in the “Fastboot” paragraph of this manual).
1. Unzip the SP Flash Tool folder on the “C:\” drive and place the firmware next to it. The path to the files must not contain Cyrillic characters.
2. The folder contains the file “flash_tool”. Launch it.

3. In the “Download-agent” field the path to “MTK_AllInOne_DA.bin” will already be indicated. Next, you need to click “Scatter-loading” and select the scatter file in the folder with the firmware.


4. Leave the switch on “Download Only” and mark which partitions need to be flashed (by default, all are selected).

5. Click “Download”. Then turn off the phone, remove the battery for a few seconds, insert it back and connect the turned off Android smartphone to the computer via USB.

6. First the red bar “Download DA 100%” will appear.

7. Then yellow with the firmware process. The percentages indicate how close the installation is to completion.
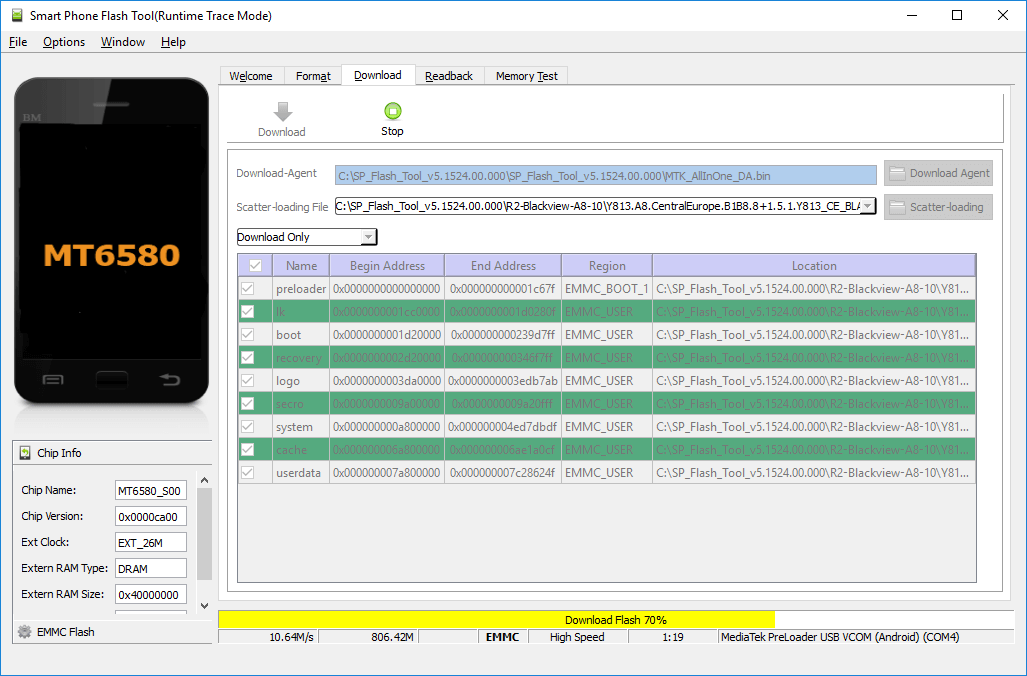
8. SP Flash Tool will notify you that the firmware of the mobile device has been completed - the “Download Ok” window will open with a checkmark.

Turn on your phone. The first launch usually lasts quite a long time.
Flashers for Samsung and LG
Devices from some manufacturers need to be flashed using special proprietary utilities (flashers). There are instructions on this topic on our website:
- Samsung -