Working with audio tracks in the MKV container. VLC video player
The dubbing process involves extracting an existing audio track from a video clip, then removing it and replacing it with your own. This can be done different ways. Some methods are used to replace background music or sounds to add new sounds. Many YouTube videos use dubbing to add a new voice track to an existing video sequence, such as commercials. Some musicians use re-recording in a different way; they replace poor quality live sound with better quality or a different version of the sound.
The rewriting process is quite easy to do in the program, but it can become more complicated depending on how well you need to do the work.
Removing and replacing audio in iMovie
First you need to remove the old one soundtrack in a video clip, for this you need to create a project and drag your video clip into it, which already includes an audio track. In the iMovie app on your Mac, create a new project by clicking the + icon on the right top corner. After that, in your Project Library, find the folder containing the video you want to use or search your Media Library. Find the video clip, then drag it into the iMovie timeline tab.

Now select this clip, and then from the menu bar, select the "Edit" command. Click on "Detach Audio" from this menu. (Alternatively, you can simply right-click on the clip and select this command there, as in the screenshot.) Note that iMovie has split this clip into two independent files: audio and video, so you can freely edit and manipulate them separately.
After this, you can very simply delete the original audio track and drag your own there. Click on the audio track in iMovie and then Delete on your keyboard. You can then use the iMovie audio library to drag and drop a new one there. sound file or import your own file from Finder.

Drag the new audio file into the bottom pane below the video clip and make sure it's aligned properly to avoid any pauses. Play the entire segment in iMovie and you now have a new video segment with a new audio track.
Combination of newaudiotracks with the previous audio trackin iMovie
This tactic is used for a variety of needs. Combining a new audio track with a previous one is not just a matter of dragging and dropping a new audio track. Correctly combining two audio files will help achieve correct sound all audio tracks and maintain the unity and continuity of sound.
For example, you recorded a video clip of yourself singing a song. Overall everything sounds good, except for a small fragment. So you recorded another take, in which you corrected all the mistakes that occurred in the first take. Using the replacement process, you insert into a video clip only that part of the audio track that exactly matches the poor quality fragment, and now the entire audio track sounds great. Thus, you have corrected all your mistakes in the sound design of the video clip.
The alignment process requires specific, proper alignment of both audio tracks plus proper alignment with the video footage so that your mouth movements line up correctly with the audio track.
As in previous method, first drag your video clip into the new project, and then click right button mouse on the timeline, select the audio track.
 Note the two parallel audio tracks for one video.
Now, instead of deleting the audio track, you need to save it. Then you need to find either another video clip with audio or just a separate audio file that you need to use in the first video. Most likely, both tracks will be the same in duration, but with slight variations in sound design. If you drag a full video clip onto the timeline, you must first select the audio track in it, and then delete the video component. If it's just audio, all you have to do is drag the audio file onto the timeline.
Place the new audio track under the old audio track. Pay attention to the similarity of sound wave vibrations, so you know exactly where and how to place a new audio clip. Both audio clips should match each other as closely as possible and have only minimal differences.

Determine where you want the first audio track to stop and where you want the second audio track to start playing. Next, you need to split both clips at the same point in the timeline. Do this by holding down Shift key and selecting both audio tracks, and then position the cursor at the split point. Click the Edit button on the menu bar and select the Split Clip button. (Or press Command+B).
Define the second split point on the timeline in the same way. You may need to play the audio track several times to determine the time interval we want to replace. Choose the separation area on the track where it is easiest to mix the audio tracks, that is, the junctions should be in the area of the minimum sound level. Now, you should have two audio files, each with two timeline dividers.

Delete the highlighted time slot on the top audio track, and then drag the highlighted time slot on the second audio track from the bottom file to the top audio file. For achievement best results It is necessary to combine the audio tracks as accurately as possible.

You may need to change sound settings and adjust audio clips to get them to sound right, so listen to them several times. After reaching desired effect, you can remove any unnecessary audio from the second audio track.
The era of silent films is irrevocably a thing of the past. Therefore, if you want to make your own film, then pay special attention to the sound: it is important to ensure that during recording not only there are no extraneous noise, but all the lines spoken in the frame were clearly audible. Ideally, the sound should be written in separate device, and only then mix it with the video sequence. “VideoMONTAZH” is capable of combining these two components. From the article you will learn how to add an audio track to a movie using this application.
Step 1. Install the program
First of all, you need to download the software and install it on your computer. This procedure will not take much time, since the installer weighs only about 80 megabytes. When the download is complete, double click launch the distribution package and follow the instructions of the “Installation Wizard” that will appear on your monitor screen. Check out license agreement, select the installation folder and create a shortcut on your desktop - “Video Montage” is ready to go!
Step 2: Add Materials
Launch the editor and start menu click on the option « New project» . The program will offer to set the aspect ratio of the future video. You can choose one of the ready-made options, enter the required parameters manually, or instruct “VideoMONTAZH” to automatically set the proportions, focusing on the first uploaded video.
Using the menu on the left side, find the folder with the movie in which you want to embed voice acting. Drag the video you want to the timeline or select it in the list and click "Add". Please note that you can add an unlimited number of files to a project. This is useful if you need to glue several rollers into one.
Step 3: Embed an Audio Track
Now you can add an audio track to the movie: to do this, go to the tab "Music". Click on the button "Add background music» > “Select file”. Find the audio file on your computer that you want to embed in the video. Need to download multiple audio tracks at once? If they are in the same folder, press and hold CTRL key, select the files and click “Open”. When adding an extra track to the list, click on it with the mouse, and then on the button "Delete music".

Next, adjust the volume of the audio track. On the scale of the same name, pull the slider to the left if you want to mute the sound, to the right if you plan to make it louder. Of course, don’t forget to uncheck the box “Add music to the original audio of the video”, if you want to completely remove the audio track that was originally embedded in the video.

Improve your movie quality
You can stop working at the third step and immediately start saving the movie, or continue working with the program and improve the quality of the video. This will be useful, for example, if you want to make a film at home according to your own script.
Most of the tools for improving video are collected under the button "Edit". Here you can trim bad scenes, add unusual effects on top of the video, improve the quality of the video manually, and also adjust the playback speed, add text and logos. If your project consists of several videos, be sure to look at the tab "Transitions" and select animation for the joints.

Save the results in a convenient form!
Now you can embed an audio track into any video file! The edited film can be burned directly into the program onto a DVD with a beautiful interactive menu, which you can completely design to your liking. It also allows you to export the processed file in any modern video format, adapt it for viewing with mobile devices and televisions, as well as for uploading to the Internet. Download “VideoMONTAGE” right now and that’s it necessary tools for working with video will always be at your fingertips!
As you know, files with the extension mkv is a special multimedia container for storing videos, audio tracks and subtitles. She is Matryoshka. Below we will describe how to properly work with audio tracks.
There is often a situation when a container contains several audio tracks and subtitles, and some of them are not needed. For example, roads with an unfamiliar language or several Russian ones. Or another option, when the sound track has the format dts, which is not always reproduced by hardware players. It can be recoded to ac3.
I will describe the most optimal, in my opinion, actions for performing these tasks.
You only need two programs.
First - Mkvtoolnix for working with mkv containers.
Second - Xilisoft Video Converter Ultimate. Beyond Coding dts V ac3 has many other useful features.
For example, let's take the once popular film "Slum Saints".
Let's launch mkvmerge GUI from the kit Mkvtoolnix
We select a movie and get something like this:

In addition to the video itself and subtitles, the container contains four more roads. English, two Russians and a road by Goblin. This is exactly what is needed. Uncheck unnecessary elements, select the final path and name of the reassembled container and click Start muxing.

After mixing is complete, the new container looks like this. Video and one audio track.

Now it can be recoded into ac3.
Let's launch Xilisoft Video Converter Ultimate. Add a file, select in the Profiles tab ac3 and a path to save. Also on the right side of the program you can change the settings for the encoded track.
Click the red button at the top and wait.

It turned out separate track ac3. Now you need to replace the track with the extension with it dts. To do this, open mkvmerge GUI again, select the file mkv with one track dts and use the add button to add a track ac3, while from the track dts Accordingly, uncheck the box.


You may ask why all this was needed?
The original file with all tracks weighed 6.56 GB, the final one 3.78 GB. In addition to the fact that it takes up less space, it can be relatively faster copied to a flash drive and watched from a device that does not support audio in the format dts(for example, SAMSUNG TVs of the sixth series of 2009, which even new firmware didn't help me learn to read dts).
It is not recommended to use mkvmerge versions higher than 4.0.0. This is especially true for owners Samsung TVs 2009 release. (2009 is the letter "B" in the model name. For example LE37 B*****) Most rebuilt containers refuse to run on the built-in player of the above-described TVs.
UPDATE2:
How can I extract subtitles or audio track separately? It's simple. For this you will need a program MKVExtractGUI. It must be placed in a folder with Mkvtoolnix.
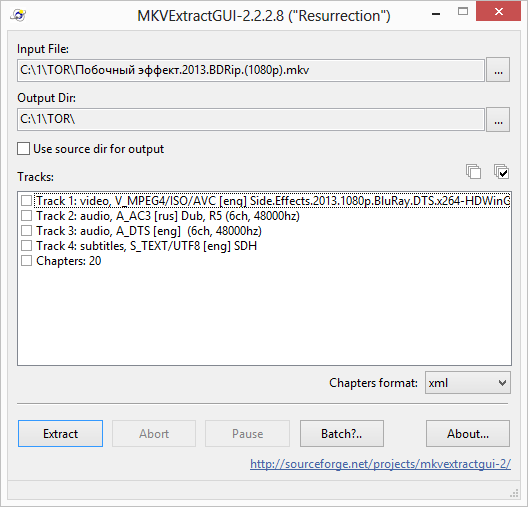
Everything here is intuitive: select a file, an output folder, and check the boxes for the files needed to be extracted from the container.
Many video files on the Internet are distributed with additional audio tracks that allow you to watch the desired movie on different languages. These audio tracks are usually in AC3 format and can be connected using standard features some video playback programs.
Instructions
Additional audio tracks are often used to watch movies. Typically, an audio file is a track with a translation of a film into a specific language. By installing it in a video, you can get a foreign version for language learning.
Where can I find audio for a film?
To search for additional film soundtracks in the format MP3, WAV Just use any search engine. There are many sites from which you can download files of subtitles, foreign and original dubbing in single-voice or multi-voice format.
Replacing an audio track in VLC
After searching and downloading the desired audio file, you should decide on how to add a third-party track to the video. This problem can be solved without using additional installation software. It is enough to use the VLC player.
VLC is free software for working with video and music. Let's look at an example of how to add an audio track in VLC:
- Open the video in the player;
Please note that there are no track format requirements. You can use any extension, it will be easily read by the application and added to the main video content. After turning off the document, the audio is not saved and you will hear the original version of the translation in another player.
- Expand the menu tab " Audio»-« Audio track»;
- The drop-down list will display only the track that was originally " sewn in" to a file, in our case " Track 1" Turn it off;

- Go to menu " Media" and select "Open file". In a new window, add a video file through Explorer;
- Press the " Additional» parameters and check the box to activate parallel media playback;
- You can add a file using the " Review».
To exit the menu " Source" Press " Play" Also, you can configure at what point in the film to start playing a third-party track.

To connect another audio track you just created in VLC, click on the “ tab Audio" and select the object " Track 2».
Video instruction