HDD testing. Programs for checking errors and bad sectors on a hard drive
Regardless of your operating system (Windows XP, Windows 7, Windows 8), go to Computer (My Computer, This Computer), right-click on the drive you want to check, select " Properties".
In the properties window, go to the " tab Service" and click the " button Run check".

Check both boxes
Automatically fix system errors.
Scan and repair system sectors.
and press " Launch".

If you check the system volume (the disk on which the operating system is installed, usually drive C), you will see the message " Windows cannot verify the hard drive that is currently in use", click " Disk check schedule".

Then restart your computer/laptop; during boot, the process of checking and correcting errors on the disk will begin. It will last from several minutes to an hour (depending on the size of the partition and the physical characteristics of the hard drive). When finished, the operating system will boot.

Checking the hard drive using the chkdsk utility.
CHKDSK (short for check disk - disk check) is a standard application in the DOS and Microsoft Windows operating systems that checks a hard drive or floppy disk for file system errors (for example, the same sector is marked as belonging to two different files). CHKDSK can also fix file system errors it finds. (from Wikipedia)
In order to run the chkdsk utility, you need to run a command prompt with administrator rights, to do this:
IN Windows XP click - "Command line"
IN Windows 7 click "Start" - "All Programs" - "Accessories" "Command line" and select "Run as administrator".
IN Windows 8.1 right click on "Start" - "Command Prompt (Administrator)".
As a result, a command line console will open.
First of all, let's find out the syntax of the chkdsk utility:
CHKDSK [volume[[path]filename]] ]
Volume Specifies the mount point, volume name, or drive letter of the drive being checked, followed by a colon.
file name Files checked for fragmentation (FAT/FAT32 only).
/F Correcting disk errors.
/V For FAT/FAT32: output the full path and name of each file on the disk. For NTFS: display cleanup messages (if any).
/R Search for bad sectors and restore surviving contents (requires /F).
/L:size For NTFS only: Set the log file size (in KB). If a size is not specified, the current size value is displayed.
/X Pre-dismount the volume (if necessary). All open handles to this volume will be invalidated (requires /F).
/I NTFS only: Less strict checking of index entries.
/C NTFS only: skip checking for loops within folder structures.
/B NTFS only: Re-evaluate bad clusters on disk (requires /R)
The /I or /C options reduce Chkdsk execution time by skipping some volume checks.
Of all the command attributes, the two most often used to check a disk for errors are /f and /r. The final command looks like this:
chkdsk C:/F/R
With this command we will check partition C, correct errors on the disk and restore information from damaged sectors (if any).
After entering this command, you will be prompted to check the volume the next time the system reboots, click Y and a key Enter.

Now you need to reboot the system, when loading you will see a window prompting a check, do not click anything, just wait 10 seconds.

Checking for hard drive errors using Victoria.
The Victoria program is designed to check for errors on hard drives with IDE and Serial ATA interfaces. The program is a completely ready-made solution for a comprehensive, in-depth, and at the same time, the fastest possible assessment of the real technical condition of the HDD.
First of all, download the ISO image of the program from official website . Unzip the downloaded archive and burn it to a CD/DVD, as described in the article How to burn to CD/DVD . After this, boot from the burned disk, how to do this is described step by step in the article How to boot from a CD/DVD disk or USB flash drive .
After booting from the disk within 10 seconds, select the program for your device (Victoria for the computer will load by default).

The program interface will launch. Press the F2 key so that the program itself finds the disk; if this does not happen, you must do it manually. To do this, press the "P" key. The same will have to be done if the system has several hard drives and you need to select one of them. If you have hard drives with a SATA interface, then in the Select HDD port menu that appears, select - " Ext. PCI ATA/SATA". Move using the cursor keys "up", "down", and select using the "Enter" key.


Next, to check the disk surface, press the F4 key. In the HDD scan menu window: select the necessary scan parameters. By default, it is proposed to scan the entire disk from the beginning of "Start LBA: 0" to the end of "End LBA: 20971520". I recommend leaving these default values. The next menu item – I recommend leaving “Linear reading”, since it is intended for the fastest and most accurate diagnosis of the surface condition. In the fourth point, I recommend choosing the mode BB = Advanced REMAP since this mode checks the disk most efficiently and corrects errors on it without deleting information.

After this, a check for hard disk errors will start and bad areas will be corrected. This procedure can take from several tens of minutes to several hours. Depends on the volume and spindle speed.

When finished, remove the disc from the drive and restart the computer.
Video of checking a hard drive using the Victoria utility. Error elimination - DRSC+DRDY is missing or the screw does not remove BUSY
Hard disk (HDD) is the most important element of a computer on which all the necessary information, programs and user files are stored. Like any other component, over time the hard drive wears out, its normal operation is disrupted, and failures begin to occur. Along with physical wear and tear, which leads to the appearance of so-called bad sectors (bad blocks), logical errors associated with the file system, indexes and the main file table often arise.
For the time being, you may not observe any problems with your hard drive, but this does not guarantee that one day the hard drive will not die. Therefore, it is important to periodically (once or twice a year) check your hard drive for errors and bad sectors that require repair. Regular monitoring will allow you to track the condition of the media and respond in a timely manner to changes in its condition. Of course, you should not neglect such a proven method of protecting information as backup. The most valuable data must be duplicated on a backup storage device.
Symptoms of a failing hard drive
In most cases, HDDs operate smoothly for several years without requiring special attention. However, in case of improper operation (physical impact, lack of proper cooling), the resource of the storage medium is significantly reduced. In rare situations, there may be a manufacturing defect or sudden failure.
Failures in the hard drive may be indicated by loading the operating system for too long, the unreasonable disappearance of files and folders, and slow startup of applications. Obvious symptoms of a hard drive losing its functionality are slowdowns in programs and long periods of copying files. If the computer constantly freezes, and nothing other than restarting helps, then in the process of identifying the causes, checking the hard drive should be the first point.
Using standard Windows 7/10 tools
You can test the media using standard Windows tools. The easiest way is to select the desired hard drive in Explorer, right-click on it and go to the “Service” tab.
Next, click the “Run scan” button and set the scan parameters in the window that opens. If both checkboxes are checked, Windows will automatically correct all system errors and restore damaged sectors during diagnostics.

The results of the audit can be found in the report.

Command line
You can also audit your hard drive using the utility chkdsk called from the command line. In fact, such a check will not differ much from the above option.
So, launch the command line by selecting the required Start menu item. Then enter the command in the window: chkdsk G: /f /r
- G – name of the hard drive being tested (select the drive you will check);
- f – error checking and correction;
- r – detection and recovery of bad sectors.

All information about errors and bad sectors found will be displayed as the diagnostics are carried out.

Third-party programs for checking your hard drive
There are many programs and utilities for finding bad sectors and fixing HDD errors. We will list only the most famous ones.
Victoria
Perhaps the most popular hard drive checking tool. The program can be launched both in Windows and in DOS mode from a bootable USB flash drive.
The interface provides five tabs: Standard, SMART, Tests, Advanced and Setup. First of all, go to the section Standard, where in the list of devices we select the hard drive we are interested in. The Drive passport area will display basic information about the HDD.

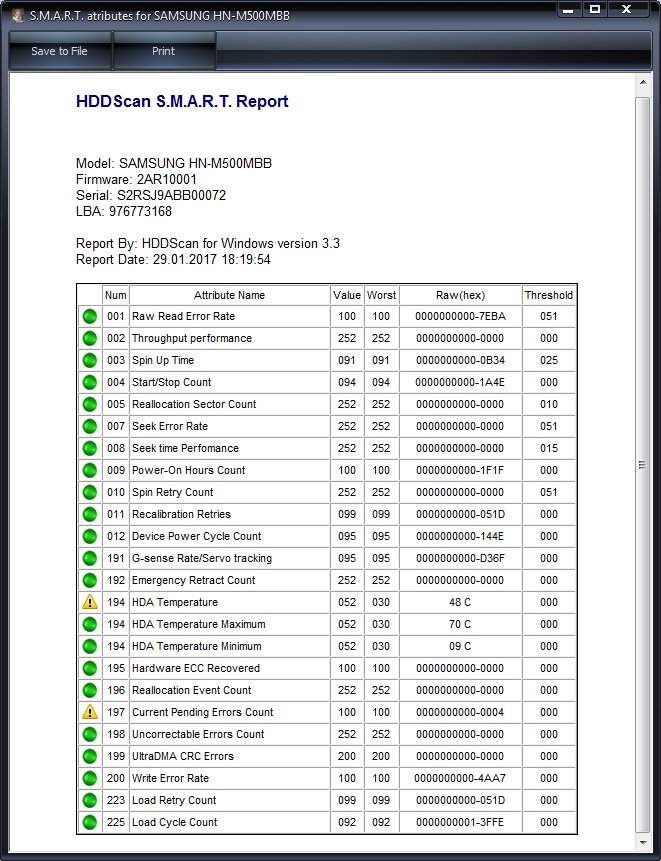
Next, select the tab SMART and press the “Get SMART” button. SMART (Self-Monitoring, Analisys and Reporting Technology) is a hard drive self-monitoring technology. Those. The hard drive monitors its operation during operation, recording information on a set of parameters that allows one to assess the condition of the media. It is this service information that we are trying to obtain.
After clicking “Get SMART”, either the inscription GOOD on a green background or the inscription BAD! will appear to the right of the button. on red. The second option will indicate that the media is in unsatisfactory condition and will most likely have to be replaced. For a more detailed study of SMART statistics, let's pay attention to the list of parameters on the left. Here we are primarily interested in the attribute 5 Reallocated sector count, indicating the number of sectors remapped. If there are too many of them, then the disk has begun to “crumble,” that is, its surface is rapidly degrading and it is urgent to make a copy of all data. In this case, there is no point in restoring the hard drive.

Chapter Tests makes it possible to check the hard drive for bad sectors, as well as try to “cure” or reassign unreadable blocks. For simple testing of the hard drive, set the switch to Ignore and start the test with the Start button. Sector health is assessed by measuring response time. The smaller it is, the better. Each response time range has its own color code. The slowest blocks are marked in green, orange and red. Sectors that could not be read at all are marked in blue. If there are a large number of “slow” and unreadable blocks, the hard drive should be replaced.

The Victoria program allows you to restore bad sectors, but we will not consider all the nuances of the procedure. Moreover, “treatment” often contributes only to a slight extension of the service life of the storage medium. To reassign bad blocks, perform a check with the mode enabled Remap. If the restoration was successful, do not rush to rejoice. Re-diagnostics of the disk after a certain period of operation. The appearance of new bad blocks will indicate that the degradation of the hard drive is irreversible, and it’s time to find a replacement.
HDDScan
This is another handy program for identifying hard drive problems. After launching the application, select the drive that needs to be checked in the Select Drive list.

Below we click on the “S.M.A.R.T.” button and get acquainted with the provided report.
Now let's diagnose the disk surface. Click on the round button to the right of the drop-down list of media and select Surface Tests in the menu that opens.


Click on the Add Test button, thereby adding a test to the list and starting its execution.
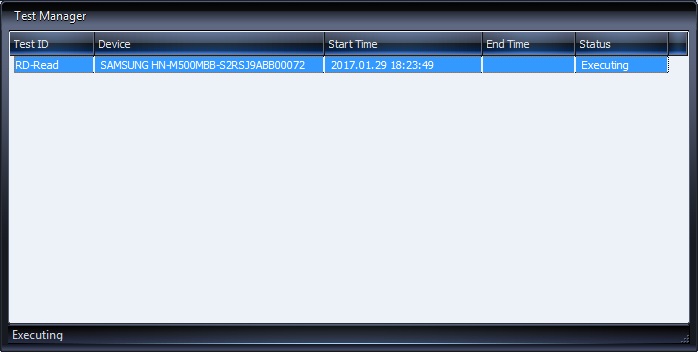
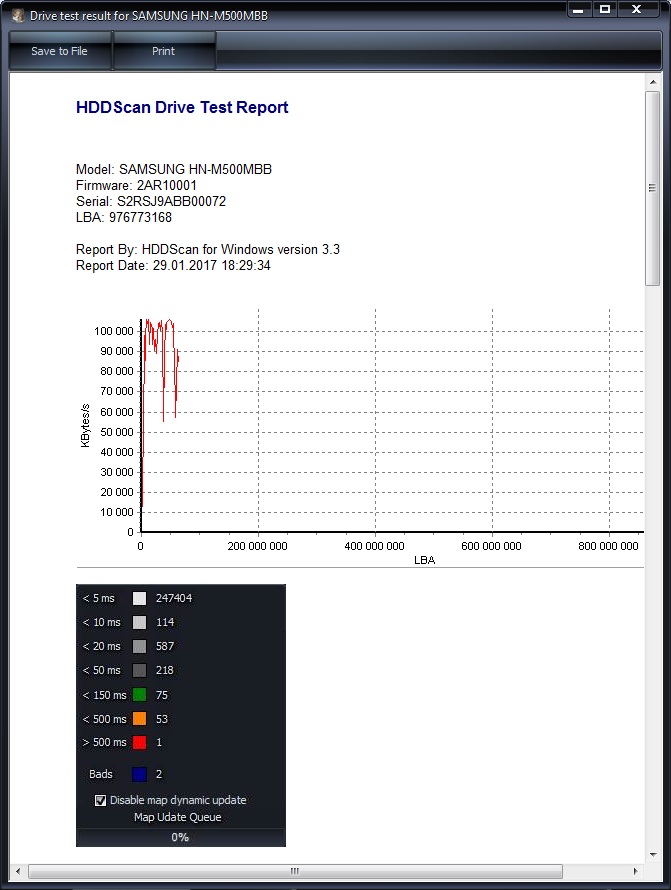
You can receive information about the progress of testing in Graph, Map, and Report modes. All blocks are also distributed into groups with appropriate color marking depending on access time.


At the end, a final report is generated.
Perhaps this is all we wanted to tell you about the methods of checking a computer’s hard drive for functionality. We hope the information provided will be useful to you and help you save important data.
Perhaps the most important component of a PC is the hard drive (HDD), since it contains all the information created by the user. Of course, any HDD needs timely maintenance, namely checking for errors and bad sectors, in order to avoid the loss of important information.
 A “bad sector” is an unreadable sector on a hard drive. It can be natural: the factory state of some sectors of any hard drive, an inevitable manufacturing defect, or acquired - a successful power failure, a shock, a leak. Few people are interested in the appearance of bad sectors one by one; this is a routine that SMART successfully grinds up.
The emergence of interest in bad sectors is usually associated with the fact that you have a partially or completely unreadable disk. From this point of view, the classification is simple:
- Broken sectors are permanent, for example, those associated with surface damage - something that cannot be restored.
- Broken sectors are temporary, associated with non-fatal errors in logic, which is what you can try to pull out; strictly speaking, the question of the operability of the restored sectors remains open.
The number of bad sectors on the disk can be:
- Constant within normal limits (live hdd). No action required.
- Constantly above normal (usually the consequences of a blow). Sometimes it can be done with manual intervention.
- Growing (crumbled due to age or design). Requires urgent replacement of the hard drive.
Reasons for the appearance of a bad HDD sector
To put it simply, the modern hard drive is a product of the evolution of the gramophone. The record spins, the head reads the record sector by sector, the control unit glues files from the read pieces. The head hovers above the surface of the plate, and when it stops, it falls. There are readable and unreadable sectors on the tracks; a sector itself is the minimum part of the track, Wikipedia will confirm.
This model is sufficient to demonstrate the main problems:
- Damage to the surface of the disk—mechanical contact of the plate with the head—may cause the disk to shed, or may remain a fixed area.
- A partial change in the surface properties (magnetization) of a sector (a typical reanimated sector) can be extended by referring to neighboring sectors.
- Various logic errors, SMART arbitrariness, fs errors (everything corrects itself during operation and based on the results of self-diagnosis).
- Shedding of the magnetic layer from the surface is known as a sign of old age, but may be a consequence of loss of tightness.
Contrary to popular belief, a blow to the case of a working HDD is not as bad as vibration. The head is held above the surface by such cunning magic that touching the surface requires a significant force, which is unlikely to occur upon impact, but is easily achieved by resonance.
How to check a disk for bad sectors and errors
It is worth remembering that the disk is checked for reading, checking sectors for writing will erase everything that was on the disk! Well, it’s also worth keeping in mind that for a proper test, the disk must be free from other tasks at the time of testing. Checking a hard drive for bad sectors is not a common task; Windows does everything that is necessary automatically.
Windows has long had a utility that checks and corrects hard drive errors, chkdsk. You can find the utility in the disk properties, the button is called “check disk”.
Any self-respecting manufacturer, when releasing a disk, puts on the website a diagnostic utility that not only monitors the condition of the HDD, but can also carry out service actions designed to alleviate its suffering, sometimes even up to calibration. Checking hard disk sectors is a must for this class of programs.
In addition, there is a zoo of diagnostic, repair, “professional” tools, in which the devil himself would break his leg for a long time. And quite a large number of truly professional programs for analysis and repair. It is worth noting that most of them are destructive, that is, with their help you can kill a working hard drive in a way that not every master can restore.
Programs for checking your hard drive for bad sectors
 For those who do not believe in chkdsk, graphical programs for checking the hard drive, or rather more or less gentle tools that do not punish for the wrong key, are HDD Regenerator, HDD Health. Graphical utilities show a health graph, tell you what parameters are being tested and, importantly, have adequately labeled buttons that make it easy to understand the program. Linux users are less fortunate; most utilities are console-based and require an understanding of the parameters.
Among the utilities from the manufacturer, it is worth remembering Seagate SeaTools - a convenient, powerful program, all its power is manifested only on native hard drives, but checking hard drive sectors is also available for “outsiders”
Checking HDD using Windows 7 and 10
Checking your hard drive for errors using Windows always involves running chkdsk in recovery mode. This launch can be done using the button in the disk properties.
“My computer” -> “Properties” -> “Tools” → “disk check” “Run check”.
Or, if the button is missing, this occurs in some editions of Windows 10, this check can be easily launched from the command line as an administrator using the command
chkdsk c: /f where c: is the letter of the drive being checked. Checking the hdd for bad sectors in the case of a system partition will begin after a reboot, since checking requires exclusive access to the disk.
You should not run this command often, but the check window that appears at every boot is the reason for the question: “how to check a hard drive for errors” and the answer to this question, since it is usually associated with disk problems.
What to do if you detect bad sectors on your hard drive
Not so long ago, hard drives were released on which it was possible to manually reassign sectors, and this is why many people are convinced that formatting from Bios cures all illnesses. But alas, now calibration is so complicated that it is carried out once at the manufacturer. It should also be understood that most changes in surface condition are irreversible and nothing can be restored. It can often be reassigned without loss of capacity, although it all depends on the condition of the “patient”.
Options for hard drive states and subsequent actions:
- The disk is working, works well, is stable, the percentage of bad ones is not growing - make a backup, forget that there are bad sectors on it and enjoy life.
- The disk is basically working, the number of bad sectors is not growing, but when accessing a certain area there are problems - try to divide it into partitions without affecting the problem area, save for a new one.
- The disk is not working, strong brakes, smart and BIOS warnings - change the hard drive.
Programs for recovering HDD drives
Victoria and Mhdd, any of these programs allows you to conduct a complete diagnosis and save the drive from many problems. They are launched from DOS and require careful study of the manual before starting, as they can irreversibly destroy the data or logic of the hard drive! In general, do not start without knowing what you are doing, especially since such hard drive maintenance has long been entrusted to the controller and in most cases he copes with it. If it's not broken, don't fix it; this old advice is most relevant when it comes to the broken sector.
3 more useful articles:
Many users of computers, smartphones, cameras, cameras and other electronic devices have at one time encountered…
Or removable USB HDD devices are almost the most common. That is why comprehensive measures for checking the hard drive should be given priority attention. Now we will try to briefly consider what HDD checking is in several main areas, and we will give an understanding of the basics of the methodology for correcting errors of various types.
Why do errors occur on the hard drive?
There are many reasons for failures, both in software and in physical terms. First of all, this includes a sudden power outage, which is accompanied by a short-term increase in voltage. And if you consider that at that moment, say, data was being copied, then it becomes clear that errors cannot be avoided.
Something similar is observed in the event of an incorrect shutdown of the operating system, when a computer terminal or laptop is forcibly turned off by long pressing the power button.
It’s good that the next time you turn it on, the standard program for checking the HDD, which is initially present in any Windows OS, starts automatically. True, not everything is so simple here either. The fact is that the HDD check can start again and again during subsequent system boots. This is due to the fact that the “native” application simply cannot fix system errors on the hard drive automatically. How to get rid of the constant launch of this process will be discussed a little later.
HDD check: main directions
Before we begin to consider the operation of numerous hard drive testing and error correction tools, let’s consider the main directions that are provided for the comprehensive verification system.

For example, the simplest method is considered to be viewing detailed information about the device. Today there are quite a lot of different utilities like Everest, CPU-Z or CPUID Hardware Monitor. It must be said that such programs provide the most detailed characteristics of the device, and at startup they even check the speed of the HDD (or rather, the spindle speed).
Another direction is testing the hard drive for system errors with a view to subsequently correcting them. In this case, the HDD is checked for bad sectors.
This process is somewhat reminiscent of defragmentation, only in the case of defragmentation of the hard drive, frequently used files and applications are moved to the fastest areas of the HDD (with a change in the physical rather than logical address). Checking the HDD for bad sectors works in a similar way. The program itself reads the current address from the damaged sector, and then rewrites it into a normally functioning one. As is already clear, in this case the logical address remains unchanged.
The third priority is to check the surface of the disk, because hard drives have a limited service life, and physical damage simply cannot be avoided. It is clear that by the end of its service life the hard drive may simply crumble, and in most cases it will have to be thrown away. Although, if the damage is not too serious, you can restore the hard drive, for example, by using special recovery utilities. We will consider them separately.
It goes without saying that you cannot ignore data recovery on inoperative hard drives. Actually, this is often done by various federal services when investigating computer crimes committed by hackers and seizing the corresponding equipment from them. But let's not get into the weeds. HDD sectors can also be checked by an ordinary user. The main thing is the presence of a set of special utilities.
Checking HDD and fixing errors using Windows
Now a few words about the built-in tools of Windows operating systems. They also include HDD checking. Windows 7, for example, is no different from its predecessors and successors (XP, Vista, 8, 10).

This tool is called from the usual “Explorer” by right-clicking the manipulator (computer mouse) on the corresponding disk or logical partition. Properties are selected in the menu, after which you go to the appropriate tabs, where you can carry out maintenance.
When calling such a service, it is strongly recommended to set parameters that, when activated, will scan the HDD. Windows will also be able to automatically fix system errors. True, this approach may not always help. It happens that the system issues a warning that it is not possible to automatically correct errors.

In this case, it is better to use the command line or the “Run” menu, where a variety of commands are written depending on what exactly needs to be done. The simplest command of this type is “chkdisk c: /f” (testing with automatic correction of system errors). For NTFS file systems, you can use "chkntfs /x c:". By the way, it is manipulations of this type that allow you to get rid of the annoying check of the hard drive when rebooting the computer terminal.
In general, it is better to read reference information about using this or that command, because checking the HDD can be done in completely different ways, depending on what letters will be entered after entering the main command.
Informer programs
As for information applications, you can find quite a lot of them. As mentioned above, the most well-known are utilities like CPU-Z or Everest. But these are, so to speak, general purpose programs.

CrystalDiscInfo is considered to be the most acceptable and most powerful utility that combines the functions of an informer and a scanner. By the way, it is capable of not only displaying information on the device, but also even controlling some basic parameters, say, changing the spindle speed.
Programs for checking HDDs for bad sectors
Speaking about what a program for checking HDDs for bad sectors is, it is worth mentioning such a powerful utility as Victoria, created by a Belarusian developer.

The application can work both in standard mode in Windows environment and in DOS emulation. What is most interesting is that it is in DOS that the utility shows its maximum capabilities.
Checking the disc surface
Testing the surface of the hard drive (Surface Test mode) can be used in standard tools of the Windows OS itself, or you can turn to specialized utilities such as HDDScan.
It is noteworthy that the software package itself is available in the form of a portable version and does not require installation on a hard drive. It goes without saying that you can start the scanning process even from a regular flash drive, using the default settings or applying your own (they are located in the Process section).
Of course, the program will be able to identify problems with the integrity of the HDD surface, but it will not be able to revive a damaged hard drive. But there is a way out here too.

Reanimation programs
Even a damaged hard drive or removable USB HDD can be reanimated thanks to a unique development called HDD Regenerator, which, when it first appeared, made quite a lot of noise in the field of modern computer technology.
According to the developers themselves, this application is capable of restoring physically damaged sectors of the HDD surface using magnetization reversal technology. There is no point for the average user to delve into all the intricacies of the technological process. The main thing is that the program works perfectly. From the outside, this may seem strange: how can you remagnetize a hard drive using software? However, in combination with the use of physical methods, this process has become possible for use in stationary computer systems. The hard drive doesn't even need to be dismantled.
Data Recovery
With data recovery, the situation is somewhat worse. This is understandable, because not every utility is capable of working like HDD Regenerator.
Of course, we can recommend using some software packages like Acronis True Image. But such a utility works on the principle of creating a backup copy. In case of damage to the hard drive or accidental deletion of information, it is better to use tools like Recuva, PC Inspector File Recovery or Recover My Files. But they cannot provide a complete guarantee of data recovery, for example, in case of physical damage to the HDD.
By and large, if the hard drive is large enough, it is recommended to create backup copies of data in advance. Then you won’t have to look for specialized utilities or rack your brains over how to recover lost information.

Comprehensive solutions for HDD testing
In order to carry out a comprehensive check, including promptly obtaining information on the device, actions that include a complete check and correction of HDD failures and damage, data recovery, etc., it is better to use several software packages together. For example, in the worst case scenario, the combination might look like this:
- information stage - CrystalDiscInfo;
- full HDD check - Victoria;
- surface test - HDD Scan;
- recovery of a damaged hard drive - HDD Regenerator.
Which program is better?
It is not possible to say which program for checking HDD or removable media is the best, since almost all utilities have their own specific direction.
In principle, among the main applications for checking and automatically correcting errors, the Victoria package (high-quality HDD error checking) can be especially highlighted, and in terms of disk recovery, the championship undoubtedly belongs to HDD Regenerator.
Conclusion
We briefly talked about what HDD checking is and what some types of software products are designed for. However, in conclusion, it is worth noting that it is not recommended to bring your hard drive to an extreme state; you need to check it at least once a month. This approach will avoid many problems in the future.
In principle, you can set up an automatic scan of the hard drive on a schedule, even using the standard Windows Task Scheduler, so as not to call the process manually every time. You can simply choose the right time, but here you need to take into account the fact that when the testing process is running, it will be extremely difficult to work with the system.
By the way, even installing a conventional uninterruptible power supply or stabilizer will protect the hard drive from the harmful effects associated with power surges or power outages.
Regardless of your operating system (Windows XP, Windows 7, Windows 8), go to Computer (My Computer, This Computer), right-click on the drive you want to check, select " Properties".
In the properties window, go to the " tab Service" and click the " button Run check".
Check both boxes
Automatically fix system errors.
Scan and repair system sectors.
and press " Launch".
If you check the system volume (the disk on which the operating system is installed, usually drive C), you will see the message " Windows cannot verify the hard drive that is currently in use", click " Disk check schedule".
Then restart your computer/laptop; during boot, the process of checking and correcting errors on the disk will begin. It will last from several minutes to an hour (depending on the size of the partition and the physical characteristics of the hard drive). When finished, the operating system will boot.
Checking the hard drive using the chkdsk utility.
CHKDSK (short for check disk - disk check) is a standard application in the DOS and Microsoft Windows operating systems that checks a hard drive or floppy disk for file system errors (for example, the same sector is marked as belonging to two different files). CHKDSK can also fix file system errors it finds. (from Wikipedia)
In order to run the chkdsk utility, you need to run a command prompt with administrator rights, to do this:
IN Windows XP click - "Command line"
IN Windows 7 click "Start" - "All Programs" - "Accessories" "Command line" and select "Run as administrator".
IN Windows 8.1 right click on "Start" - "Command Prompt (Administrator)".
As a result, a command line console will open.
First of all, let's find out the syntax of the chkdsk utility:
CHKDSK [volume[[path]filename]] ]
Volume Specifies the mount point, volume name, or drive letter of the drive being checked, followed by a colon.
file name Files checked for fragmentation (FAT/FAT32 only).
/F Correcting disk errors.
/V For FAT/FAT32: output the full path and name of each file on the disk. For NTFS: display cleanup messages (if any).
/R Search for bad sectors and restore surviving contents (requires /F).
/L:size For NTFS only: Set the log file size (in KB). If a size is not specified, the current size value is displayed.
/X Pre-dismount the volume (if necessary). All open handles to this volume will be invalidated (requires /F).
/I NTFS only: Less strict checking of index entries.
/C NTFS only: skip checking for loops within folder structures.
/B NTFS only: Re-evaluate bad clusters on disk (requires /R)
The /I or /C options reduce Chkdsk execution time by skipping some volume checks.
Of all the command attributes, the two most often used to check a disk for errors are /f and /r. The final command looks like this:
chkdsk C:/F/R
With this command we will check partition C, correct errors on the disk and restore information from damaged sectors (if any).
After entering this command, you will be prompted to check the volume the next time the system reboots, click Y and a key Enter.
Now you need to reboot the system, when loading you will see a window prompting a check, do not click anything, just wait 10 seconds.
Checking for hard drive errors using Victoria.
The Victoria program is designed to check for errors on hard drives with IDE and Serial ATA interfaces. The program is a completely ready-made solution for a comprehensive, in-depth, and at the same time, the fastest possible assessment of the real technical condition of the HDD.
First of all, download the ISO image of the program from official website . Unzip the downloaded archive and burn it to a CD/DVD, as described in the article How to burn to CD/DVD . After this, boot from the burned disk, how to do this is described step by step in the article How to boot from a CD/DVD disk or USB flash drive .
After booting from the disk within 10 seconds, select the program for your device (Victoria for the computer will load by default).
The program interface will launch. Press the F2 key so that the program itself finds the disk; if this does not happen, you must do it manually. To do this, press the "P" key. The same will have to be done if the system has several hard drives and you need to select one of them. If you have hard drives with a SATA interface, then in the Select HDD port menu that appears, select - " Ext. PCI ATA/SATA". Move using the cursor keys "up", "down", and select using the "Enter" key.
Next, to check the disk surface, press the F4 key. In the HDD scan menu window: select the necessary scan parameters. By default, it is proposed to scan the entire disk from the beginning of "Start LBA: 0" to the end of "End LBA: 20971520". I recommend leaving these default values. The next menu item – I recommend leaving “Linear reading”, since it is intended for the fastest and most accurate diagnosis of the surface condition. In the fourth point, I recommend choosing the mode BB = Advanced REMAP since this mode checks the disk most efficiently and corrects errors on it without deleting information.
After this, a check for hard disk errors will start and bad areas will be corrected. This procedure can take from several tens of minutes to several hours. Depends on the volume and spindle speed.
When finished, remove the disc from the drive and restart the computer.
Video of checking a hard drive using the Victoria utility. Error elimination - DRSC+DRDY is missing or the screw does not remove BUSY