Login to xp as administrator. Login to your computer as an administrator
Requirements.
The article is applicable for Windows XP.
Information
Typically, if you have multiple accounts on your computer that have local administrator rights, Windows will automatically hide the built-in Administrator account. But there may be a need to log into Windows using this account. This can be done in three ways, and the choice of method depends on the settings of your system.
Method No. 1. If you are using the Welcome screen.
1. Wait for the screen " Greetings", where you will be asked to select the desired account from the list;
2. Hold down two buttons “Ctrl” and “Alt” on the keyboard, without releasing the pressed buttons, press the “Del” button on the keyboard twice;
3. The screen should display the " Login to Windows" with two fields "User", "Password" and three buttons "OK", "Cancel", "Options >>";
4. In the "User" field, enter Administrator and password (if you have one) and click "OK";
If you log into Windows automatically, i.e. If you are not prompted for a username and password, then follow these steps:
Ending a session
<имя Вашего пользователя>
";
3. In the "Exit Windows" window, click the " Exit". We draw your attention once again "Exit" button;
4. Wait until the session ends and the " Greetings";
5. Then follow steps 2 - 4 indicated in method No. 1;
Method number 2. If you are not using the Welcome screen.
If you do not use the "Welcome" screen, but instead it opens " Login to Windows", in which there are two fields "User", "Password" and three buttons "OK", "Cancel", "Options >>", then:
1. In the "User" field, enter Administrator
2. In the "Password" field, enter the password (if you have one) and click the "OK" button;
If you log into Windows automatically, i.e. If you are not prompted for a username and password, then follow these steps:
1. Wait for the desktop to load;
2. Click the "Start" button and select " Completing work...";
3. In the window " Shutting down Windows", in the "Select the desired action" field, select " Ending a session <имя Вашего
пользователя>
" and click "OK";
4. Then follow the steps indicated in method No. 2;
Method number 3. Using safe mode.
1. Turn on your computer;
2. As soon as letters and/or numbers appear on the screen, periodically (2 times per second) press the “F8” button on the keyboard;
3. A menu should appear on the screen. In this menu, select " Safe Mode";
4. If a window appears asking you to click "Yes" or "No", click the " button Yes";
5. The “Administrator” account will appear automatically, all you have to do is select it and enter the password (if you have one);
In all versions of Windows that were released later than Windows XP, logging in with Administrator rights is not so easy. This can easily be explained by the fact that an account with Administrator rights has been blocked. Why was she blocked? In fact, the answer is simple - users logging in under this account expose the entire system to unnecessary risk. By making thoughtless changes, the user can “thwart the system” or severely damage it.
Let's take a closer look at why you shouldn't log in as Administrator when working on a computer. The entire operating system is in the hands of the Administrator, that is, he is able to influence the system through various settings. Curious or inexperienced users can harm the operating system without realizing it. For example, reconfigure the registry.
Sometimes there are situations in which it is extremely important to log in as an Administrator. I think we shouldn’t dwell on the question, why do this? As mentioned earlier, with the Administrator account, the settings of everything your heart desires are concentrated in your hands.
So, we gradually approached the consideration of the procedure itself, after which it is not difficult to log into Windows 7 with Administrator rights. The account itself must be part of the administrator account group
You can log in as Administrator in several ways.
1. Using the Computer Management utility:
2. Using the “Command Line”:
Instead of the word administrator, you should write the name of the system administrator.
How to log in as administrator in Windows 8?
As for the Windows 8 system, the previous two methods of logging in under the Administrator account also apply to this version.
Windows 8 also allows you to run software as Administrator. Here you need to right-click on the shortcut of the program that you want to open as Administrator. This brings up a menu at the bottom of the monitor. Among the list of the menu that appears, find “Run as administrator”, launch it, and a program will open that gives you Administrator rights.

You can also make sure that a certain program is constantly launched using Administrator rights. In this regard, on the shortcut of the desired program, click on the right functional mouse button, selecting “Properties”. Next, select the “Compatibility” tab and in it put a check mark next to the entry “Run the program using administrator rights.” Accordingly, click “Ok”. After such actions, the program will always open with Administrator rights.

You can do the same action in another way. Right-click on the shortcut, select “Properties” and the “Shortcut” tab. Then click on “Advanced” and check the box next to “Run as administrator”. Click “Ok” in each open window.
Each account in Windows 10 has its own access rights. Privileges can be given to either a regular user or a user with extended rights, or an administrator. If you log into the system with administrator privileges, you can do everything: change UAC, settings and administration of the local network, installing any applications - in general, really everything you want to do in the operating system.
Method number 1 - using the command line
How to use it? We launch cmd mode on behalf of the administrator using any method convenient for you (for example, right-click on the “Start” button and select “Command Prompt (Administrator)” from the menu).
Now that you are logged in, enter the following command in the invitation line: and calmly log in to the system with maximum access rights.
![]()
This is the most accessible, simple and understandable way to log into the system as an administrator, since it does not require special knowledge and skills, and all the necessary administration skills are reduced to a banal right-click on a menu item.
Method No. 2 - using the “Local Security Policies” snap-in
The above snap-in is an excellent tool for OS administration. You can find out more details from the article. If you haven't used it before, now is the time to join. This mechanism is incredibly functional and capable of quite a lot, so you will use its services more than once if you want to make your work in Windows 10 more comfortable and enjoyable.
We enter it using the Win+R key combination and entering the command “secpol.msc”. An alternative method is “Start” -> “System Tools - Windows” -> “Control Panel” -> “Security and System” -> “Administrative Tools”.
Finally, if you are logged into this tool, open the folder “Local Policies” -> “Security Settings” and on the right in the list of options select the option “Accounts: Account status ‘Administrator’”.

Double-click on the parameter and activate the presented option.

We save all changes, and now you can log in under the current active account with admin rights.
Method No. 3 – using the “Local Groups and Users” utility
Again we use the “Win+R” key sequence and enter the “lusrmgr.msc” command. The equipment we need opens. We expand the “Users” branch in detail and study the list of users who have access to the system.

We select the user we need and double-click. The form for user access parameters to the OS opens. Go to the second tab “Group Membership”, and here we add the “Administrators” group to the privileges of the active user. How to do this? First, click the “Add” button.

Next, in the text field of the new form that opens, enter the name of the group – “Administrators”. After that, click on the “Check names” button. The group must be identified and its full name must appear on the same form. Click OK, and the group is added to the privileges of the active user.

Method number 4 - using Windows 10 settings
Go to the “Settings” menu of the system and select the “Accounts” section. Next we need the category “Family and other users”. Here, in the section of the form we need, we perform one click on the user’s name. The “Change account type” button appears. Click on it.

As a result of such simple manipulations, a miniform appears on the screen with a choice of account type. Select “Administrator” from the list and confirm your decision by clicking OK.

Now all that remains for us is to log into the system under this user and take advantage of all the benefits of extended superuser rights.
In this article, I described several practical ways to log in as an administrator in Windows 10. In fact, such rights may be needed if you often install new applications, clean the registry, or change operating system settings. In all other cases, the rights of a regular user may be quite sufficient, and you can work successfully without administrator privileges.
Hi all. In today's article I want to show you the easiest way to how to log in as administrator in windows 7. But for this you and I will need it, you will learn how to enable it by following the link.
Open the start menu, hover your mouse over the arrow next to the “shut down” button and select “change user” from the context menu that opens.
Next, the monitor screen will turn off and after a few seconds all the accounts registered on your computer will appear on it; you need to select the one with the signature “Administrator” and double-click on it with the left button.

Now the computer has successfully started the system under the administrator name and from now on absolutely all Windows 7 settings will be available to you.
If you are not an experienced computer user, which I am 100% sure of (otherwise you would know how to login with administrator rights), then I do not recommend staying in the system for a long time with this profile.
Because if used carelessly, Windows 7 may start to fail and then it will have to.
How to log in with a regular account?
To log in from a regular account, you need to do the same thing as I showed above, but the only difference is that in the menu that opens, you must select not the “change user” item, but the “log out” option.
Since if you select the first one, the administrator account will not be disabled, as a result, when you turn off the computer, you will receive a warning that shutting down Windows may lead to data loss.

If you saved all the data before exiting, then this problem can be easily solved, just click the “yes” button.
I would also like to recommend you one of my latest articles about... Perhaps it will be useful to you.
And that's all for today. Now you know how to log in as administrator windows 7. I hope you liked this post and share it using the buttons below or subscribe to my RSS channel.
The administrator account gives the user complete control over the computer. In this case, there is access to all system folders and files that are located on the computer. It becomes possible to make changes that will affect other users of the computer. You can change security settings, install software and hardware.
By default, in Windows 10 this account is not active and is not displayed when selecting a user. To log in with these rights, you must have this type of account on your computer. You can check your account type after logging in.
If your account type is not Administrator, then you will not be able to log in with Administrator rights unless you know the username and password of the account on the computer.
How to log in as administrator

How to log into windows 10 as administrator
You can use the Local Security Policy utility. To quickly enter, you can use the command line by typing “secpol.msc”. You can open it in the standard way by clicking the Start menu, selecting “Control Panel”, then “Administrative Tools”.
In the window that opens, you need to expand the “Local Policies” branch, select the “Security Settings” item and on the right, in the policies, select the following item: “Accounts: State “Administrator”. You will need to double-click on it and enable your account. The rights will be granted and upon startup it will be possible to log in as an administrator.

How to log into a computer as administrator
You can log into the system with administrator access with unlimited capabilities through the “Local Users and Groups” utility. You will need to run the command “lusrmgr.msc” at the command prompt. Then expand the “Users” section to see all the users that are on the PC. 
What to do if a user with rights is deleted?
If the admin account has been deleted, it will not be possible to restore it using the described methods. These recovery methods are only suitable if you do not have access to your account, for example, if you forgot your password. Then you can give your current account admin rights.
In this case, it is recommended to use System Restore.
The first method is to open the Control Panel through the Start menu. Then select the “Recovery” section, then “Run system recovery”. After these steps, the “System Restore” window will open, where you will need to click “Next”. All possible recovery points will become available to which you can return/rollback, including the one where the admin account still existed.
If this method does not help, then you can try another method.
To do this, you will need a disk or flash drive with the required OS. When the system boots, enter safe mode (pressing “F8”), then select “Troubleshoot computer problems.” The Windows 10 System Recovery Options window will open. You will need to boot from the drive and select “System Restore”. After which the OS will be updated, the administrator account will be created anew. In this case, the files will not be affected and will be saved in their places.
The Administrator account gives the user full control over the computer, including full access to all system folders. However, while using this account, UAC is disabled and does not display warning messages.
By default, in Windows 10, the Administrator account is not active and is not displayed when selecting a user. In this article we will talk about how to activate this account and how to use it to log into Windows 10 as an Administrator.
Step No. 1. Launch Command Prompt with Administrator rights.
To log into Windows as an Administrator, you first need to activate the Administrator account. And for this it is necessary.
To do this, first press the key combination Windows+X and in the menu that opens, select “Command Prompt (Administrator).”
After this, a User Account Control (UAC) warning pop-up will appear. In this window, click on the “Yes” button.

This way you will launch the command prompt with Administrator rights. Now, using this command line, you can run a command that will activate the Administrator account in Windows 10.
Step #2: Activate the Administrator account.
So, after the command line is open, you can activate the Administrator account. To do this, on the command line you need to run the command “ net user administrator /active:yes" If you have an English version of Windows 10, then this command will look like this “net user administrator /active: yes”.
After the message “Command completed successfully” appears in the Command Prompt, you can close the Command Prompt.
Step No. 3. Log in to Windows 10 as Administrator.
After activating the Administrator account, you can log in to it like any other account on your computer. To do this, click on the “Start” button, and then click on the user name in the upper left corner of the “Start” menu and select “Administrator”.

After this, a standard screen for logging into your account will appear, and in order to log into Windows 10 as an Administrator, all you have to do is click on the “Login” button.
Some notes about using the Administrator account:
- You should not use the Administrator account all the time. Perform the system operations you need and disable this account using the command “net user administrator /active:no”;
- If you plan to regularly log into Windows 10 as an Administrator, then set a password for this account;
- The Administrator account is local, and when using this account you will not be able to use new applications for Windows 10;
- The Administrator account can be enabled or disabled through “Local Users and Groups” by running the command “usrmgr.msc”;
When working with the Windows operating system, the user has to resort to solving tasks that require elevated privileges. As standard, you can edit any files in Windows and install applications. To change some system configuration files Administrator rights will be required. Of course, you need to edit system files with caution, since at some point Windows will not start or will not work correctly.
Also, some commercial companies have an administrator who monitors computers in offices. To do this, he has elevated privileges that provide access to any location in the system.
Using the Command Line
The most common method for enabling elevated privileges is to use the command line. In Windows 10 and 7, you can use the Start menu. In the top ten, right-click on Start and select command line as administrator. To activate elevated privileges, enter the following phrase:
net user administrator /active:yes
Now you can log in using this account.
Built-in Windows 10 feature
A fairly simple method. In Windows 10, open the search on the taskbar and enter the word “ Administrator».
Click on the result " Enable Built-in Administrator on next boot." After which you need to restart the PC. 
Using the Group Policy Editor
To use this method, you need to make sure that the system has the “Professional” edition, otherwise it will not work. Open the window " Execute"Using the Win+R combination and writing the command gpedit.msc.
Now on the left we open the following section: . On the right side of the window we find the “Administrator account status” parameter. Must be active. To do this, double-click on the parameter and turn it on. 
After Windows restarts, the user will have elevated rights.
User Account Settings
Every version of Windows has basic account settings. To configure them, you need to hold down the Win+R keys and enter the command control userpasswords2.
Go to the “Advanced” tab and click the “Advanced” button in the “ Additional user management». 
Important! In this method, the Windows edition must correspond to the professional one, since in other versions " Local users and groups"do not work.

If the entry was deleted
There are times when it is not possible to detect an account with elevated rights in the system using the above methods. In this case, her could have been deleted both users and viruses. To fix the problem, you should perform the following series of actions:
- Elimination computer problems from safe mode;
- Examination computer for viruses using various utilities;
- Recovery system image using the DISM command;
- Recovery systems.
In one of my articles, I already wrote that you can add and change the properties of user accounts through the “Control Panel” - “User Accounts”. However, this method is more suitable for ordinary users. But it will be more convenient for the system administrator to manage accounts through the “Computer Management” console – “Local users and groups”.
To get to the “Computer Management” console, right-click on the “My Computer” icon on the desktop and select “Manage”. Next, expand the “Utilities” section and select “Local Users and Groups”.
The “” snap-in is designed for creating new users and groups, managing accounts, setting and resetting user passwords.  Local user
is an account that can be granted certain permissions and rights on your computer. An account always has its own name and password (the password can be empty). You may also hear another user account name – accountT
, and instead of “username” they often say login
.
Local user
is an account that can be granted certain permissions and rights on your computer. An account always has its own name and password (the password can be empty). You may also hear another user account name – accountT
, and instead of “username” they often say login
.
The Local Users and Groups snap-in node displays a list of user accounts: built-in accounts (for example, Administrator and Guest), as well as real PC user accounts you created. 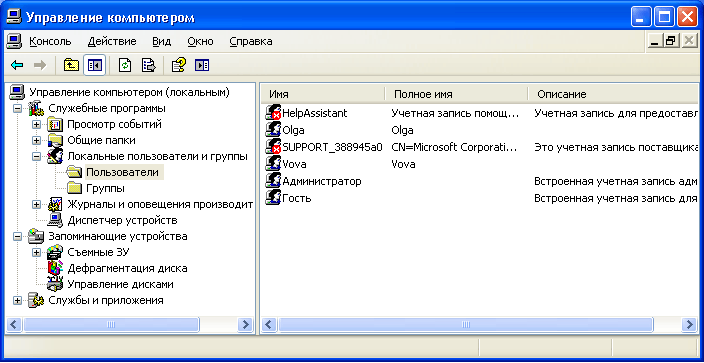 Built-in user accounts are created automatically when Windows is installed and cannot be deleted. When creating a new user, you will need to assign it a name and password (optional), and also determine which group the new user will belong to. Each user can belong to one or more groups.
The node displays both built-in groups and those created by the administrator (i.e., you). Built-in groups are created automatically when you install Windows. 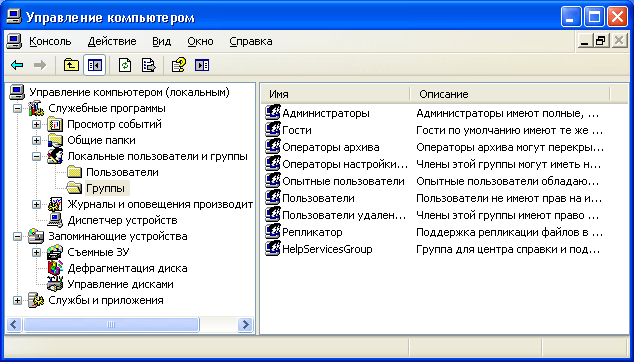 Belonging to a group gives a user certain rights to perform various actions on the computer. Group users Administrators
have unlimited rights. We recommend that you use administrative access only to do the following:
Belonging to a group gives a user certain rights to perform various actions on the computer. Group users Administrators
have unlimited rights. We recommend that you use administrative access only to do the following:
- installation of the operating system and its components (device drivers, system services, service packs);
- updating and restoring the operating system;
- installing programs and applications;
- setting up the most important parameters of the operating system (password policy, access control, etc.);
- managing security and audit logs;
- archiving and system recovery, etc.
You, as a system administrator, must have an account that is a member of the Administrators group. All other users on the computer must have accounts that are members of either the Users group or the Power Users group.
Adding users to a group UserAnd is the most secure because the permissions granted to this group do not allow users to change operating system settings or data of other users, install some software, but also do not allow the execution of legacy applications. I myself have repeatedly encountered a situation where old DOS programs did not work under the account of a member of the “Users” group.
Group Advanced users supported primarily for compatibility with previous versions of Windows to run uncertified and legacy applications. Power Users have more permissions than members of the Users group and less than Administrators. The default permissions granted to this group allow group members to change some computer settings. If support for non-Windows certified applications is required, users must be members of the Power Users group.
Account Guest provides access to the computer to any user who does not have an account. To increase computer security, it is recommended to disable the “Guest” account and configure access to shared PC resources for existing users.
Now let's see how an account is created through the “Computer Management” console – “Local users and groups”.
Create an account
When installing the original version of Windows XP (this does not mean the assembly from Zver or the like) you are prompted to create computer user accounts. You must create at least one account under which you can log in the first time you start. But, as a rule, in real life it is necessary to create several accounts for each user working on a computer, or for a group of users united by a common task and access permissions.
To add a new account, open the “Local Users and Groups” snap-in – select the “Users” folder – then in the right window, right-click on an empty space and select “New User”: 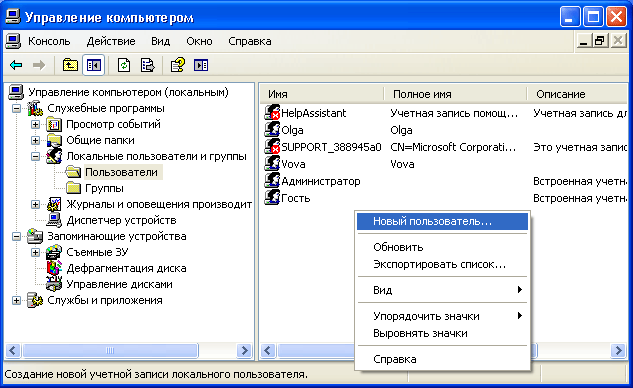 In the window that appears, enter a user name and description. Also set a password for the user (you can read how to come up with a strong password for your account).
Then configure additional parameters - check or uncheck the boxes next to the required items: 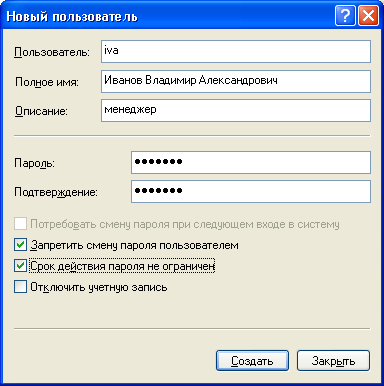 You can uncheck the box next to “Require a password change at next login” and check the boxes next to “Prevent the user from changing the password” and “Password never expires.” In this case, the user will not be able to change his account password himself. This can only be done by you working under an administrator account.
After clicking the “Create” button, a new account will appear in the list of users. Double-click on it and in the window that opens, go to the “Group Membership” tab. Here, click the “Add” – “Advanced” – “Search” button. Then select the group you want the user to belong to (we recommend the Users or Power Users group) and click OK in all the windows that appear. After that, here in the “Group Membership” tab, remove all groups from the list except the one you just selected. Click “OK”:  Thus, you have created a new account and included it in the group.
Now tell the user (in our case Ivanov) his account name ( iva) and password so he can log in. On all computers on the network to whose resources Ivanov needs access, you will need to create the same account with similar parameters. If there is no account for Ivanov on any computer on the network and the “Guest” account is disabled, then Ivanov will not be able to view the shared network resources of this computer.
If a user account is no longer needed, it can be deleted. But in order to avoid various kinds of problems, it is recommended to first disable user accounts before deleting them. To do this, right-click on the account name - select “Properties” - in the account properties window, check the box next to “Disable account” and click “OK”. After making sure that this has not caused any problems (monitor the network for a few days), you can safely delete the account: right-click on the account name and select “Delete” from the context menu. A deleted user account and all data associated with it cannot be restored.
Access Control
So, let's say several users are working on one computer, and you have created your own account for each one according to the rules described above. But suddenly there was a need to block access to certain folders or files on the computer for certain users. This problem is solved by assigning certain access rights to computer resources.
Access Control consists of granting users, groups and computers certain rights to access objects (files, folders, programs, etc.) over the network and on the local machine.
User access control local computerA carried out by changing the parameters on the “ tab Safety” in the “Properties” window:

Setting up security for the My Documents folder
Tab “ Access” of the same window is used to control network access to shared objects (files, folders and printers) on network computers.
In this article we will talk about access control local users to objects local computer. This function is only available in the NTFS file system. If the computer has an NTFS file system, but the “Security” tab is not displayed, go to “Start” - “Control Panel” - “Folder Options”. On the View tab, under Advanced Options, uncheck the “ Use simple file sharing (recommended)” and click “OK”:  The main concept associated with access control is Permissions
.
The main concept associated with access control is Permissions
.
Permissions determine the type of access a user or group has to an object or its properties. Permissions apply to files, folders, printers, and registry objects. To set or change permissions for an object, right-click on its name and select “Properties” from the context menu. On the “Security” tab, you can change permissions for a file or folder by checking or unchecking the boxes next to the desired items in the list of permissions.
You can set your own permissions for each user. First, you need to select a user in the list, and then specify permissions for that user. For example, one user can be allowed to only read the contents of a certain file (permission “ Reading"), another - to make changes to the file (permission " Change"), and deny all other users access to this file altogether (uncheck all the boxes under “ Allow”, or check all the boxes “ Prohibit”).
To view all effective permissions for files and folders on the local computer, select “Properties” – “Security” – “Advanced” – “Effective Permissions” – “Select” – “Advanced” – “Search”, highlight the name of the desired user and click “OK” " Items marked with checkboxes are permissions for this user: 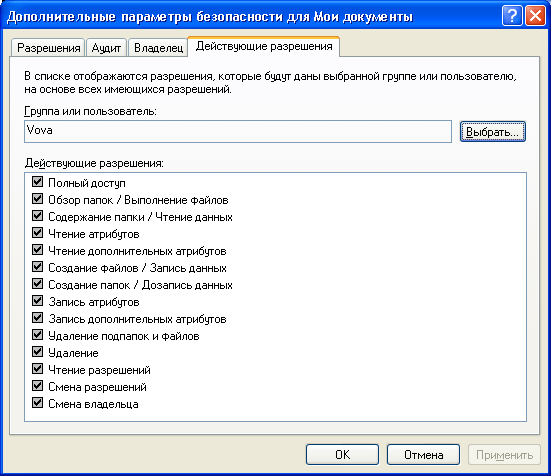 In the same window you can familiarize yourself with the “Permissions”, “Audit”, “Owner” tabs. I will not dwell on them in detail within the framework of this article, because... It already turns out too voluminous.
If the list of users on the Security tab does not include the user to whom you need to assign permissions, click the following buttons in sequence on the Security tab: “ Add” – “Additionally” – “Search" From the list, select the name of the user account to which you want to assign permissions and click “OK.” Instead of an individual user, you can select a group - permissions will apply to all users in this group. Remember these buttons well. You will do this procedure in all cases when you need to add a new user to the list of permissions, auditing, ownership, network access, etc.
Access control doesn't just apply to users local computer, but also for accessing shared files, folders and printers over the network. I already talked about differentiating access rights for network users in relation to a folder in the article.
A small instructive article from which you will learn how you can find out what rights your account has, what other users are present in the system, and how to log into the OS as an administrator.
So, let's start the excursion with the most basic and paramount.
How can you find out which profile (account) you are logged into the system under?
IN Windows XP it is enough that you open Start Menu and see the account name in the header.
IN Windows 7 need to go to Control Panel And User Accounts.
IN Windows XP right-click on To my computer, select Properties, go to the tab Additionally and click the button Options in the field User Profile:
A window will appear in which you can see all user profiles and, if necessary, play tricks with them. But that's what anyone wants.

In Windows 7 we follow the path: Control Panel -> All Control Panel Items -> User Accounts -> Account Management

Now we'll find out What rights does the account (profile) have?.
In XP and 7 this is done the same way - right-click on To my computer(in the Start menu or on the Desktop) and select Control.

Next we need a point Local groups and users and in it Users

If you click on a user, you can also play tricks with his rights and password, which is what we’ll do now.
IN Windows XP You can only change and add a profile using administrator rights. They can be obtained, in most cases, by logging into the system.
IN Windows 7 it's more interesting. The fact is that even if you have an Administrator account, he is, as it were, not a full Administrator. The "seven" has a built-in SuperVisor or SuperAdministrator, and to log into the OS under it you just need to uncheck the box Disable account V Administrator Properties.

After this, we reboot and when loading, a new account will appear:

There is still a small nuance here. In Windows 7 Home Basic and Starter there are no Local Policies, which means you cannot uncheck the item.
But it’s okay, you just need to launch (the console) (RMB on it and selecting Run as administrator), then enter in the field
net user Administrator /active:yes
and reboot.
It is worth warning you that when you log into the system as an Administrator, all programs (including those located in) are launched with his privileges. This can give the green light to all sorts of viruses and malware.
And yet, it is advisable to set a password for the Administrator account.