After updating Windows 10, the keyboard stopped working. How to remove the on-screen keyboard from Windows startup
The on-screen keyboard is a special Windows capabilities 10. It is designed to help people with special needs when working on a computer. But this function will be useful for any user when their physical keyboard fails. Virtual input will help replace it, since the panel contains all the keys necessary for comfortable operation PC.
Using virtual Windows keyboards 10 may also be needed to improve the security of personal data. The essence of this option is that the computer may be infected with a keylogger. This is a special type of virus that reads keyboard strokes. Accordingly, your password may end up in the hands of attackers. And it is believed that screen input will avoid this situation.
Launching the on-screen keyboard
Now let's look at options for enabling the virtual keyboard both from the system and when logging into it. Moreover, the methods differ slightly.
Option 1: Login Screen
It is quite possible that the physical keyboard is broken, but you urgently need access to user files on the computer. Account is under a password, the input of which in a standard way impossible. The Win 10 on-screen keyboard will definitely come in handy here. It is launched in the following way:
- Select a user on the login screen.
- There is an icon in the lower right corner "Special abilities".
- Slider "Screen keyboard" put it in the activation position.
- Click on any free place to stop the announcer sound.
- Move the cursor to the password entry field.
- Enter secret combination and confirm your login.
Option 2: System tray icon
The taskbar is the area at the bottom of the screen that consists of menus. "Start", notification area and pinned and current programs. One of the tray elements can be the call icon needed in in this case functions.
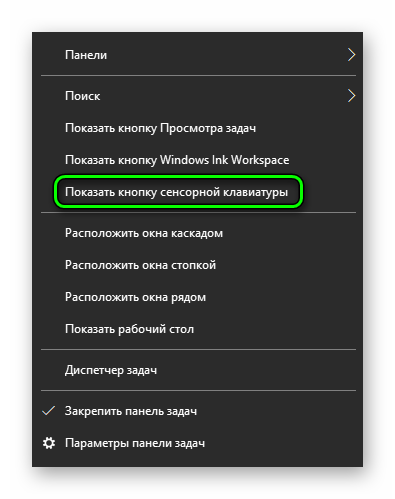
Right-click on the taskbar and activate the item “Show touch button...”.
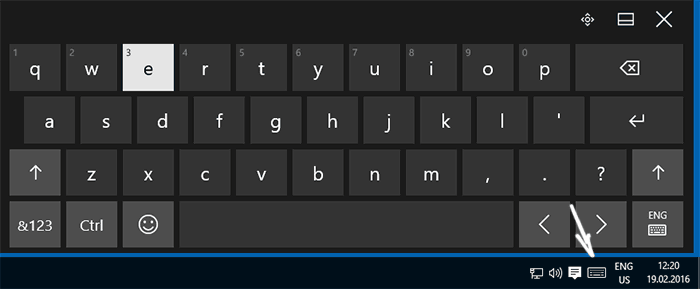
Click on the new icon and the corresponding element will open.
Option 3: Accessibility
Open menu "Start". At the bottom left is a gear-shaped icon. If you hover your mouse over it, a caption will appear "Options". Click on it and open "Special abilities". The touch input activation point is located in the window "Keyboard".
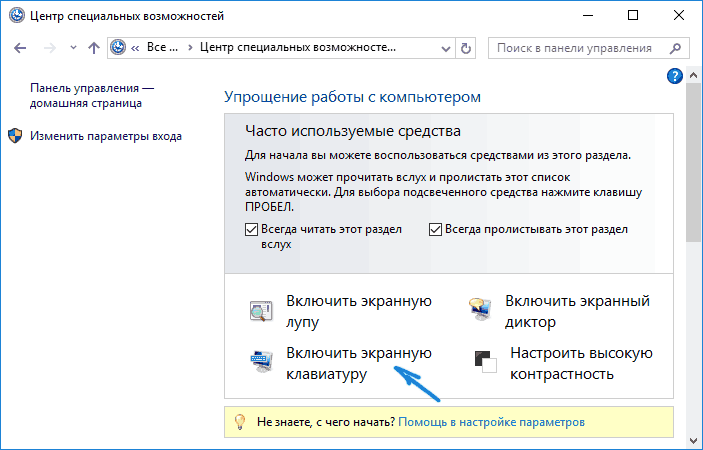
You can still do everything through "Control Panel". The easiest way to open it is through a search in Start. Switch the view of elements to icons. Towards the end of the list there is an item "Center special features» . There is a point "Turn on on-screen keyboard» .
There are more keys quick access To this section- Win + U.
Option 4: Search
Search is a universal option for accessing any system and installed components. It is called by simultaneously pressing Win + S. Enter in the line "screen" and select the second item from the list.
You can right-click on the desired item and place it on the taskbar or in the list of Metro tiles located in the menu "Start".
Option 5: Run
Go to "Service -Windows" in Pusk. From there call the element "Run". Enter the command osk and press "OK".
This beginner's guide provides several ways to open the on-screen keyboard in Windows 10 (even two different built-in on-screen keyboards), as well as solutions to some typical problems: for example, about what to do if the on-screen keyboard appears on its own when you open each program and you can’t turn it off completely, or vice versa - what to do if it doesn’t turn on.
Why might you need an on-screen keyboard? First of all, to enter on touch devices, the second common option is in cases where the physical keyboard of a computer or laptop suddenly stops working and, finally, it is believed that entering passwords and important data from an on-screen keyboard is more secure than from a regular one, since it is more difficult for keyloggers to intercept it (programs that record keys pressed). For previous OS versions: .
Easily enable the on-screen keyboard and add its icon to the Windows 10 taskbar
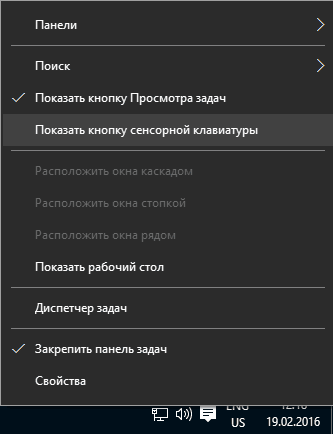
First a few of the most simple ways turn on screen Windows keyboard 10. The first of them is to click on its icon in the notification area, and if there is no such icon, then click right click mouse on the taskbar and in context menu select "Show button" touch keyboard».
If your system does not have the problems described in last section Following these instructions, an icon for launching the on-screen keyboard will appear on the taskbar and you can easily launch it by clicking on it.
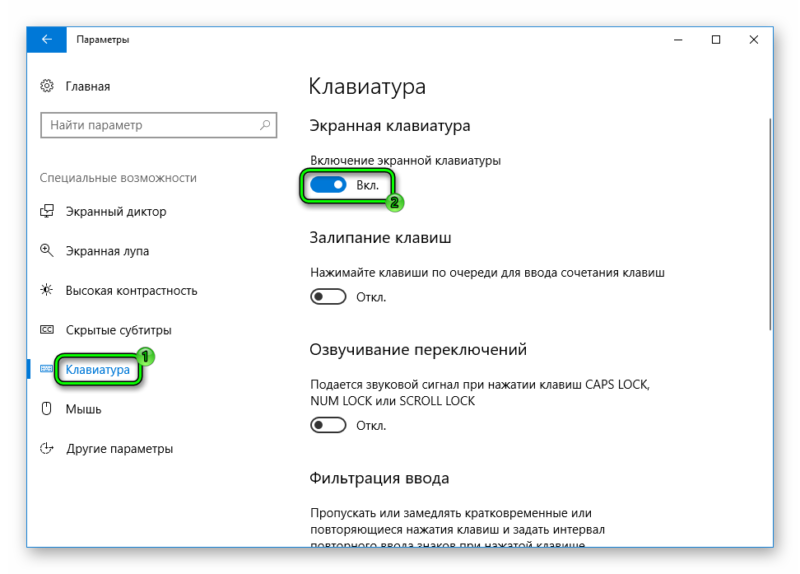
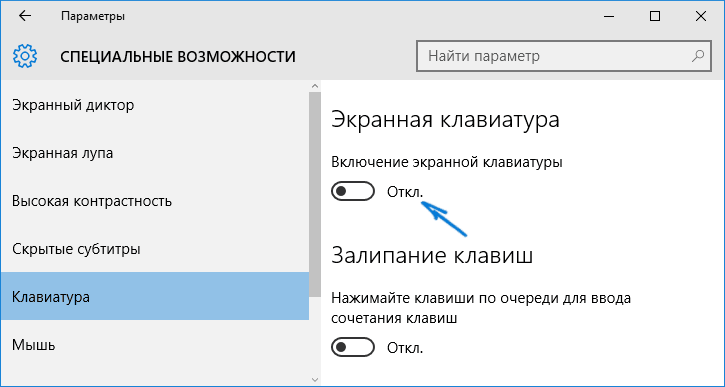
The second way is to go to “Start” - “Settings” (or click Windows keys+ I), select the “Accessibility” settings item and in the “Keyboard” section enable the “Enable on-screen keyboard” option.
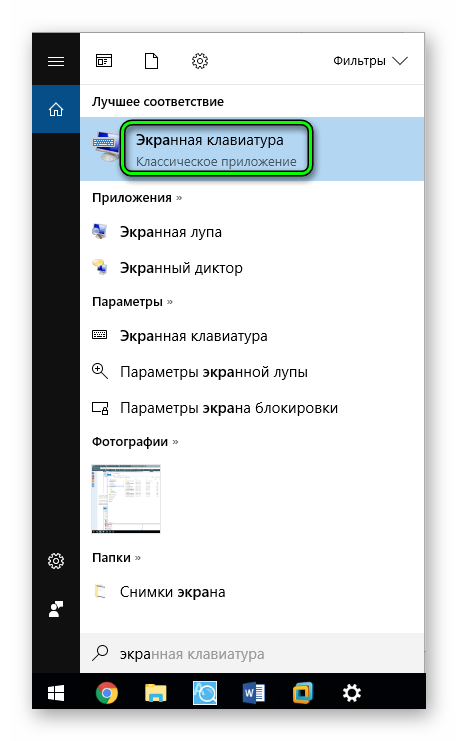
Method number 3 - the same as for launching many others Windows applications 10 To enable the on-screen keyboard, you can simply start typing “On-screen keyboard” into the search box in the taskbar. What’s interesting is that the keyboard found in this way is not the same one that is included in the first method, but an alternative one that was present in previous versions OS.
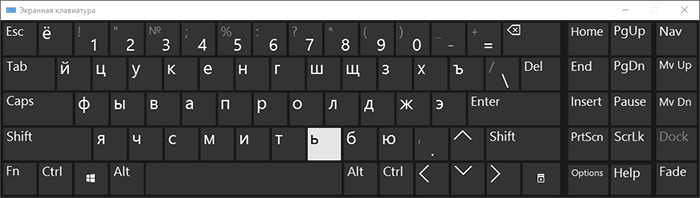
You can launch the same alternative on-screen keyboard by pressing the Win+R keys on your keyboard (or right-click on Start - Run) and entering osk in the "Run" field.
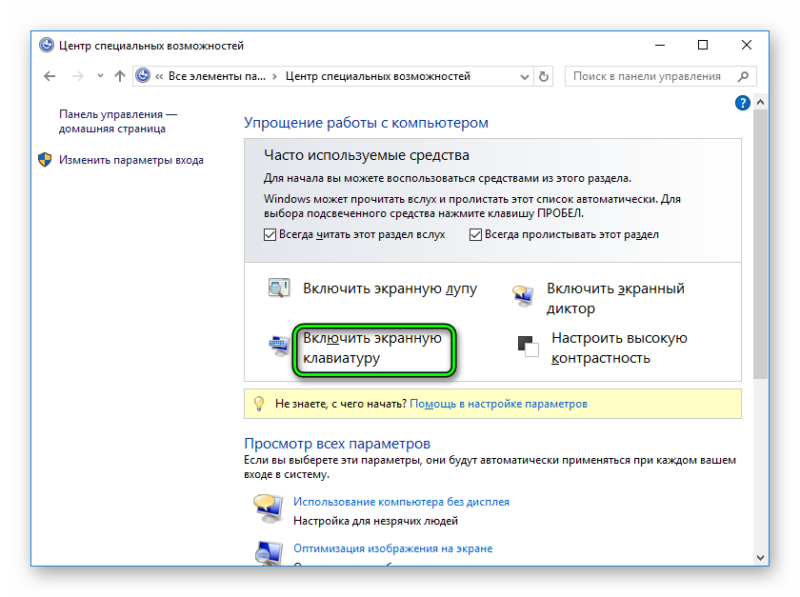
And one more way - go to the control panel (in the “view” item at the top right, put “icons”, not “categories”) and select “Ease of Access Center”. An even easier way to get to the accessibility center is to press the Win+U keys on your keyboard. There you will also find the “Enable on-screen keyboard” option.
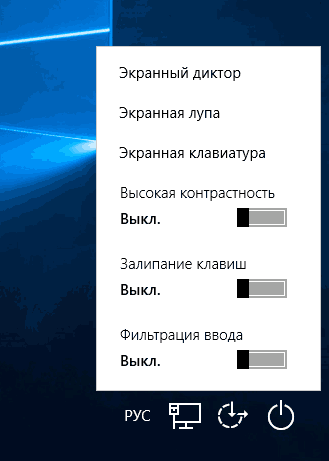
You can also always enable the on-screen keyboard on the lock and input screen Windows password 10 - just click on the accessibility icon and select desired item in the menu that appears.
Problems with turning on and working the on-screen keyboard
And now about possible problems related to the operation of the on-screen keyboard in Windows 10, almost all of them are easy to solve, but you may not immediately understand what’s going on:
- The On-Screen Keyboard button does not appear in tablet mode. The fact is that setting the display of this button in the taskbar works separately for normal mode and tablet mode. In tablet mode, simply right-click on the taskbar again and enable the button separately for tablet mode.
- The on-screen keyboard appears all the time. Go to Control Panel - Ease of Access Center. Find the "Use your computer without a mouse or keyboard" option. Uncheck “Use on-screen keyboard.”
- The on-screen keyboard does not turn on in any way. Press the Win+R keys (or right-click on “Start” - “Run”) and enter services.msc. In the list of services, find “Touch Keyboard and Handwriting Panel Service.” Double-click on it, launch it, and set the startup type to “Automatic” (if you need it more than once).
It seems that I have taken into account all the common problems with the on-screen keyboard, but if suddenly I did not provide any other options, ask questions, I will try to answer.
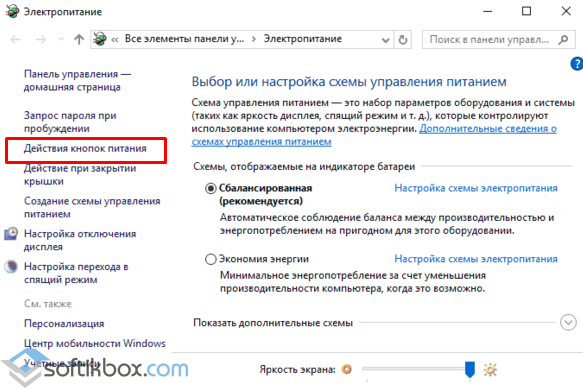
Customize the keyboard in any computer system is one of key factors affecting the provision comfortable work. This applies not only to regular typing or entering commands. Very often certain keys on the keyboard are used in computer games to simplify the control of characters or actions performed by the player. But let's look further at basic settings, which are carried out directly in operating system(on-screen keyboard, accessibility features, and drivers will not be considered).
main directions
Now we do not take into account the subtleties of setting keyboard parameters for playing games, since such settings are made either in the game itself or using special gaming utilities.
The main directions on how to customize the keyboard are:
- installing, adding or removing languages;
- setting parameters for changing language or layout;
- changing the language switching order;
- setting the type of language bar.
How to customize the keyboard in Windows 10: adding languages
Let's consider this type settings on Windows example 10. In principle, they are the same for all versions of the system, however, in the tenth modification, access to the parameters is carried out slightly differently.
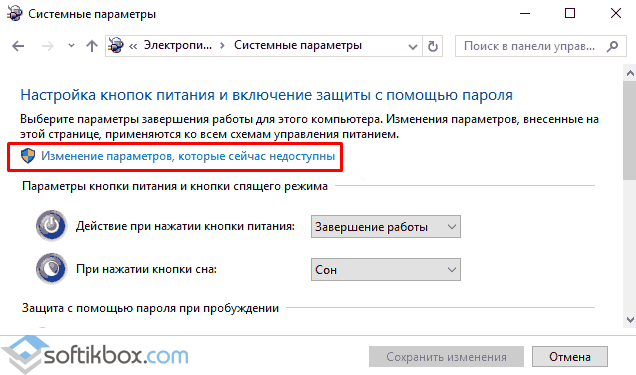
So, how to configure the keyboard in the “ten”? Since it has two main settings panels, you can use either the settings section, called up from the main Start menu with a choice of region and language settings, or the standard “Control Panel”, which can be accessed in the simple case carried out through the “Run” console by entering the Control command.

In the first case, on the right in the window where the installed languages, you just need to click the add new language button and select the one you need from the list.

In the second option, select the “Language” menu in the “Control Panel”, after which you use the add language item, which is located on top panel on right. Again, simply select from the list desired language and layout.
Please note that language and language layout- not the same thing. For example, for in English Both English classic and American layouts can be used. The Russian layout can correspond to both Russian and Ukrainian language etc.
Nuances when installing a language change
Now, in the question of how to configure the keyboard, it is worth paying attention to the sequence of switching languages if more than two are installed on the system.
Probably, many people noticed that when using any combination of changing the language, the switching occurs in a strictly defined way. For example, the first switch Alt combinations+ Shift or Ctrl + Shift on the left corresponds to the setting of the English language, the second (also on the left) - to another language. But what if the user wants to use such a switch to install not English at the first stage, but some other language installed in the system?
Appeared in Windows 10 interesting opportunity shifting languages according to their switching priority. In the language section of the Control Panel, languages can be moved up and down, which changes the language of the first switch when using the left one or a combination. For example, if Russian is the first language, English is the second, and any other language is used as the third, for this sequence the language change will occur in the specified order. By moving the third language to the place of English (in the second position), the user will receive its activation the first time he switches from the left side of the keyboard and vice versa.
In addition, if you go into the settings for each language, you can see several additional settings, including even checking spelling as you enter text with strict matching. You can immediately change the language of the operating system itself, configure handwriting etc.
Changing keyboard shortcuts
Now a few words about how to configure language switching on the keyboard using button combinations. This is done in the language section of the regular “Control Panel”, where you use the transition to additional parameters, and in the settings window, click the hyperlink to change the language bar keyboard shortcuts.

After this, the user is taken to the standard settings window, which is present in all Windows versions. Here you press the button for changing combinations, select the most convenient one from the list (for both language and layout), after which the changes made are simply saved. After this, the installed keys on the keyboard for quick change will be activated automatically and without rebooting the system.
Displaying the language bar
The appearance of the language bar can also be customized for ease of use. This is done from the section that was described for changing keyboard shortcuts, but only on the “Language Bar” tab.
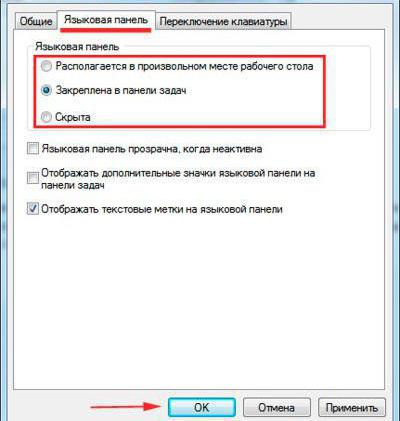
Most users prefer to use the pinned option in the “Taskbar” (in this form, the language icon appears in the system tray next to the clock). However, you can place language bar to any other place on the “Desktop” or even hide it completely. It is better to leave the display of language labels, but you can leave the display of additional icons or the use of transparency when the panel is inactive.
Possible malfunctions and methods for eliminating them
Finally, regarding the question of how to customize the keyboard, it is worth mentioning situations when the assignments of the keys need to be changed (for example, when the buttons break or when the letters are randomly changed or an action involving reassigning the buttons).
Without the use of third-party programs that allow reassignment, in Windows you can only use system registry. But without knowing the codes corresponding to each button or action, the order of creation string parameters and entering data will be quite problematic.
Therefore, in most cases, as a more simple solution suggested to install special utilities like Microsoft Keyboard Layout Creator, Media Key, SharpKeys or MapKeyboard. In such programs, you can reassign any key within a few seconds. As is already clear, this is both simpler and faster.
There are several types of keyboards: physical and on-screen. The latter is not necessarily sensory. It is designed to navigate between computer components and enter text. You can select the keys of such a virtual keyboard using either a mouse or another input device.
Enable the on-screen keyboard in the Windows 10 operating system
There are several simple methods you can use to enable the on-screen keyboard in Windows 10.
Method No. 1
- Right-click on an empty space on the taskbar and select “Show touch keyboard button.”
- A small keyboard will appear on the taskbar with one letter or number highlighted. Click on it with the mouse to activate the virtual keyboard.
![]()
If this method does not work, move on to the second.
Method No. 2
- Click “Start”, select “All applications”, then expand the “Accessibility” branch. Find “On-screen keyboard” and right-click on the element. Select “Pin to Start Screen.”

Method No. 3
- Click “Start”, “Control Panel”. Select the “Special Features” section. If the view mode is set to “Small icons”, you can immediately select “Ease of Access Center”.
- A new window will open. Click "Enable on-screen keyboard". Also in this section you can disable or configure the use of information input means (keyboard and mouse).

Method No. 4
- Click “Start”, “Settings” and select “Accessibility”.
- A new window will open. In the left menu, select the “Keyboard” section. Drag the slider to the “On” position to activate the on-screen keyboard.
To enable the touch keyboard in tablet mode, the following methods will work.
Method No. 5
- Click “Start”, select “Settings” and “Devices”.
- In the left menu, select “Input” and drag the slider to the “On” position in the “Automatically display the touch keyboard...” item.
- Whenever the keyboard is disconnected from your Windows 10 PC, a touch keyboard will appear on your monitor screen.
What to do if the on-screen keyboard does not work?
- If your on-screen keyboard doesn't work, it may be set to the wrong mode. The fact is that virtual keyboard works separately in normal mode and tablet mode.
- Possibly not included required service. To activate it, you need to do the following actions. Press “Win+R” and enter “msc”.

- Select “Touch Keyboard and Handwriting Panel Service” from the list.

Double-click the service settings, set the value to “Enabled” and restart the computer.
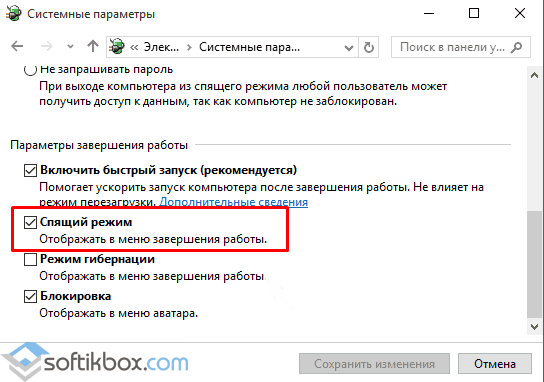
How to make sure that the on-screen keyboard does not start along with Windows, if such a nuance occurs? The on-screen keyboard usually starts up along with the system due to the fact that it was used at the stage Windows installations. In this case, the on-screen keyboard is automatically added to startup. Auto-start of the on-screen keyboard can also be the result of unconscious experiments with system settings by children or beginners. The on-screen keyboard cannot be removed from startup in the usual way, going to the “Startup” section as part of the standard task manager or an analogue implemented by third party programs. It is removed from startup (exactly as it is placed there) in the section system settings special features.
We go to the control panel and using its search engine we get to the Ease of Access Center. Using the Win+U hotkeys will make it easier and faster to get to this Center, but these hotkeys only work for Windows 7 and 8.1.
1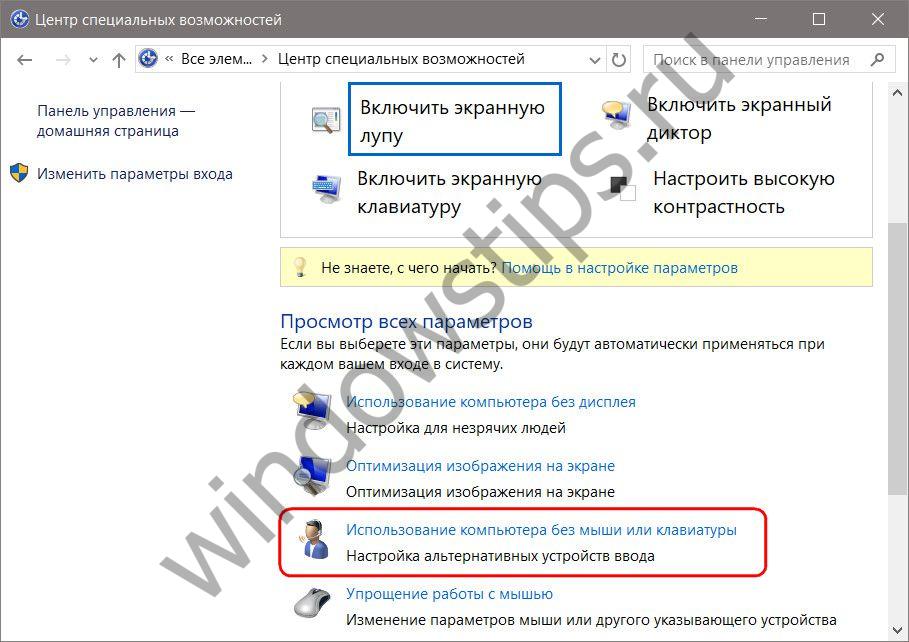 2
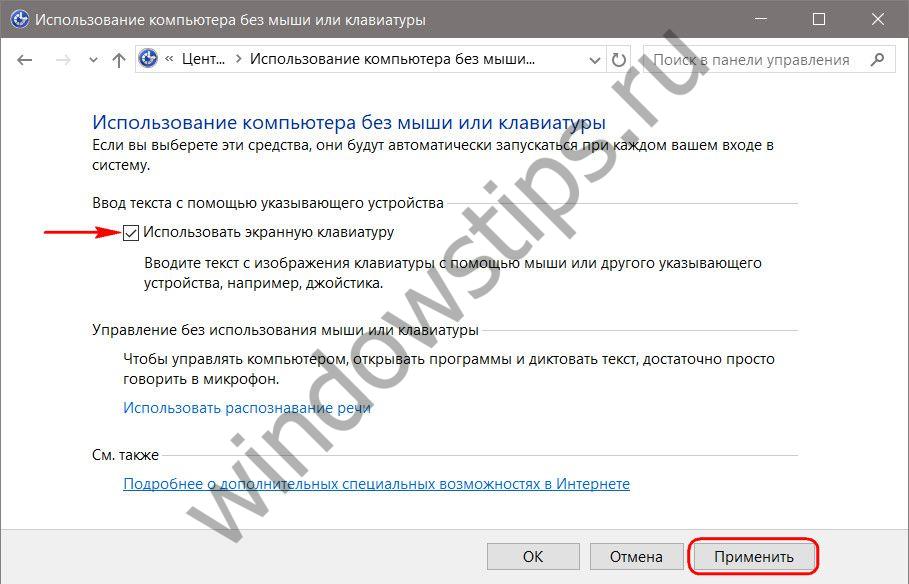
2 The first option in this section is the download option you are looking for along with Windows screen keyboards. To prevent the latter from starting along with the system, the “Use on-screen keyboard” option must be inactive. Uncheck the activity checkbox and apply the changes at the bottom of the window.
 3
3 The reverse process - checking this box if it is inactive - must be done by those who, on the contrary, are looking for a way to add an on-screen keyboard to the system startup.