How to install Explorer permanently on your desktop. Setting up Windows Explorer
Actions with folders and files are performed through Windows 7 Explorer, which allows you to open files and directories, copy them, move them, delete them, rename them and other important operations. Below we describe methods on how you can open Explorer on a computer with Windows 7, as well as solutions to problems when Explorer restarts spontaneously in Windows 7, with specific recommendations on what to do.
How to open through the Start menu?
To launch File Explorer in Windows 7, you need to perform the following several sequential steps:
Launch using the desktop icon
To do this you only need to complete one step:


Via context menu
In Windows 7, the operation can also be performed using the right mouse button:
- Launch the context menu from the “Start” button;
- Then click “Explorer”.
Key combination
This is one of the fastest launch methods. You just need to remember that to do this you need to hold down the “Win” button and click on “E”.
 After this action, an explorer window will instantly pop up on your desktop.
By special team
The algorithm for this method is also not very complicated and consists of only a few steps:

Troubleshooting restart problems
Unfortunately, it is not only the computer owner who can restart Explorer, but also, for example, a virus or an incorrect entry in the registry. Also, frequent restarts may be caused by applications that are incompatible with the OS and incorrectly installed versions of PC hardware drivers.
Basically, the difficulty of the task lies in the user’s ignorance of the true cause of the problem, so it is recommended to follow the recommendations below in their strict sequence.
Note: after completing each step of the instructions, you should restart the PC and check the operation of the explorer. If the error has not yet been resolved, then proceed to the next step.
The following sequential steps are required:

 Next, click “Enter.” In the window that appears, go to the “Services” tab and check the “Do not display Microsoft services” checkbox. Then click “Disable all”;
 If, after restarting the PC, the explorer is already functioning normally, then it can be concluded that one of the disabled services has failed. It is necessary to sequentially reactivate them and restart the computer (this is the only way to identify the culprit of the error).
Conclusion
After completing the above steps, in most cases the error disappears, but if all actions are unsuccessful, you will have to resort to the following measures:
- Install the latest software for the video accelerator;
- Uninstall the programs installed on the PC one by one, starting with the one that was installed most recently;
- Use the Windows 7 recovery function and roll back it;
- Reinstall the OS.
Instructions
Many users of the Windows operating system are familiar with disabling Explorer: all shortcuts disappear from the desktop, the Start button and the taskbar line disappear. The user sees only the desktop background and the window open when the program crashes. To get your computer out of this state, you need to understand the cause of the current situation and know how to fix it.
The immediate cause of the above situation is the termination of the explorer.exe process. Open the task manager by pressing Ctrl + Alt + Del and look at the list of processes. Among them is explorer.exe. If you complete this process, Explorer will turn off and you will lose access to the desktop, files and folders.
Recovering the Explorer process is very simple. Open the task manager, select “File” - “New task (Run)” from the menu. In the window that opens, enter explorer.exe and click OK. The explorer will start, and within a few seconds the computer’s functionality will be completely restored. You won’t even lose data from programs that were open when the crash occurred.
Since Explorer is the main tool for interacting with a computer, many users are trying to improve it in one way or another. For example, you can use the QT Tab Bar program, which gives Explorer new capabilities. You can read more about this program here: http://optimakomp.ru/uluchshaem-provodnik-windows/.
When you open a drive or folder, you work with Explorer. It can also be called through the “Start” menu - “All Programs” - “Accessories” - “Explorer”. When opened this way, the program always shows the contents of the “My Documents” folder, which is not always convenient. But you can change the Explorer settings so that it shows all drives. By then placing the Explorer shortcut on your desktop, you will receive a conveniently configured tool for working with files and folders.
To carry out this modification, open: “Start” - “All Programs” - “Accessories”. Then right-click on “Explorer” and select “Properties” from the context menu. A window will open, you need the “Object” line with the text %SystemRoot%explorer.exe. Replace the line text with %SystemRoot%explorer.exe /n, /e, /select, C: and save the changes. Please note that drive C is indicated at the end of the line; it is the first drive on most computers.
Now open the task manager and end the explorer.exe process. Run it again as described at the beginning of the article. Open Start again - All Programs - Accessories - File Explorer. You will see a convenient list of your computer's drives. If necessary, create a shortcut on the desktop: open “Start” again - “All Programs” - “Accessories”, select “Explorer” with the right mouse button and select “Create Shortcut”. Then drag the appeared “Explorer (2)” onto the desktop and correct its name, if desired.
The Explorer shortcut is a very useful tool that can be placed on the taskbar. Using it, you can quickly go to the “Library” (it contains video, documents, images and music folders). This is also a quick way to get into local drives or other folders located on the computer.
You can either add the Explorer shortcut to the taskbar or remove it (read more about how to add program shortcuts to the taskbar). To add or remove, just open any folder on your computer, then right-click on it (on the taskbar) and select the command “ Remove a program from the taskbar»/« Pin a program to the taskbar».


In this article, I'll show you how to customize the Explorer shortcut so that when you click it, it will open any other folder you want rather than Library. To do this you need:
1. Right-click on the shortcut " Conductor" Then right-click again on the command “ Conductor » from the context menu that opens. Next, click “ Properties ».

2. The dialog box “ Properties: Explorer" In the field " Object» the path to the library is specified. For example, let's make it so that when you click on the "Explorer" shortcut, "Local Disk D" or "Local Disk C" opens.
"Local drive D":
%windir%\explorer.exe /e, d:\

"Local drive C":
This article will talk about different ways to add folders, files and programs to the “Favorites” list of the file manager of the Windows operating system - Explorer.
In the Windows operating system, there is a “Favorites” list in Explorer. To this list, by default, the operating system adds links to certain folders (for example, “Desktop”), as well as to the folders of some programs after they are installed (for example, cloud file storage folders Google Drive, OneDrive, Yandex.Disk and others).
You can easily add other new folders to the Favorites list, or remove folders located there from the Favorites list.
First, let's look at adding links to folders to the Favorites list, as well as removing them from this list.
Removing a folder from Favorites
To remove a folder from the “Favorites” list, you just need to move the mouse cursor to the desired folder and click on the right mouse button. In the context menu you need to select the “Delete” item and after that the folder will be deleted from this list.

Adding a folder to Favorites
To add a new folder to Favorites, you must first open File Explorer. Then you need to select the desired folder and simply drag it, while holding down the mouse button, into the Explorer window into the “Favorites” list. In this case, the inscription “Create a link to Favorites” will be visible next to the dragged folder.
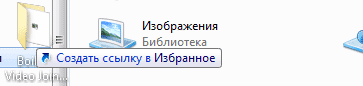
You can add a folder in another way. To do this, you need to open Explorer, and then in the Explorer window, open the folder that you want to add to the Favorites list. In this image, the CD-DVD folder is selected.

After this, a new folder appears in “Favorites”, in the example given - the “CD-DVD” folder.

Recover deleted folders to Favorites
After removing the default folder links, you can restore them. To do this, right-click on “Favorites”, and then select “Restore Favorite Links” from the context menu.
Deleted links to folders that were set to Favorites by default will be restored. This action will not affect previously added folders to Favorites; links to these folders will remain in the Favorites list.

Adding programs to Favorites
Using the methods described above, you cannot add program shortcuts to Favorites. When you try to move a program shortcut to “Favorites”, the message “Could not be placed in “Favorites”” appears.

You can work around this obstacle by opening the Links folder, which contains the contents of the Favorites list.
If the program that you need to add to “Favorites” does not have a shortcut, then you need to create a shortcut for this program and send it to the Desktop.
A shortcut for a program is created in this way - the “Start” menu => “All programs” => Select the program and right-click on it => in the context menu select “Create a shortcut” => “You cannot create a shortcut in this folder. Should I put it on my desktop?” => “Yes.” Now the shortcut for the selected program is placed in the Desktop folder.
After the folder with the program shortcut has been opened in Explorer or the shortcut of the selected program is on the Desktop, you need to open the Start menu and open your personal folder (the name of your user folder) in the very top right corner. The contents of the Favorites list are located in the Links folder.


Open File Explorer, and then drag a program shortcut to the Links folder from the folder that contains the shortcut for the selected program. If the shortcut for the selected program is on the Desktop, then simply drag the shortcut to the “Links” folder.
In the image, I dragged the Skype program shortcut into the Links folder, and immediately after that the Skype shortcut appeared in the Favorites list. In the Favorites list, program shortcuts are displayed without an arrow.

Adding files to Favorites
In exactly this way, you can add individual files to the Favorites list. First you need to select a file that will be placed in the “Favorites” list.
For the example, I selected a “Word document” named “Questions.” You will need to right-click on the selected file and select “Create shortcut” in the context menu.
Before moving a file shortcut, you can remove the ending “Shortcut” from the file shortcut so that the shortcut name does not differ from the file name. This way the label will simply look more beautiful.
To do this, right-click on the shortcut, and in the context menu select “Rename”, and then remove unnecessary words from the name of the file shortcut.
After these steps, you need to open the “Links” folder, to do this you need to follow this path - “Start” menu => “Open a personal folder” => “Links”.
Now drag the file's shortcut from the folder it's currently in to the open Links folder. Immediately after this, a shortcut to the Questions file appears in the Favorites list.

In order to remove added programs and files from the Favorites list, you need to move the mouse cursor over the selected file and select “Delete” in the context menu.
Conclusions of the article
If necessary, the user can add files and folders to the Favorites list in Windows Explorer. If a program or file is not needed in your favorites, you can remove it from there.
1. The Explorer icon can be created through the open main menu using Start – Programs.
Operations in the right pane of Explorer
Creating a new folder in the current folder
You can create a folder using one of the following methods.
Via the context menu.
1. Right-click on an empty space in the right panel to open the context menu.
2. In the context menu, select New – Folder.
3. Enter the name of the folder and fix this name by clicking the left mouse button outside the folder icon.
Via menu bar
1. Open the folder where you want to create a new folder.
2. Select the menu items File – New – Folder (a new folder icon with a standard name will appear; you can immediately edit it).
3. Left-click in the name rectangle and type the name.
Create a shortcut to a program or existing document
When creating a shortcut, you can use one of the following methods.
Via the context menu.
1. Open the context menu in an empty space of your open folder.
2. Select Create - Shortcut - in the dialog box, click the Browse button, in the folder structure that opens, find the location of the object for which you are creating a shortcut.
3. Select the found object and click the Open button.
Via drag and drop in one of two ways.
1. Drag selected objects with the right mouse button; when you release it, a context menu opens, from which select the Create shortcut command.
2. Dragging the Selected objects with the left mouse button from folder to folder while simultaneously pressing CTRL+ SHIFT, in the context menu that opens, select the Create shortcut command.
Via the menu bar.
Select the object, select menu items File - Create shortcut (the shortcut is created in the same folder).
Changing a shortcut
1. Select the desired object (launched file) for which you want to change the shortcut.
2. Open the context menu for this object, select - Properties - Shortcut tab.
3. On this tab, click the Change icon button.
4. Review the family of symbols, select the icon that suits you and click OK (to change the icon).
5. Click OK in the Shortcut Properties dialog box
Deleting an object
Removal is carried out in one of the following ways.
Via the menu bar.
1. Select the object to be deleted.
2. Select the menu item File – Delete and confirm deleting to trash
Via the context menu.
1. Select the object to be deleted.
2. Open the context menu and select the Delete command and confirm deleting to the trash.
Deleting using the Delete key on the toolbar and the DEL key on the keyboard is also carried out in the trash.
To delete objects bypassing the trash can, use the DEL+SHIFT keys together.
Copying and moving an object to a random folder
Such operations are carried out by copying an object from the right panel of the Explorer window to the left panel.
Using DRAG & DROP technology.
1. The folder of the copied object is open in the right panel.
2. In the left panel, find the folder where the selected object from the right panel will be copied (click on the + or - icon to expand and collapse folders, but do not open them, otherwise the contents on the right side of the panel will change).
3. Then drag (copy) the selected object from the right panel to the receiver object in the left panel (hover over it). If you are above the desired folder, the color of its name is inverted. releasing the button at this moment guarantees a 100% hit.
Copying (moving) an object via a buffer.
1. Open the source folder and select the desired object.
2. Then we place (copy or cut) this object into the clipboard using the context menu or toolbar buttons, or the Edit menu bar item.
3. Place the cursor at the insertion location and use the same options as in step 2 - paste the object from the buffer.
Changing the display mode of objects in the right panel
4 display methods: large icons, small icons, list, table.
It is most convenient to switch between these modes on the toolbar using the corresponding buttons.
Another option is through the menu item View - select one of the modes from the list (small, large, list, table).
A table is a display of the contents of a folder in several columns: name, type, size, changed. Using a table, you can sort by a specific criterion by left-clicking on the column header. You can resize columns using your mouse. Place the mouse pointer on the border of the columns and use the left mouse button to drag the border in the desired direction.
Group operations with objects.
Copy operations are carried out not only with individual objects, but also with a group of objects.
First you need to display objects in the form of a list or table.
Methods of selection: 1 object - click with the left mouse button; a group of objects - using the keys Shift + left mouse button - select objects in a row, Using the CTRL key - select any objects in random order.
Search tools
The search engine is called through: menu Service – Search – Files and folders or main menu Start - Find - Files and folders. The Search dialog box opens.
Tab Name and location allows you to limit the search to a certain category of object names and folders in which they may be located.
Fig 9. View of the Search dialog box
Tab Date- allows you to limit the search to a specific date range.
Additionally, it allows you to specify the type of file being searched and set the range of its expected sizes.
Line Name- allows you to enter the name of one specific file or group of files using a name template (the metacharacters * and? are used in the name).
Line Search text– allows you to enter a text fragment that may presumably be contained in the searched file.
Line Where to look– is a combo box that allows you to select the drive or folder name (use the Browse button) in which to search.
Checking a box on a line Including nested subdirectories produced if it is necessary to search in all underlying subdirectories.

Rice. 10 View of the Date tab of the Search dialog box
Button Find is the start of the search, button Stop– stops searching, button New search resets all settings for a new search.
You can narrow your search by combining tab conditions. Name and location, Date And Additionally.
In Fig. Figure 10 shows search modes with checking the date of creation or modification.
All files mode – disables the date checking mode when searching.
Find all files mode – enables date checking.
Remaining modes: between, for the last X months, for the last X days– allow you to find files or folders for a certain time interval.