How to split a hard drive into 2 disks. How to partition a hard drive
Dear friends, today I want to tell you how break hard windows disk 7 into sections without formatting it. Everyone clicked on the computer icon and saw that there were hard drives"C" and "D", I won't dwell on removable media. The standard situation is when on drive “C” we have, and on drive “D”, those who take care of their documents, we store photos, videos, films, music files and of course we install it there various programs and games. Those who installed the operating system on the computer themselves, during installation saw that you were asked to format the hard drive and configure hard drive, that is .
It would seem then that there is nothing complicated, formatted “C”, you want to break it into sections, but you want to install the whole system. But this is “C”, but what about “D”? You can’t create a partition without formatting, but I’m not going to format it either, I have data collected on it for almost a whole year.
Why did he give up this section anyway? I started looking on the Internet for information on how I could split the “D” drive without losing data. There are a lot of articles - format and break them up. Or split without formatting using this, this, and this program. In general, everything is as usual.
I won’t burden you with unnecessary information, but will describe it in detail, with pictures. how to partition windows 7 hard drive into sections without formatting it.
Go to the “Start” menu and enter “Computer Management” in the search bar. Select the “Computer Management” tab. A window will open in which you need to click on “Disk Management”.

In the window that opens, click right click mouse on the disk you want to partition. In the window that pops up, click on the line “Compress volume”.
Scanning of free space will begin.

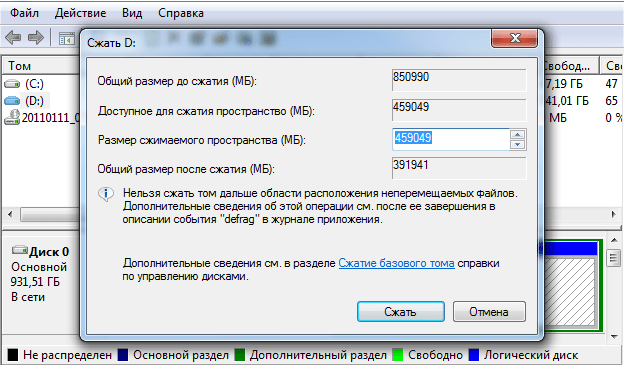
A window with settings will open, that is, you will see how much maximum space you can take from the disk (most likely “D”; you won’t be compressing the volume on drive “C”, where the operating system is located) for the disk you are creating. Feel free to exhibit maximum value(without going beyond the limits suggested to you), if compression is not possible, then reduce the volume for compressing the partition. Do not be afraid - on the partitioned disk, in addition to your files, after these actions there will also be a lot of free space. Click the “Compress” button.
You will see what has appeared free space. Right-click on it in the “Create Simple Volume” window that opens. The "Creation Wizard" will open. simple volume" Click “Next”.

Here set the maximum value proposed to you that you have chosen. Click "Next".

Here you will be asked to assign a drive letter. Select the partition letter and click Next.

After selecting a letter, you need to format the created partition. The “Master...” will do all this himself. All that remains is to click “Finish”.
Reboot the computer. All! You have new section(new volume). . If you don't like the name of the section you created - " New volume", then right-click on it and click "Rename". Just remove the “New Volume” label. The computer will then call it “Local Disk” by adding the letter you assigned.

Well, that's all, now you know how to break hard drive windows 7 easy and simple. Good luck everyone!!!
Hi all! As a standard, the hard drive is cut into two parts: for the system and for the user. This division seems unfair to me, because over time it accumulates large number information and find required file in a maze of folders it becomes impossible. Therefore, today we will look at how to partition disks on Windows 7.
Why do this at all? Here are some reasons:
- Safety. Most often when installing games or entertainment programs. If you give this category a separate place, it will be much easier to localize and fix the problem.
- Convenience and practicality. It's like putting things into shelves. After all, in life no one stores work documents, say, in the refrigerator. Therefore, it is better to divide everything on the computer so that it is in its place.
- Functionality. You'll be surprised how many useless files you have on your computer once you start categorizing them. The first step to clearing your device of information garbage is to increase the number of memory sections.
Now let's move on to how to split a hard drive into two. The process can be roughly divided into two parts: cutting off a piece free memory from existing disk and creating a new section from the resulting material.
How to create a section of unallocated memory
Partitioning the hard drive into partitions in Windows 7 begins with startup. It can be opened in two ways: by simultaneously pressing on Win keys and R or in the “Start” menu, find the “ ” program.

Command line– a program that executes requests. To go to disk management, there is a command diskmgmt.msc.

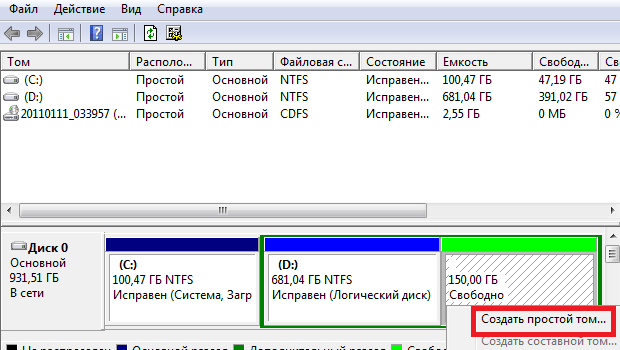
After the transition, a menu opens with all sections of hard disk. In my case on Windows 7 it looks like this:

Disk D has 500 gigabytes free. Using this space, I will create an F drive specifically for storing TV series.
First of all, you need to select the volume from which you plan to allocate space to create a new storage, and, calling up the functions menu, select “Shrink Volume”.

The computer will send a request to the system about the amount of available space. At this time, you should not work with files stored on the disk being scanned. The “thinking” process takes from a few seconds to a couple of minutes, depending on the size of the disk and the power of the computer. Once the data is collected, you will be able to see a summary of the information.
Everything is written in megabytes, to convert to gigabytes the number needs to be divided by 1024. I have enough space for TV series at 150 gigabytes, multiplying 150 by 1024, it comes out to 153600 megabytes. I enter the data and start the compression.
How to create a new partition
The first results can be observed immediately. The system received data about the new memory area and added information about it to the general screen.

Now all that’s left to do is to make sure that the computer displays this section of memory as separate disk. Let's call already usual menu management and select “Create simple volume”
The Partition Creation Wizard will launch. A program that makes working with Windows easier. The default settings there are optimal. You can simply click “Next” until it opens last window. In it, the operation is carried out by pressing the ready button.

The new volume will be created quickly. To make sure everything went well, open My Computer. In my case it looked like this:

Thanks to these simple steps, working with your computer will be simplified due to the ability to rationally distribute files.
If you are still not sure whether partitioning your hard drive will work, you can watch the video on the topic of the article:
Split the disk into Windows partitions 7 is best during Windows installation. We will perform all disk operations using Windows installer 7.
And so it is with you new computer or new hard drive on which you want to install Windows 7. Perhaps the computer is not new, the disk is also not the latest, but you want to kill EVERYTHING old on the disk and install Windows 7 cleanly, from scratch. By the way, it is always better to install Windows completely, that is, after formatting the disk. To do this, go to the BIOS, do the installation "", insert the installation into the drive and reboot the PC. If you want to install Windows from a flash drive, then first connect the flash drive, then turn on the computer, go into the BIOS, and make the installation Boot PC from a flash drive or USB drive.
Select the installation type "Full installation"
The installation of Windows 7 begins. When it comes to the screen shown in the picture above with the inscription "Select installation type", select the second item with the inscription " Full installation". It is outlined in a red rectangle.
Next, a screen will appear that says “Select a partition to install Windows.” If you have new disk or a computer with which no one has done anything yet, then you will not have a single partition created and only the inscription “Unallocated space” and the full capacity of the disk.
Disk setup

To start working with the disk, click the “Disk Setup” button. You will have several new buttons: “Delete”, “Expand”, “Format”, “Create”. See below.

Create a system partition
Click the "Create" button. And a line appears on our screen, consisting of a “Size” window and two buttons “Apply” and “Cancel”. 
Setting the size of the system partition
If you don’t change anything and just click the “Apply” button, then only one partition will be created, occupying the entire disk space. You can't do that!
For data security purposes and to speed up the operation of the OS, we will leave only a small piece for Windows. This is what will happen system partition. And we will use the rest of the space to store our data. And so on in the “Size” window, delete the numbers and write, for example, 50,000, as in the picture below, and click the “Apply” button. (Why exactly 50 GB is described in the article " ). Or other numbers if you want to create a disk partition of a different size. 
Creating/cancelling the creation of a "System Reserved" partition
A window appears with a suggestion and a warning: “To ensure correct operation all its capabilities, Windows can create an additional partition for system files." If you want your Windows to work correctly, click the "OK" button, as below on the screen. This is what the majority does and this is correct. (If someone suddenly wants their Windows worked less correctly, then you can click “Cancel.” Then the partition for system needs will not be created and you will save only 100 MB of space on your huge hard drive. Well, I don’t think there are any like that. Although, anything can happen in life.) 
If you clicked the "OK" button, then two sections will appear on the screen at once: 1 - Reserved by the system exclusively for system files of 100 MB in size and 2 - Primary (this will be our system disk). And there will also be a significant piece left occupied space.

We create a partition for storing data.
Using the mouse, select the ruler with the unmarked area and click the “Create” button.

You will again have a ruler with a “Size” window and the “Apply” and “Cancel” buttons.

If you are not going to create additional sections (and I don’t advise you to create anything else unless absolutely necessary), then simply click the “Apply” button without changing anything. 
Another section will appear on the screen and it will be highlighted. The partitions we created are only allocated disk space. Now it needs to be formatted.
Formatting sections
Click the "Format" button and formatting of the highlighted partition will begin. And before that, the installer will display a message: “When formatting the disk, all information on it will be lost.” This is a warning in case you want to format an already working disk with data. And now we just need to format the prepared section. Otherwise we won't be able to write anything to it. Therefore, click the "OK" button 

The warning window will appear again. Click "OK".

This completes the creation of partitions. You have three sections, but the first one is not yours, but system reserved. The second partition is the system partition, which is 50 GB - this one is for Windows OS. The third, with the remaining volume, is for your data. Your disks are formatted and ready to go. You can continue installing Windows 7. To do this, select the “second” partition, since the first one is reserved by the system. It is important not to make a mistake here. Otherwise, you can install Windows on another partition, and then dividing the disk will be completely pointless. Click the "Next" button. Windows installation will continue.
Removing partitions
If the computer is not new and the disk is already partitioned, but not as you need, the picture will be somewhat different. In the second picture you will have a picture that resembles the penultimate picture of this article. Then you will need to do this. Select the bottom section and click the "Delete" button (When you delete a partition, all information on it is lost). You will see a line called “Unoccupied Space”. Mark the section above it and also delete it, and so on until you have only one ruler left with an unoccupied space. And then we do everything as described starting from the second picture.
Resizing partitions
If you are reinstalling Windows 7 - 10 and want to change the size of drive C, but you still have important information, which you are not going to delete, you can perform the expand function.
All necessary sections must be created immediately . Otherwise, the unallocated space will not be available to the system. And you won't even know that you still have free disk space.
Well, if Windows works well, there is no need to reinstall it, but there is a problem with the volumes of the partitions and they need to be changed. What to do then? To solve this problem there is great program" ". It will help you change partition sizes without reinstalling Windows.
The question is quite relevant, since today almost any laptop and any computer finished assembly sold already with pre-installed operating system Windows system. In 90% of cases you will not have broken hard disk, that is, only the system one local disk.
But everyone is accustomed to the fact that the hard drive is divided into several parts, most often there are two of them: one for the system and programs, the second for storing personal information. Let's consider splitting the disk into two parts using the built-in Windows tools 7. Starting from this version, you can partition a disk without third-party software products. In my case, there is only one disk with a size of 60 GB.
Let's try to break it into two parts. To do this, click on the “Computer” icon right key mouse and click on the “Management” section.
In the Computer Management window, go to the Disk Management tab. Our “drive C” will appear on the right side, which we will divide.
We do not touch what is “Reserved by the system”, since the boot area is located in this small area. Right-click on the “drive C” area and in the pop-up menu click on “Shrink Volume”.
And the volume will be polled to determine the available space for compression. Let's wait...
Total size before disk compression: 60938 MB. Space available for compression: 28370 MB. That is, this maximum size, which can be chopped off from “drive C”.
You will have much more, since my disk is small and the system also needs space to store it. After compression, 32568 MB will remain. I recommend for system disk with Windows 7, leave 100 GB if your disk is 500 GB. If your disk is larger, then leave 150 GB for the system.
For the sample, I will leave it as it is, that is, I will try to free up as much space as possible for “drive D” with personal information. After you click on the “Compress” button, the process of allocating space will begin. After minutes of waiting, it appeared free space.
Now, in place of the “Not allocated” section, we will right-click and select “Create simple volume” from the menu.
The Create Simple Volume Wizard opens.
At the next stage, we create the size of the future “drive D”. If you want to split the disk into two parts, then leave it as is. If we want, for example, to split it into three parts, then we write here the size of the second local section, and on the remaining unallocated area we do the same and create a third volume.
In general, I leave it as is so that I get two disks and click “Next”.
At the next stage, select the letter of the future drive. In my case, this is the letter E, since the letter D is occupied by the CD drive.

Often many users need to split one local disk into two virtual ones. Most often this is done for subsequent installation of the operating system or for ease of sorting. For example, one section will store only music, while the second will be used for games and various programs. There are several ways to divide your hard drive into 2 parts. This article dedicated specifically to this process.
General information
If you have only one local disk, it is logical that it will store system files your Windows, and installed programs, and personal information such as photographs and documents. If something happens to the operating system and you cannot fix it, you will need to reinstall it. But during the installation of a new operating system, data may be irretrievably lost.
Of course, you can first copy everything to a flash drive or to cloud storage. But, firstly, there can be a lot of information. And secondly, the OS may break without warning, and you simply won’t have time to save anything.
The best option in this case is to install Windows on another hard drive. But if you have only one, what should you do in this case? Break it into two sections. Each one will work exactly like regular HDD. The only difference is that they will be virtual. 
On one part you can install Windows and various programs. They will still need to be reinstalled when changing systems. And the second can be used to store all materials that will “move” to the new OS. These are all kinds of documents, installers for programs and images of games, photographs, videos, projects and so on.
Windows installation
The easiest way to divide a hard drive into two virtual partitions is to do this during the installation of a new operating system. There is only one disadvantage of this method - the HDD will have to be formatted. That is, it should not contain any data important to you.
It's easier to split the disk into pieces immediately upon purchase. Empty disk Before installation, the OS is formatted and divided into parts. This avoids huge amount problems in the future.
None additional funds you don't need it - just regular installation DVD or bootable flash drive. Such a flash drive can be created using various software, for example, UltraIso utilities.
It is worth remembering that if you want to change the sizes of virtual partitions or combine them into one again, this can easily be done in an already installed Windows.
Separation during installation
There is nothing complicated about this. Follow the instructions provided:

Thus, you managed to split the hard drive into two partitions on a new disk. The volume should be chosen based on your needs. If you want to store only system files here Windows files and nothing more - you can get by with 50 gigabytes. If you are going to install browsers and other programs here, organize a swap file, and save cached information, it is better to set larger volumes.
Preparation with separation using Windows tools
If you already have an OS installed and you are not going to change it in the near foreseeable future, you can use standard tool Windows. In this operating system There is special service, with which you can create and change virtual parts of the HDD. In order to split your media into two partitions, you need to do the following:

Creating a new partition
By following the steps in the previous part of the guide, you will have free disk space. It is already displayed open utility immediately below the list and labeled as “not distributed”.