How to find out phone parameters on Android. What to look for when choosing a smartphone camera
In the process of formatting a document, let it be an abstract or course work, the user has to remove the numbering on the pages in accordance with technical requirements. You can remove page numbering in Word from the entire document at once, or remove it only on certain sheets. All the methods listed below will be relevant for such versions Microsoft programs Word like 2007, 2010, 2013 and 2017.
Remove numbering from an entire document
There are cases when, due to inattention, errors are made in the process of numbering a document. To remove page numbers from an entire document, you must follow these steps.

After completing actions from the first, second and so on until last page numbers will be deleted.
Manual removal of page numbers
If you need to remove numbering from one sheet, then in this case, will help manual method. You need to go to the corresponding sheet, the numbering on which you want to remove, double-click on the page number. 
After the number is highlighted, press the “Backspace” key on the keyboard.
Disabling numbering using headers and footers
To remove numbers only on the first page, without affecting subsequent ones, you need to use the “Header and Footer” function.

After completing the steps, the numbering will disappear from the first page, and will remain in sequential order on subsequent pages. That is, accordingly, the second sheet will be numbered 2, the third sheet will be numbered 3.
It should be taken into account that if there are section breaks in the document, then the removal of numbering will be implemented for each section separately.
When working with text documents Very often there is a need to number pages. Numbering allows you to create a correct table of contents and simplifies navigation through the document.
In text Word editor Page numbering is enabled using the “Page Number” button on the “Insert” tab. Most users know about this and usually there are no problems with it. However, sometimes page numbering needs to be adjusted to the specifics of a particular document, for example, removing numbering from the first page, and not everyone can cope with this task.
Now we will consider just such a problem. The material will be relevant for users of modern Word versions. Such as Word 2007, 2010, 2013 and 2016.
To remove page numbers from title page First, make a simple page number that will appear on all pages of the document, including the first. After that, go to the “Page Layout” tab. Here you need to click on the small button, which is located in the lower right corner of the “Page Options” button block.
After clicking this button, the “Page Settings” window will open. Here we go to the “Paper Source” tab and turn on the “Distinguish between first page headers and footers” option.

Then close the “Page Settings” window using the “OK” button. With this simple manipulation we removed the numbering from the first page Word document.
But there is one important point, now there is no number on the first page of the document, but on the second page there is a number “2”. If this numbering option suits you, then you can finish here. If you want the numbering on the second page to start from number “1”, then you need to go to the “Insert” tab, click on the “Page Number” button and open “Page Number Format”.
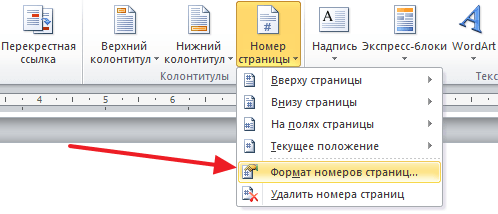
The result will be small window with numbering parameters. In order for the number “1” to appear on the second page of the document, here you need to enable the “Start with” option and set the value to “0”.

Thus, after saving this setting, Word will begin numbering pages not from one, but from zero. This means that on the second page we will get not “2”, but “1”, as needed.
It should be noted that this method removing numbering works fine only for the first page of a Word document, but if you need to leave the first two pages or more without numbering, then it will not work. In this case, the document must be separated using section breaks. You can read about how this is done.
Not every document needs page numbers. Therefore, when users get their hands on typed text, many of them begin to be interested in the question: how to remove page numbering in Word.
There is nothing complicated about this. And after reading this article, you can be convinced of this.
Typically, page numbers are placed in the header and footer area. Therefore, to remove page numbering in Word, you need to go to header and footer editing mode.
If the document is numbered at the top or bottom of the page, move the mouse pointer over the page number so that it looks like an arrow and double-click on it with the left mouse button. The header and footer area will be delimited by a blue dotted line with the text on the left side: "Header" or "Footer".
Select the page number and press the “Delete” or “Backspace” button on your keyboard.
If the numbering in the document is placed in the page margins, then clicking on it will not switch to the header and footer editing mode. To remove this type of numbering, open the “Insert” tab and click on the button "Header" or "Footer". Select from drop down menu "Change footer".

The header and footer editing mode will open. Select with your mouse the area that limits the page number and press “Delete” or “Backspace”.

To exit the header-footer editing mode and return to working with text, double-click on the text with the left mouse button.

There is another way that will help remove automatic numbering pages in a document. To do this, open the “Insert” tab and in the “Header and Footers” group, click on the button "Page number". Next, from the drop-down menu select "Remove page numbers".
Page numbers in the document that appear at the top, bottom, or in the margins of the pages will be removed.

To remove numbering from the first two pages in Word, do the following. Go to header-footer editing mode: double-click on the number at the top or bottom of the page with the mouse. Next on the tab "Working with headers and footers"– “Designer” check the box "Special footer for the first page". Exit header and footer editing mode.

After this, place the cursor at the end of the text on the first page of the document. Go to the tab "Page Layout"– “Breaks” and select from the menu "Next page".

As a result, the numbering from the second page in Word will be removed.

Now you should not have any questions about how to remove page numbering in Word 2007, Word 2010 and later versions. In addition, we figured out how to remove numbering from the first page or from the first two pages in a document.
Rate this article:When writing graduation papers, abstracts and reports require the creation of a title page with general information(title, topic, author, company or educational institution etc.). The cover of the work should not contain extraneous characters and is most often written according to a predetermined template that meets the requirements. In most cases, the user can only insert his data into the “header” of the sheet, and then add this blank to his work. In this article you will learn how to remove the page number from
Differences between versions
Because every few years Microsoft updates its package office programs, their functionality or interface often changes. This instruction Suitable for all versions of Word starting from 2010. The differences will be minimal. Removing the page number from the title page is very easy using the instructions below.
Removal instructions
We need to perform two procedures - delete the first number and start numbering from number 1 on the second page. Let's look at them in order. First, let's find out how to remove the page number from the title page standard means programs:
- Place the cursor on the first page. Then open the "Page Layout" section. In Word 2016, you need to go to the "Layout" section and select the "Page Setup" window.
- Go to the "Paper Source" tab and click on the checkbox next to "first page". Close the settings window with the OK button.
- The number on the title page will now disappear.
There is also alternative way. To do this, you will need to go to the “Designer” section. Then click on the footer to open the settings menu. Check the box "Special footer for the first page" and erase the number from the "title".
Now you know how to remove the page number from the page. All that remains is to correct the numbering of subsequent pages if necessary. To do this, follow the instructions:
- To reassign the number of the second sheet to one, open the "Insert" tab.
- Now click on the "Page Number" button and open the "Format" item.
- In the "start at" line, set the ordinal value to 0 so that the second sheet starts at one.

These instructions are suitable for any type of numbering, regardless of its location and settings. It takes no more than a minute to remove the page number from the title page in Word.
Also, in many works it is necessary to disable numbering on several subsequent sheets. For example, when after home page content should go. Then it is recommended to do next steps:
- Place your cursor on the second page, where the content is located.
- Then click on the "Page Break" button in the "Insert" tab.
- Now the first section is the initial two sheets, and the second is all the rest. To break the connection between them, double-click on the footer.
- Click on the button to go to the next section. Select "Same as previous section". After this, the two sections of the document will no longer be related to each other.
- Now let's edit the second section. Open the header and footer editing again. Go to the “Page Number Format” settings and set the numbering to the desired number. If the section is preceded by a title page and contents, then the numbering should begin with the number 3.

Now you know how to remove the page number from the title page (2010-2016 Word). Using these instructions, you can easily edit documents according to all requirements. You can also use separate tool on creation title pages. If you don’t have an exact template, then you can create the title page manually. Word comes with many pre-built templates. They all differ in background, design, color, row layout, etc. If necessary, you can download additional templates from the official website office.com.