Create animation using the timeline. Photoshop Lessons
Creating realistic snow using technology digital drawing may well seem quite a difficult task to some. Not long ago we brought to your attention a tutorial on adding static snow to a photo, and today's Photoshop tutorial will show you a method for creating a realistic animated snowfall and then converting it into an animated GIF file. So let's get started!
Lesson Presets
Video without comments
This video was recorded during the creation of the lesson. Unfortunately, we did not have the opportunity to record the corresponding comments, so the video does not contain audio accompaniment.
1. Making snowflakes
Step 1
Create new document with a canvas size of 800x800 pixels
Step 2
Select the Brush tool and set the size to approximately 4 pixels

Step 3
Create new layer, and randomly scatter a number of black dots across the canvas. Each dot will represent a separate snowflake. Name this layer “Snowflakes”. Try to avoid concentrating too many snowflakes in one area.

2. Setting up animation
Step 1
Before we start animating the snowflakes, let's once again clearly imagine their flight. As they fall from the sky, they randomly change their direction, deviating from side to side, which together gives this spectacle some grace (note the picture below). So, we can break the flight of a snowflake into two components: from top to bottom, and from side to side. We'll start the animation by making the snowflakes move from side to side.

Step 2
Open the timeline: Window > Timeline

Step 3
The Timeline panel will open. But you won't see the timeline itself yet. Pay attention to the single button in the center of the panel, prompting you to select which scale you would like to create. Make sure the “Create Video Timeline” option is selected.

Step 4
Now that we have a timeline specifically for the video, it should display two layers corresponding to the two layers available in the Layers palette. Click the arrow next to the name of the snowflake layer in the timeline panel. This will give you access to the animation properties.

Step 5
Make sure that the playback queue indicator is in the position corresponding to the very first frame, and click on the stopwatch icon shown below. This will automatically place the keyframe on the first frame.

Step 6
Before we start bringing the snowflakes to life, I suggest you place some guides on your canvas. Enlarge the image of one of the snowflakes and place a vertical guide on top of it.

Step 7
Then place two more guides on the sides of the snowflake. This will set the distance the snowflake deviates as it moves from side to side.
To position the two side guides symmetrically, you can use the ruler, the display of which is activated by the keyboard shortcut Command/Ctrl + R.

3. Lateral movement animation
Step 1
Now that our scene is prepared and we have access to frame-by-frame animation, we can start moving our snowflake. Position the playhead at the 1 second (1:00f) mark on the timeline, then use the Move tool to move the snowflake to the left guide line.
If you hold Shift at the same time, the movement will be strictly horizontal.

Step 2
Now move the slider on the time scale to the third second mark (3:00f) and move the snowflake to the right line.

Step 3
Finally, position the slider on the time scale at the 4:00f mark and move the snowflake back to the center guide line.

Step 4
Since your animation will only play for four seconds, we need to position the end work area at the 4 second mark. Move the end of the work area slider to the 4-second mark on the time scale. Then expand the drop-down menu on the right top corner time panel, and select Loop Playback.

Step 5
By pressing the Spacebar you can preview the created animation.
Step 6
Here you can see that the movement of the snowflakes is too sharp. This can be corrected by adding additional frames. So, position the slider on the time scale just before the 1:00 mark, and notice the position of the snowflake.

Step 7
Use the arrow key to move the snowflake closer to the guide line.

Step 8
Repeat this procedure, positioning the time scale slider on the other side of the 1:00f mark.

Step 9
The same thing around the 3:00f mark

Step 10
Preview the animation by pressing Spacebar. By moving the snowflake closer to the guide line, we thereby “softened” the moment of change in movement. As a result, the movement of snowflakes became more natural.
4. Developing animation
Step 1
Now that our snowflakes can move from side to side, we need to make sure that none of them leave the canvas while moving. To do this, identify the snowflakes that disappear beyond the boundaries of the canvas, and erase them using the Eraser Tool.
Step 2
Click on the eye icon next to the name of the background layer in the layers palette. As a result white background will be hidden and snowflakes will be displayed on transparent background.

Step 3
Select both layers in the layers palette, right-click on them and select context menu“Convert to Smart Object” item. It is important that both layers are selected.

Step 4
The next step is to increase the size of our canvas, freeing up space to animate the snowflakes flying down. Select the Crop Tool (C) and drag down the bottom edge of the canvas. If you hold Alt while doing this, the canvas will expand proportionally in both directions.

Step 5
Create a new layer under the snowflakes layer and fill it with white.

Step 6
Place the snowflakes layer at the top of the canvas.

5. Downward Animation
Step 1
In the Timeline panel, click the arrow next to the name of the snowflake layer to access the animation properties. Please note that the Position property has been replaced with the Transform property. This happened because we converted the layer to a smart object.

Step 2
Place the workspace end marker at the 4-second mark (4:00f).

Step 3
Move the timeline slider to the first frame and click on the stopwatch icon. Set the keyframe to the first frame.

Step 4
Move the time scale slider to 4:00f, and use the Move tool to move the snowflakes to bottom part canvas.

Step 5
Press Space to preview animation. Snowflakes smoothly fall down, gracefully deflecting from side to side. In the next few steps we will fill the entire canvas with snow.

6. Adding Snow
Step 1
Create a copy of the snowflakes layer: Layers> Create a duplicate layer (Layer> Duplicate Layer). The same can be done by dropping a layer with snowflakes on the create a new layer icon at the bottom of the layers palette. When duplicating a layer, the animation is preserved. Keep in mind that when creating a duplicate layer using the usual Command/Ctrl + J combination, a duplicate will be created without animation.

Step 2
Move the copy along the timeline to about the 10f mark.

Step 3
Press Spacebar to preview the created animation. Now our snowflakes fill most of the canvas when falling.

Step 4
Repeat the process until the entire canvas is covered in falling snow. You may have to manually adjust the storyboard for some layers.
Step 5
Notice how the falling snowflakes look too synchronized. To add a little more chaos, we'll create another copy and adjust its animation so that these snowflakes fall a little faster than the others.
In addition to this, you can slightly adjust the animation of already created copies by varying the speed of their fall. Just make sure that there are no gaps in the density of the snowfall.

Step 6
Select all the created layers with snowflakes and convert them into one smart object.

7. Making the movement of snowflakes even more erratic
Step 1
Our snowfall is looking pretty good. But it can still be improved. What we'll do in the next few steps is to add even more variety to it. Start by making a copy of the snowflakes layer (Command/Ctrl + J). Since all our animation is now contained within one smart object, it will be completely preserved when copied.
Make sure the timeline slider is positioned on the first frame so that the animation of the created copy lasts the full 4 seconds.

Step 2
Activate Free Transform (Ctrl+T) and make this layer a little larger, also rotating it a little.

Step 3
Create another copy (Command/Ctrl + J) resize it and rotate it to opposite direction. This will create the effect of the intersecting path of snowflakes, making their flight even more natural.

Step 4
Continue creating copies of the snowflake smart object, transforming and changing the animation speed of each one. In this case, snowflakes on a vertically stretched layer will fall faster than snowflakes on a vertically compressed layer.
Be careful not to overdo these types of transformations.

Step 5
Press Spacebar to preview the animation. Since we added layers, and layers in the form of animated smart objects, it may take Photoshop some time to render the next preview.
Step 6
Make sure the end of work area marker is at the 4 second mark (4:00f). When you are completely satisfied with the created animation, select all the layers and combine them into one smart object. Rename it “Snowfall”. Press Command/Ctrl + S to save the file.

8. Preparing the image to which snow will be added
Step 1
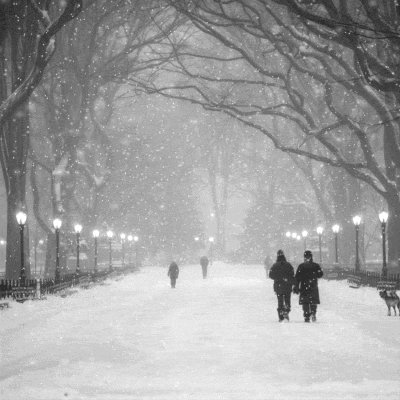
Now that we have the snowfall ready, we can start preparing the photo to which the snowfall will be added. Open the photo of your choice. In my case, this is a photo of a snow-covered park alley.

Step 2
The next step is to crop the photo. I don't really like cropping photos, especially other people's ones. But since our finished image should be a square GIF, we'll have to apply cropping. Select the Crop Tool (C) and set the aspect ratio to 1:1 (square).

Step 3
Position the handles so that you have a 600x600 px square and press Enter.

9. Adding snowfall to a photo
Step 1
Go to the document with the created snowfall, click on the canvas and drag the smart object to the tab of the photo document. Hovering over a tab will open the corresponding document. Move the cursor over an area of the canvas and release the mouse button. The smart object will appear on top of your photo.

Step 2
If the timeline is not already open, open it: Window > Timeline. Click on the Create Video Timeline button.

Step 3
Move the workspace end marker to 4:00f.

Step 4
Press Spacebar to preview the animation. As mentioned above, it may take some time for Photoshop to render the animation. But in the end we will be able to see our snowfall, and very clearly, since our snowflakes are black. We'll fix this later.

10. Filling the photo with snow
Step 1
Now you need to add additional layers to fill the surface of the photo with snow. But first, activate Free Transform (Ctrl+T) and make the snowfall layer slightly larger than the canvas size.

Step 2
Copy the snowfall layer and use Free Transform to adjust the size of the copy in accordance with the alley receding into perspective. Since this layer is reduced in size, the snowflakes on it will fall more slowly (just like in real life).

Step 3
In order to avoid the effect when snowflakes on this layer suddenly appear on top and just as suddenly disappear below, we will use a layer mask. First, turn off the visibility of the original snowfall layer, since we need to clearly see the duplicate. By clicking on special button Add a layer mask (Add layer mask) at the bottom of the layers palette, create a layer mask for this layer. Use a large soft brush in order to mask the top and bottom of this layer.

Step 4
Press Space to preview the created animation. The snow should fall behind the nearest tree line and disappear near ground level.
Step 5
Create another copy of the snowfall layer, and resize the duplicate to be slightly larger than the previously created copy. This layer of snow should be placed approximately half the length of the alley.
The layer mask will also be copied here. Adjust it according to the size of the second duplicate.

Step 6
Create another copy of the snowfall layer (Command/Ctrl +J). This time, clear the duplicate layer mask (drag it onto the trash can icon at the bottom of the Layers palette). Photoshop will ask you to confirm this action. Select “Delete”.

Step 7
Change the layer size. Create a few more copies and vary their size using Free Transform (Command/Ctrl + T).

Step 8
Create another copy of the snowfall layer and increase its size to 175% of the original.

Step 9
Go to the menu: Filter> Blur> Gaussian blur (Filter> Blur> Gaussian blur), setting the blur radius to 2.9 pixels. This will create the illusion of defocus, as if individual snowflakes are flying directly in front of the camera lens.

Step 10
As an additional step, apply another Gaussian blur filter with a slightly smaller radius to the two background layers.

11. Finishing the snow
Step 1
The last thing we can do is make the snowflakes white. To do this, click on the icon of one of the smart objects with snowfall. As a result, the smart object editing window will open. Turn on the visibility of the white background layer here.

Step 2
Now create an Inversion adjustment layer on top of all existing layers. The result will be white snow on a black background.

Step 3
Save the smart object document, close it, and return to your working document. You will notice that the photo has become invisible. Select all layers with snowfalls and set them to Blend mode – Screen.

Step 4
Press Spacebar to preview the animation. All snowfall layers are arranged in accordance with the principles of parallax, which in turn creates a sense of depth.

12. Snow modification
Step 1
Since the snowfall is created using smart objects, we can easily make any changes. So, let's improve the snow. Double click on the smart object icon to open the editing window.

Step 2
If you think that the snowfall looks too uniform, then here you can change the size and position of the layers that form it.

Step 3
Opening each smart object double click get to the original layer with snowflakes.


Step 5
Save and close each smart object. Return to your snowfall scene. Press Spacebar to preview the animation. The snow looks noticeably better.
13. Create a GIF file
Step 1
Most quick way creating a GIF file is a save option for WEB. But in in this case we used large number smart objects including a certain amount layers, so it will take Photoshop a lot of time to process all the information. Instead, we will first create a video file. Go to the menu File > Export > View Video (File > Export > Render Video).

Step 2
Set the settings shown in the screenshot below and click “Render”.

Step 3
Once the file is rendered, save it to your hard drive and open it again in Photoshop. Photoshop will automatically open it as a video file.

Step 4
Now go to the menu File\u003e Save for Web (File\u003e Save for Web), set necessary settings and click “Save” (Done). If you want your animation to play in a loop, be sure to enable the appropriate option.

Congratulations, lesson completed!
In this lesson we learned how to create the traditionally complex animation of falling snow. We used the technique of breaking motion into several components through the use of smart objects. I hope you learned something new here and we were able to show how easy working in Photoshop can be.
Photoshop is still far from being able to create animation in it high quality. But it still has enough features to do so, which is especially important if you don't want to waste time learning a new application.
In this article I will talk about several advanced technologies, which will help you create complex animations in Photoshop. We'll look at timeline panels and the various properties that can be animated. I'll also talk about the importance of adjustment layers, filters, and smart objects for animation.
Timeline panel overview
By opening the timeline panel ( Window > Timeline), you can choose from two types of timeline: video and frame animation. The latter is intended for frame-by-frame animation. This panel works by converting layers in the Layers panel into individual frames. I won't go into detail on this timeline; I'd like to focus on the video timeline instead:
Photoshop has two timelines. ( Larger version)
Timeline for video
The Video Timeline allows you to create keyframes animation, in which you can define key points along the timeline, and Photoshop will interpret the frames in between into a solid animation. Let's create simple animation to see how it works:

The Timeline panel shows layer (1) with properties for layer (2). The timeline shows the current time indicator (3) and existing keyframes (4). ( Larger version)
The timeline image above shows layers from the Layers panel. Each of them contains a drop-down panel that allows you to view the layer properties available for animation. To animate a layer property, click on the stopwatch icon, which allows you to create a keyframe for the animation. Note that the frame is automatically placed on the current time indicator:

The stopwatch icon is selected for the Position property. The frame is automatically added to the timeline. ( Larger version)
Drag the current time indicator to another point on the timeline and move the layer. Another frame will be automatically added to the timeline:

Moving a layer automatically adds a frame at the current point in the timeline indicator. ( Larger version)
When the animation plays, it shows an object on the canvas moving from one position to another:
Photoshop automatically creates animation between frames.
Layer Types
Before we make animation in Photoshop, we will look at all types of layers and their properties that can be used for this.
A standard (pixel) layer is a layer that contains pixel information. This is the main layer type in Photoshop.
Properties for this layer:
- Position;
- Opacity;
- Style.

A standard layer on the timeline with layer properties.
By adding a layer mask or vector mask to any layer, we enter additional properties related to this mask:
- Layer mask position;
- Enable layer mask.

A layer with a layer mask on the timeline.

Layer with a vector mask on the timeline.
A shape layer contains a shape created using the Shape tool or the Pen tool. Because shapes and line segments are created using vector mask information, the properties of that mask are added to the other properties of the layer:
- Position;
- Transparency;
- Style;
- Vector mask position;
- Enable vector mask.

A shape layer in the timeline with layer properties.
The text layer contains editable text. If the text has been rasterized, it will be a standard layer with pixel information. This must be taken into account even before making a gif with animation in Photoshop.
Text layer properties include:
- Perspective;
- Transparency;
- Style;
- Text wrapping.

Text layer on the timeline with layer properties.
A smart object can contain any of the above layer types or a combination of them. It provides a container for any layer that keeps the original layer unchanged, using instead new set properties. These properties include:
- Perspective;
- Opacity;
- Style.

Text layer on the timeline with available properties.
Because the smart object saves original quality layer, it can be scaled without loss of quality. But it cannot be stretched beyond the dimensions of the original layer contained in it. This would lead to a loss of quality.
I would also like to mention two more types of layers - video layer and 3D layer. Both of these layers are significantly different from all the others listed previously. A video layer is a group of layers that contains own set properties. 3D beyond what it contains unique set properties, functions in an environment completely different from other layers, which makes it even more complex. In the pictures below you can see how both layers appear in the timeline:

A group of video layers on the timeline with layer properties.

A 3D layer on the timeline with layer properties.
I advise you, before making a GIF image in Photoshop, to become familiar with these two types of layers yourself. Further in this article I will focus only on standard types layers, no video and 3D.
Layer properties
Let's look at the basic layer properties available for animation.
The “Position” property allows you to move an object along the X and Y axes. The object’s position is controlled using the “Move” tool:
The Position property of the object sets keyframes to move the ball back and forth along the x-axis.
The Opacity property allows you to create layer opacity frames. It is available in the layers panel:
The object's Opacity property is used to create a dissolve effect.
The Style property allows you to create layer style keyframes. You can access them by double-clicking on the layer in the layers palette.
In this article I will talk about what animation is in Photoshop. We'll see how animation works in Photoshop using the example of creating a New Year's banner.
I will work in Adobe Photoshop CS6. My interface is Russian, since I am writing from work.
I have the English version at home, and I advise you to study with the English version, here's why:
- You can easily navigate the program in any language (after English in Russian you can easily find tools, because this is your native language, and after Russian you may have problems with adaptation).
- Majority good lessons are written in English.
- Program localizations often differ from each other, and the quality of interface translation sometimes leaves much to be desired. Incorrect translation of tools can confuse a person beginning to learn the program.
Let's start creating animation in Photoshop CS6
Let's launch Photoshop.
Create a new document File -New (Ctrl+N).
In the window that opens, set the banner dimensions: 600 x 120, let's call it “New Year banner” -> “Ok”.

Creating a background
I select in advance the materials that I will use in my work (backgrounds, fonts, etc.).
Open the prepared texture: Ctrl+O. You can download the texture I use.

Open the layers palette “Layers” – F7.
Select the window with the texture, drag the layer from the layers palette onto the layer with the banner.

If the texture turns out to be too small or very large compared to the banner, adjust its size using the “Ctrl+T” transformation.
Small square markers will appear in the corners of the image. Hold Shift to maintain the aspect ratio as you resize, and drag the corner handle diagonally to reduce or increase the size of the image until the background fills the entire surface of the banner.

After we have adjusted the texture to the size of the banner, we move on to its color correction.
Go to the menu “Image” - “Adjustsments” - “Hue / Saturation” (Image - Correction - Hue / Saturation).

I set the following settings to achieve a bright, saturated color:

We write the text
Create a new layer (Ctrl+Shift+N) or click on the new layer icon in the layers palette.

Select the Horizontal Type Tool (T).
Select a brush with any star, paint with white color #ffffff. To select a color, click on the small square at the bottom of the left panel.

On a new layer, draw stars in random places. To make the stars brighter, click several times in one place. Here's what I got:

Make a duplicate of the layer (Ctrl+J). Click on the eye icon in the layers palette to hide the visibility of the previous layer.

Select the top layer with a copy of the stars. From the left panel, select the Lasso Tool(L).
Select each star in turn, press “V” (Move Tool) and move it to any other place, so in different frames we will have stars on different places, which will create a flickering effect.

After you move all the stars to another place, create a duplicate of the layer you worked on (Ctrl+J), hide the previous layer in the layers palette by clicking on the eye, and again repeat the operation of moving the stars to new places, you can also finish drawing several new stars.
Thus, we will have 3 layers with stars, in each of which the stars will be in different positions.
Everything is ready.
Let's move on to creating animation in Photoshop
Open the timeline. Go to the “Window” menu - “Timeline” (Window - Timeline).

In the timeline panel that appears, we find the button in the middle “Create Video Timeline” (Create a timeline for video).

After this, the scale will change appearance. Now click on the icon with three squares in the lower left corner of the window to create a frame-by-frame animation.

The frame-by-frame animation panel has opened. Now there is only one frame in which all visible layers are shown (the contents of the selected frame are shown in the main window on the monitor).
Go to the layers palette - F7. We now need to turn off the top two star layers (click on the eye), leaving only one visible. This will be the first frame.


Go to the layers palette. Turn off the first layer with stars, turn on the second. Thus, in the second frame we will show stars in other places.

Click on the new frame icon again. Turn off the second layer with stars, turn on the third.

Pay attention to the time under each frame, this is the duration of the frame. 5 seconds, which are the default, is too much for us - the animation will slow down, click on the arrow and set the duration of each frame to 0.1 seconds.

In order for the frames to change smoothly, we need to create intermediate frames between the key frames. To do this, being on the first frame, click on the icon with several circles at the bottom of the temporary panel.

In the window that appears, indicate how many intermediate frames we want to create. I'll set it to 2. For all frames except the last one, set it to "Next frame".

Between the first and second keyframes you now have 2 intermediate ones.
Now we stand on the 2nd key frame (now it is the 4th in a row), again click on the icon with circles and create 2 more intermediate frames. Now we just need to close the last and first frames to get a smooth animation.
Select the last frame in the timeline. Click on the circles. In the window that appears, in the “Intermediate frames” line, select “First frame”, add the same 2 frames.

Now, under the frames at the bottom left, we indicate the number of repetitions of the animation “Constantly”.

Select the first frame, press the triangle to the right “Play” to see what happened.


Selecting the file format for save GIF, click “Save...”, select the directory where we will save, click “Save” again.
So, in this lesson we looked at how to make animation in Photoshop CS6.
I hope you learned something new and useful from this tutorial.
clair123rf; Translation: Fish
Have you ever wondered how animated GIFs are created? The author of the lesson invites you to master some animation secrets in one night with the help of this lesson. You will also learn how to use the Timeline, which is available in Photoshop versions CS6. Now let's begin!
Lesson result.
Step 1
Create a new document ( Ctrl + N) with file dimensions of 800 x 500 pixels. Fill the background with any color you want. Now let's go to the menu Layers - Layer Style - Gradient Overlay(Layer > Layer Styles > Gradient Overlay). Apply the following settings: Style Radial(Radial), colors from black (#000000) to blue (#54799b), which will be used in the center.

Step 2
Create a new layer and name it Noise Layer. Select a tool Fill(Paint Bucket Tool) and fill the created layer dark color(#231f20). Leave the layer active Noise Layer and go to the menu Filter - Noise - Add Noise(Filter>Noise>Add Noise). In the filter settings dialog box, set the following values: Effect(Amount) 3%, distribution Uniform(Uniform) and click OK.

Step 3
Press the key combination (Ctrl + U) and in the correction settings dialog box that appears, enter the values Saturation(Saturation) 100%: Change the blending mode of this layer to Soft light (Soft Light).
Translator's note: In order to achieve the same color as the author in the screenshot, when adjusting Hue/Saturation, you can set the Hue value to - 140.

Step 4
Add any text you want. Here we will use the text of the 123RF website logo. In layer styles use Stroke(Stroke). Select stroke size values according to your preferences.
Translator's note: On the author's screenshot there is already rasterized text along with the Stroke style. To achieve the same effect, after applying the stroke, set the Fill of the text layer to 0%, convert this layer to a smart object, and then rasterize it.

Step 5
In this step we will create a glowing effect for the text using layer styles. Double-click on the layer to bring up the Style Options window. To customize layer styles, use the screenshots below.
Embossing(Bevel & Emboss)

Inner shadow(Inner Shadow)

Inner glow(Inner Glow)

Color overlay(Color Overlay)

Outer glow(Outer Glow)

Shadow(Drop Shadow)

Step 6
Once you're done creating lighting effects using layer styles, go to the Layers palette and reduce the value of this layer Fills(Fill) by 0%.

Step 7
Duplicate the layer you created in step 5 and turn off all layer styles on this copy. Now set the styles like this:
Inner shadow(Inner Shadow)

Inner glow(Inner Glow)

Step 8
Below is the result after you applied the layer styles.

Step 9
Now we will create moving spots of light. Create 5 layers on top of the existing ones, and rename them as 1,2,3, R and F. If you have your own text, create layers according to your letters. Group these layers into a folder and give it a name Light Spots and change the blending mode to Lightening the base(Color Dodge).
Activate the tool Brush(Brush Tool), select a soft brush, set Opacity(Opacity) to 95% and draw spots on top of the text with white color. For each letter there is a separate light spot on its own layer. Below in the screenshot you can see how the author’s layers look in the layers palette.

Step 10
Now let's go to the menu Window - Timeline(Window > Timeline). You will notice that your layers are already built in this palette on the left side of it. Select each of the five highlight layers that are in the group. Light Spots and make sure that the current time indicator (blue slider) is at frame zero. Now on each layer in the group, when it is active, click on the option Position(Position) to create a keyframe.
Translator's note: To activate the time scale, click the button Create a timeline for a video(Create Video Timeline) and all your layers will load into the timeline. The same layer or group will be selected as in the layers palette.

Step 11
Set the current time indicator (blue slider) to 01:00 F and move the layers with light spots along the trajectory of their movement relative to the outline of the letter.

Step 12
This is what it will look like starting position light spot on letters. Move the current time indicator along the scale and move layers with light spots, creating keyframes. Continue moving them until you've finished moving the speck across the entire letter of each text layer. For instructions, see a few screenshots below.
Translator's note: Make small sections to move the light spots so that their movement and, accordingly, the animation are smooth.

To animate the contents of a layer in timeline mode (as opposed to frame-by-frame mode), keyframes in the Animation panel are set when you move the current time indicator to a different time (or frame)
To animate layer content in timeline mode (as opposed to frame-by-frame mode), keyframes in the Animation panel are set by moving the current-time indicator to a different time (or frame) and then changing the position, opacity, or style of the layer's content. The sequence of frames between two existing frames is automatically added or modified, changing layer settings (position, opacity, and style) evenly between new frames to create the impression of movement.
For example, if you want a layer to fade out, set the layer's opacity in the opening frame to 100% and click the opacity stopwatch for that layer in the Animation panel. Then move the current time indicator to the time or frame you want to consider ending and set the opacity of the same layer to 0%. Frames between start and end will be automatically interpolated, and the opacity of new frames will be reduced uniformly.
In addition to interpolating animation frames, you can also manually create frame-by-frame animation by drawing on empty video layers.
If you need to create an animation in SWF format, use Adobe Flash applications, Adobe After Effects or Adobe Illustrator.
To create an animation in the timeline in Photoshop Extended The following general workflow is used.
1. Create a new document.
Set the background size and content. Make sure that the pixel proportions and dimensions match the purpose of the animation. Must be installed color mode RGB. Unless there is a specific reason to change, keep the resolution at 72 ppi, bit depth 8 bpc, and square pixel aspect ratio.
2. From the Animation panel menu, set document timeline options.
Specify the duration and frame rate.
3. Add a layer.
Add one of the following.
New layer for adding content.
New video layer for adding video content.
A new blank video layer for cloning content or creating hand-drawn animations.
4. Add content to the layer.
5. Add a layer mask (optional).
A layer mask can be used to display only part of a layer's contents. The layer mask can be animated to display different parts layer contents at different times.
6. Move the current time indicator to the desired time or frame number where you want to set the first key frame.
7. Enable setting keyframes for the layer option.
Click the triangle next to the layer name. A base-down triangle displays a list of layer parameters. Then click the Stopwatch icon to set the first keyframe for the layer parameter you want to animate. You can set keyframes for multiple parameters at the same time.
8. Move the current time indicator and change the layer parameter.
Move the current time indicator to the time or frame where the layer property changes. Do one or more of the following:
Change the layer's position to give the appearance of content moving.
Change the layer's opacity to make the content fade in or out.
Change the position of the layer mask to show different parts of the layer.
Turn the layer mask on or off.
Some types of animation, such as changing the color of an object or completely changing the content in a frame, require additional layers with new content.
Note. When you animate shapes using the Stopwatch icon for the Vector Mask Position or Enable Vector Mask properties, the vector mask animates, but not the shape layer.
9. Add additional content layers and change their settings if necessary.
10. Move or adjust the layer duration bar to set the time the layer appears in the animation.
To play the animation, use the Animation panel controls. Then view the animation in your browser. You can also view the animation in the Save for Web & Devices dialog box.
12. Save the animation.
You can save the animation as an animated GIF using the Save for Web & Devices command, or as a sequence of images or videos using the Preview Video command. You can also save it to PSD format, which can be imported into Adobe application After Effects.