Remove password when starting Windows 10. stage
If at Windows installation 10 you indicated your account Microsoft entry, then every time you turn on the computer you will see a password prompt. Naturally, this is not very convenient, especially if you use enough complex password. In this material, you will learn how to remove the password when logging into Windows 10 and sign in automatically after starting your computer, even if you use a Microsoft account.
Step No. 1. Execute the “netplwiz” command.
First, we need to run the “netplwiz” command. To do this, open the “Run” menu (combination Windows-R keys), enter this command into the line and press the enter button.
Also this operation can be done using . To do this, open the start menu and enter the command “netplwiz” in search bar. Then run the netplwiz program, which will appear at the top of the search results.

Step No. 2. Disable the password request.
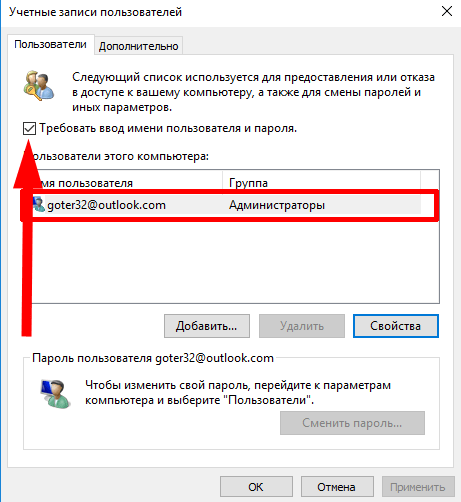
After executing the “netplwiz” command, the “User Accounts” window will open in front of you. It is in this window that we can remove the password when logging into Windows 10. To do this, we need to uncheck the box next to “Require username and password.” After that, close the window by clicking on the “Ok” button.

Step No. 3. Confirm that the password is disabled.
After clicking on the “Ok” button, a confirmation window will appear in front of us without a password. Here you need to enter your current password twice. account The Microsoft you use to sign in to Windows. After that, you need to close this window by clicking on the “Ok” button.

That's it, now you have removed the password in Windows 10, and the next time you boot operating system you don't have to enter it. But, when exiting sleep mode, the password request will still appear. In order to disable the password request in this case, you need to perform another step No. 4.
Step No. 4. Disable the password when exiting sleep mode.
In order to remove the password request when exiting sleep mode, you need to make some more settings to the system.
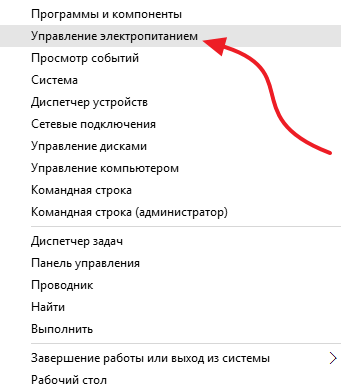
If you have Windows 10 without updates, then you need to click right click Click the “Start” button and select “Power Management” from the menu that opens.
Next, you need to go to the “Request password on wakeup” section. If the “Wake up password request” section is missing, then try opening the “Power button action” section, which should contain the same settings.


After this, you need to activate the “Do not ask for password” function and click on the “Save changes” button. Thus, we have completely removed the password when logging into Windows 10.

But, if you have installed Latest updates for Windows 10, then the “Power Options” section will not have the settings described above. In this case, you need to use the "Options" menu. To do this, open the START menu, go to Settings and open the Accounts - Sign-in options section. There should be an option called “Login required”, you need to switch it to “Never”. After this, the system will remove the password prompt when logging into Windows 10 after sleep mode.

If you have Windows 10 Professional or Windows 10 Enterprise, then you can do the same procedure using the Editor group policies. To do this, run the command “gpedit.msc” and in the window that opens, go to the section “Computer Configuration - Administrative Templates - System - Power Management - Sleep Settings”. There are two options in this section that allow you to remove the password when exiting sleep mode (marked in the screenshot below).

Once again, I repeat that the Group Policy Editor (gpedit.msc) is only available for Windows 10 Professional or Windows 10 Enterprise. If you have Windows 10 Home, then you will not be able to gpedit.msc and will need to configure it through the Options menu.
If you are the only one using your computer, or you trust those you share it with, then why not remove the password when logging into Windows? This allows the computer to boot faster, straight to the desktop, and can save time. It also removes the extra startup step so Windows can jump to the desktop without your intervention.
Alternatively, if other people have access to your computer, you can enable a login password to keep their data safe.
Enable password when signing in to Windows 10
Password login is enabled by default or when Windows update 10, or at new installation. If you previously disabled it or for some reason did not enable it, follow these steps:
You will need to either log out and log back in or reboot the system for the changes to take effect.
Disable password entry when logging into Windows 10
To disable password entry, you are essentially doing the opposite of the above.
- Press the keyboard shortcut Ctrl+R and enter " netplwiz».
- Uncheck the box next to " Require username and password" and then click " Apply».
- At Windows request enter the password twice .
- Click "OK" to save changes.
You will need to log out and restart your computer for this change to take effect.
If you know more quick way enable or disable password in Windows 10? Please write in the comments.
Windows 10 from Microsoft is considered one of the most secure operating systems of our time.
And in some places, the “default” security seems unnecessary, especially at the computer startup stage, when the system requires you to enter the administrator password.
You can disable this option in 5 minutes by following a simple sequence of actions.
Why do you need a password in Windows 10?
The main purpose of the account login code is to protect personal information user from unauthorized viewing and modification.
It helps limit access to the computer to children, colleagues, and household members, and also helps maintain the security of the operating system from making unnecessary changes to its basic data by malicious and spyware, viruses.
Attention! Please note that it is your own responsibility to disable the code when logging into Windows 10. Without it, anyone can access information stored on a computer: copy it, change it, delete it.
Disable password entry in Windows 10
The easiest way to disable your Windows 10 login password is by opening the User Accounts menu. To do this, perform the following manipulations with the system.
- In the Start menu (lower left corner, Windows symbol) find the “Run” item or hold down the Win+R keys. In the command launch window that opens, type the word “netplwiz” (without quotes).
An alternative solution to the problem of launching the change user data menu is to enter the command “netplwiz” directly into the search bar of the Start menu and select the top-most launch option offered by the system.
2. In the “netplwiz” control module window that opens (editing accounts), uncheck the “Request username and password” item. In unlicensed modified versions the text may differ slightly.
And click the “OK” button to confirm the changes.
3. Confirm your intention to make changes to your computer’s security settings by entering a valid code for your account. You need to enter the code twice in the main field and the required confirmation line, then save the changes by clicking “OK”.
Alternative way to disable Windows 10 password
You can remove the code when Windows login 10 and alternative way, which involves making changes to registry fields. The registry is a repository of system settings, keys, and other information.
Regardless of the chosen method of solving the problem, after making all the described changes and saving them, the system needs to be rebooted. If you did everything correctly, then you will be able to log into Windows 10 without a code.
If the password prompt appears again after a restart, consider whether your system needs to be reinstalled.
How to Enable Required Password in Windows 10
Enable mandatory password entry on start screen You can log into the Windows 10 operating system in the same way you disabled it.
- Through “netplwiz” in the window for editing user accounts, just check the box “Require username and password”.
- Using “Regedit” in the registry settings editing window, you should replace “0” with “1” in the AutoAdminLogon variable.
Additional solutions to the problem
In some cases, the above methods for disabling and activating the password request do not work. This is a sign that the system installed on the computer is not working correctly (viruses, hardware failures, incorrect programs).
In this case, the only way to solve the problem with the mandatory password entry is to reinstall the operating system. Windows systems 10. After reinstallation, you need to disable or activate the password request at login step by step.
How to remove password when logging into Windows 10
Remove the password request when booting Windows 10 for automatic login into the system
In Windows 10, as in previous versions this OS, you can use special modes to complete the job and quick recovery sessions. For example, hibernation mode, which allows you to save everything you did in a given session and switch the computer to lower energy consumption. At the same time, even if it is not possible to recharge the laptop or connect the PC to the network, the hibernation mode will save everything on the hard drive until turned on. But after turning it on, you are asked to enter your account password every time, which is very annoying if you are the only one using the computer. We suggest considering ways to remove the login password in Windows 10.
How to remove the login password in Windows 10. Method 1
The simplest method that is suitable for all users, including beginners who recently switched to “ten”.
This completes the steps of method No. 1. Now we know how to disable the login password in Windows 10. Let's move on to the second method of disconnection.
How to remove the login password in Windows 10. Method 2
This option to cancel a password login is a little more difficult for inexperienced users, but not as complicated as it might seem. Let's use the keyboard and enter the combination Win + R. In the Run utility window, enter “Netplwiz”: 

In fact, there are a lot of ways to disable the login password in Windows 10. You can even use the option through the registry, but so that you don’t accidentally mess things up in this segment of the system, we didn’t consider it. The methods presented above are the most optimal and everyone can choose the one that suits them.
What are the differences between them? When using a local account, you usually plan to work on one computer, without synchronizing settings, installed applications and objects on the desktop. This approach was used back in Windows 7, and it may not require entering a password when logging into Ten.
WITH the advent of Windows 8, the authentication method has changed, and now, along with using a local account, it is now possible to use a Microsoft account when logging in. In this case, all OS settings are synchronized with the server, and you can log into your account from other devices. Authentication using a Microsoft account requires the user to set a password each time they try to log into the OS.
In the material presented, I will share with you tips on how to get rid of this. It is advisable to do this if no one is working on the computer except you, and you do not care about the safety of your confidential information(such as the password stored on the PC for Email, pin and code of a bank card, means of entry into other services). If someone else is working on your computer, it would be wiser to leave the OS login locked.
Method 1 – by changing user account settings
You can remove a password in Windows 10 different ways. One of them is to use the user account settings.
Open the mini command input panel through the “Run” menu by pressing the key combination Win+R(the Win button is a key on the keyboard with the Windows logo on it). On the panel that appears, enter the command netplwiz.
A form opens with settings for work user accounts. Select our active user in the list and uncheck the box that requires entering the username and password.
Click the “Apply” button. A transaction confirmation form appears, where you need to specify the current password for your active Microsoft account.

Enter your login password twice in the appropriate fields and click OK. We check that the checkmark in the field we need has disappeared and reboot to check if our method worked.
Method 2 – Using Registry Editor
One of the main disadvantages this method– this means that your password will be available for viewing in open form in the register, and anyone interested will be able to see it. Besides, this algorithm very reliable and comfortable, so in a progressive approach this method you can rest assured.
We launch the registry editor when using a key sequence Win+R and entering the command regedit. Opens working window editor.
Opening a thread HKEY_LOUCAL_MACHINE \Softwares \Microsoft \WindowsNT \Current Version \Win logon.

- Changing the value AutoAdminLogon by double-clicking on this field, as a result of which the value of the parameter should change from 0 to 1.
- Changing the value DefaultDomainName to the domain name or local PC name. You can always see this value on the computer properties form. To call it, right-click on the “This PC” object in open Explorer and select “Properties” from the pop-up menu. Here you will find the full name of your PC.
- Change the field value if necessary DefaultUserName to a different name, or simply leave the active user untouched
- Generate String Element DefaultPassword, and in the “Value” field enter the password of your current account.
Now all that remains is to check the effectiveness of the procedure performed by restarting the computer and trying to log into the system.
How to remove password entry when exiting sleep mode?
When leaving sleep-mode a form also appears asking you to provide an account code. We'll remove that too.
To do this, go to Windows settings by selecting the appropriate item in the Start menu.

On the parameters form, go to the subsection “Accounts” -> “Login Options” and in the first paragraph we change the value of the parameter to “Never”.

Well, that’s all, now you have the right to freely leave the computer for any length of time, and the password request window will not appear.
Method 3 - Reverting to local account authentication upon login
As I already said at the beginning of my article, the authentication method can be changed from local to Microsoft and vice versa. Let's say that you preferred last option. Then, if you switch to a local account, the need to enter a password every time will disappear by itself. How to return to local method authentication? Go to the menu Windows Settings through start menu"Start".


The first number will ask us to enter the password for the active account. Let's do so.

The next form will ask you to enter your local account username and password. We enter the username arbitrarily, but intentionally leave the password fields blank.

Now everything is ready. We exit the operating system and log in with fresh authentication parameters by clicking on the button on the next window to log out.

Now log in again and make sure that a password is not required.
So we figured out how to remove the administrator password when logging into Top Ten. Some of the above methods are safer, others are more convenient and practical. We tested them all and can say with clear confidence that they all work. Choose whatever you like and enjoy the comfort of working in Windows 10.