Is it possible to scan a document? How to scan a document onto a computer: step-by-step training
Good afternoon, dear readers! Quite often, PC users are faced with the need to scan documents from a printer to a computer. Overall this is a fairly simple procedure, but there are several ways to complete this task.
Preparing to Scan
Before scanning documents or pictures, you should connect the MFP, that is, install drivers for this device on your laptop. After this, the device will allow you to transfer information to the screen. The second point is software. Windows 10 and earlier versions of the OS have pre-installed programs that will allow you to make a digital copy. These programs are not designed for further work with data. The user simply receives a drawing or a document in PDF format, which is difficult to edit.
Many manufacturers supply their own software. It also makes digital copies. The advantage is that it works with the equipment as correctly as possible, but the user will not be able to perform any special operations with the resulting images.
The third option is to install a program from a third party. She has maximum possibilities. An example of such software is Adobe Reader. It is worth understanding that such applications are not free, but they will provide much more opportunities.
Software from Microsoft
By default, any laptop or PC has a program for working with photos called Paint, as well as a “Scanner Wizard”. When using Paint, just open the program and find the “Get Image” button. The application will suggest a receiving method - a camera or a scanner. We press the scanner and get a ready-made picture with information. All that remains is to simply save it. To scan a document, text or photo with high quality, you must follow a certain procedure. If these are documents, then you need to remove all unnecessary things. For example, remove the cover from a passport. If it is a book, then it needs to be placed as tightly as possible against the scanner glass. The document should be positioned level and slightly indented from the edge of the printer. Otherwise, part of the image may not be captured by the scanner. During scanning, the lid must be tightly closed, otherwise highlights may appear. If you follow these rules, the picture will turn out to be of the highest quality.

The second method is the wizard from Microsoft. In this case, you need to place the document on the scanner and go to Printers and Scanners. Select the scanner and click get image. The advantage of this method is that you can adjust the quality of the photo. If you need a quick copy, then a resolution of up to 200 Dpi is enough, if you need to carry out further actions with the image, then the choice should be 300-400 Dpi, but if we are talking about handwritten text and it needs to be recognized in the future, then the desired option is 500-600 dpi Next, the wizard offers step-by-step instructions and you just need to do what is indicated in the application windows. Both programs described above are entirely in Russian.
Software from manufacturers
All brands that produce printers, scanners and MFPs offer their customers their own software. It is more convenient compared to software from Microsoft, as it offers more settings. In general, the sequence of actions is similar - you need to select the image quality, color (make the picture darker or lighter), and the format in which the received data will be saved. HP, Canon, Epson and other brands have such applications. It is worth understanding that the maximum picture quality depends on the device itself. For this reason, when choosing a technology, you should pay attention to the scanner resolution. Another important point is that scanning can be carried out both in color and in monochrome. This point should also be specified before starting the scan. After the printer completes the procedure, the user will see the result in a preview. Then you can simply save the resulting image or select a specific area on it. Another possibility of programs from equipment suppliers is scanning several documents and saving them in one file or as separate images.
Software from third party developers
A significant difference between programs and third-party manufacturers is the ability to scan an image not as a picture, but as text. This is very convenient if you need to scan a text document, book or handwritten text and then work with it. This need often arises in offices or among students. That is why the answer to the question of how to make text documents when scanning is to purchase high-quality and specialized software. As a rule, it is not too cheap, but such programs have much more possibilities. Programs such as Adobe Reader offer similar functionality. It should be understood that for the correct formation of text, the quality of the image and source must be high. In some cases, the text is not very correct, so it is recommended to carefully review the document afterwards to correct possible errors. Most often this happens when working with handwritten text. This is logical because a machine cannot always recognize a person's handwriting.
That's all for today. Come again!
Thank you for your attention! See you again! Sincerely, Rostislav Kuzmin.
Today there are many ways to create a copy of a paper document, convert from paper to electronic format, etc. If you only need a photocopier to create copies of paper documents, then to convert a paper document into its electronic format you will need not only special equipment, but also software.
How to create an electronic version of a document?
In order to create an electronic copy of a document, the user will need a scanner or MFP (multifunction device). Of course, if there is no need for an MFP, then you shouldn’t buy one; it’s easier to get by with a scanner. Firstly, it will cost much less, and secondly, it will perform exactly the function that the user needs, namely, scan a document and convert it into electronic format.
To operate the scanner you will need special software - a driver. Usually it comes with the device, but if it is not there, you can always find it on the Internet. You can use the universal ABBY Finereader program, which directly scans and recognizes text.
The entire procedure for converting a paper document into an electronic format comes down to just these two procedures (scanning and text recognition). To make an electronic copy of a document, you need to: go to the “Start” menu, and in the list of all programs, find either the driver for the scanner or MFP, or the ABBY Finereader program and run it. After starting the program and the scanner, you can open the lid and place a paper document on it with the text facing down. The document should be placed on the scanner surface as evenly as possible in relation to the edges of the working surface of the device. Next, you need to press the lid as tightly as possible so that the light does not fall on the work surface. Otherwise, the electronic document will turn out to be overexposed, that is, the part of the text that was illuminated will not be visible.
Next, in the settings, you should select the optimal scanning parameters, such as color, output size, output resolution, etc. When everything is ready, you can click on the “Scan” button. When the procedure is completed, you should click on “Recognition”, with the help of which the text will be converted into an electronic format, for example .doc, and the document can be opened in a text editor to make changes.
In modern conditions, you can scan a document or picture from a printer, that is, create an electronic copy of it, using various methods. One of them is to use a printer with built-in scanner capabilities.
Selecting Scanning Equipment
Before you start scanning, you need to make sure that the printer connected to your computer has the properties of a multifunction device (MFP). It is not possible to create a copy using a regular printing machine. So, scanning from a printer to a computer begins with the correct connection of the MFP to the computer via a USB port, followed by the installation of hardware drivers, which is performed automatically from the disk or the operating system driver installation wizard. A driver disk is included with the device.
Once installed correctly, a notification appears in the lower right corner of the desktop indicating that the device is ready for use (in Windows). 
Standard method: built-in scanning wizard
To scan a document to a computer from a printer, you need to follow the following algorithm (the method works in Windows 7/8/10):

This procedure can be done in a different sequence (it happens that the wizard does not start automatically when you press a button on the printer). Then it can be launched from the start menu, called “ faxes and scanning«. 
Then continue working with the application.
Scanning via the Paint app
Most Windows users are familiar with the simplest graphical application Paint (installed automatically during installation of the operating system). This editor can not only process images, but also scan photos to your computer.
There is an option in its menu receiving pictures"From a scanner or camera." 
Using it, we get a window with selection of parameters procedures (you can scan in black and white, color, adjust the quality of the scanned document). 
In general, quickly, conveniently and everything else, you can continue editing the image right there in Paint, saving it in a convenient format. 
Third Party Applications
It happens that the functions of standard scanning programs are not enough. For example, you need to recognize scanned text, save the image in a different format, or use special quality settings for the resulting image, and process it. In this case, you can resort to specially developed scanning programs with advanced functions.
- ABBYY FineReader - can recognize text and digital images in high quality. Paid, but with testing period;
- ScanLite - used when you need to scan a large number of documents;
- OCR CuneiForm is another program for scanned text recognition files in many languages. Distributed free of charge;
- PaperScan free a convenient program for transferring pictures to a computer and processing the resulting image.
- WinScan2PDF is a free program for Windows that saves scans in pdf format;
To summarize, we conclude: you should use one or another scanning program based on your goals and the result obtained. The standard methods are suitable for the average user, but specialists and professionals will need additional utilities. Good luck with your choice!
- The service is provided at network offices.
- The price is for 1-sided scanning. For 2-sided scanning, the cost doubles.
- Scanning from a book or any other bound original increases the cost by 2 times.
- Scanning is in color by default.
Examples of our work


Scanning paper documents is the best and most reliable way to save information if there are no electronic options, or if you urgently need to send copies of documents by email.
Scanning photographic documents, old black and white, color photographs in the absence of negatives or electronic files is necessary for their printing, high-quality processing and subsequent printing, as well as storage in a family archive or organizational archive.
Our company offers color and black and white document scanning and photo scanning from A1 to A0 format.
It has long been known that in the future almost all document flow will be done electronically. And the amount of information that already exists will be converted into electronic form by scanning.
Scanning a large volume of documents is not an easy process, because all the information must also be systematized, but in the end you get a small medium with a convenient search system.
The Kopirka copy center is equipped with professional equipment that allows us to produce large volumes of work. The company has a large number of offices, in any of which you can contact on relevant issues. We carry out copying on high-performance Xerox equipment. The format of documents can be different (from A4 to A0). Scanning of small volumes of documents is carried out on site (up to 1000 scans) and does not require much time; larger volumes are performed at the company’s main production facility. Operations take place in the resolution and quality you require.
“Scanning” documents and photos on your phone is a useful feature. Luckily, there are very simple ways to scan documents.
Of course, a dedicated scanner will still be better if you often need to scan a large number of documents, but using your phone as a scanner will also work if you only need to scan a few documents. Here's what we recommend for Android.
Best Way to Scan Documents on Android: Google Drive
If you are using an Android device, then the best way to scan documents is the Google Drive app, which is installed on almost every Android device.
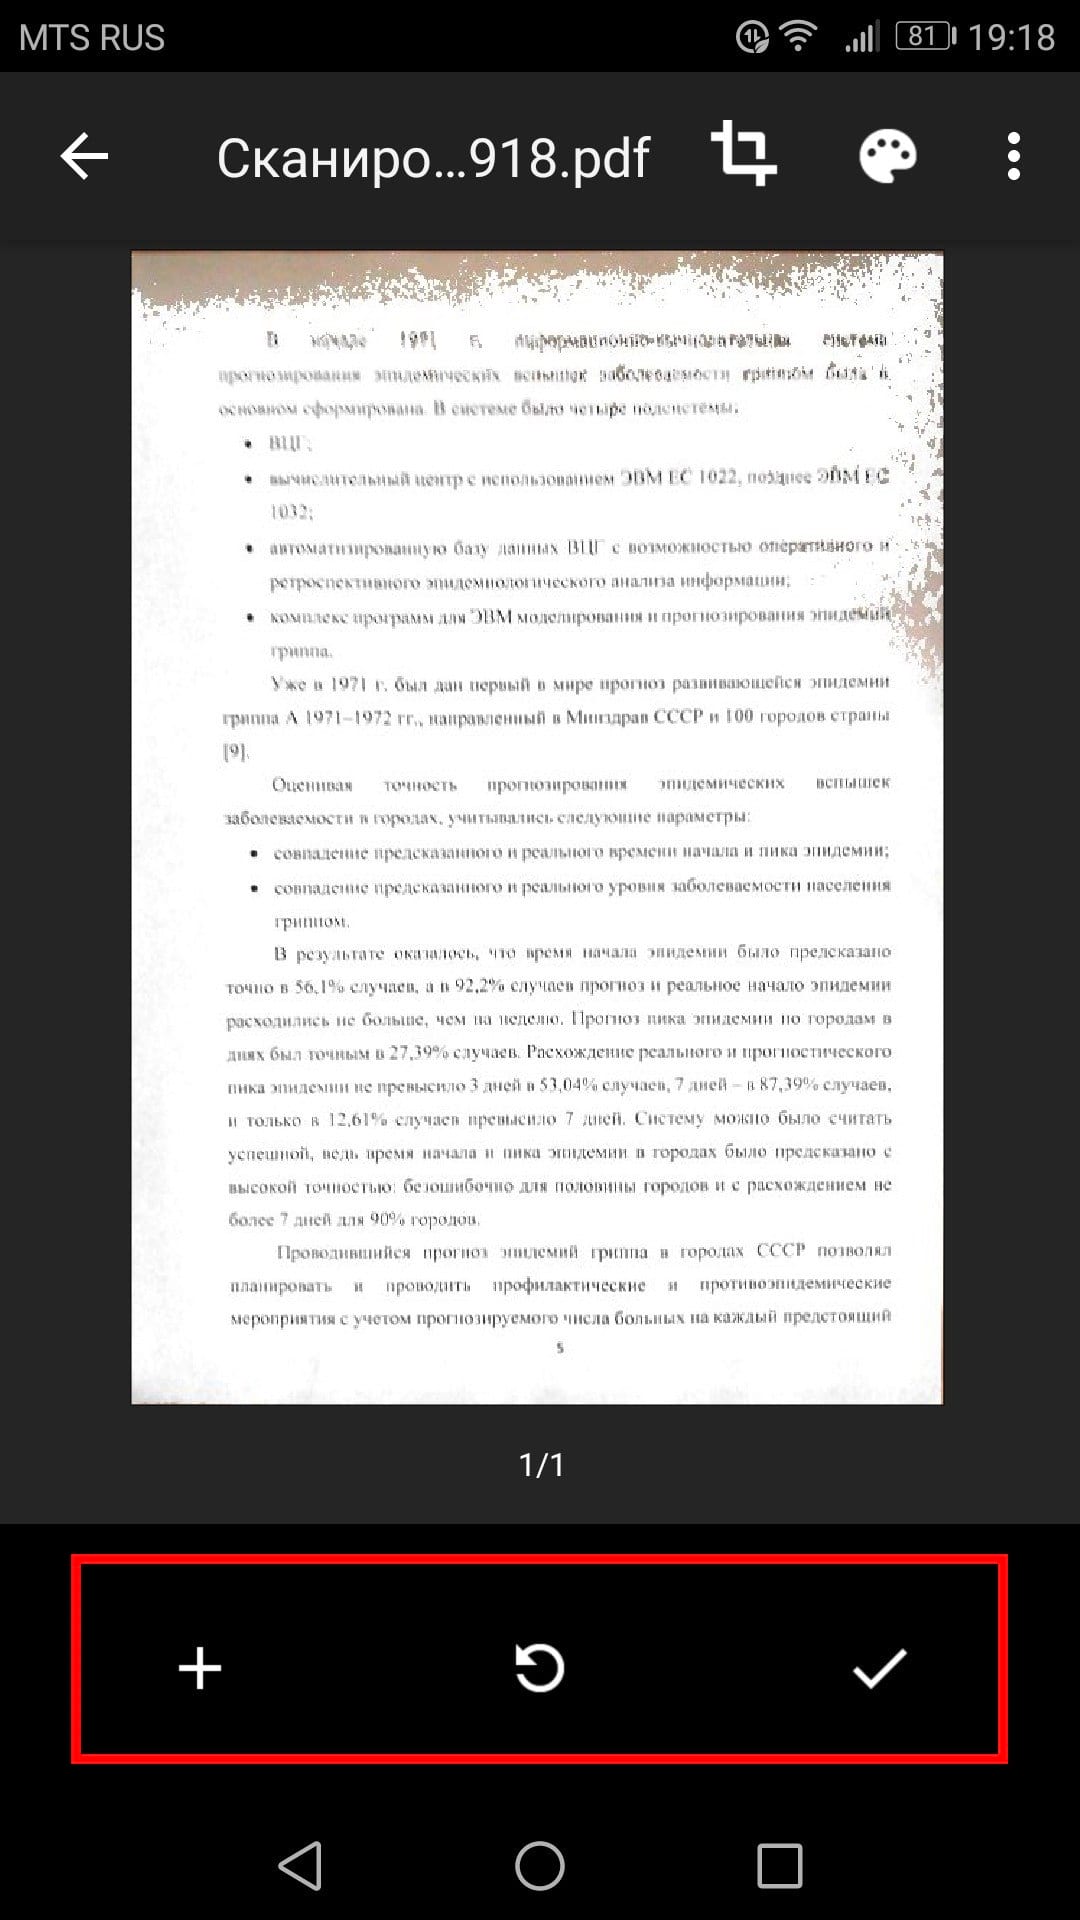
You can scan documents directly from Google Drive by clicking the "+" button in the bottom right corner of the main screen.
From the pop-up menu, select Scan.

He may ask for permission to access the phone's camera. Click Allow.

When you are ready to scan a document, position the document so that it takes up as much of the screen as possible and press the blue button. You can also use the flash by tapping the flash icon next to the capture button if your device has a flash installed. If your device does not have a flash, this option will not appear.
After scanning the document, a preview will appear immediately. Don't worry if most of the document is cut off when you view it. Click on the corresponding icon to select the area you want to save.

Touch, hold and drag the dots to change the area that is scanned.

When finished, click on the checkmark in the lower right corner of the screen.

You have three options immediately after scanning:
- Click the plus sign to add more pages to your document.
- To scan again, tap the circular arrow in the middle.
- Click the check mark icon to complete and upload the document to Google Drive.
You can also make minor adjustments after scanning. For example, clicking on the palette in the upper right corner will allow you to change the scan color selection and match it to a specific document type. By default, the scanner will automatically select the one it thinks is best.

Finally, the three dots in the top right corner will allow you to delete, rename and rotate the scanned document if necessary.

Scanned documents are added to Google Drive in PDF format, and names are added along with the word "Scanned" followed by the date and time. You can move, rename or delete any of the scanned documents by clicking the three dots next to the file name.


You will then convert this scanned PDF into a document, which you can then edit or export to Microsoft Word.