Open access on win 7. Setting up shared access to a folder over a network in Windows
This article will show you a simple way to set up file access on Windows 7, for those cases when you need to provide anonymous access to general Windows resources 7. This setting assumes that network access will be without a password, without restrictions. This is a common situation for home and office networks.
Similar articles for other OS:
So, step by step.
Allow folder sharing
In Explorer you need to find the folder that you want to share (give public access to it) and click on it right click mice. In the context menu, open Properties for this folder. In the properties window, go to the "Access" tab and click the "Sharing" button:
After this, in a new window, you need to specify full permissions for the “Everyone” user group:


After clicking the "Finish" button, this folder will become available over the network:

Now in the folder properties you can see that it is accessible over the network:

Configuring network settings Windows 7
Next you need to open " Network and Sharing Center" (via the Network icon in the tray or through the Control panel) and on the left side of the window click on "Change additional sharing settings":

In the next window, your profile will immediately open local network- there you need to enable two parameters and click the "Save changes" button:

After that, in the same window, go to the “General” profile:

And there, disable the “password protected sharing” option and, of course, click the “Save changes” button:

That's it for the setup network access without password for Windows 7 is completed. Now you can log into this computer via the local network and Windows will not require you to enter a password.
If Windows requires a network password
Despite the fact that the settings described above have been made, when you log into this computer, another computer may request network password. This is possible if there are local users on both computers with the same name, but with different passwords.
There are two solutions to this problem:
- Remove matching user logins.
- For users with the same login, specify the same password. An empty password is also considered the same.
How to unshare a folder in Windows 7
On Windows 7 cancel public access It is not implemented at all obviously, unlike Windows XP. On Windows 7, to cancel sharing, you need to click the “Advanced settings” button on the “Access” tab and disable it there. Microsoft developers have a peculiar logic.


Sharing a Windows 7 folder via the command line
File sharing can be set up much faster if you use command line(console, cmd.exe). Just run one command in the console:
net share files=c:\files
It shares the folder c:\files and asks for her network name files.
You can also cancel sharing via the console:
net share files /delete
This command deletes a network (public) folder files. Folder c:\files Of course it stays in place.
Sharing Windows 7 files using the Shared Folders snap-in
Included in the tool kit Windows management 7 yes special program(snap-in) for managing shared resources on a computer. It's called "Shared Folders" and you can run it with the command fsmgmt.msc(in the console or via Win + R):

Alternatively, this snap-in can be opened through the Start menu: “Control Panel - Administrative Tools - Computer Management - Shared Folders”.
Setting up password-free access for other operating systems
If you live in Krasnodar and you need to set up a local network in Windows
If you found this article useful or simply liked it, then do not hesitate to financially support the author. This is easy to do by throwing money at Yandex Wallet No. 410011416229354. Or on the phone +7 918-16-26-331 .
Even a small amount can help write new articles :)
Today, using both Windows XP, Windows 7, and Windows 8 in one home or small business is quite possible.
While Windows 7 and Windows 8 have similar tools for sharing files online, there are differences that might puzzle you.
Basics of file sharing on a local network
When setting up or troubleshooting file sharing problems over a home or small business network, the first step is to make sure that all computers on the network are part of the same network. working group . There is an exception: if you have a laptop that is usually connected to corporate domain and is configured as a domain element, and you intend to leave it as such.
The default workgroup name for Windows systems is WORKGROUP. But you can use a different name. Simply put, the PC will see all systems on the local network that share the same workgroup name. If you are joining a machine to a workgroup, in the settings Windows systems a master is provided.
To manually change the system workgroup name, call the System Properties dialog box (Figure 1). To do this, in the Control Panel ( Control Panel) open the System section. On Windows 7 and Windows 8, click the link Advanced System Settings(Advanced system settings). Select the Computer Name tab and click the Change button to enter a new workgroup name (or new Domain name or computer name).

Figure 1. In System Properties it is offered as manual method joining domains and workgroups, and using the wizard.
Once you have your computers recognizing each other in Windows Explorer, you can start sharing files by designating files and folders to be shared. But more on that in a moment.
Use HomeGroups to Share Files and Folders Locally
Microsoft is counting on you to use the built-in features in Windows to share files. home groups (homegroups). These are essentially pre-configured groupings of shared files and printers. Homegroups are generally easy to set up, but they also have a number of limitations and potential problems with performance. For example, XP systems cannot be joined to a homegroup. Transferring files using home group may be noticeably slower than a standard workgroup connection.
Homegroups can be used in Windows 8.1, Windows RT 8.1, and Windows 7, with a few important caveats. In Windows 7 Starter, Windows 7 Home Basic, and Windows RT 8.1, you can carry out annexation to the homegroup, but not create her. In RT, you also won't be able to share local content with others. Systems installed as domain members can also be joined (but not created) to home groups.
Typically, Windows 7 prompts users to create or join a homegroup when the PC first connects to the network. Not so with Windows 8: When you set up a Windows 8.1 PC, a homegroup is automatically created if there are no other homegroups on the network. If there is another computer on the network with a homegroup, the utility will notify you and show a button Join now(Join now) (see Figure 2). If you click the button, you will be prompted to enter your homegroup password.

Figure 2: If you already have a homegroup on your network, Windows should automatically ask if you want to join it.
However, before you join a homegroup, I recommend clicking the “Change advanced sharing settings” link. Advanced sharing settings dialog box ) allows you to configure resources for the network. The program offers three sections: Private (current network profile) (Private), Guest or Public and All Networks. The organizational chart of this utility can be confusing; this is what is shown here:
- In sections Private(Private) and Guest or public(Guest or Public) you can specify whether to enable network discovery and file and printer sharing. You should leave these options enabled because, after all, you want your computers to see each other and share files.
- Chapter All networks(All Networks) is more interesting. Here you can set whether users on other computers can access Public Folders (we'll get to those shortly), and determine which devices on the network can stream media across the network.
To accommodate older devices, you can also downgrade the encryption standard used by the network. Finally, you can set whether password-protected sharing will be implemented on the current computer. If you enable this setting, users will need to have accounts on the computer to share files.

Figure 3. The All Networks section of the Advanced sharing settings dialog allows you to password protect shared files.
When you are done with the Advanced sharing settings dialog, you can click the Save changes button and return to the previous dialog. Click the button Join(Join now) and you will be asked to select which folders you want to share.
The Share with other homegroup members dialog box can be a little confusing at first. One thing to keep in mind is that you are not defining file types, you are defining folders saved in your user profile. Selecting Shared in the Video category, for example, means that only those files in your Video library or folder can be accessed by others. Videos saved in other directories will not be shared.

Figure 4. Windows allows you to control what is shared in folders and Windows libraries default; you have two options - Shared and Not shared.
Click the Next button to join the homegroup. You will now be able to navigate within the shared resources of other computers when you go to the Homegroup section in Windows Explorer.
More detailed information You can find information about Windows HomeGroups on the HomeGroup page on the Microsoft website.
Sharing files over the network using folders Are common
Whether your system is connected to a HomeGroup, or just part of a workgroup, you can use the Public folder to share files with anyone who has access to your computer—on the network or locally. If you created a homegroup, the General folder will be used automatically. Otherwise, you will need to enable the General folder yourself.
Again, once you enable the Public folder, any files stored in that folder or its subfolders will be available to everyone who has access to that computer. Keep in mind, however, that the Public folder on each system is a separate folder, independent of the Public folders on all other systems. This is not a single shared folder accessible over the network.
Once you have enabled the Public folder, I recommend making it new Library(Library). Right click on her name and select Add to library(Include in library).
Share specific files and folders
I don't usually use folders Windows data by default, I think more convenient creation my own folder hierarchy. (Keep in mind that if you want custom custom folders to be automatically backed up using File History in Windows 8, they must be included in the Library.) Luckily, it's relatively easy to assign separate folders, subfolders and files to share - for yourself, within a homegroup or for other specific users.

On Windows 7, click (Share with) and then Individual people(Specific people); The File Sharing dialog box will open, similar to the one in Windows 8.
Interestingly, if you want to make a specific folder (other than the Public folder) accessible everyone on your network, you will have to do several extra steps. You must open the properties of the file or folder, select the Sharing tab and click Share.

Figure 6. The Advanced Security Settings tool in Windows 8 allows you to set the permissions of individual users by sharing files and folders.
Double-click a specific user's name and the Permission Entry dialog box will open (see Figure 7). You can also specify, among other things, whether the permissions also apply to subfolders and the files within them.

Figure 7. The advanced permissions dialog box allows you to set what a specific user can do with selected folders and files.
Windows 7 also allows you to set certain user permissions on files and folders, but this is located in a different place. Right-click the folder and select Properties, then select the Sharing or Security tab. On the Sharing tab, select Advanced Sharing and then Permissions. On the Security tab, highlight the username and then click Edit. (This works for Windows 8 too.)
Setting up shared files and folders manually will take some effort, but it will obviously allow you fine control over access and access levels to data on your PC. When you want to access something publicly accessible on another computer, you simply go to the Network section in navigation bar Windows Explorer, click the Expand button next to the specific system, and open the file or folder you are looking for.
Cloud: organizing access to your own data
Using HomeGroups and Shared Folders makes it easier for others to access your data. This also allows you to access data on multiple computers on your local network. But an even more flexible solution is in cloud technology. Services such as Dropbox, Google Drive and OneDrive (Microsoft) make it extremely easy to sync data across multiple machines and mobile devices. You can also access your data using any Internet-connected browser, and you can share files and folders with other people over the Internet with relative ease.
But there are downsides to the cloud-based approach to storing files and folders—besides the necessity subscription fee when you go beyond the limits of free storage. For example, often you cannot grant different permissions different people. More importantly, you typically can't sync files between systems on your local network without having to upload the same data to the cloud, where, again, you're faced with potentially having to pay for storage.
There is no one-size-fits-all way to share data
To provide access to files and folders - to yourself and others - you'll probably use different methods for different purposes.
Homegroups make it easy to share data across certain folders Windows, especially if you don't need to install different resolutions for each file and folder for different users.
Manually specify shared files and folders - and even disks - are best option when you want to tightly control access or if you prefer to store data in your own directory structure.
Finally, cloud storage- ideal for synchronizing files and folders on multiple devices and when you are not connected to a local network. As a bonus, you also have the option to do remote backup important data.
Found a typo? Highlight and press Ctrl + Enter
In Windows XP, organization public access to folders, drives and printers is performed at the user level. On the one hand, this is, of course, very convenient: when trying to access a particular folder, you don’t need to remember and enter different passwords. But at the same time, it is necessary to create accounts on each computer for all users who will need access to the resources of this computer over the network. If you don’t want to create accounts for all users on computers, you can activate a guest account. True, in this case, any user within the local network will be able to access your shared resources. But let's talk about everything in order.
When we have it at our disposal, we can begin to use it directly. One of the options for using the network is to provide sharing drives and folders computers.
You cannot share any content on your local network. separate file: To make a file available to other network users, you must share the file. folder in which it is stored. Remember that by sharing a folder, you thereby give access to all folders and files located in it.
On Windows XP networks, there are two sharing modes:
- Easily share computer resources
- Enhanced computer resource sharing
Easily share files and folders
Simple file and folder sharing is enabled by default. You can verify this by clicking “Start” – “Control Panel” – “Folder Options” – “View” tab. There should be a checkbox next to the “” item:  If there is no checkbox, then your computer is using advanced sharing.
So, let's say I want to “share” the “Reports” folder, which is located on my computer on local disk WITH.
To open shared access to a folder or drive, you need to right-click on the required object - select “Properties” - go to the “Access” tab.
If we are sharing a disk or folder for the first time, we will need to click on the following link:  And then select “Just enable file sharing”:
  In the window that opens, check the box next to “Share this folder”:
  This way, you will give network users access to the files contained in this folder in read-only mode. They will not be able to change the files located in this folder or write their own files to it.
In the “Shared resource name” field, you can enter the network name of the folder under which it will be displayed in the list of shared resources on the local network. But this is optional.
If you check the box next to “ Allow modification of files over the network”, then allow users to copy their files to this folder, as well as change the documents contained in it.
Then click “Apply” – “OK” in this window. After this, the folder will become public and a hand symbol will appear on it: 
For security reasons, you should not give full access to system folders(Windows, Program Files) and folders containing important data. It's best to create special folder or shared folders network files and give full access only to these folders.
For users on your network to be able to access shared folders, you must enable the “ account” on the computer where they are located. Guest" This will allow any user to access the shared folder from any computer on the network.
To check whether a guest account is activated on your computer, click right key Click on the “My Computer” icon on the desktop and select “Manage”. In the window that opens on the left in the section “ Utilities"highlight the item" Local users and groups." Having opened it, go to the “Users” folder - in the right field we find “Guest” and double-click on it with the mouse:  In the next window, the “Disable account” checkbox should be unchecked:
  That's all there is to it easy sharing to files and folders. Usually, this mode enough when working in home network. However, on a local network of an organization, a more serious delineation of user rights is required. In this case, you must enable “Advanced file and folder sharing.”
Advanced file and folder sharing
If you want to use advanced sharing of files and folders on network computers, then you need to go to “Start” – “Control Panel” – “Folder Options” – “View” tab and here uncheck the box next to “ Use simple file sharing (recommended)" The “Guest” account must also be disabled for security reasons.
Allowing shared access for folders in advanced mode is the same as in simple mode: Click the desired folder or disk with the right mouse button - select “Properties” - go to the “Access” tab and check the box “Share this folder”:  In the “Shared resource” field, you can enter the network name of the folder under which it will be displayed in the list of shared resources on the local network.
In the “Note” field, if you want, you can enter a description of the folder (for example, “working documents”, etc.).
You can also limit the number of users who can use the shared folder at the same time. But it makes sense to do this only in very large networks or on weak computers.
And now we come to the very interesting moment in the organization of shared access - differentiation of access rights for network users in relation to the folder. Differentiation of access rights - this is the creation of certain rules, according to which network users (each individually or a group of users) will be able to perform certain actions with the contents of a shared folder: full access, modification, or only reading its contents.
To set these rules, click the “ Permissions" You will see a window like this:  Here you can add a user or group to the list and define permissions for it by checking the boxes next to the appropriate items.
Please note that the method described above (advanced mode) will work without problems if both computers (on which the folder was shared, and which is trying to access it over the network) have same names users with the same passwords. In other words, if you, working under the user Vova , have posted a folder for public access, then in order to access it from another computer, a user must also be created on it Vova with the same password (as on the first computer). Moreover password must not be empty, otherwise Windows will refuse to share the folder. If the above condition is not met, problems may arise with access to shared directories (drop-down windows with messages like “access denied,” etc.).
So let's add users here and set permissions for them:
Click the “Add” button. In the next window, click “Advanced”:  In the window that opens, on the right, click the “Search” button:
  I want to allow access to the folder to users registered with this computer(including the user Vova
). Therefore, at the bottom of the window, scroll through the entire list and find the name “Users” - select it and click “OK” - then “OK” again:
I want to allow access to the folder to users registered with this computer(including the user Vova
). Therefore, at the bottom of the window, scroll through the entire list and find the name “Users” - select it and click “OK” - then “OK” again: 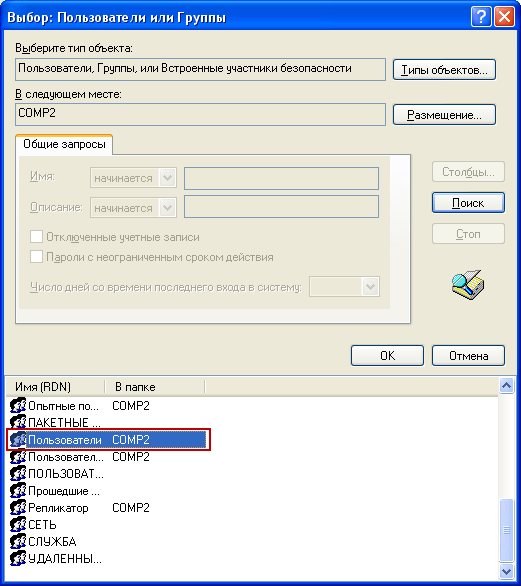 In the next window, I decided to give rights to read and change files in this folder - so check the appropriate boxes and click “Apply” - “OK”:
  That's all! Now I can easily access this folder from another computer (where the user is registered Vova
) and change the files in it.
That's all! Now I can easily access this folder from another computer (where the user is registered Vova
) and change the files in it.
To see all computer resources open for public access, go to “ network " Then select “Show workgroup computers.” At double click mouse on the name of any computer – its resources open for public access to other computers on the network will be displayed.
In addition to unlimited access to the virtual world wide web, the most important task of a local network is the exchange of information between various devices connected to it. And this information, as a rule, is packed into a folder and lies in the bins hard drive network computer.
Accordingly, the question arises: how to share a folder in Windows 7 on a local network, which we will consider in this article.
By the way, to open access to folders on Windows 8 and Windows 10 you need to run similar actions: The only difference here is the operating system interface.
How to share folders in windows 7?
So, to share a folder in Windows 7 over a local network (LAN), you first need to:
Assign the local network the value “Home” (if all network members enjoy absolute trust) or “Enterprise network” (or “Work”).
To check or change this option, you need to go to “Start” -> “Control Panel” -> “Network and Internet” -> “Network Center” and click the link on the left side of the active networks section

You should add only those users to your home group to whom you are willing to provide unlimited access to any network resources.
This is necessary so that the firewall does not block access to the folder for of this type local network connections.
Change network profile properties.
To do this, go to “Start” -> “Control Panel” -> “Network and Internet” -> “Network and Sharing Center” -> “Change advanced sharing settings”
expand the “Home or work” line here and place a marker on all items with the words “enable” and “allow” (with the exception of “ password protection" - it is recommended to disable it).

Encryption can be left at default (128 bits), and skip the “Multimedia” section for now.

These options will allow other systems to “see” the computer’s disks, opening the way to shared resources, and will also give you the opportunity to independently manage your Home Group.
On this preparatory stage finished - you can share the folder on Windows 7. To do this:
Right-click once on the desired network folder;

Go to the “Sharing” column, then in the right context menu select the capabilities of other local network users in relation to this folder. 
How to restrict access to a folder to other users?
To partially block access to windows folder 7 should go to subsection context menu“Specific users” and in the window that opens, select “Home group” or one specific user to whom you do you allow access to a network folder. For other computers on the local network, this directory will still remain inaccessible.
Also create shared folder on the local network, you can use the properties of the object:
Right-click once on the future network folder and select the “Properties” menu item;

Here go to the “Access” tab;
In the window that opens, click “Sharing” and select the users you want do you allow access to the specified network folder;

Click “Share” and “Done” again to save the settings.

For settings additional parameters general access, click “Advanced settings”.
In the window that opens, select the “Share” checkbox, and then click the “Permissions” button.

You will be taken to the next dialog, where you need to click the “Add” button, in the window that opens, click on the “Advanced” command, and then click “Search”.
Here a list will open in which you need to select the “Network” line, and then double-click the “Ok” command to save the changes.

Returning to the "Advanced Settings", at the bottom of the window provide necessary permissions or bans for a selected group of users.

By default, the right to open and view files from this folder is given.
If you allow “Edit”, then visitors will be able not only to read them, but also to make changes. But they will not be able to create new files or delete existing ones. This also applies to launching programs, if any, in this folder.
« Full access» removes all of the above restrictions.
Confirm sharing the folder by clicking the “Ok” button.
If after such “operations” there is still no access to the Windows 7 network folder, you should go to the “Security” tab in the properties window and do similar manipulations there:
At the top of the window, click the “Change” button;
Select the user group you need and assign it the right to access the network folder (there are many more permission options here, but check only the rights discussed above).

To configure access to a network folder using a password, you must enable the password protection item at the “Change additional sharing settings” stage.
Many of us have more than one PC at home with different operating systems. The need often arises. But if one of them runs Windows XP, and the second one, this becomes a problem, because... in Windows 7 very great attention is devoted to issues network security (what can we say about then). Get access to network resources from Windows XP, without making additional settings, almost impossible.
To deposit necessary settings let's go to the menu " Start", and from there to "Control Panel" and select from the list that appears "Network and Sharing Center"
In the window that appears, we see the name and map of the active network. To configure the network, it is necessary that the “Home Group” is not created; if it is created, you need to exit it. If a homegroup has not been created, its status is defined as "Ready to create". Now we need to go to the menu item “Select home group and sharing options”.
In the window that appears, select "Change advanced sharing settings...".
After which a large list of settings will be displayed on the screen. To us for correct settings networks need to be changed following parameters as shown in the picture:


We save all the parameters and open general access to the necessary ones, to do this, select the folder, right-click on it and select from the list that appears "Properties", in the folder properties, select the tab "Access". Click on the button "General access…".
In the window that appears, you need to select users and their level of access to the folder. In order for all network users to have access to the folder, you must add a user group called "All"(If it is not in the list, you must select it in the field at the top of the screen and click on the “Add” button).
Upon completion of these simple manipulations, press the button "General access" and a window appears on the screen with the specified network path to the folder. Now click on the button "Ready".
Attention!
If your HDD formatted in file system You need NTFS before reinstalling Windows, either disable sharing, or adjust the rights, because if you open access to folders only for your account you risk not being able to access them from the new operating system.