Restoring ntfs partition. Recovering the HDD file system while saving all data
Hard disk drives (HDDs), which for various reasons are not detected by the operating system, receive RAW status and access to them is no longer possible. When you try to open such a disk, Windows advises you to format it, but if you follow this recommendation, all recorded information will disappear. It is advisable to restore an acceptable format: NTFS or FAT32.
The sources of problems with the HDD can be different, and before doing anything to restore the format, it is worth identifying them. Here are the most common:
- Connection failures. For example, the user incorrectly disconnected the disk or the power supply stopped and the file system became corrupted.
- The cable that connects the drive to the board is broken.
- Malicious software that violates the data structure.
- Errors that occurred when reinstalling or updating the OS.
- In the case of a flash drive, the reason for changing the format to RAW may also be a malfunction of the USB connectors.
- Malfunctions of the PC motherboard.
- Errors when working with Acronis Disk Director.
Format recovery
To restore NTFS format from RAW, try the following:

Restoring format using special programs
If, when you try to check the HDD using the method described above, a message appears: “CHKDSK is not valid for RAW disks,” you can use programs that allow you to restore the NTFS format from RAW. Let's look at the most popular of them.
DMDE
DMDE is a utility that looks for damaged partitions in the file system and helps restore the disk to NTFS status. After downloading and installing the program, you need to do the following:
- Launch the application.
- On the left, check the box next to the phrases “Physical devices” and “Show partitions”.
- Select the damaged drive and click OK. After this, the utility will find the RAW section and indicate it with a crossed out icon. If this does not happen, perform a full scan (the corresponding button is located at the bottom of the window).
- Now try to open the RAW volume and click “Recover” and then “Apply settings”.
- After this, as a rule, the HDD format changes to NTFS.

DMDE program window
IMPORTANT. If you are trying to return the NTFS status to the system disk and do it from another PC, then after the operation is completed and the HDD is returned to its place, the old computer will still display it in RAW format, so it is advisable to first restore the Windows bootloader.
Recuva
A simple and easy-to-use program that can fix RAW disks and flash drives. The procedure is as follows:
- Launch the application, select “Recover all files”, mark the damaged disk and click “Start”.
- The utility will detect files with a broken structure and correct the format to NTFS.
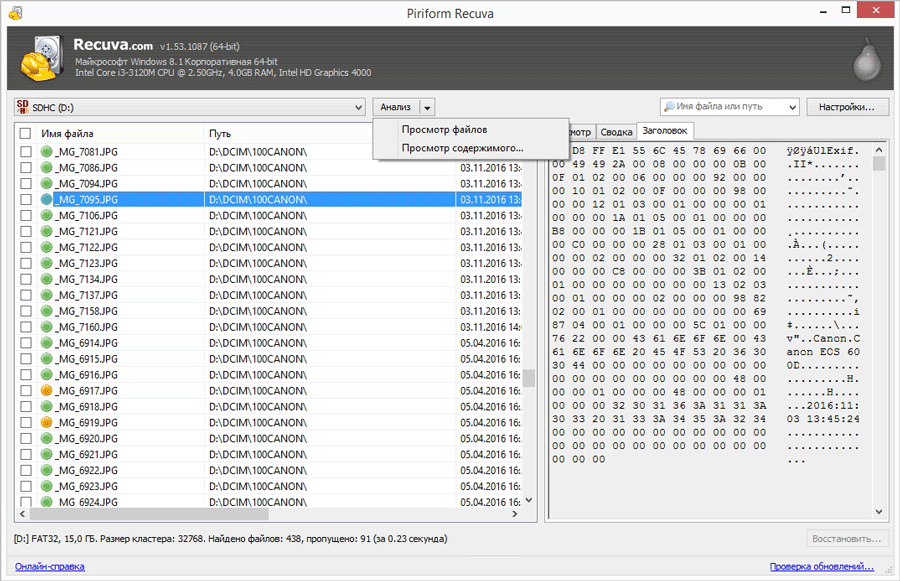
Piriform Recuva program window
TestDisk
The third utility that restores the disk format. Just download and run it, and then:
- Select New, press Enter.
- Then click on the problematic HDD, then Enter again and select Analyze and Quick Search.
- After executing the command, select Write to restore the information structure.

Instructions
It is very difficult to solve this problem without partially losing files. But with the right approach, file loss can be reduced to almost zero. Click on the hard drive partition, file system which you want to restore, right-click. From the context menu that appears, select Format. In the window that appears, select the file system, in which the section should be formatted. Set the formatting method to "Quick". By formatting the disk in this way, you can later restore the information. After that, click “Start”. After a few seconds, the hard drive partition will be formatted and the file system will be restored.
Now that the hard drive partition is formatted and the file system has been restored, you can recover the lost information. After returning the file system, do not save any information to this partition, as this will significantly increase the chances of data recovery. To restore them you will need the TuneUp Utilities program. Download the program from the Internet and install it on your computer.
Launch the program. After scanning your computer, you will be taken to the main menu of the program. In this menu, left-click on the “Troubleshooting” tab. In the window that appears, select “ Recover deleted data". In the next window, select the desired disk partition and click “Next”. Another window will appear. There is no need to write anything in the “Search Criteria” line, since you are not looking for a specific file. In the same window, check the box next to “Show files only in good condition” and click “Next”. The process of searching for deleted files will begin. After it is completed, the found files will be displayed in the program window. Just select them with the left mouse button and click “Recovery” at the bottom of the program window. Lost files will be recovered.
Sometimes, installing new programs or updating drivers can disrupt the operation of the operating system. You can restore it using a special program included in the standard set of operating system utilities. This program periodically creates system restore points, recording system information and registry settings in them. Enabling workable settings from such a point allows you to return the computer to a normal state. In the Windows operating system, there are several ways to restore the system.
Instructions
If the problem appeared immediately after installing the new driver, then after restarting Windows you will see a black screen with boot options. You must select "Load last known known configuration (with working settings)." This mode will return the last working driver settings and registry settings.
If problems arise while working with your PC, and you do not know when the failure occurred, then you need to enter the System Restore program. After that, select one of the restore points, for example, for yesterday. If restoring the settings from yesterday did not help, you need to
Most often, the disk file system is changed to RAW after the computer was turned off incorrectly, when the lights were turned off, or the user saved time and pulled the power cord from the outlet. Another reason is viruses that change the NTFS to RAW format of HDD drives. How to fix this problem, read this article.
What is the RAW file system?
If the disk is in RAW format, Windows will display it among other partitions on the hard drive. But when you try to open it, the computer will give you an error and ask you to format it. In addition, any actions with this volume will be unavailable: error checking, defragmentation, etc. (it is useful to read “”).
There is no RAW file system as such. If the disk receives this formatting, it means that the computer drivers are not able to determine the type of its file system - NTFS, FAT or FAT32. In practice, this happens in several cases:
- the file system structure is damaged;
- The partition has not been formatted;
- There is no correct access to the contents of the volume.
If the OS volume is damaged, the “Reboot and select proper boot device” or “Operating System not found” warnings will appear when the computer boots.
Recovery
If the problem occurs on a non-system drive, but it contains important information that will be lost when formatted, use standard Windows tools or third-party programs to fix the error.
Windows tools
Basically, the standard chkdsk utility helps fix problems with formatting in RAW.
After checking, the computer will repair damaged sectors and the NTFS file system on the problematic volume.
Important! This method is effective if the flash drive or hard drive has been formatted in NTFS.
The chkdsk utility will also help when the system disk is damaged. But for this you will need a boot disk or flash drive.
- Start the computer from a bootable USB flash drive or disk → Select “System Restore”.
- Advanced options -> command line -> enter chkdsk drive_letter: /f.
In the recovery environment, the partition letters are different from the names of the logical drives. To avoid mistakes, open the list of computer partitions in the command line.
Enter diskpart → list volume → the list will indicate which disk is the system one.
Third party programs
There are third-party programs that help restore the NTFS file system if for some reason it was reformatted to RAW. They do not damage the user’s information stored on the volume, unlike the chkdsk utility, which can “affect” them during the recovery process.
MiniTool Power Data Recovery
Important! This method is most effective if the RAW file system appears on a flash drive.
TestDisk
This is a multifunctional free utility that works with hard drive partitions using a large number of options. The program is presented in a portable version, so it does not require installation. Main disadvantage
If at one point you connect your removable drive with a bunch of important information to your computer, you see the message “To use the disk in drive n:, first format it. Do you want to format it?”, then this article is just for you.
Restoring a flash drive after converting it to RAW format.
First, let's figure out what RAW is. After all, everyone is accustomed to seeing familiar file systems on their drives, such as NTFS, FAT32. They are used for both SSD solid state drives and hard drives and flash drives.
The file system is needed so that the disks can function and communicate with the computer. Thanks to it, the computer translates information into binary code, which it understands and with which it can work, and the user already sees the result of this work: photographs, text, videos, audio recordings, games and applications. What exactly is RAW? Without going into too much detail, RAW is a glitch, a system error. Let's figure out why this problem occurs.
Why did the flash drive become RAW?
If the file system on your flash drive suddenly becomes RAW, it means that there have been various types of failures while working with it or your computer. Starting from banal system failures, ending with the operation of a malicious program, the so-called virus. If you are sure that the failure occurred due to a virus - when you connected the flash drive, the antivirus told you that there was a threat on it, but you ignored these warnings - then first you should scan the system and eliminate the original source of the problem, namely the virus that caused you have a lot of problems.
![]()
The virus could also get onto your computer via the Internet; to prevent infection in the future, you should be more selective in choosing sites when searching for this or that information, focusing on trusted sites. It is also quite possible for physical damage to the drive, for example, due to a fall, voltage drop in the computer, or incorrect removal of the flash drive.
So now you know why this problem occurs. The main thing is, do not rush to format the flash drive, you will lose all the files on it. You can try to “revive” it with the built-in Windows utility or other third-party programs that are publicly available on the Internet.
How to fix RAW format on a flash drive
If you don’t need the data on the flash drive, then you can safely format it using the built-in tools. But if it contains valuable data, you need to fix this problem. This raises the question: how to fix a flash drive in RAW format?
There is no need to despair, everything can be restored without loss, however, everything is not always so easy and cloudless. If you have little idea what to do if the flash drive is in RAW format, then you should still contact a specialized service center, where they will restore all the data for a fee. If you are confident in yourself, then you can restore the flash drive yourself. There are special programs to solve this problem.
How to fix the RAW format on a flash drive? You should start with the built-in program, which is launched via the command line. You just need to enter the command in the command line field: chkdsk n: /n, where n is the letter indicating the drive that you want to “cure”, and the second /n is the function of fixing the file system during scanning. If the built-in program does not cope with this problem, it will display the message “Chkdsk is not valid for RAW disks.” But don’t be upset, there are still many that will help in the fight against this ill-fated RAW.

If the built-in program is powerless, the relatively free DMDE program will come to the rescue, which you can download from the official website. Launching and installing this utility is not difficult, so we will not dwell on this in detail. After installing and launching the application, you will see two windows. On the left, select “Phys. Device”, on the right - a problematic flash drive. Double click on it. At this moment, an express scan of the contents of the flash drive will take place.
Go to the “Found” folder, then to the “All found + reconstructions” folder, then click “Rescan entire volume” and confirm your actions. Now be patient, because the larger the capacity of your flash drive, the longer the scanning will take. After completing this procedure, in the window you will see all the files contained on the flash drive before it failed, but keep in mind that they will have completely different names. Then you can start restoring them.

If, after all that has been done, nothing worked for you or the functionality of this program does not meet your requirements, you should consider another option, namely MiniTool Power Data Recovery. There is a free version of the program, the functionality of which is limited only by the maximum weight of the restored file (up to 1 GB).

- After installing and running this utility, you must specify the drive from which you want to recover data.
- Select a flash drive. MiniTool Power Data Recovery will show you the files it contains. You can select all or only the necessary ones.
- In order to save files, you need to click the Save Files button (located on the left, blue).
- Next, the program will ask you to specify the directory (disk) where you want to save the files from the ill-fated flash drive. And she will also warn you so that you do not try to save data to the flash drive from which you are restoring it.
From this moment the copying process will begin; the duration can be a decent amount of time, which depends on the size of the files and the computing power of the computer. After all your manipulations, wait for the copying to complete. That's all, all that remains is to check the necessary files in the folder where you saved them to see if they are readable. And actually start “resurrecting” the flash drive. That is, simply format it.
What to do if the flash drive cannot be formatted in RAW format
It would be useful to touch upon one more aspect of this problem, namely: what to do if the flash drive cannot be formatted in RAW format? If you managed to extract the files using the above program, you now need to think about how to restore a flash drive that has become a RAW format and return it to its previous functionality. Go to “My Computer,” right-click on the drive and select “Format.” If after this the same ill-fated RAW format remains, then not everything is so rosy and you will have to “sweat a little.”
In this case, to restore the flash drive, it is necessary to perform the so-called low-level “deep” formatting of the drive. Unfortunately, Windows itself does not know how to do this, but the wonderful NDD low level format utility, which is distributed shareware, will come to the rescue.
Working with this utility is simple:
- Launch it in “Continue for free” mode to continue using it for free. In this case, the functionality of the free version will be enough for us.
- In the window that opens, select the drive.
- Next, in the window that opens, go to the “LOW-LEVEL FORMAT” tab, click “Format This Device” and confirm this action.

After completing the low-level formatting process, the duration of which depends on the computing power of the computer and the size of the flash drive, a message will appear that you need to format the flash drive using built-in Windows utilities in order to restore the “normal” file system. When formatting, specify your preferred NTFS or FAT32 format, but remember that the FAT32 file system does not allow storing large single files, so if you download movies, games and similar “heavy” files, the NTSF file system is perfect for you.
To summarize all of the above, I would like to say that there is nothing terrible in this problem and everything can be solved. Even if your flash drive contains very important files, documents, etc., there is no need to hang your nose. If you do everything correctly, you will recover all your files without loss.
Photos from open sources
A situation in which a hard drive requires recovery can happen to every PC user. It may be needed for various reasons. One of them is file system corruption.
How to determine if a file system has crashed
If the disk is used for its intended purpose, it has a FAT or NTFS file system. These formats indicate that it works well and does not require restoration. But sometimes it turns into RAW. How can you understand that a failure has occurred?If you access the disk, but it does not open and a message appears about the need to format it, then a failure has occurred.
This message may mean the following:
- The structure of the file system used was destroyed;
- There is no clear access to the content;
- Invalid data was written to the boot sector.
How to perform a restore
Don't rush into formatting. You can restore the file system of your hard drive without resorting to extreme measures.Recovery using Testdisk
It is offered free of charge. It makes it possible to return lost data to a state that is close to ideal.Let's say our hard drive has several partitions. For example, partition D turned out to be damaged. We select the damaged partition in the program, then indicate the type of structure that we have. In our example, this is the Intel/PC partition. Select the Analyze item. An analysis will be carried out and a list of partitions for recovery will be provided. Select the Quick search option. She, in turn, will select all files from the partitions. Once you find what you need, click the Write button. After all the actions performed, the lost information will be restored.
Recovery using RS Partition Recovery program
Its interface is quite simple. The main menu has 3 parts. On the left is a list of hard drives and logical partitions. The center shows their data load. The files selected by the user are displayed on the right.- To start the recovery, you must click “Wizard”. After this, the operation menu will appear. The hard drive will be analyzed.
- In the program, all partitions are divided into 3 categories: hard, removable and logical drives. In order to start data recovery, you will need to select the desired partition. After that, click "Next". You will be asked to select the type of analysis: operational scanning or full analysis.
- It is better to immediately conduct a full analysis. It processes 3 filters at once. The first filter will calculate NTFS systems. The second one will process files that belong to this system. Deep analysis will work regardless of the file system.
- If you choose the first option, then some of the files simply will not be found. In this case, files may be found that do not show signs of damage.
- After this you can start scanning. The larger the volume of the disk being checked, the longer the process will be.
- After the analysis is completed, you will find out how many folders are in this section.
- In order to familiarize yourself with all the files found during the analysis, you need to go to the main menu and click “Finish”.
- The “Deep Analysis” folder will appear in the center of the window. Next, you will need to select them in this folder, and then click “Restore”. All that remains is to choose a place to save them.
- In this window, you will need to select the location to save the data, the option to restore the folder structure that was deleted, and restore file streams to NTFS. After this, you will need to click the “Restore” button.
Generally speaking, there is no RAW file system. In the Windows operating system, RAW means that the file system type was simply not determined correctly. This can happen for various reasons:
- because the disk is not formatted;
- the disk is faulty or its file system is damaged;
- Correct disk access is not defined.
In this case, the operating system reports a corresponding error and offers to reformat the disk again. Of course, all data on it will be lost.
Naturally, this raises the question: if the flash drive has a raw file system, how can I correct the situation? And this can be done both using standard Windows OS tools and using third-party utilities.
Restoring the file system using Windows
- call the command line using the keyboard shortcut - ;
- In the window that opens, type the command: cmd;
- The management console will open, where you will need to type the command: CHKDSK /F. The name of the disc may be different. For example: /C, /A, /I, etc.
A special utility program will launch, which will not only check the disk partitions for errors, but will also try to eliminate them.
You may also need to restart your computer before checking.
After the program has completed its work, you will need to call another one to scan errors in real time:
- the management console is called as described above;
- enter the command: sfc /scannow.
So the problem can be solved: if the hard drive is raw how to fix it?
Restoring a file system using utilities
Restoring the file system of a flash drive without losing data is also possible using third-party utilities. They have various additional functionality and differ in the organization of the interface, but their common purpose is the same: to restore a damaged disk file system, but without losing a single bit of data.
Here are just a few of these programs:
- RS Partition Recovery;
- Mini Tool Power Data Recovery;
- Test Disk (this utility does not work with file names written in Cyrillic);
- Win Hex;
- Get Data Back for FAT/NTFS (only for FAT and NTFS systems).
Looking for a program to recover NTFS partitions? Accidentally recreated, deleted or formatted logical partitions of your hard drive? Is your computer's system hard drive or SSD not recognized by the system or inaccessible?
Download for free
Get your files back
Hetman NTFS Recovery 2.8
Hetman NTFS Recovery will return information from working, broken or damaged hard drives, will recover data lost after formatting, deleting or recreating NTFS logical partitions, will recover accidentally deleted files (“Shift” + “Delete”).
The utility comprehensively analyzes the contents of the hard drive in search of traces of files deleted from the NTFS partition. The program allows you to view the contents of deleted files. The user interface, implemented in the style of a Windows Explorer window, makes the program accessible to any user.
$140 Price: RUB 1,999
Video about the program
After watching the video, you will become familiar with the interface and main features of the program. The trial version allows you to analyze the storage medium and make sure that the necessary files can be restored in full.
Purpose of the program
In the case of restoring files deleted from the Recycle Bin or without using it, the utility supports FAT and NTFS. If you delete or format a partition the program will recover data from the NTFS file system only.
The program will recover deleted or inaccessible files and folders from NTFS devices such as system hard drives, SSD drives, etc. Recovers information from formatted partitions and deleted volumes, and returns access to files and folders located on unreadable hard drives. Innovative algorithms will ensure safe and reliable data recovery and return more intact files than similar tools.

Recovering NTFS partitions after formatting
Hetman NTFS Recovery will recover data from a hard drive that was accidentally partitioned, even if the partitioning process was interrupted and the drive remained in an unreadable state. By performing a low-level scan, the utility identifies lost NTFS partitions even if data with the FAT file system was written over it or if part of the system information was lost.

NTFS is considered a fairly reliable file system, but malfunctions are possible here too. The program will retrieve files after any system error, even if the logical volume is unavailable. If necessary, the utility uses an NTFS backup copy, which is stored in the center of the partition, or will restore files even if both copies of the system table were severely damaged.

Deleted the file from the Recycle Bin or, bypassing it, using the combination “Shift” + “Delete”. Don't panic - the utility will return the files in a matter of minutes. Even if you constantly delete files without placing them in the Recycle Bin, their contents are not instantly overwritten. The file system only marks the entry as “deleted” and the program, analyzing the file table, restores the data.

Viruses can block valuable information, damage the hard drive, or erase important system structure at the beginning of the disk. A similar situation occurs as a result of a power outage or system crash during a file copy operation. The utility will quickly restore information lost as a result of malicious software or system failure.

Restoring the NTFS structure on a broken disk
Sometimes access to the system drive is blocked by an error message. These messages range from "Access denied" or "Windows can't access the drive" to prompts to format the logical partition, most often due to corrupted or missing system information. Hetman NTFS Recovery gains low-level access to such devices and recovers important information.
Features of the NTFS recovery program
The innovative algorithm used, implemented in the utility, meets the highest standards of quality and security for recovering information from both working and damaged devices.
Files
Recovering text document files DOC, DOCX, RTF, PDF,..., spreadsheets XLS, XLSX,..., presentations PPT, PPTX,..., compressed archives ZIP, RAR,..., digital images JPEG, PSD,..., video and audio materials in AVI, DAT, MKV, MPG, VOB, MP3, ... formats, the utility offers a comprehensive solution for any data formats. Mail messages, databases, binary and executable EXE files, program source codes, virtual disk images - this is not a complete list of files supported by the program.

Recover NTFS partitions from any device
Hard disks
Hetman NTFS Recovery recovers information from system drives of computers and laptops running the NTFS file system.
External USB drives
The program works with external drives and any other devices (NTFS only) connected with a USB cable to the user's computer.
SSD drives
The utility recovers data from SSD drives lost after formatting, system failure or file deletion (with the TRIM function disabled).
Recovering NTFS in step-by-step mode
The step-by-step wizard implemented in the program allows users to perform all actions simply, error-free and understandable. The information recovery process takes three simple steps. The user interface, implemented in the style of the Windows Explorer window, the Russian-language help file and interface make the program accessible to any user. The utility finds and displays deleted files along with existing files, marking them with a red cross.

NTFS data recovery algorithms
Years of experience of Hetman Software engineers allowed us to combine two different data recovery algorithms in the program. “Byte-by-byte” analyzing the entire volume of the storage medium, the program finds “signatures” of the beginning and end of various types of files and combines this information with the data obtained after analyzing the main file table and its copy. This approach allows you not only to restore the contents of files in full, but also to preserve the structure of the directory tree, as well as all service information (file names, size on disk, dates of creation and editing, etc.). The results of the program are comparable to the results of professional forensic data recovery laboratories.
Preview and HEX editor
Analyzing the device in search of deleted data, the utility displays the found files in the form of standard icons, just like Windows Explorer. By selecting a file in the program, you can view or listen to its contents, as well as familiarize yourself with all the service information (storage folder, file attributes, file size, etc.). The built-in HEX editor displays the file contents in hexadecimal format, and also displays a list and numbers of sectors in which its contents are stored. For logical partitions, the HEX editor displays information about the boot sector and its copy, and also shows a list of sectors in which MFT records are stored.

NTFS Recovery Security
The utility analyzes the disk in read-only mode, without writing anything to the device during the file recovery process. A professional approach to working with storage media prevents overwriting deleted files with new information. The program supports the creation and subsequent recovery of data from a virtual image of the device. This feature significantly increases the chances of recovering information from a damaged or failed disk.
Saving recovered files
Recovering information from a system partition requires a large amount of free space to save the results. It’s good to have a large external USB drive at hand. The acute shortage of free space is due to the fact that data must be saved to another logical drive.
Are you trying to restore the structure of an NTFS disk after formatting? Are you looking for how to recover severely damaged data from a flash drive? Do you want to get back deleted data while completely preserving the file structure?
Recovering NTFS partitions with the program
RS NTFS Recovery
Recover deleted files to NTFS at half price with RS NTFS Recovery! This is a powerful tool for recovering any type of data, reconstructing the structure of damaged and inaccessible partitions, and completely restoring the operation of the file system after formatting. That is, the program works with the same efficiency as RS Partition Recovery (but only in the NTFS system), and will cost half as much!
Download RegistrationFast and easy operation
Learning to work with RS NTFS Recovery is not difficult, and it won’t take you much time. Its intuitive user interface makes using the most advanced data recovery engines a matter of just one click. With Quick Scan mode, RS NTFS Recovery can find and recover recently deleted files in minutes.
Designed for recovery from NTFS
RS NTFS Recovery is a utility specifically designed for processing information stored on disks formatted in NTFS. It works with files with long names, compressed and NTFS encrypted files, as well as alternative data streams. Today, this is one of the most advanced solutions for recovering data from NTFS partitions.
Full recovery
In deep analysis mode, the program very carefully and comprehensively scans the disk, offering the most complete recovery of formatted, damaged and inaccessible media and their partitions. In this mode, RS NTFS Recovery scans the entire contents of the disk, looking for characteristic signatures of known file types, which allows for high-quality recovery even in the most difficult cases. RS NTFS Recovery can extract the original file or folder from the recovered drive and recreate its exact copy on healthy media.
Instant preview of deleted files
RS NTFS Recovery offers the most convenient instant preview of recovered documents. This feature allows you to view the contents of deleted files in real time. It can display photos and documents in their original formatting, including embedded objects, play audio files, and view compressed files from archives. A preview is also available in the demo version of the program - you don’t even have to buy it to evaluate its capabilities. First, make sure that RS NTFS Recovery can actually handle the recovery of your files, and then make your purchase. If you have successfully viewed all files. You are guaranteed to be able to restore them!
Content Analysis
Many types of files can be successfully recovered, even if they are on inaccessible, severely damaged or formatted drives. RS NTFS Recovery uses an algorithm for analyzing the contents of recovered files (Content-Aware) - it analyzes the entire surface of the disk in addition to scanning the file system. First, RS NTFS Recovery finds and calculates the length of each file, detecting structures known to the program, such as file headers. Detailed scanning and cutting-edge algorithms for analyzing the collected data allow us to achieve the highest accuracy of recovery. By performing Content-Aware analysis, RS NTFS Recovery provides impressive recovery rates in the most complex cases.
Supports all NTFS file systems
RS NTFS Recovery supports any volumes formatted in all versions of NTFS, including NTFS5. All 32-bit and 64-bit versions of Windows OS, Windows 8 are also supported.
To recover data from a flash drive or disk formatted in the NTFS system, use the RS NTFS Recovery program. If you are working on a FAT system, RS FAT Recovery or the universal RS Partition Recovery will suit you.
Program features:- Data recovery from any types of hard drives, USB flash drives and other media formatted in NTFS;
- Complete restoration of system operation after a system or hardware failure, as well as restoration of information lost for any reason - after a virus attack, formatting or deletion without the recycle bin, etc.;
- Reconstruction of disk partitions even with a high degree of damage, restoring functionality to inaccessible disks;
- The ability to restore the necessary files in a matter of seconds or scan the stored information in detail to extract all data available for recovery;
- Repairing damaged partitions and recreating “from scratch” severely damaged logical disk structures;
- Possibility of “delayed recovery” of data using virtual disk images;
- Recovering Microsoft Office documents (Word, Excel, PowerPoint, etc.), Adobe Reader documents, database files, digital images and photographs of any format, video and audio files;
- Supports popular file systems NTFS / NTFS 4 / NTFS5, and popular Microsoft Windows operating systems, including XP, 2003, Vista, 2008 Server and Windows 7, 8, 10.
Almost every user has encountered a RAW file system error and wondered how to return to NTFS. To begin with, I would like to dwell in more detail on the reasons for the appearance of this very RAW and give some terminology.
So, RAW is not a file system at all. In this way, the OS identifies an unknown structure. By the way, RAW translated from English means raw material / raw material. NTFS – New Technology File System, translated from English - new technology file system.
You can name a number of signs that will help identify the problem when accessing a particular section. Windows may return the following dialog boxes and messages:

The following factors can contribute to resetting the disk structure to RAW type from NTFS and the appearance of similar errors:
- sudden voltage surge;
- incorrect disconnection of disks from power supply;
- incorrect OS update at any stage;
- bad sectors;
- unstable operation of the motherboard;
- damaged cables;
- virus attack;
- If an error occurs with a USB screw/flash drive, you should also check the connector itself.
There are a number of ways to return a file system to NTFS from RAW, but we will start with the one that minimizes risks and helps preserve the data structure and the data itself. So, how can you return a RAW disk to NTFS without losing data? Let's look at several methods in order, starting with the simplest.
Classic restart
No matter how trivial it may sound, a simple reboot sometimes helps to return the file system from RAW to NTFS. This is due to a temporary glitch. If this method does not help, move on.
Checking connections
- If you have a desktop PC and it is not under warranty, open the system unit and carefully check the integrity of all wires, connections and their tight fit. The check did not find anything, just try reconnecting the disk into a free slot on the motherboard.
- If the netbook/laptop is under warranty or not, contact the service center.
- If we are talking about removable media, reconnect it to another USB connector. If the situation repeats, check the functionality of the USB with another device - mouse, keyboard, other media, etc.
First you need to eliminate the physical malfunction, and then move on to a software solution. The above methods did not help to return the file system from RAW to NTFS? Go ahead.
Check Disk will help with NTFS
Checks hard drives and removable media for bugs in the file system with further correction. In some cases, this will help return the PC to working condition.
Launch cmd with elevated privileges:

No access to cmd?
The situations are completely different: if Windows does not boot, then there is no access to the command line. Naturally, there is no way to run Check Disk utilities with SFC.
- Use live discs on CD/DVD/flash drive.
- Use a boot disk or flash drive to restore NTFS:

To avoid errors, use the DiskPart utility:


After rebooting, do not forget to return the boot device - install the system disk.
If you have a desktop PC, you can disconnect the hard drive and connect it to another one and run the scan from a different operating system.
Antiviruses will return NTFS
Check your system for viruses. The following will help:
- MALWAREBYTES – trial version works fully for 14 days, you can download it from the official website.
https://ru.malwarebytes.com/premium; - Dr.Web CureIt! – free for use at home, you can download it from the developer’s website by following the link.
https://free.drweb.ru/download+cureit+free.
Having ruled out a virus attack, and if it was not possible to restore a normal file system, proceed to further instructions.
Formatting or how to return NTFS
One of the simple ways to return the hard drive to normal is to format the disk, but this can only be done if nothing important is stored on it. You can convert RAW to NTFS using the built-in Windows utility - diskmgmt.msc.

Third-party tools to help the NTFS file system
Proven third-party tools that have proven themselves to be the best can also return a file system from RAW to NTFS.
Recuva - from the well-known developer Piriform, they also created CCleaner.
We will download the program from the official website and select the version with the free license.