Android displays contact address when calling. Android: Contact Management
Android remains and will be the most popular mobile platform for many years to come. Users mainly use smartphones running this operating system, and, in turn, the main function of smartphones is making calls. Today we will look at the problem where all contacts have disappeared on an Android device.
Contacts from a device running Android OS can disappear for various reasons: system failure, accidental launch of the full wipe function, virus activity, and so on. For any reason for the lack of contacts, you need to do one thing - restore the phone book. Fortunately, there are several ways to accomplish this task in the most popular operating system.
Method 1: Recover contacts via Google account
The easiest recovery method is that you import the contacts saved in your Google account (of course, if you have them there).
And since each Android device requires logging into a Google account to operate, you probably already have a telephone directory in this profile, which means there will be no problems with recovery.
Please note that depending on the version of the Android OS shell in your case, they may differ slightly. If you do not find this or that item, write the name of the device model and Android version - we’ll try to figure it out together.

Method 2: display contacts from SIM card
If you do not store contacts in your account, they may be on the SIM card of your device. Accordingly, you only need to activate the visibility of contacts saved on the SIM card of your device.

Method 3: Import contacts from a file
Very often, users have a contacts file with a VCF extension on their hands, but do not know how to insert it into their phone. If you have such a file, then you can transfer it to your device, quickly adding to your phone book.

If previously there were no problems with Android devices in terms of transferring contacts (as a rule, they appeared immediately after installing a SIM card), then new devices require a much more subtle approach.
Considering that not all Android smartphone users are well versed in their operating system, the question that the smartphone does not see contacts arises more and more often. So what could be the reason and how can it be eliminated?
Android has no contacts, what should I do?
Import from SIM card
Can't see contact book on Android
Many users are confused by the fact that contacts do not appear automatically after installing a SIM card. This is not a malfunction of the device at all, but an idea of the designers. If the SIM card contains contacts and the phone book is empty, you just need to transfer the entries manually. To do this, go to the “Contacts” menu, select “Import/Export” and click “Import from Sim card”.
Cache full
It is also quite possible that the notebook cache is full. In this case, an error may appear on the smartphone screen. In order to eliminate this inconvenience, you need to find the “Contacts” application through the settings and click “Delete / Clear cache”.
Reset
If the error that occurs does not disappear after resetting the cache, apparently there is some kind of malfunction in the smartphone itself. It is worth trying an operation such as resetting the settings. In this case, the data stored in the device’s memory will be deleted, so it is better to immediately make backup copies on external media. One way or another, such an operation is much cheaper and faster than repairs. You can reset the settings by following the following path: “Settings” - “Backup and reset” - “Data reset”.
Using third party programs
In order to use the contact book conveniently and without interruptions, there are several convenient special applications.
RocketDial is a sortable notebook that has all the necessary attributes: T9, quick search, blacklist and others.
Talking Caller ID is a voice-controlled address book. Works great even in the noisiest places.
Such discrete books, as a rule, work without failures, allowing you not to worry about your contacts.
If none of the above methods help, you should contact the store where you purchased your Android smartphone and submit it for warranty repair.
How to recover numbers that have disappeared from an Android phone?
To do this, we can use the standard recovery method that Gmail offers us, or a special application. Often the need for this arises after we have reset the settings, updated the firmware, or after being infected with some kind of virus. The reasons can be very diverse.
Of course, the reasons for the disappearance of numbers can be very prosaic. For example, there are often cases when we simply placed the slider in iCloud in the inactive position (opposite the “Contacts” item).
If contacts have been deleted from cloud storage, we can also restore them. Disable Wi-Fi on your PC. After this, we launch “Contacts” in iCloud (if we restore them through OS X, this item may be called slightly differently, for example, “Address Book”). We find the number we are interested in, open it and export it to Vcard (that is, we save it with the vcf extension in case something goes wrong).
Contacts can also be easily restored from a backup of the iTunes application on a PC (provided that a backup was made).
Related videos:
Other news on the topic:
Viewed: 6,978 times
__________ _____________ __________ ______ ____ ______ ______________ __________ ________ ______ ________ _____ ________ _______ _____ _________ ____ ______ _____ ______ ___ __________ ____ _______ ______ ______ ______ ________ ______ ____ ________ ____ ________ _______ ______
All owners of devices running Android OS know that it is most convenient to store various information on the gadget. The same applies to contacts. Storing phone numbers in a notebook has long been an outdated option. They can be stored, for example, on a SIM card. If there is not enough memory, transfer them to your phone memory or memory card.
Contacts on Android will always be at your fingertips. But sometimes it happens that data disappears. By an absurd accident, important contacts can be lost. For example, you gave the phone to children or an inexperienced user and he deleted it. Or you yourself “clicked something wrong,” as often happens, and lost the necessary information. Fortunately, there is a way out. How to recover lost data will be discussed further.
How to recover missing information on Android?
A smartphone is not a computer and emergency system recovery is not a help here. For this purpose, there are many third-party programs designed specifically for restoring erased information. You can return not only contacts, but also images, music or even videos.
The operating principle of such utilities is quite simple. All information we delete does not disappear without a trace. At least for the time being. It occupies a certain part of the device’s memory, which the smartphone considers as free for further recording. And if something new has not been written “on top” of the erased data, then it will be possible to restore it.
Lost contacts on Android: how to restore them yourself?
To begin with, I would like to give an example of a list of programs that you can work with to achieve your goal:
- Wondershare Dr.Fone;
- Super Backup Pro;
- Recuva;
- Android Data Recovery;
- Undelete Beta and others.
Besides them, there is a lot of similar software. Most often, you will need to connect your phone to your computer, but in some cases you can download the utility only to your gadget and use only available methods.

It is best, of course, to take care of the safety of your data in advance and store it in the cloud or synchronize it with other devices.
Android does its job perfectly. If so, then they definitely won’t get lost. And you can edit them even from your computer, the main thing is not to lose data from your account.
Part 1. (emotional)
So, Android is already a REAL competitor to its “Apple brother” (iPhone), but things are still there.
I read 4pda.com and am horrified:
a huge number of programs for/replacing CONTACTS/Dialer.
- Android developers make SO MANY shortcomings that they require (take their place in the market) so many substitutes.
- the quality of these programs almost ALWAYS leaves much to be desired. Namely. Well, it’s good that it hasn’t been done yet, it’s been done, but THIS is how it was done (as best they could). BUT..
I’m reading this and it’s HORROR. Can I find a NORMAL program?! Which would not contain at the very beginning of the description that it is designed only for these CHIPSETS (!) (and I know what CHIPSET I have?!? - people don’t always know what Android they have) - we’re not talking about programs , which must work in real time. These are really tied to and optimized for specific HARDWARE. But here we need a UNIVERSAL SHELL (!) that expands the standard display and search capabilities. NOT replacing, but expanding, so as NOT to change or spoil ANYTHING (100%, because NOTHING was replaced - everything remained in the system as it was. We just wrote additional functionality, as if ON OVER)
To any REPLACEMENT programs
I started to be CAREFUL (because...
There are a lot of messages (corresponding) on the forum -..
..- CONSTANTLY, something STOPS WORKING AFTER installation)
I'm looking for a program/add-on/shell for< КОНТАКТЫ >,
which would display (at least select)
field< ПСЕВДОНИМ >
I would also really like to find a program that would search (search in all fields including< ТЕЛЕФОННЫ >. So that if I typed several digits of a phone number in the search, the program would find it for me in its WHOLE form. Nowadays, almost ALL(!) programs do NOT know how to search in fields<телефон>- searched only by name.
===
Well, the MOST IMPORTANT thing,
and you can write wishes for improvement
(alteration)
(writing patches)
for Android itself
(so as not to install a third-party one, but to fix/improve the native one)
===
TAGS:
"Cry of the soul" (damn, as usual) , Android , CONTACTS,
Part 2.
To be fair,
ultimately
"Hurray! - Earned"
So.
Given. Android. or rather<телефоyная книга>- she's the same<Контакты>in Android.
- there are standard ones: full name
- There is<Псевдоним>
- and there is even<Транскрипция>(for the First Name separately, for the Last Name separately and for the Patronymic - separately)
Yes, they are. But..
Display.
=========
Display is only possible:
First name Last name or
Last name First name
those. if you have contacts neither first nor last name that you DO NOT know, but only know/filled in<Псевдоним>(Taxi driver, Sheepskin coats, Amplifier, Dacha No. 18, etc.), then such contacts will apparently NOT be displayed... Or what?!--After all, Display does NOT provide for displaying the field of ANY other fields except<Имя>And<Фамилия>.
That is, the field<Псевдоним>There is. There is a need for it. But you can see it only in the mode of viewing all information about the contact. Just<Псевдоним>Not displayed (NEVER AND NEVER in standard Android)
When there is an incoming call, standard Android (again) displays only<Имя>+<Фамилию>+possibly<Отчесво>. Perhaps, because they DO NOT fit - only what fits in one line is displayed (only the first name and half of the last name fits: “Vladimir Iv”. There are no options. There are no settings for displaying other fields in Android.
In this regard, TWO problems arise:
-1- display<Псевдонимов>in Contacts
Well, to select/search for the Andrey/Natasha we need from hundreds of the same name and WITHOUT_surname (all differences are stored in the field<Псевдоним>).
-2- display<Псевдоним>for incoming calls.
Several hours on 4pda.com
-1-
PixelPhone
Short description:
Phone, History, Contacts, Favorites, Speed Dial.
http://4pda.ru/forum/index.php?showtopic=290128
Review:
http://4pda.ru/2013/09/27/116756/
-2-
Call Informer
Short description:
Information when calling from a contact (
Full name - fits completely
Nickname,
Phone with specification mobile/home/work/etc;
Company/position;
Address;
Email ;
!!!and even!!! Note.)
http://4pda.ru/forum/index.php?showtopic=217632
Part 3. (Unanswered questions - emotional again)
Your contact list is one of the most important things on your device. This is where you will store people's contact information: their names, phone numbers and email addresses.
If you have any existing Google Contacts, they were most likely added when you set up your phone or tablet. Plus, you can easily add contacts manually. To get started, open the application Contacts.
As in the picture above, you can add a new contact using the Add Contact button (which is usually identified by a + sign or something similar). A list of fields will open in which you need to enter your name, phone number, email address, address, etc.
Sometimes you can add contacts directly from other apps, for example, if someone sends you an email, you can save their address in a contact. To add their email address, click on the sender's information. A dialog box will open where you can quickly add the person to your contact list.

Viewing and editing contacts
You'll return to Contacts whenever you need to view or edit one of your contacts. Each version of the Contacts app is different (yours may have a different icon, for example), but some tasks are still fairly universal.

Using Contacts
To make a phone call or send a text, use your contact list. There are two ways to use contact data: you can start with the app Contacts or go directly to the app you want to use to make a call or send a message.
In general, working with contacts on Android is both easy and difficult at the same time. The thing is that most people use applications installed by the manufacturer, and these can be either standard ones from Android or programs included in proprietary shells. So, first, let's look at the general situation using one example.
Android contacts are located in the application of the same name. As a rule, shell developers for Google OS put it on the first home screen, so finding it is not difficult.
The interface of the Contacts application is simple and clear. At the top there is a menu of Phone Book sources, icons for searching and creating a new contact, as well as a menu for the application itself.

Swiping left and right allows you to quickly access contact groups, the speed dial screen, and even your call log.

The phone book sources menu allows you to select contacts from which to show in the application. There are options: SIM, Skype and other instant messengers, Google accounts and the phone book of the device itself. The user can check or uncheck the boxes next to each source. Helpful advice: if you are annoyed that Android pulls up email addresses, nicknames from Skype and turns the phone book into mush, then simply disable the relevant sources.
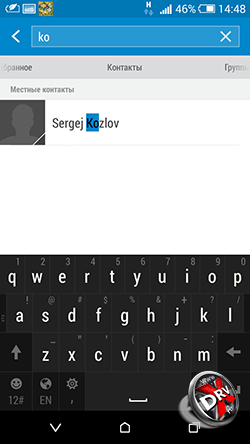
The contact search in the application has automatic selection. To find the right person, you don't have to type their full name. It is enough to indicate the first letters and the application will select all matches.


When creating a contact, the user selects its location, then indicates a number (you can choose from 6 options) and email. You can add a contact to a group. In addition, for each contact you can specify additional fields: from birthday or other significant events to a custom note.


The application menu includes eight items. We will dwell on some of them later. The settings mainly concern the way contacts are displayed in the application. You can also set up synchronization with accounts, view the capacity of the SIM card, and select the tabs that will be shown when swiping left and right.
How to Transfer Contacts from Android to Android
Unlike iOS, Android by default offers a large selection of native options for transferring contacts from one device to another.


Every Android smartphone is linked to a Google account. To transfer contacts using Google, you just need to make sure that synchronization of contacts with your Google profile and Gmail is enabled on your old smartphone. To do this, go to Settings - Account and Sync - Google - Gmail. Next, click on the account name and select Contacts. Depending on the settings made earlier, they will sync automatically or when clicked. Then on the new device it is enough to do the same thing so that the contacts appear on it. It is important that gadgets are connected to the Internet.

You can also transfer contacts from Android to Android using SIM card or VCard file. To do this, in the Contacts application, go to Menu – Contact Management – Import/Export Contacts. Here you can export contacts to a SIM card, memory card or phone memory.
Then the SIM is inserted into the new phone, and the memory card can be moved there. On the new device, the same actions are performed, only instead of Export you need to select Import from the appropriate location.
If the user has exported contacts to the phone's memory, then he will then need to transfer the VCard file from there. This can be done by connecting the phones to the computer - most Android phones are defined as removable drives, or sent by e-mail to yourself (but here it is more logical to use synchronization via Gmail, described above), or transferred via Bluetooth. Then on the new phone you need to repeat the steps already described for importing contacts.

You can also transfer contacts from phone to phone using Bluetooth. True, this method is only suitable for a small number of records - and once you can send no more than 10 pieces. To do this, go to the Contacts application menu and select the Send contacts option. Then check the box next to the required entries and then select the sending method – Bluetooth. You first need to establish a Bluetooth connection between the phones.
Also, the Send contacts item allows you to send them by email, SMS or MMS, but these methods are not relevant when transferring contacts from phone to phone.
How to Transfer Contacts from iPhone to Android
There are two ways to transfer contacts from iPhone to Android: synchronizing with Gmail and using a VCard file. Both will require some effort.

By default, iPhone contacts are synced to iCloud. You need to switch synchronization to Gmail without losing your phone book. To do this, go to Settings on your iPhone - Mail, addresses, calendars - Accounts/iCloud and turn off Contacts synchronization. A pop-up window will appear. In it you need to select the “Keep on phone” option. This is how we will save contacts on iPhone. If you choose another option, your contacts will be deleted from your iPhone.

Now you need to set Gmail as the default account for Contacts on your iPhone. The setting is done in the Settings section - Mail, addresses, calendars. In the Contacts sub-item, one of the last will be the Default Account. You need to select an item and check Gmail. After some time, your contacts will be synced with Gmail. If it already has contacts, they can be duplicated.

Next, you need to activate your Gmail account on Android. After some time, the contacts will appear on the phone. If this does not happen, then you need to look in the sources menu in the Contacts application to see which sources are activated. Your Gmail account may be unchecked. You may also need to force synchronization. This is done in Settings - Account and Sync - Google - Gmail.
To transfer contacts from iPhone to Android, you can use a VCard file. You can only create a file in iCloud. Therefore, first of all, you need to make sure that your contacts are synchronized with the cloud.

To make a vCard file, you need to select all contacts using ctrl-AWindows or Command-A on a Mac, there is an Export vCard option in the iCLoud web app settings menu. Save the file to your hard drive or flash drive. Write it to the memory of your Android device in any convenient way.
We have already described further actions. In the Contacts application, you need to go to Menu - Contact Management - Import and Export Contacts, select Import Contacts, and then the location of the VCard file - in the phone memory or on the SD card. The Contacts application will copy all data from the file into the device memory.
Instead of recording the VCard file on your Android phone, you can import contacts from it into Gmail and then synchronize it with the gadget. To do this, in Gmail you need to select Contacts, and then select Import. In the pop-up window, select the last item. All that remains is to synchronize the device with Gmail.
How to Transfer Contacts from Windows Phone to Android
There are several ways to transfer contacts from Windows Phone to Android. You can use applications that allow you to make a VCard file. Since Windows Phone users' contacts are synced with a Microsoft account, they will be in Outoook.com by default, you can add an Outlook account to Android. Finally, you can transfer contacts from Outlook using a csv file.

To transfer contacts from Windows Phone to Android via Outlook.com sync, you need to add an account to your phone. To do this, go to Settings – Accounts and synchronization and press +. From the proposed selection, click on Outlook, then enter your account information and select contact synchronization. This method has some disadvantages. In some cases, Outlook does not allow you to edit contacts on third-party devices, so it is better to make contacts “native” to Android by transferring them via a file
On Outlook.com, you need to select People from the menu. Then click on the Manage button, and in the new menu - Export for Outlook.com and other services. The contacts will be saved to a CSV file. It needs to be saved to your computer.
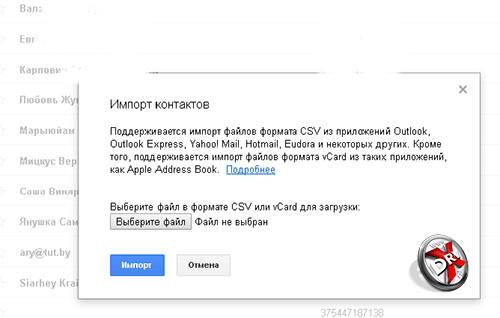
Next, in Gmail, as already described above, you need to select Contacts. There is an Import item in the menu. If you click it, a pop-up menu will appear in which you need to select Import from a CSV or VCard file. All you have to do is select a file on your hard drive, the contacts will be uploaded to Gmail and then synchronized with Android.
How to transfer contacts from Android to computer
Transferring contacts from Android to computer is very easy. It is enough to create a VCard file. Microsoft Outlook or Windows Contacts programs, as well as other applications, can work with it.

To export contacts to a VCard file on your phone, you need to go to the Contacts application: Menu - Manage contacts - Import and Export contacts and select the option: Export to SD card or Export to phone memory.
All contacts will be saved to a VCard file. Then you can save it to the computer’s memory and open it in the appropriate program for working with contacts. The file can be stored as a backup copy on your computer. However, it will not sync with Android. Therefore, it is advisable to synchronize Android contacts with Gmail.

By the way, you can also export contacts from Gmail. To do this, select the export contacts item in the menu. They can also be saved in a VCard file.
When opening a VCard in Windows programs, problems with displaying the Cyrillic alphabet may occur. VCard is saved with UTF-8 encoding by default, and Windows uses Windows-1251, however, in the latest versions of the OS, Microsoft has expanded Unicode support. However, if the problem still exists, then you need to open the file in any text editor, for example, Notepad 2, that supports changing the encoding. Change it and save. In fact, a VCard is a regular text file.
Sync Android contacts with Google
Android contacts sync with Gmail and Google by default if you have an account added to your phone. And without an account it is impossible to fully use Android.
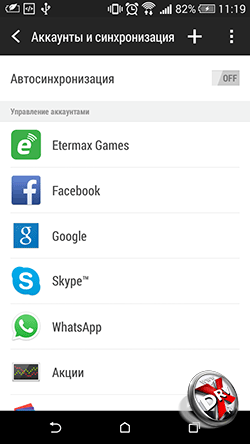
To add an account, you need to go to Settings - Accounts and Synchronization. Here, click on Plus and select from the Google list. Next, enter your account information or create one.

Now Google will appear in the list of added accounts. If you go into it, the mailbox name “[email protected]” will be present there. By selecting an account, you can manually start synchronizing various Google data and services. Contacts are at the very bottom of the list.
In the menu item Settings - Accounts and Synchronization at the very top there is an Auto-sync switch. If you activate it, all accounts will be synchronized automatically. If it is turned off, then synchronization must be started manually, as described in the paragraph above.
Importing contacts to Android
Importing contacts to Android is quite simple.
In the Contacts application, you need to go to Menu - Contact Management - Import and Export Contacts.

A menu will open with three options for importing contacts. Import from SIM. You need to select it to copy contacts from the SIM card to the phone's memory. Import sSD-fold and Import from phone memory must be selected to overwrite contacts from contact files, for example, VCard. Android does not need to specify the location of the contacts file. The system itself will find all supported files and offer to select the one from which data will be imported.
If it is not physically possible to connect your phone to a computer in order to write a VCard file to the phone, you can send it by mail, via Bluetooth, upload it to the cloud and then download it to your device.
You can also import contacts to Android through the Google Contacts application. You can access it from Gmail. In the Advanced menu item, select Import contacts. Next, to transfer contacts to Android, you just need to synchronize your contacts with Gmail.

In the new version of Gmail, the Import option is in the More section, not the Advanced section. It also supports importing contacts from Yahoo mail, Outlook, AOL and others. Therefore, if your contacts are synced with other email services, you can retrieve them from there directly. It is enough to enter your mail access data. However, Google warns that for a number of services, the contact import function is implemented by third-party developers, so everyone must decide for themselves whether to trust their credentials to third-party service providers.
Where are contacts stored in Android?
Contacts in Android are stored in the file contacts.db or contacts2.db. It is a SQLite database. It is easy to find software on the Internet that can be used to read such files. However, the files themselves are not so easy to find.
To access them, you must have root rights. If they are not there, the user simply will not see this file, nor will he see the folder in which the database is located. Only if you have root rights can you go to Android/data/data/com.android.providers.contacts/databases/, where the contact files are located.
Export contacts from Android
You can export contacts from Android using the built-in functionality of the Contacts application.
In the application menu, select Manage contacts and then Import and export contacts. There are three options for export: save contacts to SIM, save to memory card or phone memory. When saved to a memory card or phone memory, contacts will be exported to a VCard file, which can then be used to import contacts to both Android and iOS, email services, cloud, and desktop applications.
How to Recover Android Contacts
The solution to this problem depends on whether contacts have been synchronized with Gmail and whether a VCard backup has been made.
If your contacts were synced with Gmail, then you can simply sync them with your phone. However, it may happen that contacts were accidentally deleted from your Android smartphone. It synced with Gmail and the contacts there also disappeared. It's no problem.

Google stores contacts for up to 30 days. In Gmail, in the Advanced/More section, select Recover Contacts. A menu will appear in which you select the date for restoring contacts. Once they are restored to Gmail, they can be synced with your phone.
If a backup was made to a VCard, then to restore it, simply load the file into the device memory or onto a memory card and import contacts from it, as described in the previous sections.
How to delete contacts on Android
There are several ways to delete contacts on Android, depending on how many contacts you need to delete and how securely you want to delete them.

To delete one contact, you can open the Contacts application, select the desired Contact and tap on it while holding your finger in one point. A context menu will appear containing the Delete item.

You can also go into contact and click on the three dots in the upper right corner. This is the contact menu. There is also a delete option here.

The Delete contacts option is also available in the menu of the Contacts application itself. When you click on Delete contacts, the user will be presented with a list of contacts in which they can mark contacts for deletion or select all. Next, click on the Delete button.
You can simply reset all phone data. This is done in Settings – Backup and reset.
Backup Contacts on Android
Android offers several ways to backup contacts
The first method is simple and reliable, but keeping your contact backup up to date will be difficult. We are talking about exporting contacts to a VCard file. How to do this, see above in the section Exporting Android contacts.
The second method is to synchronize contacts with Gmail. It is often enabled by default. How to manage synchronization is described above.


Selecting an account for Android backup
The third way is to enable backup for the entire phone on Google servers. This is done through Settings – Backup and Reset. When you activate backup, Android will make a copy of the phone on Google servers, not only contacts will be saved there, but also all personal data, application data, etc.
Contacts apps on Android
The Contacts application for Android has good functionality and is quite convenient, so there is not much point in third-party solutions, but we will still look at some applications
VCF Contacts
- Developer: AndloRD.
- Grade: 4,1.
- Number of installations: 1 million.
This application is an alternative to the standard Contacts from Android. It is not distinguished by advanced functionality, but is rather interesting because of its different approach to storing the phone book. If Google Contacts stores all information in a database, then VCF Contacts stores all information in a vCard (vcf) file. This is the file that can be obtained as a result of export.


When you install the application, it takes an existing vCard file as a basis or creates one based on the Android phone book. As a result, the user always has an up-to-date vCard file on his phone. This can literally save you in the event of a sudden system failure.
Contacts can be sorted, sent by mail, via instant messengers. Unfortunately, the functions to add to Android and to another vCard file are only available in the paid version.
Contacts+
- Developer: Contacts Plus team
- Grade: 4,1.
- Number of installations: 50 million.
Makes contacts more fun. All contacts are presented with avatars. This view makes it easier to call the right person - selecting by person faster. There are advanced search functions: you can search not only by name or phone number, but also by mail, SMS, etc.


Themes and various phone book design options are supported. Contacts+ also has call and SMS log.
Contacts are stored in encrypted form.
The application has a separate backup function. However, in the free version you can only save up to 2000 contacts, calls or SMS. Copying is configured separately for each category of information.
Save contacts to TXT
- Developer:Viked.
- Grade: 4,3.
- Number of installations: 15 thousand.
On Android, contacts can be exported in vCard format. This application allows you to save them in txt. You can save all contacts, individual entries or several in a text file.
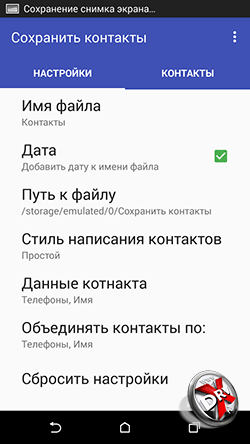

You can also configure which fields will be saved in the file.
The file can be used in the future at the user's discretion. You can also send it by email.
Simpler Contacts Dialing
- Developer: SimplerApps
- Grade: 4,3.
- Number of installations: 5 million.
First of all, it is an alternative to the standard Android phone implementation. Not only the phone book is supported, but also a dialer, Caller ID, and work with SMS. However, the application has several interesting functions for working with contacts. The most important thing is backup. You can make a local copy of your contacts or save it in the application cloud. You can set up automatic backup generation. The application constantly searches for duplicates in contacts automatically.


Another interesting feature is searching for photos on Facebook. The application prompts the user to compare his friends on the social network with his contact list and, if there are matches, use Facebook profile photos for the Caller ID.
In addition, you can use various themes for the application interface.
SA Contacts Lite
- Developer: samapp.
- Grade: 4,0.
- Number of installations: 1 million.
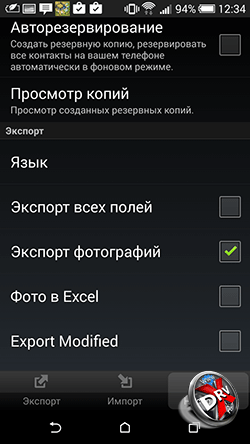
Applications for exporting and importing contacts in Excel files. Excel is the best source for importing into Outlook.
The application allows you to customize which fields will be exported to Excel. You can transfer all contact fields, including the photo. The only exception is a personal melody assigned to a contact.


The application also automatically converts encodings according to the requirements of Windows and Microsoft applications so that names in contacts are displayed correctly.
The exported file can be stored on a memory card, sent by mail, or uploaded to cloud services.
The limitation of the free version is that you can only export the first 300 contacts. You will have to pay for a larger phone book.
Conclusion
Working with contacts in Android is well organized. There is almost no need to turn to third-party applications if you read our guide. With Android tools you can perform all possible actions with contacts.
However, if you want to decorate and diversify your dialer or phone book, there are plenty of applications in the Play Market. True, you need to be careful when choosing them. We are still talking about personal data.
You can hide contacts that don't have phone numbers. You can also customize which contact groups in each account appear in your contacts list.
Determining whether to display contacts without phone numbers
If you use your contacts list for calls only, you can hide contacts that don't have phone numbers.
Defining Displayed Groups

4. Select or clear the check boxes next to the groups whose contacts you want to view in the Contacts app.
This action affects the display of contact groups on this screen only. Synchronization settings will not change.
5. Click the button Ready.
A message will appear after all changes have been made. If the changes affect a large number of contacts, this process may take some time.
Change how contacts are displayed
Merging contacts
When you add an account or contacts through other methods, such as through email messaging, the Contacts app tries to prevent duplicate entries from being created by merging the new contact information with existing contacts. You can also manually merge contacts.
You can also use Online Contacts to eliminate duplicate entries by using the Find and Merge Contacts command in the More Actions menu (see the Online Contacts guide for more information).