How to do a system restore? How to run System Restore: instructions. How to restore the system
Operating system failures occur for various reasons: incorrect installation of drivers and applications, computer viruses, problems in hardware. Let's figure out how different ways start recovery operating system Windows 7. These methods are divided into two categories: using and without using the environment Windows recovery 7.
Windows 7 Recovery Environment
Windows Recovery Environment, which translates to “Windows Recovery Environment,” provides the recovery tools we need. Further in the text we will use the abbreviation Windows Recovery Environment - WinRE.
Let's try to access WinRE tools:

The absence of an option in the additional boot options menu is a sign that there is no WinRE Windows 7 environment on your system disk. The reason is the removal of a protected partition hard drive, which is created for WinRE when .
In this case, select one of the download options:
- With Windows distribution 7;
- from a recovery disk created on another work computer.
Once you have access to WinRE, you can try to restore Windows 7 using environment tools.
Method #1: Last Known Good Configuration
The simplest method is based on the fact that the system stores information about the latest successful download computer.

If you can't return Windows to working condition method No. 1 - go to method No. 2.
Method number 2. WinRE: startup recovery
In this mode, faults that interfere with normal loading of the OS are analyzed. To start the mode you need to go to select the option. The following window will appear, in which we click the first item:

Startup Repair in System Recovery Options automatically fixes problems that prevent Windows from starting
If problems are found in the boot parameters, you need to confirm the need to make corrections by pressing the button Fix and restart.
Method No. 3. WinRE: System Restore
This method allows you to “roll back” the system to the time when it worked normally by selecting one of the restore points. But first these “points” must be created.
The recovery point is a kind of “cast” working environment V certain moment time. The records of this point include only system and software ones. User files (documents, images, music files) are not saved in the records.
Such points are created automatically by the operating system every 7 days. The user can create this point independently. It is recommended to do this before starting work that you are not sure will be completed successfully: installing an unknown software, drivers. If the job fails, a restore point will allow you to return Windows to its original state.
Does Windows create restore points?
In order for Windows to automatically create points for system disk System Protection must be enabled.

Create a restore point yourself

Now, in case of failure Photoshop installations, we can “roll back” the system to this point.
Performing a rollback

Method number 4. WinRE: image recovery
This is a data recovery mode from a backup copy. Let's try to create it.
Create an archive copy of the system
- Go to category Backing up computer data control panels.
- Press the system button.

Creating a system image in the “Backup and Restore” section of the Panel Windows management 7
- Selecting a local disk for storage copies of Windows 7. It is advisable that this is not the disk on which Windows is installed. You can create backup copies on a DVD or on a network resource.

- Select the disks that need to be included in the backup copy.
Setting up archiving allows you to choose what to archive, either at the discretion of the OS or manually. If you specify the manual selection option, you can specify exactly which drives should be archived
With its help, the OS can save in special file areas key system parameters and the most important data from the point of view of operational stability. And if suddenly a failure occurs in the operating system - restore necessary files. How to use this function correctly? How to make System Restore a reliable data protection tool?
Windows OS (if we take into account its most popular versions - XP, Vista, 7, 8) is equipped with sufficient big amount features designed to protect files and the system as a whole from failures.
Recovery is just one of them, but it is recognized by many IT specialists as the most important. It is also worth noting that this function works closely with many others.
Recovery functionality in Windows 7
One of the most popular modifications of Windows OS today is presented in version 7. This operating system endowed with quite a lot of functionality in terms of recovery. In particular, it can save files responsible for the correct operation of drivers, video and audio codecs. If any of the marked software components fails, then recovery Windows systems 7 will work perfectly, returning the computer to full functionality. Also, the PC will be quite reliably protected against registry failures and boot errors. Files responsible for the corresponding areas in the OS are also securely stored and easily restored.
In what cases is the function especially needed by the user? Most common option- erroneous installation of a program that greatly interferes with the operation of the PC, and it is impossible to remove it. Also, recovery can be useful if the user set certain settings some time ago. system settings, and now doesn’t want to waste time changing them to original state or simply forgot how to do it.

Among the most common problems- Windows refuses to boot. This situation may arise if, for example, a virus infected the system or the user himself accidentally installed a malicious program, or even inadvertently deleted important files with his own hands. In this case it will be useful to us special disk for restoration - today we will also talk about the intricacies of its use.
How does recovery work?
At the heart of the conservation mechanism key files- This is the “restore point” of the system. Depending on the OS version, this or that data is included. If we talk about, say, Windows XP, which is still popular, it writes relatively few types of files to the recovery point. Mainly this system libraries, registry entries, some applications. In more advanced versions of the OS from Microsoft, where there is system recovery - Windows 7, 8 or Vista, this function involves the use of a much wider range of data. IT specialists say that the total volume of protected files is such that in the event of a failure, almost any OS function can be restored without problems. True, many of the user files are not subject to backup (but this is even noted by experts as a plus - when the system is restored, the data will not be affected and therefore will not disappear).

A separate system recovery program is usually not needed if we use modern versions of Windows. The built-in application provides high quality this function. The corresponding program, which is normally present in Windows, can be flexibly controlled manually, or you can run it automatic execution, which ensures that “restore points” are created by the system regularly. In version 7 Windows minimal interval (according to default settings) - 7 days, provided that the user has not installed programs, drivers or downloaded OS updates.
Consumed resources
How many resources does the function in question consume? How to make system recovery a more economical process from this point of view? Everything, however, depends on the actual resource availability on a particular PC.
If the disk is relatively small - less than 64 GB, then the operating system allocates about 3% of this volume for the recovery function. If the hard drive is more capacious, then the OS can use 5% for backup. However, in modern versions Windows provides a function for automatically optimizing the used disk space. For example, if the allocated resource runs out, then the previous recovery points are simply deleted. Note that the system recovery program that Windows 7 is equipped with allows the user to very flexibly manage the corresponding disk resources.
Setting the function
Actually, access to the recovery function settings is located in the OS management area, which is actually responsible for protecting the system. Find the desired option very easy. This can be done by going to the "Control Panel", then selecting the "System" icon, and then the "Protection" option. If you cannot find the icon you need, then required settings can be found in another way. To do this, click right click Click on the "Computer" icon on the desktop, then select "Properties", and then find the "System Protection" option. A third option is also possible - press the combination WIN keys(the one with the Microsoft branded flag next to ALT and SHIFT) and R, then enter rundll32.exe in the window that opens, then a space and add shell32.dll, Control_RunDLL, sysdm.cpl, 4. This option may be useful if, for example, the contents of the desktop are not displayed on the screen for some reason (due to a virus, other malware or system failure).

In the window that opens, you can actually launch the recovery function, configure it, delete unnecessary checkpoints or set new ones. Here you can also set the allowed amount of disk space used.
Nuances of settings
Let us list the main nuances regarding the settings and selection of system recovery options - using the interface in Windows 7 as an example.
Among the most useful features is the ability to choose to protect files from individual system parameters. True, IT experts are not very loyal to this option, believing that data that ensures the correct operation of the OS should be backed up as a priority.
Windows 7 users can optionally delete all “restore points” created by the system. If we are working with XP or Vista, then in any case we will need to leave one - the one that is the latest. Experts recommend using this option with caution. Once the files copied to the backup are deleted, it will be impossible to restore them.

“Dots” are always needed, since there is a possibility that due to unintentional user actions or due to virus infection, system files will be deleted. It is likely that in order to continue working with the computer, you will need third-party software, and possibly a special system recovery disk - Windows 7, 8 or XP do not have regular means with similar functionality.
Starting the recovery
Having familiarized ourselves with the theory, let's move on to practice. How to run System Restore? There are quite a few ways to do this. Let's list the main ones that apply to Windows 7.
First, you can click the “Start” button, then in the “Search” line enter the word (in Russian) “Recovery” and select the item of the same name.
Secondly, we can also click on “Start”, move the cursor to “Run” and enter rstrui.
Thirdly, there is an option to run System Restore through Control Panel items. Go to this settings area and select the “Archive” icon. Then click on the “Restore system parameters” option.
In most cases, the OS will prompt the user to select a checkpoint. By what criteria should this be done? It all depends on what exactly required - removal the desired file or software error- system recovery. In the first case, you should focus on the date when the file was still on the computer. But, as a rule, it is enough to select the most recent OS “point” created.
Selecting all necessary settings, you can start the process. Its duration varies greatly depending on the number of files on the PC, the period of use of the operating system, the performance of the hardware, etc. It is problematic to derive any average values here. But there is a chance that Windows will do it in a few minutes.
System recovery and backup image
System Restore in Windows 7 is being expanded most useful function. The point is that the computer can create a “backup image” of Windows. His fundamental difference from files backed up as part of recovery, in that it contains a set of almost all system data. A backup OS image can be guaranteed to help the user out if the most important ones from the point of view of Windows performance data.
It is also worth noting that Windows 7 has another interesting option - cancel recovery. The fact is that directly during the process of returning the system to one of the previous “points” launched by the user, another one is created - the current one. This is useful if, for example, System Restore was launched by mistake. Or the user did not guess correctly control point, and the process did not bring the expected results. You can create a system image in the same program area that we discussed above - “Backup and Restore”.
Should I disable recovery?
There is a version among IT specialists that the recovery function consumes too much system resources, and therefore it is advisable to turn it off. To some extent, this point of view is close to the truth. Indeed, in order to consistently set a working system restore point, the computer requires memory and processor resources, as well as hard drive space. However, their number is absolutely not critical. On modern PCs, even if we take into account devices with average performance, the noted types of resources are more than enough. The slowdown in your computer will be barely noticeable, so disabling this feature is not advisable.
What other recommendations from IT specialists can you take into account? Many of them, in particular, do not recommend minimizing the amount of disk space allocated for running an OS such important function. There is no need to think about how to make system recovery extremely economical in terms of system resources, experts say. A disk space of 3-5% of the total hard drive volume is quite a bit, especially if you compare this resource with the capabilities of the function.
Disk recovery
In some cases, we may need a system repair disk. Above, we have already indicated in which cases this is most likely to happen - if, due to a virus or by the user himself, the key Windows operation files. Another option is an error standard program system recovery.

IT specialists highly recommend making such a disk in advance. There's nothing complicated about it. To create a disk, click "Start", then select "Control Panel", and then select the "Backup and Restore" option. We find the item “Create disk” for the appropriate purpose. Next, follow the instructions displayed on the screen. Of course, even before we open this program area, you should put it in the DVD drive blank disk. The recording process takes several minutes.
If we plan to use the disk, we will have to run system recovery through the BIOS. More precisely, not to carry out the process itself using this tool, but to make settings that are key from the point of view correct loading functions from disk.

How exactly to restore the system in this case? Through BIOS we need to set the correct boot sequence relative to those installed on the computer disk drives. The point is that according to Windows default runs from the hard drive. To set the correct settings, go to the BIOS (DEL key at the very beginning of booting the PC), then select the item Boot menu Sequence or consonant with it. After that, we put the DVD drive in first place in the sequence of media. Then we save (usually F10) and reboot. After this, the computer will start not from the hard drive, but from the system recovery disk.
Working with him software interface is somewhat different from the similar process in Windows itself. Let's consider its features. How to perform a system restore from disk? Which scenario should I follow?
In the "disk" recovery interface, there are three options to choose from. The first is work at the load level system files. It's called "Startup Repair" and allows you to rewrite critical correct operation OS data from disk to hard drive. The second option is "System Restore". This function is generally similar to the one that is launched in Windows in the “Control Panel” according to the instructions we discussed above. There is, however, an important difference - the restoration in this case cannot be canceled. However, as with Windows, you can select different “points” one by one. The third option is "System Image Restore". This, as we said above, is an alternative to recovery, and in many cases more reliable in terms of subsequent correct operation of the OS. But, in order to use it, we must create an image of the system in advance.
Thus, depending on the goals of system recovery, we choose one of three options. In most cases, you can restore the functionality of your PC from the disk, even if the most important files are deleted. System recovery on a laptop using a disk is carried out using approximately the same algorithms.
How to restore Windows 7 system on the laptop, when loading, a black screen appears, the recovery environment does not work, I deleted all the hidden partitions, there is no original disk. I spent a lot of time, tell me what to do now, or at least how to insure myself against such situations in the future, preferably without using paid programs Reserve copy data. Ilya.
How to restore Windows 7 system
Unfortunately, there are many reasons for this problem, ranging from incorrectly written drivers, harmful effects of a virus, errors file system and ending with our erroneous actions when working with a computer, there is no need to be afraid of such problems, you need to learn how to deal with them effectively.
Let's think how to restore windows 7 system, and we will also insure ourselves in the future against possible troubles using backup and recovery tools built into the operating system. We will learn how to restore Windows 7 without using third party programs for backup even when the System Recovery Options are not loaded and the F-8 button will be useless.
- Friends, if our article does not help you, then check out others on this topic, for example: in it you will learn how to restore a non-bootable system using various utilities command line, the first is Bootrec.exe with the commands /FixMbr and /FixBoot or the bootsect /NT60 SYS utility, as well as Bootrec.exe with the /RebuildBcd parameter, these utilities can be launched from the recovery environment or from the Windows 7 recovery disk. Another article will teach you restore the damaged or deleted bootloader of the seven bootmgr itself. The article will show you how to restore your operating system when system recovery is disabled and much more.
- If Windows 7 freezes on boot or suddenly reboots, or may suddenly show blue screen with an error, then perhaps all these problems are due to numerous file system errors. How to fix the situation even when the operating system does not boot due to these errors is written in this article.
- Well, eight articles from the section will give you a detailed understanding of all the built-in Windows 7 recovery tools: restore points, previous versions files, creating a system image and a recovery disk, and so on. So, let's begin.
Windows 7 has quite a powerful and good tool in its arsenal -> Recovery environment, which is created automatically when installing Windows 7 in a hidden partition and contains five other tools that solve numerous problems and problems.
- Note: If you learn how to use Windows 7 recovery tools correctly, and this is not difficult, then you can do without additional and paid data backup programs.
You can launch the recovery tool by pressing the F-8 button on the keyboard immediately after starting the computer. After this, the menu Additional boot options will open in front of you: Troubleshoot your computer, then Safe mode, Safe Mode with Boot network drivers etc.

The first thing to do is apply Startup recovery(Automatically fix problems that prevent Windows from starting)

Required digression: After pressing the F-8 button when booting the computer, you may not have the > item, but only Safe Mode and so on, the question arises why.
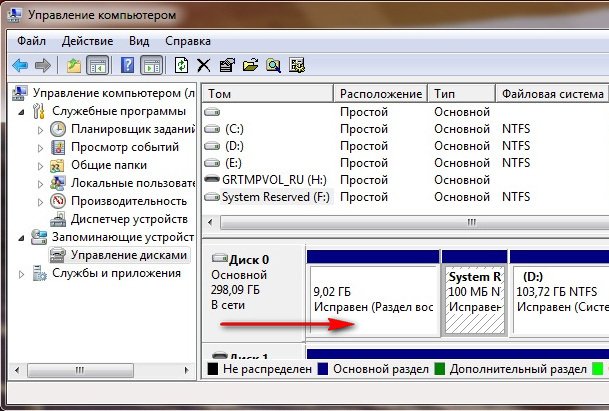
When installing Windows 7, a recovery environment partition is created automatically and is located in the root of the drive (C:) in the Recovery folder. You can also see in the Disk Management window - separate, hidden section hard drive, its volume is only 100 MB, it is used for storage boot files boot configuration (BCD) and system bootloader (bootmgr file).
You can see it under Computer->Management->Disk Management. Under no circumstances should you delete this partition (many people delete it out of ignorance), otherwise you will not be able to start the recovery environment, that is, the item Troubleshooting your computer you won’t, and in more severe cases you simply won’t boot the system.

In the lower screenshot you can see another hidden partition, with a capacity of 9.02 GB, this is a hidden recovery partition with factory settings on my laptop, yours may be larger or smaller. It’s also better not to delete it; if necessary, you can always restore Windows 7 from it.
What should you do if you do not have a partition with a recovery environment and when you press the F-8 button in the Additional boot options menu, the Troubleshooting computer option does not appear? How then to restore the Windows 7 system??
An installation disk with the Windows 7 operating system can help here. You can run the recovery tool by booting from the original installation Windows disk 7, selecting the item at the very beginning System Restore. If installation disk you don’t have it, then you can use it (you can make it in any running Windows 7) in five minutes, then you can also boot from it and do the same.


So we finally got to the System Recovery Options, either using the F-8 button and the Troubleshooting item, or the Windows 7 installation disk or the Windows 7 Recovery Disk.
In the System Restore Tools Selection menu, select the first one:
Startup recovery-> there will be an analysis of faults that interfere with the normal loading of Windows 7 and their further correction for normal loading and functioning of the operating system. During the process, we may be warned that problems have been detected in the boot parameters, click Fix and restart.
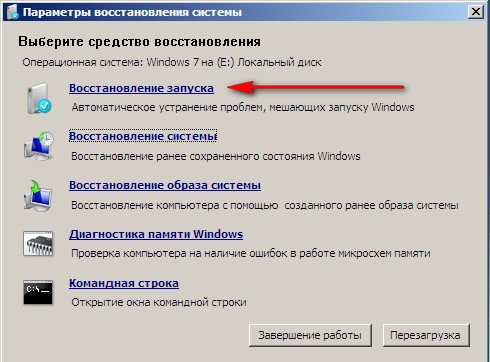


System Restore->using this function, we can, if we have it enabled, roll back to the time when our Windows 7 worked and loaded perfectly, everything is simple here.


->This is the tool I personally use; if used skillfully, it can be replaced paid programs on data backup, if interested, read on.

What's good about it? It will help when you don't have the original Windows 7 installation disk and you've deleted the hidden partition with your laptop's factory settings, but that's not all.
Sometimes there are situations when, due to various reasons or due to the actions of a virus, you will not be able to load the operating system at all, or many people ask How to restore Windows 7 system even if the menu with Additional options Downloads will also be unavailable. Should I reinstall the operating system again?
Therefore, immediately after Windows installations 7 on your laptop or computer, we create it using this function-> Restoring a system image, an archived image of our Windows 7 on the hard drive, we take care of it. You must create a Windows 7 Recovery Disk (read below), it will help you use the System Image if the Advanced Boot Options menu does not load.
Let's go to Start -> Control Panel->Archiving computer data.

Choose Creating a system image

Next, select Local disk on which we will store the system archive. In my case, Local disk (E:), if you have system unit some hard drives, then of course it is better to place the backup on the hard drive where the operating system is not installed.


Note: You may notice that I have two operating systems installed on my laptop, so the archiving program selected two Local disks.

Click Archive and the process of creating an archive with our Windows 7 will begin.
Created, it will look like this.

Now, if necessary, you can deploy the archive with Windows 7 to your computer in 20-30 minutes. It would be better if you additionally copy the archive with the system onto a portable one HDD, this way you will protect yourself doubly.
Let's imagine that we can't start Windows 7 and deploy the backup we created, let's do it together.
Let's launch Windows 7 Recovery Tool, by pressing the F-8 button on the keyboard immediately after starting the computer. The Advanced boot options menu opens, select Troubleshoot your computer.

Restoring a system image


Use latest accessible image systems
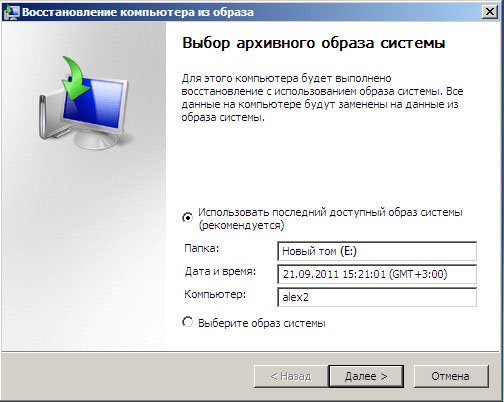

Of course, all our data is on Local disk, where the operating system is now being restored, will be deleted, so you can first boot from any Live CD and copy what you need.
How else can you restore your Windows 7 system? Of course, using the Windows 7 Recovery Disk. Let's create Recovery disk, which can be used to boot the computer, it will contain recovery tools that can be used to repair problems Windows boot 7, as well as restore the operating system from archival copy, which we created in advance.
Important: The bitness of the system is important for the recovery disk, you can use a 32-bit recovery disk for any 32-bit Windows 7, and a 64-bit recovery disk for any 64-bit Windows 7.
Let's go again Backing up computer data
Create a system repair disk, insert the DVD into the drive, press

Create disk


When Boot Disk Windows 7 recovery will be ready, put it in a safe place.
To restore Windows 7 from a Recovery Disk, you basically don’t need any working operating system at all. You will only need to change the boot priority to the drive in the BIOS of your computer, insert the recovery disk into it and restore your Windows 7 using the archive. Many here can draw an analogy with data backup programs and this is correct, they work on the same principle, only Of course, their functionality is more convenient.
- If you don’t know how to change the boot priority in the BIOS, read our articles and
Recovering Windows 7 from a Recovery Disk. I show you how to do it. Let's say we're in trouble, we can't start Windows 7, when we press F-8 on the keyboard immediately after starting the computer, nothing happens. We cannot get to the menu with Additional boot options and an error message is displayed. In this case, the system archive on the hard drive is not available to us. This is exactly the kind of trouble that happened to our reader Ilya, who wrote us a letter asking for help.
In this situation, many people reinstall Windows 7 from scratch, but not you and me, because we have System Recovery Disk.
We insert it into the drive and reboot, set it to BIOS loading from the drive, as I said, the boot disk starts the System Recovery Options program.
Press Enter until the prompt to boot from the disk disappears.
If you are facing a serious problem with your computer, then the best and easiest way is to restore it to an earlier time. happy time- System Restore. This is how you protect personal files, even after eliminating them with a recently modified registry, removing drivers and software that can only cause computer pain.
You may encounter many problems while using the device. If there is a problem with the system, it will not be able to boot successfully and you will not be able to use applications. In this situation return of Windows before an earlier date will help you get it back previous state. Additionally, there are other reasons that may cause unexpected changes to occur on your computer. You may delete it incorrectly installed program or driver. However, if this does not solve the problem, try restoring your system to an earlier date. A good place to start is to get your computer in proper working condition.
How to restore a device to a specific date?
The first thing you should do is back up your system. Then, when you have to perform a restore, you can use it directly. Other versions have a snap-in that can create copies of the image and restore the last working state of the OS. Open this tool, create a backup and save it to your local or external hard drive. If something goes wrong, you can use it to get your computer back to working order.
However, many users believe that the built-in Windows tool very difficult to use and creates a large backup image of the system. To solve this problem, try running a third-party utility.
Video - System Restore in Windows 7. Creating a restore point
Restore your computer to an earlier date using AOMEI Backupper
AOMEI Backupper - powerful program, which allows you to create backups and restore the system, partition, disk, file/folder. In addition, it has many other tools that create bootable media, synchronize two folders, etc. Free option The program is designed for PC users with Windows 10/8/8.1/7/Vista/XP. So, to restore the system to more early date, download AOMEI Backupper Standard.
Step 1. Launch the utility. On the left, click "Restore". Then click on the "Path" button to select the image file for data recovery. Click Next.

Step 2. A window will appear reminding you to restore the system. Click Yes and select a backup time. Click on it and click Next.

Step 3. You will be taken to the Transaction Summary page. Confirm the information if there are no problems, and then click “Start Recovery.”

When the progress reaches 100%, click "Done".
If you only want to restore some drivers and not all, then try downloading the tool Driver Easy. It allows you to select only those components that are needed for backup and recovery, and thus save a ton of storage space for others important files and programs. In addition, with using Driver Easy to detect and update everything necessary drivers for free.
AOMEI Backupper allows you to perform universal recovery, which returns the operating state of the system from one computer to another. However, this function only exists in paid version AOMEI Backupper Professional, which means you need to update your existing program.
Attention! Choosing recovery increases the likelihood that the process of returning the system to a working state will not be successful. In this case, perform all the steps gradually. To do this, first select a recent restore point and then move on to older ones. Selecting the old backup removes all software and hardware updates installed "in the interim" when they no longer work and require reinstallation after the system restore operation is completed.
Video - How to run System Restore on Windows 10
Using System Restore
Let's assume that you have enabled the function to return the system to a working state (we will discuss how to do this below). To reset the settings to an earlier date, follow these steps:
Step 1. Press Windows icon(or "Windows Search" on Windows 10) in the taskbar and in the search field, type "Recovery". Select the Recovery Control Panel.

Step 2. Click "Run System Restore" and the "Next" button. You will see the restoration dates and times. This may only be one point, but there are usually more. Select the point that you think was created before the PC started. Click Next.


Step 3. To confirm your choice, click “Done”. The system will return the computer to its last working state.

Recovering using Safe Mode
There are cases when, due to serious problems with Windows, it is not possible to successfully run System Restore. Luckily, you can still do this by booting into Safe Mode.
| Step | Description | Image |
|---|---|---|
| Step 1 |  |
|
| Step 2 | Once the corresponding dialog box opens, select the "Update and Security" option |  |
| Step 3 |  |
|
| Step 4 |  |
|
| Step 5 |  |
|
| Step 6 |  |
How to enable System Restore
As mentioned earlier, Windows 10 requires the recovery feature to be activated. In order not to encounter an unpleasant surprise missing restore points when you need them most, follow these steps:
- Enter in the field Windows search 10 “Creating a restore point.” Click on the output and select the recovery option.

- When System Properties opens, select Customize.

- The System Protection window appears. You can see that the restore feature is disabled by default. Click the switch next to “Enable system protection.” You will also see a slider. Move the pointer along the slider by 5%. Then click "Apply" and "OK".


- After confirming the action, you will return to the system properties window. Now you can create your first restore point. Click "Create".

- In the dialog box that opens, create a name for the recovery point.

- From now on, system backups will be created whenever significant changes are made.

