Interesting projects for home using Arduino. Unsuccessful Arduino lamp and traffic light projects
Arduino/Genuino UNO is a flagship board for developing your own projects, building simple systems automation and robotics based on the ATmega328 microcontroller with free software and open architecture. Arduino UNO R3 is today the most popular platform for budding inventors, DIY enthusiasts, students and schoolchildren.
Arduino UNO: board pinout
We have already told you what Arduino UNO CH340 is, so let’s move straight to the characteristics and description of the Arduino UNO board. Pinout and circuit diagram The platform is shown in the photo below. As we have already said, the entire line of boards has a completely open system architecture, which allows anyone to a third party manufacturer copy and upgrade Arduino Genuino UNO boards.
Arduino UNO board pinout in Russian, ICSP
UNO is the best option to get acquainted with microcontrollers. The board has a convenient size and everything you need to get started: 14 digital inputs/outputs (6 ports can operate in PWM mode), 6 analog inputs for sensors, a USB connector for programming and a power connector for Arduino UNO from a power supply or crown. But the main thing is the huge variety of lessons and instructions on the Internet.
Arduino UNO board specifications
- Microcontroller: ATmega328
- Clock frequency: 16 MHz
- Logic level voltage: 5 V
- Power input voltage: 7-12V
- I/O ports general purpose: 20
- Maximum current from I/O port: 40 mA
- Maximum output current of 3.3V port: 50mA
- Maximum output current of 5V port: 800mA
- PWM ports: 6
- Ports connected to the ADC: 6
- ADC capacity: 10 bits
- Flash memory: 32 KB
- EEPROM memory: 1 KB
- RAM: 2 KB
- Dimensions: 69×53 mm
Arduino UNO: electrical circuit

Arduino UNO: I/O ports, power
Operating voltage - 5 V when connected via USB from any device (computer, laptop, smartphone charger, etc.). At simultaneous connection external adapter(battery, crown, power supply), the power is automatically switched, but the board can still be programmed via a computer. Recommended power supply for Arduino Uno from batteries or accumulator is from 7 to 12 V.

Arduino UNO: externally powered
5V – the Arduino pin supplies 5V, it can be used to power devices
3.3V – a 3.3V voltage is supplied to the pin from the internal stabilizer
GND – ground pin
VIN – pin for supplying external voltage
IREF – pin for informing about the operating voltage of the board
You can supply power to the microcontroller through the VIN port using wires. "Plus" from external source is supplied to the VIN port, and “Minus” to GND (ground). Supplying an external voltage of 5 Volts to the 5V pin is not permissible, since the power supply to the Genuino Arduino Uno bypasses the stabilizer, which can lead to damage. All digital ports on the board provide a stabilized voltage of 5 Volts.
Arduino UNO: firmware, memory


The board is programmed in free environment Arduino IDE in Russian, which can be downloaded from the official website. To connect devices and modules, connectors (“male-male” and “male-female”) are used, which are connected to the Arduino ports. To start working with the platform, go to the Arduino uno r3 section “Lessons for Beginners”, where detailed instructions with examples.
The board supports three types of memory:
Flash - memory 32 kB in size, used to store the program. When the controller is flashed with a sketch via USB, it is written specifically to Flash memory. To clear the memory of the Arduino UNO, you should upload an empty sketch.
SRAM memory- This RAM Arduino 2 kB. This is where the variables and objects created in the sketch are stored. SRAM memory is volatile; when the power supply is disconnected from the board, all data will be deleted.
EEPROM- This is a non-volatile memory with a capacity of 1kB. Here you can record data that will not disappear when the power is turned off. The downside of EEPROM is the limitation of rewrite cycles - 100,000 times, according to the manufacturer.
Description of Arduino UNO in Russian
We recommend that you familiarize yourself with other boards from the Arduino-Genuino line, for example, an analogue of the most popular UNO board - RobotDyn UNO R3 from Chinese manufacturer. The board is in no way inferior in its characteristics to the official manufacturer, but at the same time has more affordable price and a number of advantages. Such as a more convenient USB connector and large quantity analog inputs.
Arduino is very popular among all design enthusiasts. Those who have never heard of it should also be introduced to it.
What is Arduino?
How can you briefly describe Arduino? The best words would be: Arduino is a tool that can be used to create various electronic devices. In essence, this is a true general-purpose hardware computing platform. It can be used to build simple circuits, and for the implementation of rather complex projects.
The designer is based on its hardware, which is an input-output board. To program the board, languages that are based on C/C++ are used. They are called, respectively, Processing/Wiring. From group C they inherited extreme simplicity, thanks to which they can be mastered very quickly by any person, and applying knowledge in practice is not a rather significant problem. So that you understand the ease of work, it is often said that Arduino is for beginner wizard-designers. Even children can understand Arduino boards.
What can you collect on it?

The applications of Arduino are quite diverse; it can be used both for the simplest examples, which will be recommended at the end of the article, and for quite complex mechanisms, including manipulators, robots or production machines. Some craftsmen manage to use such systems to make tablets, phones, surveillance and home security systems, “ smart House"or just computers. Arduino projects for beginners, which even those with no experience can get started with, are at the end of the article. They can even be used to create primitive systems virtual reality. All thanks to the fairly universal hardware and capabilities that it provides Arduino programming.
Where can I buy the components?

Components made in Italy are considered original. But the price of such kits is not low. That's why whole line Companies or even individuals make artisanal methods of Arduino-compatible devices and components, which are jokingly called production clones. When purchasing such clones, one cannot say with certainty that they will work, but the desire to save money takes its toll.
Components can be purchased either as part of kits or separately. There are even pre-prepared kits to assemble cars, helicopters with various types controls or ships. A set like the one pictured above, made in China, costs $49.
More about the equipment

Arduino board is simple AVR microcontroller, which was flashed with a bootloader and has minimal minimum required USB-UART port. There are other important components, but within the scope of the article it would be better to focus only on these two components.
First, about the microcontroller, a mechanism built on a single circuit in which the developed program is located. The program can be influenced by pressing buttons, receiving signals from the components of the creation (resistors, transistors, sensors, etc.), etc. Moreover, the sensors can be very different in their purpose: lighting, acceleration, temperature, distance, pressure, obstacles etc. Simple parts can be used as display devices, from LEDs and tweeters to complex devices, such as graphic displays. The quality considered are motors, valves, relays, servos, electromagnets and many others, which would take a very, very long time to list. The MK works directly with some of these lists, using connecting wires. Some mechanisms require adapters. But once you start designing, it will be difficult for you to tear yourself away. Now let's talk about Arduino programming.
Learn more about the board programming process

A program that is already ready to run on a microcontroller is called firmware. There can be either one project or Arduino projects, so it would be advisable to store each firmware in separate folder to speed up the process of finding necessary files. It is flashed onto the MK crystal using specialized devices: programmers. And here Arduino has one advantage - it does not need a programmer. Everything is done so that programming Arduino for beginners is not difficult. The written code can be loaded into the MK via a USB cable. This advantage is achieved not by some pre-built programmer, but by special firmware - a bootloader. The bootloader is a special program that starts immediately after connection and listens to whether there are any commands, whether to flash the crystal, whether there are Arduino projects or not. There are several very attractive advantages to using a bootloader:
- Using only one communication channel, which does not require additional time costs. So, Arduino projects do not require you to connect many different wires and there will be confusion when using them. For successful work One USB cable is enough.
- Protection from crooked hands. It’s quite easy to bring the microcontroller to a brick state using direct firmware; you don’t need to work hard. When working with a bootloader up to potentially dangerous settings you can’t get there (with the help of a development program, of course, otherwise you can break everything). Therefore, Arduino for beginners is intended not only from the point of view that it is understandable and convenient, it will also allow you to avoid unwanted financial expenses associated with the inexperience of the person working with them.
Projects to get started
When you have acquired a kit, a soldering iron, rosin and solder, you should not immediately sculpt very complex designs. Of course, you can make them, but the chance of success in Arduino for beginners is quite low with complex projects. To train and improve your skills, you can try to implement a few simpler ideas that will help you understand the interaction and operation of Arduino. As such first steps in working with Arduino for beginners, we can advise you to consider:
- Create one that will work thanks to Arduino.
- Connecting a separate button to Arduino. In this case, you can make it so that the button can adjust the glow of the LED from point No. 1.
- Potentiometer connection.
- Servo drive control.
- Connecting and working with a three-color LED.
- Connecting the piezoelectric element.
- Connecting a photoresistor.
- Connecting a motion sensor and signals about its operation.
- Connecting a humidity or temperature sensor.
Projects for the future

It is unlikely that you are interested in Arduino in order to connect individual LEDs. Most likely, you are attracted by the opportunity to create your own car, or flying turntable. These projects are difficult to implement and will require a lot of time and perseverance, but once completed, you will get what you want: valuable Arduino design experience for beginners.
Everyone has probably heard what a digital drum machine or otherwise a beat machine is. The electromechanical drum machine created by Norwegian composer Koka Nikoladze is a completely different matter. In it, sound is formed due to mechanical impact. The machine works under Arduino control, which allows you to program a melody to perform.
You've heard about Arduino and you want to quickly figure it out in order to make your own device, robot, or whatever else they come up with. You can blink an LED on the first evening, but creating a more complex gadget will take much more time. There are long weeks and even months ahead of studying programming in C, searching for compatible libraries and modules, crutches and overcoming difficulties. How to speed up the process? Start with Arduino compatible board that can be programmed in JavaScript.
Original article in English http://www.bunniestudios.com/blog/?p=2407
Ready in the photo printed circuit boards for Leonardo
The most interesting thing about the lamp is that it reacts to approach using a homemade, and actually very simple capacitive sensor. The main element, which is a sheet of foil. On this moment this assembly is just a prototype, and all the electronic components and the sensor (that same sheet of foil) are in no way integrated into the lamp itself, but the idea itself is very interesting.
Arduino, homemade glove with 5 hard-wired bend sensors, 5 HITEC HS-81 servos and mechanical arm. You can see how it all works in the video. Arduino reads data from bend sensors and controls servo motors so that the mechanical arm repeats the movements of the human hand. By the way, in the first video the author uses a ready-made set of hand mechanics, which can be bought on ebay, although without electronic components and drives. In another project, the author made a similar hand from scrap materials.
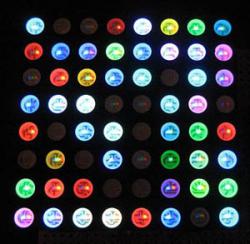 In this project the author will show how you can connect a full-color LED matrix 8x8 to Arduino. The matrix itself has 32 inputs: 8 anodes, 8 red cathodes, 8 green and 8 blue. In this case, only 3 outputs on the Arduino will be used to control the matrix. There is no magic here, but there are 4 74HC595 shift registers.
You can read more about using the 74HC59 with Arduino in the instructions Using a 74HC595 Shift Register to Increase the Number of Outputs.
One register gives us 8 outputs, since our matrix has 32 inputs, the design uses a cascading shift register technique. We will need 4 74HC59 registers, while the number of connections to the Arduino will not change and 3 outputs to the Arduino will be used. For driving. Power is supplied via USB, but you can also connect a stand-alone one.
 Filming fast-moving processes, such as a drop falling or a balloon exploding, is a very difficult task. It is almost impossible to accurately predict the moment when you need to press the shutter release without special devices. No, you can, of course, make a hundred attempts, and at some point luck will turn to you. But you can do without hundreds of balls. This is where Arduino comes to the rescue. The following describes the process of constructing an automatic trigger on Arduino based with a reaction to sound or intersection of the laser pointer beam.
Strictly speaking, Arduino will not control the camera shutter, but the flash. Unfortunately, the delay in the camera’s response to the signal is around 20 milliseconds, which is not noticeable to the human eye, but still longer than you can afford when shooting a burst balloon. Therefore, shooting is done in a dark room with a shutter speed of 10 seconds, but the flash fires exactly at the right moment. Since there is practically no lighting in the room, all exposure of the photograph will occur exactly at the moment the flash is fired (about 1 millisecond).
Arduino is a hardware computing platform that is used for designing and creating electronic devices various levels difficulties.
At the heart of this electronic designer lies a hardware platform for input and output, which is programmed in the Processing/Wiring language, created on the basis of C++. What components does Arduino consist of, what can you do with it, and how can you learn to use this smart chip?
Arduino is one of the most common miniature controllers with a set of inputs and outputs that works according to a pre-written program. This versatile controller is very convenient for creating prototypes of electronic devices, making it popular not only among students and hobbyists from around the world, but also among advanced designers and inventors.
Arduino impresses with its versatility. Using special expansion boards, this controller can interact with other devices via Bluetooth, Wi-Fi, GPRS, send and receive phone calls and SMS.
The controller is not a simple chip, but a board that implements ready-made diagram power supplies and interfaces for connecting to a PC, input and output connectors.
Thanks to wide range protocol libraries, it is possible to organize the interaction of Arduino with sensors and servos used in modern robotics.
A open architecture makes it possible to customize Arduino for any purpose. And thanks to the simplified programming language, it will be easy even for beginners to master working with the controller. It is especially convenient to work with Arduino thanks to the platform, which provides an almost instant response to programmed commands.
What can you do with Arduino? A programmer, designer or engineer can turn almost any original idea into a working prototype - you just need to purchase a controller and additional radio components. Also, programming and circuit design enthusiasts are captivated by the low cost of Arduino, which makes the controller accessible to the masses.
Arduino projects: what you can do
Let's look at a few original ideas, which can be implemented on Arduino. In addition to the diagram itself, you may need additional parts, which are most profitable to purchase on AliExpress.
Home temperature regulator
You can implement such a project using several boards Arduino Nano and one Arduino Uno/Mega, which will act as a base. Communication between modules can be realized using NRF24L01, a radio communication module that makes it possible to combine up to 6 boards.
In one case it is necessary to assemble an Arduino Nano connected to DHT22 humidity and temperature sensors, as well as an NRF24L01 module. The power source can be regular battery. Several of these devices must be placed throughout all rooms in the house.
Indicators from the Arduino Nano will be transmitted to the base, which will be Arduino Mega or Uno. It is also necessary to connect the NRF24L01 signal receiver, power supply and LCD display to display text information. The “base” must be located in close proximity to the heating system. Receiving and processing incoming data on humidity and temperature, the base will transmit commands to the heating system to increase or decrease the temperature.
CNC machine
This idea is one of the most difficult to implement. WITH using Arduino Mega you can implement not only a CNC machine, but also a 3D printer. In addition to the board itself, you will need L298N motor drivers, as well as the motors themselves. The rest of the work is frame and code development.
Smart greenhouse
All owners of a vegetable garden or personal plot know how much attention a greenhouse and the seedlings grown in it require. It is necessary to constantly monitor soil moisture, open and close doors in time, etc. With the help of Arduino, all these routine processes can be automated.
Using just one Arduino Mega board and a DHT22 controller, you can record and display information about the temperature in the greenhouse, as well as transmit commands to start irrigation, control motors to open and close doors.
Robots
Robots are the best toy not only for children, but also for adults, especially when it is possible to control them. Using Arduino and various available materials, you can make a robot in any configuration: from the most primitive to complex models.
For example, using ultrasonic range finder HC-SR04 your robot will be able to record the distance to obstacles and go around them while moving. By using the L293D motor driver, you will have 3 servos and 4 motors at your disposal. Using the HC-06 module, you will be able to control your creation via Bluetooth via a smartphone.
Of course, this is not the end of the list of Arduino projects that you can do yourself - the possibilities here are limited only by your imagination and skills.
We have collected the best and even crazy Arduino projects that we came across in 2015.
Arduino Wake-Up Machine
Hacking Combination Locks Using Arduino
This mechanism Arduino controlled can be opened by anyone combination lock in less than 30 seconds. The hacker project Samy Kamkar demonstrated a vulnerability.
Robot sorting Skittles
A project for a 3D printed Arduino robot to save time sorting Skittles. Perhaps the biggest disappointment is that the mechanism is not universally suitable for M&M's. Video and more detailed description
Protopiper - prototyping gadget
Amazing gadget for prototyping. Tired of running around with a tape measure? With this device, you can quickly sketch out a room-sized sketch.
Open Source snow blower
The engine of progress in many cases is laziness. Shovel snow? A robot is needed for this job. Perhaps snow blower sellers will not like this project, because... The author believes that everyone can make one for themselves. .
Blaster for switching music
Everyone has different musical tastes. But sometimes the music is just terrible. No one in the company likes her. It happens. If your dream and such moments are to shoot a gun and change the music... then know that the project has been implemented, dreams come true.
Give your hair more options
Send messages unnoticed, launch applications, broadcast your location - all this can be done by gently stroking your hair - this is so natural for girls.
Knit with Arduino
To knit, you don’t have to go to your grandmother or buy professional equipment. Make your own robot that knits using Arduino.
Robot BB-8 on Arduino
A project for those who dream of making a BB-8 robot from Star Wars.
Okay Google, Sesame, open the door
In this project, an MIT student implemented a door opening using voice Google Teams Now. To get into the house, you just need to say: “Open sesame.” Video and description of the project.

Typewriter playing a symphony
Typewriter 1960 turned into not only a printer, but also a musical instrument.
Robot AT-AT
Controlled robot AT-AT from Star Wars.
Robot T-800 from Terminator
There are many Terminator fans in the world, but few have recreated the T-800 robot. You can read more about the project and watch the video.

Robot minion from an egg from Kinder surprise
Funny homemade robot which you can make yourself. More details about the project.
Controlling your TV with your mind
The TV remote is no longer needed. All you have to do is think about changing the channel. The project uses a chip from the game Star Wars Force Trainer ( star Wars), released in 2009. Read more.