How to remove auto brightness on a laptop, solution to the problem. Automatic brightness adjustment
 Proper workplace lighting and optimal brightness and contrast settings for your monitor are some of the most essential. Our eyes get very tired when they have to peer closely at a dim monitor in bright sunlight, or, conversely, constantly look at the dazzling spot of the monitor in the dark.
You can, of course, manually adjust the brightness level of the monitor every time the light changes, but doing this is quite cumbersome. Programmers found a way out of this situation and created special computer programs that automatically adjust the monitor luminosity level depending on the time of day. In my opinion, the most successful of this kind of programs is the free utility f.lux.
To create a comfortable environment for the eyes, f.lux in the morning and afternoon, adjusts the monitor settings, using cooler colors, which is subjectively perceived by us as increasing the brightness of the monitor. But in the evening and at night, the image on the monitor seems to “warm”, becoming a little reddish, which creates more favorable conditions for the eyes to work at this time of day.
Here, for example, is what the image looks like on a computer monitor in a dimly lit room with the program on (left) and off (right) f.lux:

The program not only monitors the time of day, but even at the installation stage determines the geographic location of your computer. Knowing the date and time, geographic latitude and longitude allows the program f.lux accurately calculate the moments of sunrise and sunset, changing the color temperature (or color profile) of your monitor as needed.
To download the program f.lux, click on this button:
Any computer user can install this program. By launching the downloaded file flux-setup.exe You will see the following window with the license agreement:

After pressing the button "I agree" The process of copying files begins:

After copying is complete, the button becomes available "Close", by clicking on which you will complete the installation process f.lux. A program icon appears in the system tray (bottom right near the clock), clicking on it with the left mouse button opens the settings window f.lux:

This window schematically shows the position of the sun above the horizon, the current color temperature, the time elapsed since sunrise (or the time after which the sun will set), as well as your geographic latitude and longitude. To make any changes in the program settings, you need to click the button "Change Settings"(or "Settings" in a newer version f.lux):

Of course, you are unlikely to remember your geographic coordinates, so to check whether they are determined correctly, click the button "Change" on the right side of the window (see figure above). A new window appears in which you can start the process of automatically determining your geographic location by pressing a button "Locate...":

In the window that appears, you will see a Google map and the name of your (or nearest) city:

If it suddenly turns out that the program f.lux made a mistake in determining your geographical location, you can enter the name of your city in Latin letters and press the button "Search". When you are sure that your city is found on the Google map, click the button "OK".
You will again return to the window with the main program settings. Now you can decide on the speed of changing day and night color modes:

There are two options: Fast- fast (change occurs within 20 seconds) and Slow - slow (modes change within 1 hour). You can change these modes within two days to decide which one you like best.
And, perhaps, the most important settings in the program f.lux– these are the color temperature settings for day and night modes. These settings are made using the appropriate sliders and then pressing the button "Done":

When you move these sliders left and right, you will notice that they do not reach the edges of the color bars. But this limitation is easily removed by pressing a button "Expand Range":

Immediately after this, a window appears warning you that you need to restart your computer:

If you press "Restart Now", the computer will restart and you will be able to change the color temperature of the monitor over a wider range.
That's it for setting up the program. f.lux finished. The program automatically starts when the computer boots and begins its useful work, adjusting the brightness (color temperature) of your monitor depending on the time of day and making your work at the computer as comfortable as possible for the eyes.
Perhaps at first it will seem to you that changing the color of the monitor by the program f.lux distorts the image visible on the screen too much (especially in the evening and at night). But if you let this program work for at least a day, you will probably notice that your eyes get tired much less, and you work at the computer much more comfortably.
Sometimes, of course, you need to do such work on a computer when color distortion is extremely undesirable (working with graphics, video color correction, etc.). In this case, the program f.lux can be disabled for 1 hour by right-clicking on the program icon in the tray and selecting the item from the menu "Disable for an hour":

If you have read this far in the article and still do not have a clear idea of how the program is installed, operated and configured f.lux, then watch a short two-minute video about this program:
Advice: For easier viewing of the video, expand it to full screen using the button.
As you can see from this video, installing and configuring the program f.lux takes a little over a minute. You just need to set it up once and it will automatically start taking care of your eyes.
Looking online for reviews of f.lux, I came across the statement that, due to its preventive effect, f.lux is the first program that any person who spends a long time sitting at their computer should use. I completely agree with this conclusion, I use it myself f.lux and I invite you to see from your own experience how useful this little computer program is for your eyes.
Question from a user
Hello. The brightness on my laptop began to change spontaneously: when the image is dark, the brightness drops, and when it is light, it is restored to its normal level.
How can I get rid of this problem, otherwise my eyes are starting to get tired because of it? OS: Windows 8, graph. accelerator (video card) Intel HD 4000 (built-in).
Good day!
This problem began to appear more and more often after the release of Windows 8 (this OS introduced the ability to adaptively adjust the brightness, depending on the picture on your screen). Also, some laptops are equipped with special software and sensors that determine the level of illumination in the room and, based on it, adjust the brightness of the screen.
There is nothing wrong with this, but in certain cases such a change does not allow it to work normally and interferes with the user. In the article I will tell you in detail how you can disable this spontaneous change in brightness...
Eliminate automatic monitor brightness changes
1) Disable adaptive brightness control
This is the first thing to do. This option is available in Windows 8, 8.1, 10. Those who have Windows 7 can omit this part of the article.
You need to open the power settings section:
- or via the following address: Control Panel\Hardware and Sound\Power Options
- or by pressing the Win+R keys and entering the command powercfg.cpl (see screenshot below).

In power settings: follow the link "Setting up the power plan" in the selected mode (in the screenshot below - this is balanced mode. The selected mode is marked in bold black).


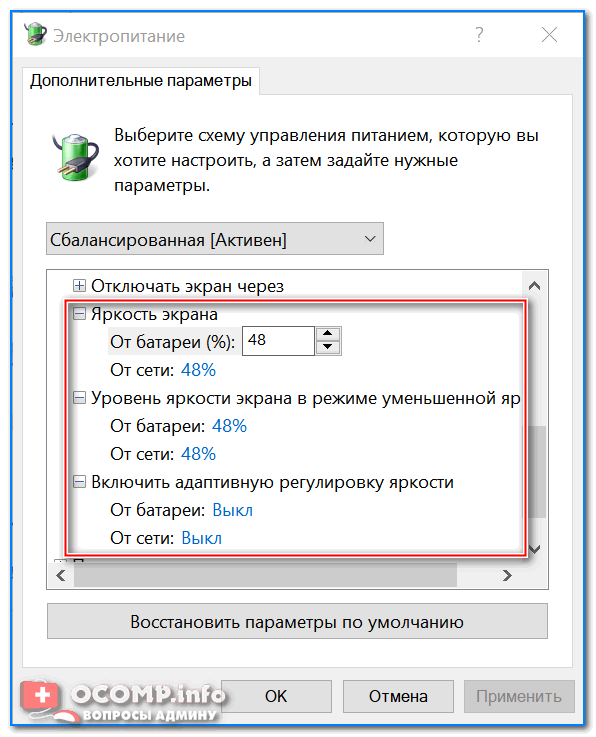
Now find the tab among the settings "Screen" and open it. Here in the tab there are 3 key settings:
- screen brightness from battery and network: set the values that suit you;
- screen brightness level in dim mode: set exactly the same values that you have specified in the tab "Screen brightness";
- turn off adaptive brightness control from mains and battery (see screenshot below).
Now save the settings and try to look at light and dark pictures (for example) to evaluate whether the brightness changes. As a rule, such settings completely eliminate this problem...
Update 06/10/2018
If you are using Windows 10, pay attention to its control panel (to go to it, press Win+i). In the section "System/Display" there is a special a setting that allows the laptop to change brightness as the ambient light changes. Turn it off too!

2) Setting up the power supply for the video card
The laptop itself can reduce the brightness under certain operating modes. For example, IntelHD video cards support display energy-saving technology and extended runtime in games when running on battery power. Similar technologies are available in both AMD and nVidia.
First you need to go to the settings of the video card driver (you can do it through - see the screenshot below), or you can do it through the tray icon, next to the clock.

Intel Graphics Settings (Tray)

Important!
If you do not have a tray icon, and there is also no link to graphics settings in the control panel, most likely you do not have the drivers installed (it is likely that you have a “universal” driver that was installed when you installed Windows). In this case, I recommend programs for updating drivers:
They need to set the following:
- set the energy saving parameter to maximum performance mode;
- disable extended runtime for games on battery power;
- disable the display energy saving technology (screen below - see arrows).

Note!
For example, in video cards from AMD, you need to open the “Power” section, then enable maximum performance, and disable Vari-Bright technology (this is AMD technology that allows you to adjust brightness).
Vari-Bright disabled! (AMD Graphics settings) / Clickable

3) Sensor monitoring service
There is one service in Windows that monitors sensors and adjusts the display lighting, depending on the lighting of the room in which your device is operating.
I can say that sometimes the service does not work correctly and can affect the brightness adjustment, even if you do not have any sensors!
How to disable sensor monitoring services
Open a window with services: the easiest way is to press keys Win+R, enter services.msc, press Enter. The method works in all versions of Windows.

Next in the list you need to find the service "Sensor Monitoring Service" , open it. In the column "startup type" set [disabled], and stop the service itself, so that the status appears as "Stopped" (see screenshot below).
Then save the settings and restart the laptop.
4) Laptop Control Center
Certain laptop models include a control center among the software installed with the drivers. For example, in the line of VAIO laptops from SONY there is VAIO control center .
In this control center, for example, you first need to open the tab "Power supply" and set high performance, as well as disable the function that extends battery life (see screenshot below).

High Performance // Power // VAIO Control Center

Image Quality // VAIO Control Center
Actually, it is hardly possible to give a description for each of these centers. The VAIO Center is shown above as an example of such software.
Lenovo laptops also have something similar: various night modes, dynamic changes in brightness, contrast and other things can significantly change the quality of the picture on the screen. It is recommended to disable them all (at least at the time of setup and adjustment).

5) Problems with hardware
A change in screen brightness may be due not only to software settings, but also to faulty hardware. In what cases can you determine that the laptop hardware is to blame:
- if not only the brightness has changed on the screen, but also stripes, ripples, and dots began to run (as in the example below);
- if when you increase/decrease the brightness on the monitor, absolutely nothing happens;
- if the brightness changes even without changing the picture on the screen and without changing the lighting conditions in the room;
- if the brightness in different parts of the screen is different.
Help!
If you have stripes and ripples displayed on your monitor, I recommend that you read my other article:

Stripes and ripples on the screen / As an example
Good luck!
Good day!
Lately, I've been getting quite a lot of questions about the brightness of laptop monitors. This is especially true for laptops with built-in IntelHD video cards (very popular recently, especially since they are more than affordable for a large number of users).
The essence of the problem is approximately as follows: when the picture on the laptop is light, the brightness increases, when it becomes dark, the brightness decreases. In some cases this is useful, but in others it greatly interferes with work, the eyes begin to get tired, and work becomes extremely uncomfortable. What can you do about it?
Remark! In general, I had one article devoted to spontaneous changes in monitor brightness:. In this article I will try to supplement it.
Most often, the screen changes its brightness due to non-optimal driver settings. Therefore, it is logical that you need to start with setting them up...
So, the first thing we do is go to the video driver settings (in my case, this is HD graphics from Intel, see Fig. 1). Typically, the video driver icon is located next to the clock, at the bottom right (in the tray). Moreover, it doesn’t matter what kind of video card you have: AMD, Nvidia, IntelHD - the icon is usually always present in the tray (you can also go to the video driver settings through the Windows control panel) .
Important! If you do not have a video driver (or have universal Windows drivers installed), then I recommend updating them using one of these utilities:
- enable maximum performance;
- disable the monitor's energy-saving technology (it is because of it that the brightness changes in most cases);
- Disable the extended battery life feature for gaming applications.
How it looks in the IntelHD control panel is shown in Fig. 2 and 3. By the way, you need to set similar parameters for the laptop to work, both from the network and from the battery.
Rice. 2. Battery power supply
Rice. 3. Mains power supply
By the way, in AMD video cards the required section is called “Power”. The settings are set in the same way:
- you need to enable maximum performance;
- disable Vari-Bright technology (which helps save battery power, including by adjusting brightness).
Power Options in Windows
Rice. 5. Selecting a power plan
Rice. 6. Change advanced settings
The most important thing here is contained in the “Screen” section. You need to set the following parameters in it:
- options in the screen brightness tab and screen brightness level in dim mode- set the same (as in Fig. 7: 50% and 56% for example);
- turn off adaptive brightness control of the monitor (both on battery and mains power).
Save the settings and restart your laptop. In most cases, after this the screen begins to work as expected - without automatically changing the brightness.
Sensor monitoring service
Some laptops are equipped with special sensors that help regulate, for example, the brightness of the same screen. Whether this is good or bad is a debatable question, but we will try to disable the service that monitors these sensors (and therefore disable this auto-adjustment).
So, first we open the services. To do this, in the run line (in Windows 7 - run line in the START menu, in Windows 8, 10 - press the WIN+R button combination) enter the command services.msc and press ENTER (see Fig. 8).
Rice. 9. Sensor monitoring service (clickable)
After rebooting the laptop, if this was the reason, the problem should disappear :).
Laptop control center
Some laptops, for example, the popular VAIO line from SONY, have a separate panel - VAIO control center. There are quite a lot of settings in this center, but in this particular case we are interested in the “ Image quality«.
There is one interesting option in this section, namely, determining lighting conditions and setting automatic brightness. To disable its operation, just move the slider to the off position (OFF, see Fig. 10).
By the way, until this option was turned off, other power settings, etc., did not help.
Rice. 10. Sony VAIO laptop
Note: There are similar centers in other lines of other laptop manufacturers. Therefore, I recommend opening such a center and checking the screen and power settings in it. In most cases, the problem lies in 1-2 checkboxes (sliders).
I would also like to add that distortion of the picture on the screen may also indicate hardware problems. Especially if the loss of brightness is not associated with a change in lighting in the room or a change in the picture displayed on the screen. Even worse, if at this time stripes, ripples, and other image distortions appear on the screen (see Fig. 11).
If you have a problem not only with brightness, but also with stripes on the screen, I recommend reading this article:

Rice. 11. Stripes and ripples on the screen
Thank you in advance for any additions to the article. All the best to everyone!
How to disable automatic brightness on iPhone? Why does the brightness on the iPhone change on its own? Auto Brightness is a screen setting on iPhone and iPad that causes the device to automatically change the display brightness depending on the surrounding lighting conditions. For example, in the sun or in bright light, the screen adjusts and increases the brightness for better visibility, and in a poorly lit room or outdoors at night, the brightness decreases. This is how the brightness on the iPhone changes itself.
Auto-brightness in iOS can also extend battery life by adjusting the brightness on your iPhone or iPad based on the ambient light.
Some users turn off auto-brightness, while others leave it enabled on their iPad or iPhone. However, auto brightness has been moved from the standard display settings to deeper iOS settings. This led some users to think that iOS 11 didn't have auto-brightness, but in reality it was just moved.
In this article we will tell you in detail how to adjust the brightness on any iPhone.
The main brightness adjustment is in the Control Center, as always.
- Swipe from the bottom edge of the screen to activate Control Center.
- Move the brightness slider up or down to change the brightness.

You can also change the brightness of the iPhone through the settings, to do this, do the following:
- Go to “Settings”.
- Scroll down and tap on “Display & Brightness”.
- To change the screen brightness, move the Brightness slider.
Previously, in this section it was possible to disable automatic brightness on an iPhone, but in iOS 11, it is not possible.


Additional brightness settings on iPhone and iPad
If you want to adjust brightness in smaller increments or control Night Mode, you need to press and hold or use 3D Touch on the brightness slider.
Here's how to increase brightness on iPhone 6S and later:
- Swipe from the bottom edge of the screen to activate Control Center.
- Tap (on iPhone 6s or later) or long-press the brightness slider to expand it.
- Slide your finger up or down on the brightness slider to change the brightness of the display.
- Tap the Night Mode button to turn it on or off.


How to enable or disable automatic brightness on iPhone?
In iOS 11, auto-brightness is now located in the Accessibility settings section. Here's how to turn off automatic brightness on iPhone:
- Open the Settings app, go to General and then Accessibility.
- Select “Display Adaptation”.
- Find the Auto Brightness setting and turn it on or off as needed.


The Display Adaptation settings mention that “Turning off auto-brightness may affect battery life,” especially if you increase the device's brightness quite a bit but then turn off the auto-adjustment option to reduce it. If you're experiencing battery drain or other issues with iOS 11, you probably shouldn't turn off auto-brightness, but instead leave it on and toggle other features like geolocation and background apps.
If it matters, auto-brightness used to be in the Display & Brightness section of Settings, but for some unknown reason was moved deeper into the Access settings in new versions from iOS 11. Keep this in mind when using this feature on different devices with different versions of iOS , since moving options around confuses users and raises questions like “where did auto-brightness go?” Now you know!
Here is a video instruction - “How to disable automatic brightness on iPhone and iPad in iOS 11”:
How to reduce screen brightness on iPhone to minimum?
This trick allows you to lower the brightness of your iPhone screen beyond the standard settings. It also uses iOS's deep access settings to accomplish this task. If you use your iPhone or iPad at night, your eyes will thank you.
This includes steps that don't rely on a glitch in the system or tricky timing. In fact, reducing screen brightness is very easy because it depends on a few simple settings that anyone can adjust.
- Open Settings → General → Accessibility.
- Go to the “Zoom” section and turn on the “Zoom” switch. You now see a Window Zoom overlay on top of the screen.
- Use a three-finger tap on the screen to access an additional overlay with zoom controls.
- Click on “Zoom Out” and use the slider at the bottom of the overlay to zoom out as needed.
- Click “Select Filter” and select “Low Light.”
This feature may not work on newer versions of iOS.


Thanks to the zoom with a customized low light filter, you can dim the screen brightness on demand using a simple triple press of the Home button. I use this feature whenever I'm using my iPhone or iPad after I should have gone to bed.
Automatic brightness adjustment can be useful, but in some cases it makes sense to turn it off.
Users of Windows 8 and Windows 8.1 have often noticed that the screen of their laptop or tablet seems a little dark.
Most often, the reason for this is unsuccessful automatic brightness adjustment settings.
The presence of a light sensor in portable devices also does not guarantee correct display brightness. Therefore, in such cases, it is better to turn off the automation and adjust the brightness manually.

Of course, it’s not very convenient to open the settings and make adjustments again every time you change the lighting level or power mode; on the other hand, you shouldn’t even consider it as work - vision and comfort during work are much more expensive. So how is it done? And this is done in an elementary way. Open and go to the "Power Options" section. By default, the balanced diet is used.


We will need to create a new one or switch to the “Energy Saving” mode. Let's choose the second option. Click the link “Setting the power plan” and in the window that opens, move the sliders to adjust the screen brightness level. After you select the desired brightness level, you will need to disable adaptive adjustment. To do this, click the “Change advanced power settings” link, in the window that opens, find the “Screen” item and click on the plus sign to expand it.
There will be two more sub-items. Select Enable Adaptive Brightness and set one or both to Off. Save the applied changes and close all windows. The display brightness should now remain at the same level. If you urgently need to change the brightness, Windows has a useful tool for this purpose - Mobility Center.