How to disable automatic system updates. Disabling automatic updates in Windows
This question is not as simple as it might seem at the beginning. On the one hand, life without updates is not nice - there is no way to get the latest, including anti-virus patches, you won’t be able to get to the latest improvements in the system software, you won’t be able to update to improve Windows performance, and so on. On the other hand, without updating the system, we keep it in its familiar, current working state.
Who knows what problems the next service pack from Microsoft's visionaries will bring with it for our applications? If you work in critical conditions, when any flying “fly” can destroy your entire architecture, then it is better to completely abandon the pumping of updates. As a last resort, you need to be able to return to the original state that was before installing the updates. We will study how to cancel updates in Windows 7, but for now we will ask ourselves the question: what to do if some patches are still needed?
Nothing bad will happen if you cancel automatic Windows updates. Any packages of this kind can be obtained from the Microsoft website and, if the need arises, download them and install them manually.
Now let's see how to cancel automatic Windows system upgrades in practice.
Let's do one... do two...!
In Windows 7, all service packs go through the so-called "Update Center". From here you can manage all the settings for this service. You can get to the Center like this:
- Select the menu "Start" -> "Computer".
- Right-click on it and in the context menu that opens, select the item called “Properties”.
- A window will appear containing a direct link to “Center”.
Second way to get to the same place: “Start” -> "Control Panel"-> “System” -> . Finally, the third alternative is to enter this query into the search bar of the Start menu - the search system will return a direct link to the Center window shown in the figure below:
 We will be interested in the window for setting the center parameters; it looks like this:
 To cancel Windows updates, select the value from the drop-down list at the top: "Do not check for updates (not recommended)". After saving this setting and rebooting the computer, the system will no longer access the network for service packs. However, an annoying flag will appear in the tray, indicating that the subsystem is not working. You can remove it this way.
Some users are concerned about how to disable Windows 7 updates on their computer. Why are users worried about system updates?
Regularly, at certain periods of time (usually once a month), update packages are released for the Windows operating system. Sometimes, if problems arise or vulnerabilities are discovered, emergency patches are released that need to be installed on your computer.
In the Windows 7 operating system, with default settings, automatic updating is enabled. The system periodically downloads and then installs updates and patches released for Windows onto the computer. Most of the updates concern system security.
Users, for various reasons, refuse to install updates for the operating system. Here are some reasons for not receiving Windows 7 updates through Windows Update:
- it happens that after installing updates, Windows or applications malfunction;
- Windows updates often take a long time, during which you cannot turn off the computer;
- with a limited Internet connection, major system updates consume a lot of traffic;
- updates take up space on the PC disk;
- users are afraid of losing their operating system activation after installing updates.
How to disable Windows 7 updates? This issue can be resolved using the system in two ways: disabling automatic Windows 7 updates, or disabling Windows 7 updating completely.
How to disable automatic updates in Windows 7
After turning off automatic updates for Windows 7, the user will still have the option to download and install updates manually.
This is a preferable option than completely disabling the update, since some updates should be installed on your computer in order to avoid becoming a victim of dangerous viruses, for example, .
Go to the Start menu, click on Control Panel, then Windows Update. In the Windows Update window, in the left menu bar, click on the “Customize settings” link.
In the “Settings” window, in the “Important updates” option, select “Do not check for updates (not recommended)”, and then click on the “OK” button.
Additionally, you can uncheck the two settings below: “Recommended updates” and “Who can install updates.”

In the future, if you need to install updates manually, in the “Important updates” setting, select “Search for updates, but I make the decision to download and install.” Next, after you've finished searching for available updates, select the updates you want to install on your computer.
How to disable Windows 7 update permanently
The second method disables the Windows Update service on your computer, so checking for updates will be disabled.
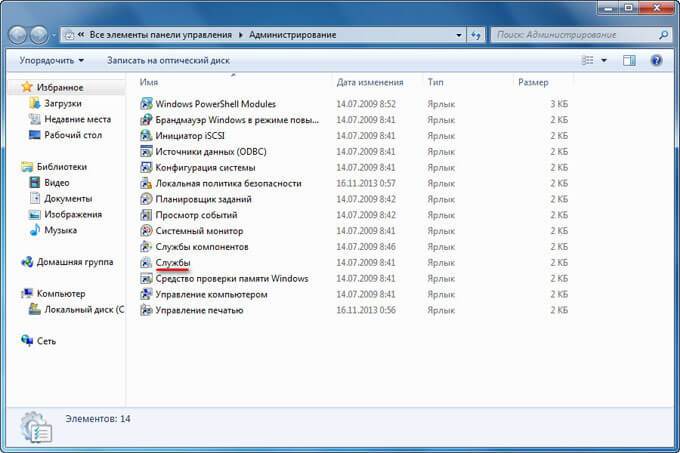
Go to the Start menu, then go to Control Panel => Administrative Tools. In the “Administration” window, double-click with the left mouse button on the “Services” shortcut.
In the “Services” window, in the list of operating system services, find the “Windows Update” service, and then right-click on the service and select “Properties” in the context menu that opens.

In the “Properties: Windows Update (Local Computer)” window, in the “General” tab, select the startup type: “Disabled”, click on the “Stop” button to stop the service at a given time.

You can re-enable the update in Windows 7 using the same method. In the “Properties: Windows Update (Local Computer)” window, select the startup type: “Automatic (Delayed Start)”, and then click on the “Run” button.
Disable Update Center on the command line
You can disable Update Center on the command line, follow these instructions:
- Run Command Prompt as Administrator.
- Enter the commands sequentially (after entering the command, press the “Enter” key):

After this, the update service and Windows Update will be disabled.
Conclusions of the article
If necessary, the user can independently disable updates in the Windows 7 operating system by disabling updates completely or disabling automatic updating of the operating system.
All versions of Windows have an important function - updating. Like most programs, Microsoft uses this opportunity to make timely changes to the system, improve its operation or eliminate vulnerabilities.
Despite the positive aspects of this feature, for most users it is unnecessary or simply gets in the way more than it brings benefits. Many active PC users experience difficulties with updates and prefer to disable them.

Reasons and methods for disabling
The main reasons for disabling updates in Windows 7 are:
- Microsoft refused to update Windows 7, that is, updates will not be released, except for critical ones, if vulnerabilities are discovered;
- During the update, the computer experiences a heavy load, since installing files requires resources;
- The Internet channel is heavily loaded, that is, during downloading, the speed is significantly limited and comfortable surfing is difficult;
- You cannot turn off your computer while installing or downloading updates;
- If you are using pirated Windows, you may encounter problems as new ways to combat piracy are gradually released;
- Limited traffic.
The probable reasons do not end there, but they are enough for clarity.
There are 4 ways to disable automatic updates in Windows 7:
- Using the Update Center;
- Through services;
- Using the console;
- Through a firewall.
Most of the features are standard, but a workaround (last option) can also be used.
Using the Update Center
In Windows 7, there is a special tool that is responsible for the entire update system. It is thanks to him that there will be no difficulties in how to disable the Windows 7 update. To use it you should:
- Click Start and Control Panel;
- Click on the “Windows Update” tile;

- Go to the “Settings” section;
- Select "Don't check for updates."

In addition to radically disabling a function, there are transitional positions when you can influence the installation of software. This is how the check occurs and, if something new appears, the user makes decisions. It is also advisable to uncheck all the checkboxes under the main menu.
How to disable Windows 7 Update via Services?
A special module, that is, a service, is responsible for the update procedure. It is an invisible part of the previous method. The service can also be disabled; the result will be similar, only it is performed without a graphical interface.
- PKM for “Computer”;
- Click on “Management”;

- Expand the “Services and Applications” category, then select the appropriate section;
- At the end of the list, find “Windows Update” and double click;
- “Startup type” - “Disabled” and “Stop”.

Here you can also either disable Windows 7 updating permanently or set the startup initiation to “Manual”. That is, the user will independently carry out updates at a certain frequency.
Disconnect using the console
The console always comes to the rescue in difficult situations and it is capable of changing some parameters that are located deep in the system with a short command. Therefore, it is impossible to consider the topic of how to disable the Windows 7 update service without mentioning the command line.
To disable the service you must:
- Press Win + R and paste cmd;
- Enter the command sc config wuauserv start=disabled;

If you want to change the startup type to manual mode, then replace the last word with demand. All the methods above work on the same principle, only the method of changing the parameters differs. There is also an alternative option.
Blocking updates through a firewall
The firewall itself allows you to control the traffic leaving your computer, so it can be filtered. It is this function that is important for us. Instead of simply disabling updates, you can install some kind of stub. All requests for a specific domain will be redirected to a local address, that is, to nowhere. The service, without receiving a positive response about the availability of data on the server, will think that everything is fine with the system.
The easiest way to install the plug is:
- Follow to C:\Windows\System32\drivers\etc;
- RMB on hosts and open with a text editor;
- Place the entry “127.0.0.1 https://*.update.microsoft.com” at the end of the list.

Also, if it doesn’t work, add “127.0.0.1 microsoft.com”, but then even in a browser you will not be able to access the corporation’s website. This method also works for most programs that require access to the network; to block them, simply change the domain to the required one.
You should understand that by disabling updates you are deliberately putting your computer at risk, since antivirus signatures, system settings and Windows stability are out of date. It is still better to manually perform at least critical updates.
First, we recommend disabling the update center using standard methods, but another way is also available. After completing the procedure, you remain the full owner of the system and no background tasks will load Windows.
If you still have questions on the topic “How to disable updates in Windows 7?”, you can ask them in the comments
if(function_exists("the_ratings")) ( the_ratings(); ) ?>
All versions of the Windows operating system provide updates, as they complement the system, fix possible errors and improve performance. Of course, such updates will not harm your computer, they are needed and should be downloaded, but there are cases in which it is better for users to refuse updates altogether. Using Windows 7 as an example, the following reasons can be identified: you have a pirated version of the system and updates block it, your computer has too little memory and updates will not physically fit on it, you have a very busy schedule and you work with your computer, and automatic updates slow down your performance . In this case, you can choose: disable updates completely or cancel only automatic ones. This article will discuss both methods.
How to disable Windows 7 update completely
This instruction cancels updates on your computer altogether: the system will not search for updates or download them. If you want the updates to still be downloaded, but their installation remains at your discretion, then it is better to give preference to the second instruction below. If you don't need updates, then proceed with this one.
- Go to Control Panel via Start.
- Set the icon sorting to “Large icons”. Find the “Administration” item and select it.


- Among all the services and system parameters, you need the “Services” item. Launch it by double clicking.


- Almost at the very bottom of the list you will find the line “Windows Update”. This is where you can disable system update downloads and installation. Double click on this service.


- In the window that appears, in the “Startup type” line, select “Disabled”.
Now click “Stop” on the next line and close the window by clicking “Apply”. - Updates are disabled on your computer.

How to disable automatic updates on Windows 7
A very convenient method, since it allows you to independently choose the time for downloading and installing Windows updates.
- Go back to the Control Panel in the way you already know. Set the sorting to “Category”. Click on the “System and Security” section.


- Look for the “Windows Update” tab; it will contain several sections below. Among them, click on “Turn automatic updates on or off.”


In the drop-down list you can select the item that suits you:
- Automatically download them, but ask you about installation time.
- Ask you about both downloading and installation.
- Do not update the system.


- After selecting the item, uncheck the “Recommended updates” box and click “Ok.” Please note that you must be logged into an administrative account.
- Updates in Windows 7 are now disabled and configured to your liking.


Automatic updates are an important functional feature of any operating system. Thanks to it, the computer receives important updates on time, making the system more stable and secure. In Windows 7, the function is activated initially. This means that if there is a connection with Microsoft servers, the update service checks for the availability of fresh packages, downloads them and installs them. Usually, all processes proceed virtually unnoticed by the user, but when constant offers to upgrade to 10 appear, this is already overkill.
Theoretically, there is no need to disable automatic downloading of updates. It is useful because it closes security gaps, optimizes the operation of the OS, and adds new features to it (regarding the “tens”). There is also a list of reasons why the auto-update service should be disabled:
- The user does not like that during the update the Internet speed drops and/or the PC cannot be turned off for a long time.
- The computer has expensive or limited wireless Internet.
- Problems after launching the updated OS.
- Failures during the installation of update packages.
- There is not enough space on the system volume to accommodate the increase in volume of Windows 7, which grows with each update.
Kinds
Still, before you disable the Windows 7 update, think about whether it is really necessary. In addition to deactivating the service, it can be switched to the following operating modes.
- Fully automatic - operations proceed without user intervention, only notifying the user that the installation of packages is complete.
- Searches and downloads the latest fixes on a schedule, and the installation of packages is carried out by the user.
- Automatic checking and notifying the user about the availability of updates.
- Self-update is disabled. Everything is done manually.
Options are selected in the Update Center component.
Disconnection methods
The settings of any Windows are stored in its registry. You can access the key responsible for the Update Center settings in several simple and a couple more complex ways. Let's look at them all.
Change Update Center settings
Let's start by setting up the service for ourselves. To access the configuration interface, you need to open the “Update Center” using one of the following methods.
System
- Through the context menu of My Computer, call up its “Properties”.
- In the left vertical menu, click on the corresponding link located at the bottom of the window.

- Go to the “Control Panel”.
- Open the “System, Security” section.

- Call the element of the same name.

If control panel items are rendered as icons rather than categories, a link to the item will appear in the main window.
- So, after getting into the desired window, click “Settings parameters”.

- Move to the “Important updates” section and select the appropriate option from the drop-down list.

The only way to completely disable receiving updates on a computer with Windows 7 is to stop the service.
Disabling the service
Management of services in the “seven” occurs through:
- direct editing of registry keys, which is very inconvenient;
- third-party programs for configuring the OS (we’ll skip this option);
- MMC console snap-in;
- system configuration;
- command line;
- Group Policy Editor (present in Windows 7 Ultimate, Enterprise).
Removing a service from autostart
The fastest way to disable updates is through the system configurator.
- Execute “msconfig” in the command interpreter window, which will open after holding down the Win + R keys or clicking on the “Run” button in Start.

- Go to the “Services” tab.
- Find “Windows Update” (maybe Windows Update) and uncheck the box next to it.

- Save the new settings.

Until the end of the current session, the service will work, properly performing the tasks assigned to it. To apply the new configuration, Windows 7 must be rebooted.
Let's use the MMC console snap-in
The system console snap-in of the same name provides access to managing all services on the PC. It starts like this.
- Open the context menu of the “My Computer” directory.
- Call the “Manage” command.

- In the left vertical menu, expand the “Services and Applications” item. Next, click on the “Services” link.

A simpler option for calling the same window would be to run the “services.msc” command through the “Run” dialog.
- Scroll to the very end of the list of services and open the “Properties” of the Windows Update service.

- In the “Startup type” drop-down list, select “Disabled” instead of “Automatic” in order to say goodbye to automatic updates forever. If you need to disable the service now, be sure to click “Stop”. Save the new settings with the “Apply” button and close all windows.

The PC does not need to be rebooted to apply the settings.
Group Policy Editor
Another MMC snap-in called the Local Group Policy Editor will help you configure any system parameter.
It is not available in the home edition of the Seven!
- The tool is launched by running the “gpedit.msc” command through the “Run” window.

- In the “PC Configuration” subsection, expand the “Administrative Templates” branch.

- Open “Windows Components” and look for Update Center.
- On the right side of the window we find a parameter whose name begins with “Setting auto-update”.
- Call up its settings.

- Move the checkbox to the “Disable” position and click “OK” to close the window and save the changes.

Let's use the command line
Through the command line, all the same operations are performed as using the graphical interface, and even more, but in text mode. The main thing is to know their syntax and parameters.
The “cmd” command is responsible for calling the command line.
- Open the command interpreter and execute it.

- In the black window, enter the text command “sc config wuauserv start= disabled” - it sets the service startup type as “Disabled” - and press “Enter”.

The service is stopped with the command “sc stop wuauserv”.

Registry Editor
The last way to remove the annoying installation of updates is to disable the service responsible for this directly, through the system registry editor.
- It is launched with the “regedit” command.

- In Explorer, go to the HKLM section.
- We follow the path indicated in the screenshot to the “Windows” directory.

- Open the WindowsUpdate directory.
- Double-click on the “DisableOSUpgrade” parameter or call up the dialog for editing it through the context menu.

- Enter one as the value and press “Enter”.

When the PC is restarted, updates will no longer bother you.
The service is enabled by changing the key value back to zero. If the specified section or key does not exist, create them yourself via the context menu. Key type: "DWORD 32 bit value".
However, keep in mind that security updates should be installed manually at least periodically to maintain a stable system.