Create a ringtone for iPhone and add it to your device. Create your own ringtone on iPhone
From the moment of purchase, every iPhone owner wants to make their gadget unique, inimitable, customize it “for themselves,” and, of course, they have the right to do so. The only thing you need to know is what and how you can do to make the device unique in its own way. Today we will talk about how to create a ringtone for iPhone with your own hands.
As surprising as it may sound, not all owners of mobile phones and smartphones know what a ringtone is. And, first of all, let’s define the meaning of the word “ringtone” once and for all. Wikipedia gives a very clear and simple definition of ringtone.
Ringtone(English) ring - bell, tone - musical accent ) - a sound, a melody played on a cell phone to notify you of an incoming call or incoming text message.
Thus, the ringtone and ringtone are, in fact, the same thing for the iPhone as for any other smartphone.
As part of today's instructions, we will learn how to create ringtones for iPhone in 2 ways at once.
Ways to create ringtones for iPhone
- Via iTunes;
- Online, or via the Internet.
When creating ringtones for iPhone, you need to know 2 important restrictions, namely:
- iPhone ringtones are in “m4r” format but only;
- Duration audio track to create a ringtone should be no more than 30 seconds.
With the definition and limitations of creating a ringtone for iPhone clear, you can now proceed directly to the procedure.
Create a ringtone for iPhone using iTunes
In a few words, the process of creating a ringtone for an iOS device via iTunes is very simple: you need to set the duration of the audio track to 30 seconds, create a version of the source in AAC format, manually change the format of the created file from “.m4a” to “.m4r” and add the resulting ringtone to your iTunes library. In practice it looks like this:
- Launch iTunes;

- Add source file from which you want to make a ringtone for iPhone in iTunes. To do this, in the File menu, select “Add file to library” and open the source. The file will appear in the main program window.

- Right click click on the source title and in the context menu that appears select "Information";


- In the window that opens with information about the file go to the "Options" tab;


- In the digital field opposite “Stop time” enter the value "0:30" and click "OK";

- Right-click again on the name of the source for the ringtone and in the context menu that appears select "Create AAC version". Another file with the same name as the source, lasting 30 seconds, will appear in the main iTunes window;

- Call the context menu again by right-clicking on the file name for 30 seconds. And select "Show in Windows Explorer". If in the folder view settings in the Windows Control Panel ticked opposite "", in Windows Explorer file extensions will not be specified and it will be impossible to change it using Explorer.

- In order for file extensions to be displayed in Explorer, you must in the Windows Control Panel go to section " Folders settings" -> tab " View", scroll the list in the field " Extra options" to the bottom, uncheck the box next to " Hide extensions for registered file types" and press the button " Apply". File extensions will become available in Windows Explorer;

- In the Explorer window with the ringtone file right-click on the file name to open the context menu And select paragraph " RenameAlt+F2«;

- Change the file extension ringtone with " m4a" on " m4r". Ignore the system warning that "after changing the extension, this file may no longer be accessible." Ringtone for iPhone is ready;
- Add a ringtone to your iTunes library by " File -> Add a file to your library -> Open" or press the keyboard shortcut " Ctrl+O". If you did everything right, The ringtone will appear in iTunes in the Sounds section.;

- and as a ringtone.
It may take up to 10 minutes to create your own ringtone for the first time, but with each subsequent time the time spent will be significantly reduced.
Create ringtones for iPhone as quickly and easily as possible through the Internet online, thanks to the guys from Audioscrobbler. Thanks to the audiko.ru service, creating your own ringtone will require a minimum of steps and only 3 minutes.
How to create a ringtone for iPhone online?
- Go to the website audiko.ru and click on the " Download". The service allows you to download sources directly from the Internet, to do this, click on “ insert link". On the page that opens to text field with "http://" paste the link to the source. Important: the link must be “direct”, i.e. no redirects. You won’t be able to download the source from a file hosting service using audiko.ru;

- Once you have clicked the "Download" button, open the source from your local disk computer. It will be uploaded to the site;


- On the next page some ringtone settings will become available, namely: change ringtone duration, set the beginning and end of the ringtone on the source music track, thereby determine which part of the track to use as a ringtone, add a fade-in and fade-out effect to the beginning and end of the ringtone. Determine the necessary parameters for the future ringtone and click to the button " Create a ringtone«;


- Wait for the process to complete, usually its duration does not exceed 1-2 minutes. On the page that opens with a link to download the created ringtone click on the “Download” link. Ringtone for iPhone in m4r format will be downloaded to your computer's hard drive;

- Upload the resulting ringtone to iTunes and make sure the ringtone is available in the Sounds section. Ready!
Certainly, creating ringtones online is much easier and faster, especially since there are ready-made solutions for this and we have just presented one of many services that allow you to create ringtones for iPhone via the Internet. But, it seems to us, every owner of the device should be able to create ringtones for iPhone with their own hands.
Sometimes using an iPhone becomes problematic. Especially when it comes to setting your own ringtones. However, the difficulty only arises when you set the signal for the first time. After following the simple and convenient instructions, you will easily understand the question of how to make a ringtone for an iPhone.
Making a ringtone
1 step
The easiest way to create a ringtone on an iPhone is through iTunes - this is the best and most convenient program for the task at hand.
To begin, the iPhone is connected via a computer to iTunes. Then you need to select a melody from the music library or add a new one.
Important! The length of a ringtone on an iPhone can be no more than 30 seconds, so choose your favorite part in advance - it will need to be trimmed in iTunes.
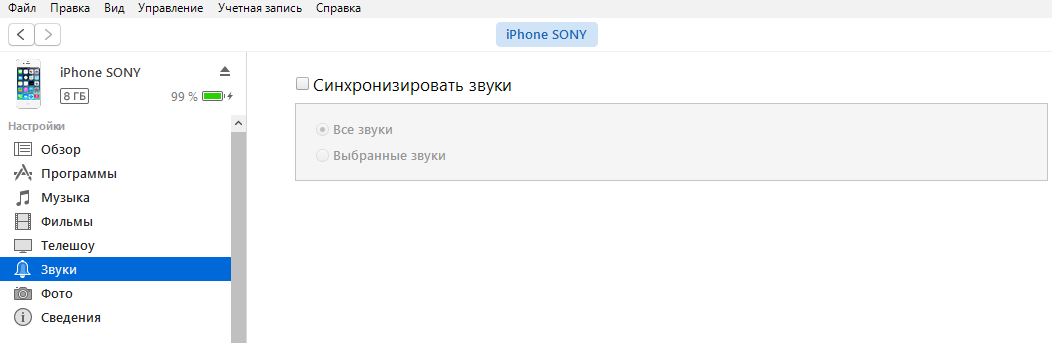
And also, before you start creating ringtones, make sure that the “Synchronize all sounds” checkbox is checked, as shown in the screenshot. In the future, you will be able to choose which ringtones to keep on your phone.
Step 2
The entire procedure is shown in detail in this video:
We tried to do the same. The result, confirmed by screenshots, is below.
You need to right-click on the selected melody and select “Information”.

A window will open in which you should open a tab called “Options”. Here you indicate the part of the song that will then be played during a call or SMS.
Near the inscription “Start” the beginning is selected, and near “Stop time”, respectively, the end of the ringtone. Click OK and move on.

Step 3
Now you need to right-click on the name of the selected song again and select “Create a version in AAC format.”

After a few seconds, a track with the same name as the selected song will appear, but its length will be 30 seconds.

Step 4
Now you should right-click on the short track and select “Show in Windows Explorer.”

A new window will pop up containing only one track that you are converting into a ringtone. This track will be in m4a format. The format will need to be changed to mp3 by simply renaming it.


Note: if your format is not displayed, you need to enable the function to display file extensions.
Step 5
When the file extension has changed to mp3, you can close Explorer. Now all that remains is a simple iPhone synchronization procedure that needs to be completed in order to download the result to your gadget.

Installing a ringtone on your phone
The last thing, and the most pleasant thing, after carrying out all these procedures is to install a ringtone on your iPhone.
To do this, in your iPhone, in “Settings”, open “Sounds” => “Ringtone”.


Here, instead of the standard set of Apple sounds, new ones created by you will appear. To set a ringtone, follow these steps:

That's it, creating ringtones for iPhone will no longer be a problem for you.
Enjoy your favorite music on your favorite phone.
They often reject the idea of setting their own ringtone for a call, considering the procedure too troublesome and preferring the standard Marimba. However, as iPhones spread among domestic users, the use of built-in ringtones begins to cause inconvenience: when Marimba sounds in a public place, every second person reaches into his pocket for the gadget to check if they are calling him.
The increased demand for original ringtones has given rise to new opportunities for creating them: now you can put a song on a call not only using iTunes, but also through other software. It is important to remember two rules: the ringtone must have special permission .m4r and not exceed 40 seconds in duration.
How to put music on a call via iTunes?
Make a ringtone via iTunes can be done using the following algorithm:
Step 1. First of all, run the program iTunes and call the side menu by pressing CTRL+S.
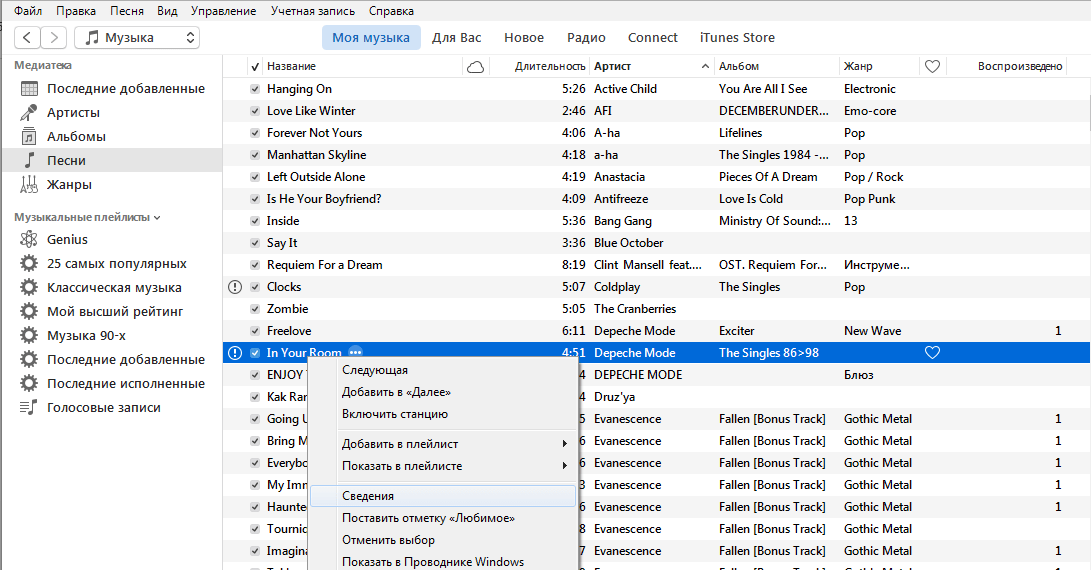
Step 2. Select the track from which you would like to make a ringtone and right-click on it. We will make a ringtone from the band's song " Depeche Mode» « In Your Room" In the menu that appears, select " Intelligence».
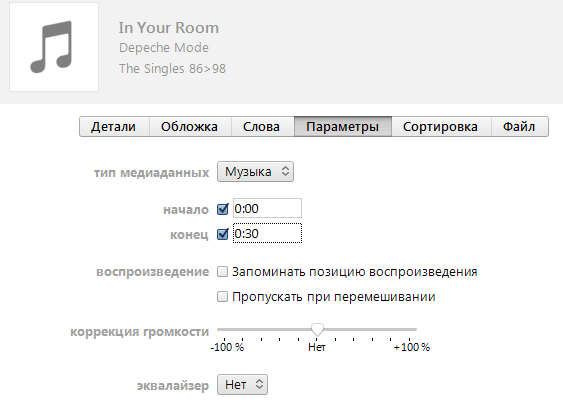
Step 3. In the block " Intelligence» move from the section « Details" (which is selected by default) to the " section Options"- you will see the following window:

Here you can adjust the volume of the ringtone (for example, double the volume of the original song) and select an equalizer preset:

The presets are the same as those available in the settings of the standard application " Music».
Step 4. Check the boxes next to " Start" And " End» and set the interval so that the duration of the ringtone does not exceed 40 seconds.
Then click the " OK"at the bottom of the window.
Step 5. Find the edited track in the library list and select it.
Although the media library indicates that the duration of the track is the original 4:51 minutes, when played in iTunes you will realize that the track is cut to 30 seconds.

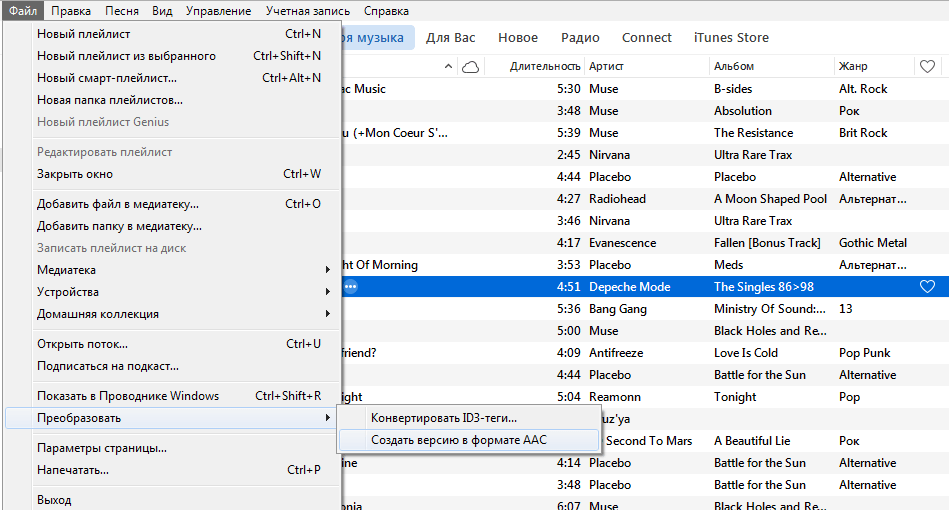
Step 6. Follow the path " File» — « Convert» — « Create a version in AAC", without deselecting the selected track:
Next to the original composition in MP3 format, a “clone” will appear - a trimmed AAC track lasting half a minute.
Once this operation is completed, do not forget to return via " Options» the same duration as the original track.

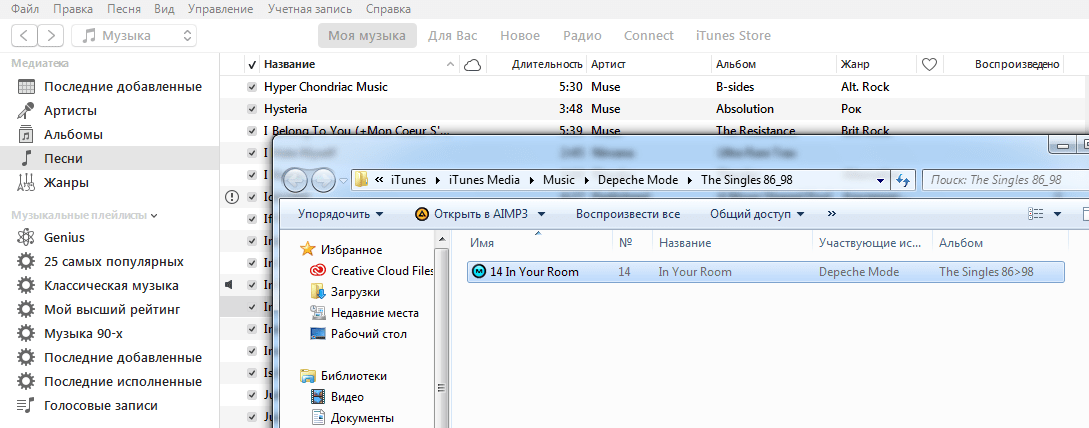
Step 7 Right-click on the AAC file and select " Show in Windows Explorer»:
A special folder will open iTunes, located on the C drive of the computer - it will contain the ringtone:

Step 8 Change the file format from m4a on m4r. This is where the difficulty lies, because on many Windows 7 computers the file formats are hidden. To show permissions, you will have to dig deeper into the computer settings - in Explorer, type “ Folders settings» and go to the found section. The following window will appear:

Go to the tab " View" and uncheck the box next to " Hide extensions for registered file types"(located almost at the very bottom). Click " Apply" And " OK" After that, next to the file name in the folder iTunes format will be displayed - change a on r it won't be difficult:

Step 9 The final chord remains: in the side menu of the media library iTunes Choose a section " Sounds"and enter the melody in m4r format in the field that appears:

Step 10 Connect your iPhone to your PC via USB cable and start syncing. Important point: after connecting the gadget to the computer, click on the device icon in the top panel iTunes and in the left panel select the section " Sounds»:
Check the box next to " Synchronize sounds" and click the " Apply" at the bottom. If this operation is not performed, synchronization will be ineffective, no matter how much you perform it.
Next, installing music for the call is a matter of technology: on an iPhone we follow the path “ Settings» « Sounds» « Ringtone" and select a new ringtone (it will be the first in the queue). A new call can be set not only to a general call, but also to a specific subscriber - to do this, you need to find a suitable contact, click " Change" and select the item " Ringtone».
How to set a ringtone on iPhone using iTools?
iTools is an alternative software solution from Chinese manufacturers that allows Apple users to bypass synchronization and iTunes at all. Create and set a ringtone via iTools incomparably easier than through iTunes however, this method has its drawbacks.
When creating a ringtone for iPhone via iTools follow the instructions:
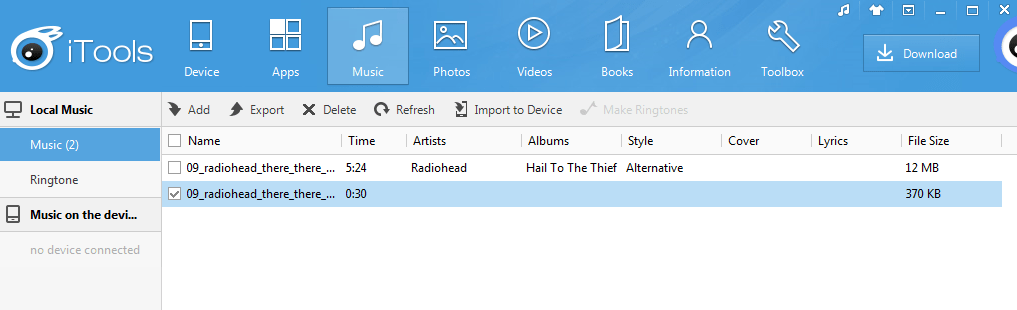
Step 1. Open iTools and move to the section " Music»:

Step 2. Through the button " Add» add the song to the list:

Step 3. Select a song in the list and click the " Make Ringtones", located in the top panel. The following window will appear:
On the right you will see the duration of the raw track - the composition from the example runs 5 minutes 23 seconds. Set the parameters " Start" And " End» so that the duration does not exceed 40 seconds.


Step 4. Click the button Save To Local", and the program will offer to save the ringtone to the computer memory immediately in the format m4r:

Step 5. Find the created ringtone on your computer and add it to the list by simply dragging and dropping:
Step 6. Connect the gadget to your computer and click the " Import To Device" in the top panel of the program. This way you will add the ringtone to the device's memory.
In terms of creating ringtones iTools has a number of advantages over iTunes: firstly, the user of Chinese software does not need to fool himself with extensions, and secondly, he does not need to synchronize. However, the program iTools There are also disadvantages: it is not Russified and does not allow the user to edit the metadata of compositions.
You can put a call on your iPhone without using a PC at all - the AppStore has several special applications for creating ringtones, such as Ringtonium And iTrax. You can read about the pros and cons of these and other programs for cutting music
We offer you step-by-step instructions in pictures, in which we will show you how you can make a ringtone for your iPhone using iTunes.
1). The first thing you need to do is install and run it.
2) In the File menu, select the option to add a file to the library.

3) Find the melody we need for the ringtone and open it.

4) The song you are looking for appears in the library window. Right-click on it and select Information in the window that appears.

5) Select the Parameters tab, indicate there the start and end time of the desired melody passage. It should be remembered that its duration should not exceed 39 seconds. To make your work easier, you can “cut” the track into small pieces in any audio program.

6) Confirm the completed action by pressing the OK button.

7) Right-click on the processed track and select the Create version in AAC format sub-item. If this item is missing, you need to go to the Edit menu, select Settings there, open the Basic tab and in the Import Settings line select Importer FFC Encoder.

If you are using a version of iTunes higher than 9.1, then in the Additional menu you must select Create a version in AAC:

If this item is missing, you must select the Importer AAC Encoder. How to do this is described several points above.
8) In the library window, on the modified track, which is no more than 39 seconds long, right-click and select Copy.

9) Click on the Start button and select Music.

10) Create a new folder in the Music folder that opens.

11) Let's name the new folder Ringtones.

12) Open the created folder and paste the copied media file there.

13) Next, go to the Start menu, select Control Panel and Folder Options. Change the category and select Small icons. Then go to the View tab and uncheck the sub-item Hide permissions for registered files.

To show the extension of registered files in Mac OS you need to:
- Right-click on the desktop and select Finder.
- In the Finder, select the Settings menu and then Add-ons.
- Check the box next to Show extensions for all files.
14) Return to the Ringtones folder. Click on the song and manually change the song extension from m4a to m4r.


16) Select Sounds to display in the library.

17) Open the File menu, select Add file to library, where in the Ringtones folder we mark the ringtone we made. Click OK.

18) Connect the iPhone to the computer. Select the Sounds tab, check the Synchronize checkbox and activate the synchronization mode. First you need to delete the source files from which the ringtone we received was made.

Standard ringtones on Apple devices are always recognizable and very popular. However, if you want to set your favorite song as a ringtone, you will have to make some effort. Today we'll take a closer look at how you can create a ringtone for your iPhone and then add it to your device.
Apple has certain requirements for ringtones: the duration should not exceed 40 seconds, and the format must be m4r. Only if these conditions are met can the ringtone be copied to the device.
Below we will look at several ways to create a ringtone for your iPhone: using an online service, the proprietary iTunes program and the device itself.
Method 1: Online service
Today, the Internet provides a sufficient number of online services that allow you to create ringtones for iPhone in no time. The only caveat is that to copy the finished melody you will still need to use the iTunes program, but more on that later.


This completes the creation of a ringtone using the online service.
Method 2: iTunes
Now let's move directly to the built-in tools of this program that allow us to create a ringtone.
- To do this, launch iTunes, go to the tab in the upper left corner of the program "Music", and in the left area of the window open the section "Songs".
- Right-click on the track that will be turned into a ringtone and select the item in the context menu that appears "Intelligence".
- "Options". Here are the points "Start" And "End", next to which you need to check the boxes, and then indicate the exact start and end time of your ringtone.
- For convenience, open the song in any other player, for example, in a standard one, in order to correctly select the required time intervals. When you're done specifying the time, click the button "OK".
- Select the trimmed track with one click and then click on the tab "File" and go to section “Convert” – “Create AAC version”.
- Two versions of your song will appear in the track list: one original, and the other, respectively, trimmed. That's what we need.
- Right-click on the ringtone and select the item from the context menu that appears "Show in Windows Explorer".
- Copy the ringtone and paste the copy to any convenient location on your computer, for example, placing it on your desktop. We will carry out further work with this copy.
- If you look in the file properties, you will see that its format is m4a. But in order for iTunes to recognize the ringtone, the file format must be changed to m4r.
- To do this, open the menu "Control Panel", in the upper right corner set the viewing mode "Small Icons" and then open the section "Explorer Options"(or "Folders settings").
- In the window that opens, go to the tab "View", go down to the end of the list and uncheck the item "Hide extensions for registered file types". Save your changes.
- Return to the copy of the ringtone, which in our case is located on the desktop, right-click on it and in the pop-up context menu, click on the button "Rename".
- Manually change the file extension from m4a to m4r, click on the key Enter, and then agree to the changes.


Please note that you can specify any segment of the selected song, but the duration of the ringtone should not exceed 39 seconds.


Now you're ready to copy the track to your iPhone.
Method 3: iPhone
A ringtone can be created using the iPhone itself, but here you can’t do without a special application. In this case, you will need to install Ringtonio on your smartphone.
- Launch Ringtonio. First of all, you will need to add a song to the application, which will later become the ringtone. To do this, tap on the folder icon in the upper right corner, and then provide access to your music collection.
- Select the desired song from the list.
- Now slide your finger over the audio track, thus highlighting the area that will not be included in the ringtone. To remove it, use the tool "Scissors". Leave only the part that will become the ringtone.
- The application will not allow you to save a ringtone as long as its duration is more than 40 seconds. As soon as this condition is met, the button "Save" will become active.
- To complete, provide a file name if necessary.
- The melody is saved in Ringtonio, but it will need to be pulled out of the application. To do this, connect your phone to your computer and launch iTunes. When the device is detected in the program, click on the miniature iPhone icon at the top of the window.
- In the left area of the window, go to the section "Shared Files". To the right, select Ringtonio with one click.
- On the right you will see the previously created ringtone, which you simply need to drag from iTunes to any location on the computer, for example, to the desktop.


Transfer ringtone to iPhone
So, using any of the three methods, you will create a ringtone that will be stored on your computer. All that's left to do is add it to your iPhone via iTunes.


Creating a ringtone for iPhone for the first time can seem quite labor-intensive. If possible, use convenient and free online services or applications; if not, iTunes will allow you to create the same ringtone, but it will take a little more time to create it.