D link dir 300 connection. Setting up a D-Link WiFi connection and password
In order to start at a construction site D-Link router DIR-300, open the box, boldly tear off the sticker from the router orange color. You can forget about the sticker.
We connect the router to the computer with a wire (patch cord of blue color), supplied in the kit.
First, open the browser ( Internet Explorer, Firefox) and type 192.168.0.1 in the address bar.
Connecting via a wireless network to a router may not always be successful, since in addition to your router there may be others available, it is possible to connect and configure someone else's D-Link DIR-300 router.
Login: admin
Password:(we leave the field empty, although out of habit I want to enter admin)
On the "Installation" tab, select the "Internet Installation" tab, and then the "Manually set up an Internet connection" button.
Looking ahead, I will say that the address is in local network provider can be issued dynamically or be static, usually at the request of the user. For a static address, providers usually ask for additional subscription fee. There are two options D-Link DIR-300 router settings, depending on the type of receiving addresses in your case, I personally use a static address, it’s more convenient.
Setting up a D-Link DIR-300 router with dynamic IP address assignment.
Option D-Link DIR-300 router settings No. 1, if the address is obtained via DHCP, i.e. dynamically.
In the “Internet connection type” field, select “PPTP Dual Access” (namely dual access, I don’t know the fundamental difference, but this is how you need to do it).
1. Select a connection with dynamic address assignment by the provider "Dynamic IP address".
2. MAC address – if the provider’s network has a binding by MAC address, click MAC address cloning, and router D-Link DIR-300 will copy the MAC address from the network adapter of your computer, this is important in cases where the router was not purchased at the time of connection to the provider.
3. IP address/server name – IP/Server name of the provider.
4. Account PPTP – username for authorization in the provider’s network.
6. Re-enter the PPTP password – we repeat the password for authorization in the provider’s network.
7. Select the connection mode - connection setup mode. In the figure, "Always-on" is selected for permanent connection. "Connect-on-Demand" - establishing a connection when necessary - that is, when traffic directed to the Internet appears, the router establishes a connection, and if there is no activity for more than the time specified in "Maximum Idle Time", it disconnects. If you select "Manual", the connection is established and terminated manually.
8. Save changes to 
Setting up a D-Link DIR-300 router with static IP address assignment.
1. Select a connection with a static address value "Static IP address".
2. IP address - the address issued to you by your provider.
3. Subnet mask.
4. Provider gateway.
5. DNS – DNS Server of the provider.
6. MAC address - if the provider’s network has a binding by MAC address, click Cloning MAC address, and the router will copy the poppy from the network adapter of your computer, this is important in cases where the router was not purchased at the time of connection to the provider.
7. IP address/server name – IP/Server name of the provider.
8. PPTP account – username for authorization in the provider’s network.
10. Re-enter the PPTP password – we repeat the password for authorization in the provider’s network.
11. Select mode connection mode connection setup. In the figure, "Always-on" is selected for permanent connection. "Connect-on-Demand" - establishing a connection when necessary - that is, when traffic directed to the Internet appears, the router establishes a connection, and if there is no activity for more than the time specified in "Maximum Idle Time", it disconnects. If you select "Manual", the connection is established and terminated manually.
12. Save changes to settings of the D-Link DIR-300 router by clicking the "Save settings" button. 
After correct settings, connection router D-Link DIR-300 Internet connection must be installed, as indicated by the "Internet Online" indicator on the left side of the browser screen.
The instructions will show basic characteristics and we will help you set up the D-Link DIR-300 router; correct configuration of even such a budget router will help you organize a full-fledged local network at home, and when you purchase a more powerful router, the D-Link DIR-300 will expand the infrastructure, becoming an excellent addition to the new device.
Before setting up the D-Link DIR-300, you must connect the router according to the following scheme:
- The provider cable coming from the panel in the entrance is connected to WAN port, which may be called "INTERNET".
- The laptop is connected to one of the LAN ports of the router. By default, these 4 ports are equal if VLAN has not been previously configured on this DIR-300.
Reset
When connecting your ex to using D-Link DIR-300 often has problems with both non-working ports and logging into the GUI interface. To correctly configure such a router, you need to start by rolling back to factory settings: click RESET button, which is located on the case near the power connector, and hold it for 15 - 20 seconds.
The RESET button is soldered directly to printed circuit board D-Link DIR-300, so you cannot apply excessive force when pressing: this will damage the router!
Restoring factory settings will also help if something goes wrong custom settings router: the previously saved D-Link DIR-300 configuration should be loaded only after rolling back to the original settings.
A detailed description of methods for restoring the factory configuration is presented in
Computer settings
The computer from which the modem will be configured must receive its local address when turning on the power of the DIR-300. To do this you need to bring network card PC mode automatic receipt configurations.
1. Through the connection icon, which is located on the taskbar, you can go to the management network settings OS.

2. Then, go to properties local connection.

3. In the TCP/IPv4 properties, you need to check the “Automatic” checkbox.

Login to the router interface
To log in D-Link settings DIR-300, you need to dial network address router in Chrome or IE.
If the PC setup is done correctly, it will boot home page GUI of the router and a request for authorization in D-Link DIR-300 will appear.

If you encounter difficulties establishing a connection between your computer and the router, you should use.
Setting up an Internet connection
D-Link DIR-300 supports all types of connections provided by Russian providers. Before setting up the router, you need to prepare a contract in order to enter the credentials correctly.
Setting up a connection on the D-Link 300 can be done in two ways:
1. Automatically using the Click’n’Connect utility. This option is well suited for IPoE and PPPoE connection types;

2. Manual configuration will be preferable to automatic for connections using a VPN server: L2TP and PPTP.

If you need to configure the D-Link DIR-300 router for providers, use these instructions.
Wi-Fi setup
D-Link DIR-300 is equipped wireless module N150 with 2 dBi antenna. In a small room, the router provides stable coverage. You can configure WiFi either manually or using the built-in utility or the WPS protocol.
- Manual configuration makes it possible to select the channel, speed mode and transmitter power, allowing you to fine-tune the router for specific operating conditions.
- The WPS protocol is supported by both TVs and mobile gadgets, connecting devices to the D-Link 300 without entering a password.
- Automatic configuration of the router’s secure WiFi network is performed using the built-in “Wizard” of the D-Link DIR-300:

More detailed information how different ways Setting up WiFi in D-Link 300 is contained in. It also provides recommendations for improving the coverage and wireless speed of the router.
Routing
Setting up a network is no longer the prerogative of geeks and IT specialists: a huge selection of devices has appeared on the market designed to make the life of an ordinary person better and more comfortable.

A home fleet of network devices can include both a “PC + smartphone + iPad” and a media server, game console, TV, IP camera and even a refrigerator, and the router is the heart home network. Setting it up means connecting these devices to the D-Link DIR-300 physically: with wires or via WiFi. And then ensure interaction between them and the Internet by establishing access and broadcast rules at the link and network levels.
The DIR-300 DHCP server distributes IP addresses to all devices and can operate in both dynamic and static modes. Tune static addresses necessary to register a route, because for this the router must associate a permanent local IP address with the MAC address of the specified device.
Configuring DHCP parameters in the D-Link D-300 is done on the “Network - LAN” tab. Here a pool of addresses is set and MAC/IP bindings are configured.


Setting up routing rules is available on the tab D-Link interface DIR-300 “Advanced - Routing”.


VLAN Configuration
Most new revisions D-Link modem DIR-300 supports VLAN - technology for dividing a network into logical segments. Configuration is performed on the “Advanced - VLAN” tab.


VLAN is used to group devices into target groups, optimize traffic and distribute access.
For example, you can allocate a child’s computer to a separate VLAN of the router and add a WiFi segment so that the child can connect a tablet or phone with his or her password to the D-Link DIR-300: no matter what device the connection is made from, this router setup will ensure viewing of protected content. filter.
The reason for using VLAN can also be the installation of an IPTV set-top box. If the provider supplies tagged traffic, then one of the interfaces of the D-Link DIR-300 router will have to be combined with a WAN port in transparent mode.
Port settings D-Link router DIR-300 in this scenario is described in the example of Rostelecom television.
Firewall and NAT
To set up remote access as home computer, and to network storage connected to the DIR-300, you need to understand how the router implements network security mechanisms.
In a broad sense, under remote access refers to any traffic initiated from the outside towards the home network and router. Thus, to organize a gaming or FTP server, ensuring connection with remote machines, some configuration needs to be done on the D-Link DIR-300.

NAT is a mechanism that translates addresses so that Internet hosts do not see the real structure of the home network on the other side of the router, but process all traffic from local computers, seeing only the external WAN IP address. Thus, NAT in D-Link DIR-300 protects against network attacks, preventing direct access from outside to internal device addresses.
But at the same time, the router will interfere if you need to give friends access to FTP folders with photos or to the game space. To configure translation rules for NAT in the DIR-300, you need to perform port forwarding.
To configure the router ports, you need to go to the D-Link DIR-300 settings on the “Virtual Servers” tab.

 +
+
There is one more problem: the router receives a gray WAN IP from the provider, which is constantly changing. Without a permanent address, connect to D-Link DIR-300 remote computer It won’t work, because the destination address is always different.
To solve this problem, DDNS technology is used, which allows you to assign a permanent IP to a dynamic IP. Domain name. The DDNS service updates information about WAN IP changes in real time and ensures continuous binding to the domain name.
Firewall is a set of rules for filtering traffic based on criteria such as address, port, protocol direction. Filtering by the D-Link DIR-300 firewall is carried out after decapsulation, routing and NAT processing.
The router allows you to reconfigure the firewall on the “Firewall - IP Filters” tab.


Network expansion
The D-Link DIR-300 Wi-Fi router supports operation in client mode. This means that either via cable or WiFi, you can connect the DIR-300 router to an upstream router to expand your existing network.
First you need to log in to the settings. In D-Link DIR-300, this function is located on the “WiFi - Client” tab.

The “Enable” checkbox switches the router to client mode, and the “Broadcast wireless network” option allows you to connect WiFi devices to the D-Link DIR-300 as a repeater.
From the list available networks you need to select the corresponding SSID name of the upstream router and log in, and in the network parameters you set the name of the current network, password and encryption method.
If the WiFi password is changed on the upstream router, the D-Link DIR-300 client settings will have to be reinstalled. Therefore, in order for the router to work as a client without interruptions, it is recommended to fragment the WiFi network and use one of the segments as a bridge.
Now you need to configure the D-Link DIR-300 router modem so that devices connected to it as a client have access not only to local nodes, but also to the Internet.
On the DIR-300 “Network - WAN” tab, you need to specify the upstream direction of the WAN through the WiFi-Client interface and set the type of routing used in the local network.

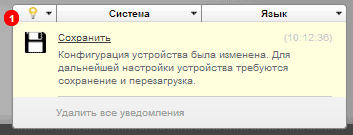
Setting up the DIR-300 is accompanied by reboot notifications after each change to the configuration.
Found a typo? Select the text and press Ctrl + Enter
class="eliadunit">
For a long time now, my friends have been asking me to buy and set up a router for them. We go to the store, buy it and set it up step by step, and you watch everything that happens, everything will be clear even to a beginner. You can connect any router, it all depends on your persistence and, of course, patience. Setting up the DIR-300 NRU Router is not difficult; this router is extremely popular due to inexpensive prices 1000-1100 rubles and good reliability and works with operating rooms Windows systems XP, Windows Vista, Windows 7.
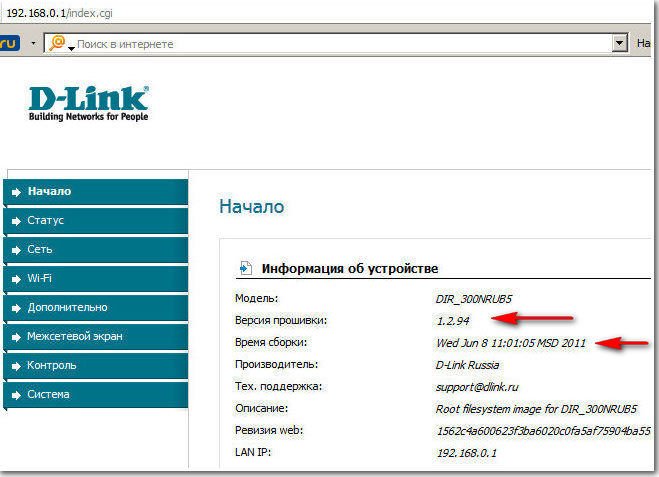
- On the official websites of Russian providers, there are instructions for installing it, but as I noticed outdated revisions b1, b2, b3, the web interface of the settings is black and brown. In 2011 D-Link updated the web interface, now the router settings windows (including the new model DIR-300NRU b5) pale Green colour, and the background is white, naturally the settings have changed a little. For providers, everything remains in place. This confuses many users who have recently purchased a router.
IN this moment according to my observations, the most often purchased model is the D-Link DIR-300 NRU b5, which has Wi-Fi support at speeds of up to 150 Mbit, uses an updated settings interface, built-in firewall and compatibility with 802.11b and 802.11g wireless standards. I advise you to know exactly what you are buying and check everything in the store. I do not recommend buying a router secondhand, since any router may be subject to damage during operation. unsuccessful firmware and you will have to roll back to official firmware.
Attention setting up a D-Link DIR-300 NRU router(HW revisions: b1, b2, b3), is slightly different from the configuration of the router model DIR-300NRU b5, but the essence is basically the same, now you will see everything for yourself. More information for you: The website has an article How to configure the Asus RT-G32 router, which may be useful to you.

Now about the settings. Before you actually go online, WAN(global computer network) from our home, you and I first go to our Internet provider or ISP in VPN- virtual private network, (for example Beeline).
There are few real providers in Russia, there are many sub-providers, in simple language intermediaries. But how to configure the router depends on how these providers organize their network.
How do all providers (providing Internet services) differ and how does this affect the router settings? Nowadays, one half of providers use a modern network protocol to operate DHCP or IPoE, where is the IP distribution and DNS addresses happens automatically (I must say it’s very convenient for an Internet provider), and to access the Internet they use an outdated tunnel protocol PPTP or a new layer 2 tunneling protocol L2TP(combining PPTP and L2F).
The other half of providers use an outdated protocol PPPoE mainly related to technology xDSL(for example Rostelecom), that is, it uses DSL modems, in the router settings, again select Type PPPoE connections(information at the end of the article) and set it up a little differently than in the first case. Of course, sometimes there are other features, so before you buy a router, this is my advice to you. Call your provider and find out all the information you need to configure the router, ask about which range of router models to choose from, so as not to have to worry later with settings, firmware and, as you said, specialists like me.
Now, let's take a closer look at the setup, in my opinion very good router from D-Link, DIR-300NRU b5. In general, I configured this router many times, both in Windows 7 and in Windows XP, but unfortunately I didn’t look at the accompanying manual, but it turns out that in fact, as our reader said, nothing is written there about Windows 7, but about XP there is information. Don't worry, our router works fine on both operating systems.

Let's start with the fact that you need to find out what network protocols your Internet provider uses, you can find out by looking at the contract with it or you need to call the support service of your provider and just ask, this is the best way, by the way. Let's start with the most common and easiest to configure network protocol today, DHCP. You also need to find out how your provider issues IP addresses; in the case of the DHCP protocol, this happens automatically; you can verify this by looking at the Local Connection Properties of your network adapter.
Windows XP. Start - Control Panel - Network Connections - Local Area Connection - Properties - Internet Protocol (TCP/IP)-Properties - Get IP automatically And .

Windows 7. Start - type View network connections - Local area connection - Properties - Internet Protocol version 4 (TCP/IPv4) and Properties - Obtain IP automatically and Obtain DNS server address automatically.


If you have the Use the following IP address checked in the Internet Protocol Properties and the addresses are registered, the same addresses must be specified in your agreement with your provider, then your Internet provider works according to PPTP protocol or PPPoE. Let's look at setting up a router with these protocols at the end. But before connecting a router with these protocols, you also need to set the Obtain IP automatically and Obtain DNS server address automatically parameters in the Internet connection properties.
Let's move on to the router settings. If something goes wrong, you can always reset your router to factory settings by pressing the button Reset.
We will connect the one carried out by your provider local cable Internet to WAN port on the router, as we see on it it is written internet, and the router and yours desktop computer let's connect with each other network cable(in our case blue) through LAN port No. 1.

Users to whom the Internet is supplied using ADSL technology need to connect the cable coming from the DSL modem to the WAN port. As we can see, the DIR-300 router has 4-LAN ports, to which you and I can connect up to 4 personal computers, where there is no Wi-Fi.

Turn on the router, open any browser: Chrome, Opera, Mozilla, Internet Explorer and enter address bar 192.168.0.1 and press Enter.


Firmware for download on the official D-Link website.


Click on the WAN line.

One of the main windows that we need opens before us. Net->Connections

If our provider uses the DHCP network protocol (a network protocol that allows computers to automatically obtain an IP address), setting up everything here is not difficult.
Connection type we exhibit IPoE
MTU: defines maximum size packet in bytes that can be transmitted over Ethernet networks, no more than 1500.
MAC: unique identificator, if your provider uses a MAC address binding, then it must be indicated in the contract; if not (in most cases), leave the one that will be set automatically and corresponds to what is written on the bottom of the router.
Allow- put a tick
Obtain an IP address automatically put a tick
Obtain DNS server address automatically, also check the box and our router will automatically pick up the data DHCP settings our provider. Leave everything else as is and click Save.


Click on the button Status - Network Statistics. In the WAN field, you and I see information that our router has successfully received the necessary data from the provider and we have Internet.

Many people sometimes ask: What does LAN show? Answer. So, our computer is connected to the DIR-300 router via LAN cable, Right!
Now we connect the laptop to our router.

Click in the router settings Wi-Fi button. General settings
. We leave everything as default. basic settings We don’t touch it either.
Security Settings-Network Authentication or protecting your network from intrusion - choose WPA-PSK(Pre-shared key). Access to your virtual network will be possible only after entering a key known to you and the users of your virtual network.

PSK encryption key: We come up with an encryption key, preferably 10-digit, consisting of letters and numbers in random order, it’s more reliable
Now our laptop also has internet. Here are friends and all the settings of our router in network protocol DHCP.
As for setting up our router in PPPoE mode, you will need to go to the router settings Net->Connections and select PPPoE connection type, then enter the username and password, as well as confirm the password. detailed instructions available on the D-Link website itself - http://dlink.ru/ru/products/5/728.html

The D-Link DIR-300 router has a point on board Wi-Fi access 802.11n and allows you to organize a wireless network at home, through which mobile gadgets can access the Internet and access each other’s files. Proper configuration of the router not only helps to avoid hacking of the home network by “craftsmen”, but also allows you to significantly increase Wi-Fi speed and increase the coverage area of the D-Link DIR-300.
After connecting the D-Link DIR-300 router to the provider’s network, you can configure Wi-Fi, set a password and distribute the Internet to wireless devices. The access point can be configured in three ways:
- Using the “Wireless Network Setup Wizard”;
- Manual setting of parameters;
- Automatically, via WPS protocol.
Quick setup
The DIR-300 provides configuration using the “Wizard”. This method requires minimal effort and allows you to configure Wi-Fi network in a matter of seconds without diving into technical details.
To establish a connection, you need to log into the router’s web interface and select the “Wireless Network Setup Wizard” section. Depending on the firmware, the “Master” may be located in different places interface, but all options and menu items in different versions The software have the same name. The procedure for working with the “Master”:
Set the network mode to “Access Point”.


Enter the access point name - the name of the Wi-Fi network, which will be displayed on all connected devices. For safety reasons, it is not recommended to leave standard name"DIR-300".

Select the “Secure Network” item and create a password that the router will request from connected devices.


After following these simple steps and applying the changes, Wi-Fi setup using the “Wizard” will be completed and the D-Link DIR-300 will be completely ready for use.
Manual setting
Unlike quick setup, manual configuration allows you to take into account the features of the connected devices and neighboring networks, which allows you to improve throughput and reception quality.
Basic manual setting Wi-Fi networks for home use on DIR-300 it is performed in 2 stages:
- Setting basic network parameters;
- Configure security settings.
basic settings
The main wireless network parameters are located in the router control panel on the “Wi-Fi – Basic Settings” tab. To go to this point in the “dark gray” interface you will need to switch to advanced mode.


Description of functions:
- Option "Enable" wireless connection» controls power to the access point. In order for devices to use a WiFi connection, the checkbox must be checked.
- Disabling Wi-Fi network broadcasting without deactivating the radio module may be necessary when using the DIR-300 in client mode. If you uncheck this box in standard mode, then wireless connection between the router and all devices will be interrupted.
- The MBSSID and BSSID parameters are configured when the router is used to simultaneously serve several wireless networks. At home, such a scenario is unlikely, and if there is only one network, these parameters cannot be changed.
- If you check the “Hide access point” checkbox, the WiFi network name will no longer be displayed both on other people’s devices and on trusted ones. In this case, the router will not stop broadcasting. To establish a new client connection, you will need to enter the SSID manually. This function implemented in D-Link DIR-300 to ensure security.
- Channel selection can be entrusted to the router firmware, leaving the value “auto”, but automatic setting is not always adequate, which often leads to a drop in the wireless speed of the router. To select manually correct channel, it is necessary to evaluate the performance of neighboring Wi-Fi networks. In the “light” air interface of the D-Link DIR-300, when selected, a histogram appears showing the channel load.

The less loaded the channel, the higher throughput, and therefore the wireless transmission speed. To study the situation in more detail, you can use one of free programs, for example, WiFi-Analyzer.

Security Settings
Professional hackers are hunting for corporate secrets and are unlikely to be interested in hacking anyone's home point access. But there are amateurs who can “harmlessly” pick up a password in order to use the “free” Internet or connect to the webcam of someone else’s computer. Therefore neglect elementary rules security is still not worth it.
Wireless network security settings are located in the router control panel on the “WiFi – Security Settings” tab. To go to this item in the “dark gray” interface, you will need to switch to advanced mode.


Description of functions:
- Method network authentication, excluding the objective possibility of hacking - WPA2. In corporate Wi-Fi networks, access is used through a RADIUS server, and for a home network, a preset PSK password key is suitable. Thus, WPA2-PSK mode will provide maximum protection.
- The encryption key is the same password that must be entered on the WiFi device in order to connect to the D-Link DIR-300. Complex password and correct setting - the most important conditions network security. The password cannot be set to simple numeric or dictionary combinations, or your date of birth. Good password contains more than 8 characters: numbers, special characters and letters, case sensitive. Regardless of the complexity, finding a key is only a matter of time, so it is recommended to change the password to a new one every month.
- AES – data encryption technology. Provides key cryptographic strength without reducing speed wireless transmission, therefore well suited for use in the 802.11n standard. The update period should be left at its default value of 3600 seconds.
- Pre-authentication through adjacent access points is only used in complex networks with multiple routers.
After completing these steps and applying the changes, setup Wi-Fi protection will be completed and the D-Link D-300 will be ready for safe operation.
Connecting using WPS
The WPS protocol was developed to simplify Wi-Fi network setup. For the user, the essence of the technology is that the router is paired with any WPS-compatible TV, smartphone or tablet without having to enter a password: when you press a button on the router, the devices exchange a digital access code and connect automatically.

Depending on the hardware revision of the router, the button may be located on the side or back of the case.

Brief instructions for connecting to D-Link DIR-300 via WPS using an Android device as an example:

Select the “WPS Button” option.

Click WPS button on the DIR-300 housing.

After a few seconds, a successful connection message will appear.


Thus, in just 4 simple steps you can connect any WPS to the router compatible device and you will not need to enter any password.
Despite the convenience this method pairing, the WPS protocol has the lowest security: when exchanging identification packets between devices, it is used digital code, which can easily be picked up by spyware.
Additional features
- The MAC filter in the D-Link DIR-300 is an auxiliary means of protecting against unauthorized Wi-Fi connections. Allows you to configure both black and white lists of MAC addresses.

- "WiFi Client List" displays up-to-date information about connected devices. The function allows you to forcefully disconnect any user from your home network.

- The “WPS” tab provides access to simplified device pairing options.
- On the " Additional settings"you need to pay attention to 2 important parameters: "TX power" and "Channel width".

Transmitter power is expressed as a percentage. The higher it is, the wider the Wi-Fi network coverage area.
The channel width can be selected automatically - 20/40, or adjusted manually. The wider the channel, the greater the throughput, i.e. speed.
The 40 MHz channel gives a noticeable increase in speed, but is less resistant to interference from neighboring networks than 20 MHz. In addition, as you approach the edge of the coverage area, the throughput of the 40 MHz channel is greatly reduced. To improve reception, you will need to configure the D-Link DIR-300 transmitter to maximum power, but then the router will begin to emit too much radio waves, which will “clog” weak waves from the antennas mobile gadgets. This will significantly reduce wireless transmission speeds on devices operating in close proximity to the router. Thus, pick up optimal values power and channel width is only possible by measuring speed and coverage directly at the DIR-300 installation site.
- It is not recommended for users who do not have special knowledge to change the values of the remaining parameters on the “Advanced Settings” tab.
- WMM technology – WiFi-Multimedia optimizes wireless traffic multimedia applications. To improve speed performance while watching online videos or calling on Skype, the option must be enabled. It is not recommended to change parameter values.
- In “Client” mode, DIR-300 can connect to another router to organize complex infrastructure in large homes or offices, as well as when connected to a provider’s Wi-Fi network.
Found a typo? Select the text and press Ctrl + Enter
This line of routers has become widespread among users and there are several reasons for this:
- Well-known manufacturer, which has been specializing in network equipment, as a result of which the products have high quality, good performance, and also very unpretentious to use.
- Small price, That is important factor, especially for simple user, who plans to install a router at home, configure it and safely forget about it until he needs something with higher speed.
- Good software, which will allow you to easily connect to almost any Internet provider. New firmwares are also regularly released that fix bugs and optimize operation.
Model differences
New models of this line are released quite often, and therefore their hardware differs. Wherein, external differences routers released several years ago may not have the newest one. They differ only in the revision indicated on the sticker on the back in the line H/W ver. B4 (for the fourth revision).
- DIR-300NRU B1, B2, B3- old models that have not been produced for some time, but it is easy to find any instructions for them and descriptions of solutions to emerging problems.
- DIR-300NRU B5, B6- newer routers that are found in stores.
- DIR-300NRU B7-one of the latest models, can be distinguished from the previous ones, including by appearance.
- DIR-300 A/C1 - latest model at the time of writing, it is often found in stores, but has some bugs.
Before you start setting up
Further paragraphs of the instructions make sense only if the device is connected to a PC or laptop using a twisted pair cable. The setup can be done without this, so if the user does not consider it necessary to carry out these actions or does not have such an opportunity, then they can be skipped.
Uploading new firmware
The first thing to do is download new firmware
to your computer. To do this, you need to go to the official website of the manufacturer, and then follow the path indicated in the picture. You need to select your device and the correct revision. 
There will be only one file that you need to download to your PC.
Checking network settings
Here you need to do the following actions(for Windows 7 and 8, for XP everything happens in “ Network connections") go to " Control Panel» - « Network and Sharing Center shared access
» - « Change adapter settings" Then right-click on “Local Area Connection” and select “Properties”. Next, you should go to the properties of Internet Protocol version 4 TCP/IPv4 and make sure that the address and settings are obtained automatically. If this is not the case, the specified values should be recorded. 
Connecting a router
Everything is quite simple here. To the Internet port (WAN), you should connect the cable from the provider, and one of the free ones is the one that will go to the computer. 
Connect as shown in the figure. On the PC itself, the global network should be completely disabled if you log in through any additional programs, which may be provided by the service provider. Don’t forget to connect the device itself to power.
Firmware D-Link DIR-300
After establishing the connection, you should go to the browser and enter 192.168.0.1 and a couple of login and password admin/admin. If they do not fit, then you can reset the router by holding the reset key on the back of the device.
After this, the user will be transferred to the main menu. 
To update the firmware, you need to go to " system", which will be located in the settings section, and then select " Update software" After that all that remains is to indicate the path to the downloaded file and click “ Update" The process may take long time, but do not reboot the device.
Setting up an Internet connection
The router will connect to global network, and other devices will connect to it to gain access. Therefore, you first need to find out how the connection is made. For this you need go to the provider's website and find out there.
Next you should click Advanced settings– Network – WAN. Here you need to click " Add", after which the following menu will be displayed, where you will need to enter the connection data provided on the website of the Internet service provider. Usually this Login: Password, in some cases the address is added vpn servers, for the static IP option this will be the address, gateway and DNS server. 
The remaining fields can be left standard. After this you need save changes and go to next page. A menu will open showing the new connection; you should save here too. After which you need to update the connection. If everything was configured correctly, a notification will be issued that the connection has been established. After this stage, the connection will be available via twisted pair.
Setting up wi-fi

Now wireless network will be available, to connect you must select it on the device and enter the password.