Honor engineering menu 4 p. Entering the service menu of a Huawei device
Many of us have long fallen in love with smartphones based on the Android operating system. They have always captivated us with their unpretentiousness, good reliability, as well as convenience and ease of use. The same can be said, in particular, about smartphones from the well-known company Huawei, which are also based on this operating system. The company from the Middle Kingdom always keeps up with the times and equips its phones with the latest versions of the operating system and multifunctional firmware, trying to keep up with the generally recognized leaders in the Android smartphone market.
However, few of us know that already quite convenient Huawei phones can be made even better by fine-tuning them to suit your needs. What we can configure in the phone’s main menu is only the tip of a huge iceberg; the rest is hidden from users in order to avoid device failure. However, people who deal with mobile phones not just at the user level, but, for example, work in a service, can easily access advanced settings on almost any phone using the engineering menu.
Looking ahead a little, it’s worth saying that inexperienced users really shouldn’t go into this “forbidden forest”, so as not to simply ruin their device through carelessness. But if you are confident in yourself and think that you understand technology at a sufficient level, then the Huawei engineering menu is exactly what you need to fine-tune your device as much as possible.

The engineering menu gives the user access to manual configuration of almost all phone parameters. Typically, engineer mode is used by developers at the stage of final configuration of the device before it goes on sale. With its help, they check the device for various errors, malfunctions, and also check the functionality of all device systems. In addition, the engineering menu contains detailed information about the capabilities of the device and its programs.
The engineering menu is built directly into the Android program, however, on some phone models, developers intentionally remove it from the phone after final testing. In such cases, it will be problematic for the owner to configure the device “for himself” directly from the phone and he will have to either use special programs that can be downloaded, for example, on Google Play, or use firmware from third-party developers.

The engineering menu for Huawei smartphones is usually always in place and is never deleted, so if you were unable to get into these settings the first time, then most likely you simply did not take into account the unique features of your device. It is also worth repeating once again that if you are not sure of what you are doing, and working with such menus is new to you, then you should carefully consider this step. Remember that unsuccessful settings in the engineering menu may not improve the functioning of the smartphone, but, on the contrary, make it much more inconvenient, and if you change the system settings, you lose the warranty and bear full responsibility for the device yourself.
How to get to the engineering menu?
In order to get into the engineering menu of a phone based on the Android operating system, you need to enter a certain secret code in the phone dialing menu. Most often on Android devices you need to dial the combination *#*#3646633#*#*. This code is suitable for most Android smartphones, but sometimes developers can change it, for example, entering the Huawei engineering menu most often occurs using the codes *#*#2846579#*#* or *#*#2846579159#*#*.

Also, codes can often change depending on the specific device model and the type of single-chip system used in it. Also, it often depends on the phone’s single-chip system whether the smartphone even has a built-in engineering menu or not. So, on devices with MTK processors, such a menu is available on almost every device, but on devices equipped with Kvalcom processors, on the contrary, in most cases this menu is completely absent.
The code should be applied immediately as soon as you enter it on the call screen, but on some phones you sometimes also need to press the call button for the code to work properly. It is also worth noting that the code must be entered and not copied, since otherwise it will not work. It is also quite useless to save such codes in the phone book, that is, manual entry is a prerequisite for the code to work.

Commands for accessing menus
If you don’t know how to enter the Huawei engineering menu — smartphone, or you can’t do it, then this is not a reason to be upset. Most Huawei devices support so-called “service codes”, which partially duplicate the functions of the engineering menu.
Service codes have been used in mobile phones for a very long time and many of them appeared long before the first Android smartphones came out. However, although such codes repeat some of the functions of the engineering menu, using them is not at all as convenient and completely unsafe. Some of them can literally delete all data stored on the phone or disable certain functions of the device. So, if you are not one hundred percent sure what a particular code means, we do not recommend that you use it for the simple reason that they may interfere with the normal functioning of your phone.

Now let's look at some examples of the most useful, in our opinion, engineering codes:
- *#06# — using this code you can find out your IMEI address.
- *#*#4636#*#* - This code provides you with some information about the phone, namely: device data, battery information, battery statistics and phone usage statistics.
- *#*#7780#*#* - this code resets settings such as Google account data, system data and settings, downloaded applications to the factory state.
- *2767*3855# — this code performs a complete formatting of the smartphone. So think twice before using it.
- *#*#34971539#*#* — this code is intended to obtain information about the smartphone’s camera.
- *#*#7594#*#* — used to change the on/off button modes.
- *#*#273283*255*663282*#*# - Using this command, you can open the file copy screen and use it to backup your most valuable photos or audio recordings.
There are also many other service codes that allow you to very carefully check and configure your telephone. However, due to the fairly large number of them, this will perhaps be a topic for a separate article, and we will move on.
Engineering menu functions
Huawei's engineering menu offers a wide variety of settings for experienced users. On most models of phones from the company from the Middle Kingdom, volume adjustments, camera settings, navigation, telephony and many other functions are available that you can change at your discretion.

In fact, there is nothing complicated in the adjustment itself. Just look for the parameter you need, for example, volume level, open it and experiment with the values until you achieve the ideal result for you. However, let us remind you once again that you should only change those parameters that you are sure of, otherwise you risk getting not a perfectly fitted smartphone, but a piece of irritating plastic.
Telephony
One of the main points that catches your eye when you first enter the engineering menu of an Android Huawei smartphone , This is the telephony menu. In this menu you will have access to many useful settings, including such important items as:
- Auto Answer. Here you will be able to enable or, conversely, disable auto answer to an incoming call.

- Band Mode. Here you can manually select frequencies for the GSM module. This menu will show you all the frequencies your phone supports. You can uncheck those bands that your mobile operator does not provide, which will ultimately save your battery power.
- CFUSetting. This option enables or disables conditional call forwarding.
- AT Command Tool. A utility for developers that supports AT commands.
- Modem Test. Fine-tuning compatibility with different types of devices.
- Network Selecting. Here you can also select mobile communication standards (GSM, WCDMA, LTE). For greater energy savings, turn off those not in use.
- NetworkInfo. A very convenient option for checking the quality of mobile operator services.
- GPRS. Setting up mobile internet connections. A choice of active SIM card is also available.
- HSPA Information. Information about the 3G network if this type of service is supported by your telecom operator.

- Mobile data service preferred. Using this item, you can increase the priority of the Internet over voice traffic. However, be careful, as incoming calls in this case may sometimes not reach you.
- Fast Dormancy. Allows you to save some of your phone's energy on third generation networks.
- RAT Mode (Phone Info). Using this menu you can select the most used communication standard. However, use with caution, as these settings block the action of the Network Selecting item.
- RF De-sense Test. Selecting a frequency range and a specific channel for testing communication quality.
- SIM ME Lock. Makes it possible to configure the regional parameters of the GSM module in manual mode.

Wireless interfaces
This is also a very interesting section, which is intended for testing a wide variety of modules designed for wireless information transfer, for example, Wi-Fi or Bluetooth:
- Bluetooth. Offers a very wide range of settings and tests for the Bluetooth module for the purpose of testing the reception and transmission of information, as well as for starting the debugging mode.
- CDS Information. Data on the parameters of wireless interfaces.
- FM Receiver. Checking the FM module.
- WiFi. Testing a Wi-Fi module for receiving and transmitting data on a specific frequency channel.
- Wi-Fi CTIA. Recording wireless technology testing logs.

Hardware Testing
This service menu for Huawei smartphones offers ample opportunities for testing and configuring the main hardware of the phone. In this engineering submenu, the user will have access to the following items:
- Audio. Allows detailed configuration of sound playback parameters.
- Camera. Adjusts photo and video settings that are not included in the standard camera application.
- Driving Current Camera. Reads current data from sensors in camera circuits.
- CPU Stress Test. Conducting testing of all device processor subsystems.
- Deep Idle Setting. Using this tab, you can disable the use of sleep mode when the device is in standby mode.
- Sleep Mode Setting. Adjust sleep mode settings.
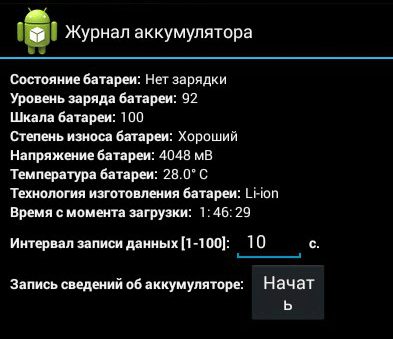
- ChargeBattery. Detailed information about the battery and its charge.
- Sensor. In this tab, the user can fine-tune the device’s sensor.
- Multi-Touch. In this menu, you can check and adjust the number of simultaneous touch points of your screen.
- Location Engineer Mode. Here the user can check the GPS module data.
That's probably all, dear friends. We hope this article was useful to you and answered most of your questions. We wish you excellent setup of your phone, and may it bring you only pleasant emotions.
And interesting features hidden from prying eyes.
Why are they hidden? Firstly, so that an inexperienced user does not break anything, and secondly, they are needed in especially rare cases and are not used regularly. Today we will talk about the engineering menu - a section for programmers, testers, geeks, experienced users and those who want to get into the very “heart” of gadget settings.
What is an engineering menu?
We are talking about a special program or system section that developers usually use at the final stage of configuring the software platform of a mobile device. With its help, they make final changes to the operation of the device, check the functioning of various sensors and test system components. Also, the hidden functionality of the service menu is used to obtain a large amount of system information, conduct various tests (about 25 pieces) and configure any Android parameters - various sensors, mobile networks, equipment, etc.
The engineering, service or system menu is available on smartphones and tablets running on a MediaTek processor. On the Qualcomm chipset it is either reduced or absent altogether.
Attention! This section is intended for experienced users who bear full responsibility for the consequences. Careless actions can harm the file system and render the smartphone unusable.
How to enter the engineering menu?
To enter the engineering menu, you need to enter a special command in the dialing application: *#*#3646633#*#*. On some versions the code *#*#4636#*#* or *#15963#* may work.
If the engineering menu code on Android does not work, or there is no dialing application on the phone (relevant for tablets that do not support calls), the MobileUncle Tools or MTK Engineering applications, which can be downloaded for free via Google Play, will help.
After entering the command or launching the application, the desired section will open. It may close immediately - you need to have “Developer Mode” activated on your smartphone. To do this, go to the gadget settings, find the kernel version there and quickly click on it 5-10 times in a row.
Engineering menu functions
The engineering menu is divided into several categories, each of which will be discussed separately.
- Telephony. All settings related to mobile communications are located here. For example, you can activate or disable certain BandModes (frequencies for 2G/3G/4G operation), check the operation of SIM cards, and even disable mobile data transfer in the background.
- Connectivity: Configure Bluetooth, Radio, Wi-Fi and Wi-Fi CTIA settings. For example, in the radio settings you can specify the radio wave, antenna type (you need to use headphones) and sound format (mono or stereo). The radio will play straight from this section.
- Hardware Testing. In this section, you can configure the operation of various components of the device, in simple words, hardware: sound levels of headphones and speakers, adjusting microphone sensitivity, various camera parameters (photo aspect ratio, adjusting ISO, HDR, focusing and much more), operation of the touchscreen, sensors (calibration right there) and so on. This category is very large and global; you need to understand each section separately and have serious knowledge and skills.
- Location. In this category, you can configure GPS operation, see how many satellites the gadget has picked up, and simply conduct testing.
- Log and Debugging. Here, logs (logs) of the battery are kept (percentage of charge, voltage, operating time, temperature) and other functions little known to the average user.
- Others. Contains two functions also unknown to the average user.
Engineering menu settings
The engineering menu opens up enormous possibilities for customizing the phone; we will consider the most interesting ones in detail.
- SAR Test - determining the level of harmful radiation from a smartphone or tablet.
- Connections - testing available wireless connection types: Bluetooth, Wi-Fi, WLAN CTIA and FM receiver.

- Audio - adjusts the sound in the speakers, microphone and headphones. About how to increase the Android volume through the engineering menu.

- Camera - configure various camera settings.

- Turning on the current camera - the operating current of the camera is displayed (in our tablet it is 2 mA).
- Load test of the CPU (central processing unit) - checking the stability of its operation, identifying errors in the operation of the processor-memory channel, testing the cooling system and power supply of the processor.
- Device Manager - activate automatic SMS registration, manage configuration parameters.
- Disable detection - adjust the signal frequency.
- Display - Sets the pulse width modulation indicator cycle, which affects the perceived brightness of the screen by quickly turning the backlight on/off; backlight adjustment; controller behind the vertical and horizontal lines of the display.

- Wake mode - its activation will not allow the device to “go” into sleep mode.
- IO - management of data input/output operations.
- Memory - detailed information about the RAM module.
- To a certain extent - detailed information about the battery (the strange name of the section is most likely due to errors in the automatic translation of names in the application, but there is no option to switch to English).
- SD card test - the name of the tab speaks for itself.
- Touch screen - checking the sensitivity and response of the display when pressed, as well as setting its additional settings.
- USB - testing the operation of the USB port.

- UART/USB switch - switching between two data transfer modes.
- Sensor - calibration (adjusting clarity and sensitivity) of the touch screen. Standard methods.
- Location - testing the GPS performance and determining the exact location.
- Battery log - detailed information about the battery and the ability to activate the recording of battery consumption information.
- MTKLogger - collection of system logs (MobileLog, ModemLog and NetworkLog).
- Temperature sensor - shows the battery and processor.
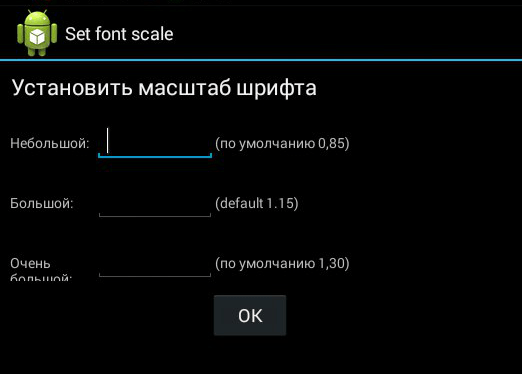
- Font parameter - change the font size.
When installing the application, some features may not be available without .
Xiaomi engineering menu
Despite the fact that our test Redmi 2 runs on a Qualcomm Snapdragon 410 processor, it also has the functionality that interests us. To enter it, you need to tap on the “Kernel version” item several times in a row.

The menu is represented by five items:
- Automatic Test. Automatic test of all device parameters.
- Single Item Test. Each of the 25 tests is taken separately. We will talk about this in detail below.
- Test Report. Report on the completed texts and their results.
- SW add HW version. Information about the smartphone version, IMEI and other numbers.
- Device View. Smartphone hardware data.

Of course, the most interesting point is the Single Item Test, where you can take a huge number of tests.

Let's make a reservation right away that there was no way to configure anything in the device we tested - only a functionality test. At the end of each procedure, you need to note its status: successful (success) or not (failed).
- Key - functionality of physical buttons. Interestingly, it was not possible to complete it successfully, since when checking the power button, the smartphone turns off.
- Backlight - display brightness.

- TouchPanel. The touch screen test includes two procedures: “Crossed calibration” and “Touch panel calibration”. The first one checks so-called “swipes”, the second one checks single taps on the screen. An easy way to calibrate your display.

- TFlash. Testing a memory card with two results: either everything is fine, or the card is damaged.
- Bluetooth. Searches for available devices.
- SIM Card. Test for the presence of SIM cards.

- Vibration. The gadget vibrates - everything is ok.
- RTC (Real Time Clock) - operation of the built-in clock.
- Speaker. Testing the conversational speaker. We didn’t understand how to get through it. We will be grateful if you can tell us in the comments.
- Receiver. Translated as receiver, receiver, but music plays during testing.
- Headset. Testing the 3.5mm jack to detect headphones, play sounds, and support headset control buttons.

- LED. Notification indicator, everything is obvious here.
- FM (radio). Click Search, and if you hear noise in the headphones, then everything is working properly.
- Camera. Everything is obvious: a test of the main and front optics, as well as the flash.
- Battery. An informative section with information about the correct operation of the USB cable (charging), the condition of the battery, its charge level and temperature. Similar data can be obtained more.

- Wi-Fi. Detection of nearby access points. There are no settings.

- Torch (flashlight): shines/does not shine.
- The loopback test includes a test of the spoken microphone. First, click Recording, then Playing.
- LCD. Screen colors.
- GPS. Detection of available satellites.
- Gyro (gyroscope). Three parameters - X, Y, Z - change depending on the position of the device in space.
- G-sensor (Accelerometer). Rotate the gadget in all planes and turn it over. The three parameters should be ok.
- Proximity Sensor. It is usually located near the speaker and is designed to dim the gadget screen during a conversation, thereby eliminating accidental clicks.
- Optical and Magnetic Sensor (optical and magnetic sensors) - points we don’t understand, share your knowledge in the comments.
After passing all tests, you can go to the Test Report section. As you can see, our “animal” is in excellent shape and has passed all the tests, which is very pleasing.

conclusions
Above we have listed the main sections of the engineering menu available on the tested devices. Now let’s summarize what features the user receives during installation:
- Formatting, restoring to factory settings.
- Testing the operation of individual elements of a smartphone or tablet, such as sensors, touch screen sensitivity and calibration accuracy.
- Detailed information about the device and its parts. For example, you can track battery consumption since the last charge and view statistics on the programs used.
- Energy optimization. Alternatively, unnecessary frequency ranges are turned off. In Russia, the standard indicators for working in 2G and 3G networks are 900 and 1800 MHz, while in the USA they are 850 and 1900 MHz.
*#0*# - Enter the service menu
*#*#2846579#*#* - Software version, network information
*#*#34971539#*#* - Camera information
*#*#273282*255*663282*#*#* - Make a Backup of all media files
*#*#232339#*#* - Wireless LAN test
*#*#197328640#*#* - Enable Test Mode for maintenance
*#*#0842#*#* - Back-light test
*#*#2664#*#* - Touchscreen test
*#*#0842#*#* - Vibration test
*#*#1111#*#* - FTA Software Version
*#12580*369# - Complete Software and Hardware Info
*#9090# - Diagnostic Configuration
*#872564# - USB Logging Control
*#9900# - System Dump Mode
*#301279# - HSDPA/HSUPA Control Menu
*#7465625# - View Phone Lock Status
*#*#232338#*#* - Show WiFi MAC address
*#*#1472365#*#* or *#*#1575#*#* - GPS test
*#*#232331#*#* - Bluetooth test
MASTER SECURITY CODE
309296
3092
9296
STANDARD GSM CODES FOR Huawei Honor
Change PIN - **04*, then enter the old PIN, and the new PIN twice.
Change PIN2 - **042*, then enter the old PIN2, and the new PIN2 twice.
Unlock SIM card (PIN) - **05*, then enter PUK and new PIN twice
Unlock SIM card (PIN2) - **052*, then enter PUK2 and new PIN2 twice
Set up unconditional call forwarding (you must order this option from your operator)
Cancel all forwardings - ##002#
Cancel all conditional redirects - ##004#
Activate all conditional forwardings - **004*Phone number#
Set up unconditional forwarding
Turn off and deactivate - ##21#
Deactivate - #21#
Enable and activate - **21*Phone number#
Enable - *21#
Check status - *#21#
Unconditional forwarding in case of "no response"
Turn off and deactivate - ##61#
Deactivate - #61#
Enable and activate - **61*Phone number#
Enable - *61#
Check status - *#61#
Setting the call time before unconditional forwarding is triggered in case of “no answer”
When setting up call forwarding on "no answer", you can set the time in seconds that the system gives you to pick up the phone. If you do not pick up the phone during this time, the incoming call will be forwarded.
Example: - **61*+709571234604321**30# - sets the wait time to 30 seconds
Set the waiting time - **61*Phone number**N# , N=5..30 (seconds)
Remove previous installation - ##61#
Forward calls in case of "not available"
Turn off and deactivate - ##62#
Deactivate - #62#
Enable and activate - **62*Phone number#
Enable - *62#
Check status - *#62#
Forward calls when busy
Turn off and deactivate - ##67#
Deactivate - #67#
Enable and activate - **67*Phone number #
Enable - *67#
Check status - *#67#
Set call barring (you need to order the service from the operator)
Change password for all bans (default - 0000)
- **03*330*old password*new password*new password#
Configure barring of all outgoing calls
Activate - **33*password#
Deactivate - #33*password#
Check status - *#33#
Complete ban on all calls to Huawei Honor
Activate - **330*password#
Deactivate - #330*password#
Check status - *#330#
Ban all outgoing international calls on Huawei Honor
Activate - **331*password#
Deactivate - #331*password#
Check status - *#331#
Bar all incoming calls
Activate - **353*password#
Deactivate - #353*password#
Check status - *#353#
Set up barring of all incoming calls when roaming
Activate - **351*password#
Deactivate - #351*password#
Check status - *#351#
Call waiting (you need to order the service from the operator)
Activate - *43#
Deactivate - #43#
Check status - *#43#
Anti Caller ID function in a smartphone
Deny - #30#phone number
Allow - *30#phone number
Check status - *#30#
Caller ID function in the phone
Deny - #77#
Allow - *77#
Check status - *#77#
Questions about Huawei Honor secret codes
Ask a question about secret codes on Huawei Honor
Mobile technology from Huawei and its separate brand Honor, running the Android operating system, has firmly established itself in the modern market. In addition to extensive device configuration in its own EMUI shell, developers also provide access to in-depth changes to system parameters in the engineering menu. After reading this article, you will learn how to access it.
Go to the Huawei service menu
The engineering menu is a settings panel in English, in which you will be able to change various parameters of the gadget and complete information about it. These settings are used by developers during the final testing of the device, immediately before its release for sale. If you are not sure of your actions, then do not change anything in the menu, as this may lead to unstable operation of your smartphone or tablet.

In conclusion, I would like to add that in case of inept or incorrect manipulations in this menu, you can only harm your gadget. So think carefully about whether a speaker that isn't loud enough or experimenting with your camera is worth it.
Alexander Grishin

You can change a lot of settings in the Huawei smartphone menu, however, many users do not even realize that the device contains hidden additional settings available in a special engineering menu. Smartphones running Android OS can switch to the corresponding interface in two ways.
The first, most common method is entering a universal code. To enter the engineering menu of Huawei Honor, Huawei Nova or Mate using the specified method, you need to:
- Open a standard application for making calls (in other words, a “dialer”).
- Enter the code in the same way as a regular phone number. Combinations are suitable for Huawei devices *#*#2846579#*#* or *#*#2846579159#*#* .
- Press the call button and wait for the menu to appear.
The functionality of the additional interface offered by the system is quite wide, but you will not be able to change the screen brightness or increase the volume in this type of engineering menu. To do this, you will need a second method - entering a specialized code
*#*#14789632#*#*
After activating it, a menu will appear in which you can change system parameters. The greatest scope for modifying your smartphone is provided by the “Hardware Testing” tab, where you can test and change the settings for sound, video, display and other parameters.
It will not be easy for people with poor knowledge of English to understand the engineering menu, so it is better to thoroughly study all the parameters and their names before changing this or that function. Better yet, don’t change anything there yourself, so as not to break the phone.