How to add a second hard drive. Connecting a second hard drive to the computer
Hello dear visitors. In this lesson, I will show you using a real example how to connect a hard drive to your computer. I want to warn you right away that this is not difficult and it will not waste much of your time.
Let's get started right away!
First of all, prepare the system unit: turn off the power and disconnect all cables from it so that they do not interfere with us. After this, remove the side cover from the system unit by unscrewing the two screws on the back.

Now we can already see the insides of our computer. note to the lower right system unit. Here are the bays for connecting hard drives.

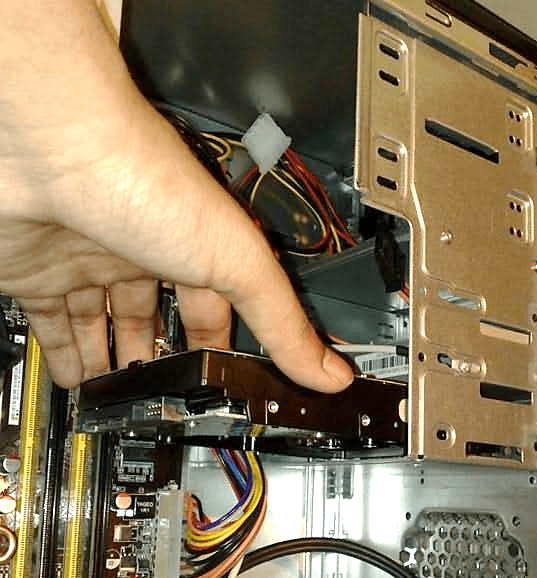
Pick up the hard drive and carefully insert it into the free slot. The main thing is that the connectors for connection are turned inside the system unit.


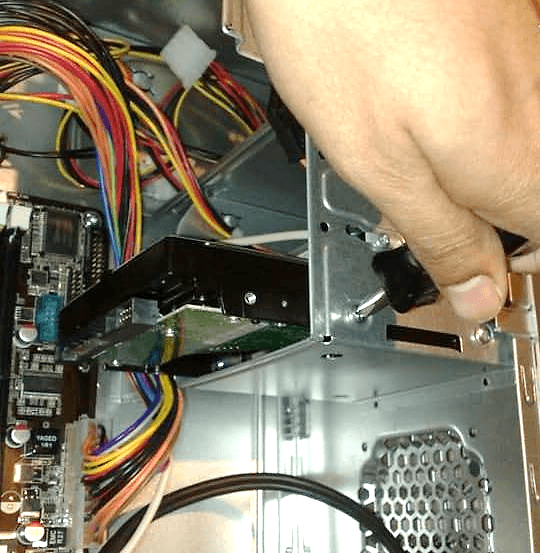
Here the holes in the hard drive and on the slot itself where the drive is connected must also match. We will use these holes for fixation. We take 4 bolts and fasten them on one side and the other.

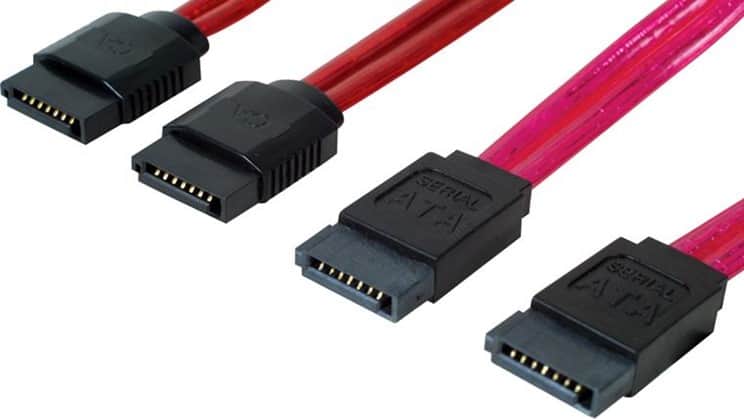
Completed at this stage installing a hard drive into the system unit. Now you need to connect it to the motherboard. To do this, modern computers use a SATA power cable and a SATA interface cable. This is what they look like:

First of all, connect the SATA interface to the hard drive.

Be sure to connect the correct way. If you suddenly feel that the cable does not fit into the connector, then try connecting it on the other side. He'll definitely fit in.
The other side of the cable must be connected to the motherboard. We look for a suitable connector and connect it. Typically, these connectors are located at the bottom of the board and are labeled SATA.

The last step remains - supply power to the hard drive.
We take the SATA power cable and connect it to the hard drive, next to the first connector.

The other side of this cable must be connected to the power supply. Examine the wires coming from the power supply and find a connector for connection.

By the way, if you already have another hard drive is connected to the computer, then most likely the power is already leaving it and of course you can use it so as not to create new wires.
This is how it can hang unnoticeably among the wires:

After connecting the hard drive to the system unit, we proceed to setting it up in the system. Close the system cover and reconnect all the wires. Let's turn on the computer!
If you have a new hard drive, then most likely it will not be immediately detected by the system and you will need to format it.
Open the Computer section and see if a new hard drive has appeared?


Right-click on the Computer section and select Manage.


ATTENTION! The main thing here is not to mess anything up and not to delete data from the necessary disks!!!
Create a simple volume and format the new hard drive and, if necessary, assign a drive letter to it.


Well, as you can see, in modern computers connect hard drive very simple! It only remains to mention that in addition to the modern SATA interface, there is also IDE, which is used in old drives! It looks like this:

Now let's summarize briefly. So, to connect the hard drive to the computer you need to do the following steps:
1. Install the hard drive in a free slot
2. Connect the SATA interface
3. Connect SATA power
4. Set up a hard drive in Windows
That's all, good luck connecting the hard drive!
Sooner or later, any user is faced with the fact that his data no longer fits on his existing hard drive. A second hard drive can be a solution to this problem. In this article we will tell you how to install a second hard drive on your computer.
Step #1: Prepare your computer for installing a second hard drive.
First, you need to prepare your computer. First, you need to turn off the power and disconnect all cables from it. Simply turning off using the button on the power supply is not enough; the computer must be completely disconnected from the power supply.
Secondly, you need to open access to the internals of the system unit. To do this, you need to remove both side covers. Typically, the side covers are fixed to the back of the system unit with four screws. Remove these screws and carefully remove both side covers.
Step No. 2. Installing the second hard drive and fixing it.
Once the computer is completely unplugged and the side covers are removed, you can begin installing the second hard drive. Hard drives are installed in a special compartment of the system unit. Identifying this compartment is quite simple. It is located on the lower right side of the system unit, and its width is exactly suitable for 3.5-inch hard drives.
In inexpensive computer cases, this compartment is usually turned with the hole towards the motherboard (as in the photo below). In more expensive models of computer cases, the hard drive compartment is turned towards the side cover.

When installing the hard drive, it is better to keep the system unit in a vertical position. Insert the hard drive into the hard drive bay (as shown in the photo below). In some cases, in order for the hard drive to fit into the bay without problems, you will need to remove the video card or RAM. You can read about how this is done in our articles: and. If your system unit has a lot of space for hard drives, then try to install the second hard drive away from the first. This way they will cool better.
Once the second hard drive is installed in the hard drive bay, it must be secured using four screws, two on each side of the hard drive (see photo below). You should not save screws and fix the hard drive with only two or three. In this case, it will vibrate and create a lot of noise.
Step No. 3. Connecting a second hard drive to the computer.
Once the second hard drive is installed in the computer and securely secured, you can begin to install it. Hard drives are connected using two cables: one cable goes to the motherboard (data is transferred through this cable), and the other to the power supply (it is used for power supply).
A cable is used to connect the hard drive to the motherboard (see photo below). This cable usually comes with the motherboard. If you do not have such a cable, you can purchase it separately.
To connect the hard drive to power, use a cable with a similar connector. (photo below).

If there are difficulties connecting the second hard drive to the computer, then look at how the first hard drive was connected and proceed in the same way.
Step No. 4. Assembling the system unit.
After the hard drive has been installed, securely fixed and connected, the system unit can be closed. Replace the side covers and secure them with screws. After installing the side covers, the computer can be connected to power and started. If everything was done correctly, then after the computer starts, a second hard drive will appear in the system.
Hello, friends. Sooner or later, disk space runs out. We constantly fill our devices with data and one day we find out that there is no more space on our disk. And I want it to always be there. Today I’ll tell you how you can quickly solve this problem yourself. In today's article we will connect the hard drive to the computer ourselves.
So, friends, you have discovered that you have a problem, but don’t worry, connecting the HDD is actually simple. A typical computer is equipped with one to six hard drives. You can turn them into a place to store files, or install another operating system. For example, on one disk you have Windows 10, and on the other Windows 7. When necessary, you boot from “seven”, and when not, from “ten” - you can do that. And you can make RAID arrays if necessary.
We connect a 3.5 hard drive from a laptop to a computer via a USB adapter
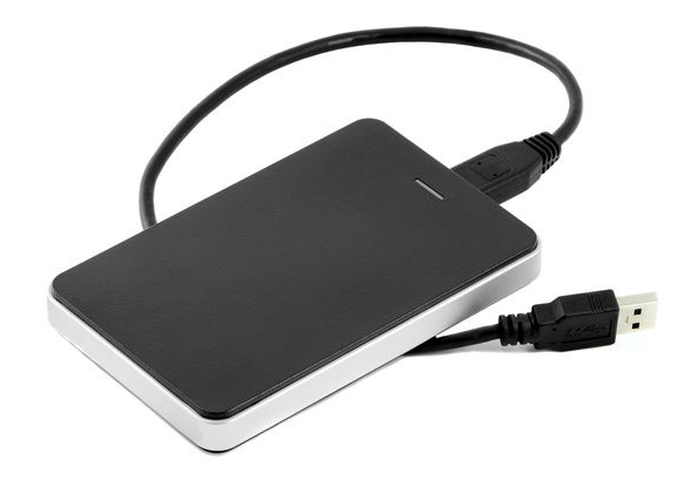
The easiest and most hassle-free option is to buy an external portable hard drive. This drive is connected via a USB connector and used as a large flash drive. The advantage of this solution is that you can store a lot of things on it? It connects easily to your computer, is compact and easy to carry. There are also disadvantages:
- the presence of a cord that must be connected all the time;
- read-write speed is lower than that of a disk connected in the usual way;
- special sensitivity to shocks and falls.
What does this have to do with a laptop disk? Inside this case is the most ordinary laptop hard drive. And if you have such a used laptop disk, you can make it portable yourself. The most important part is the adapter. You can buy an adapter in a store, taking the disk with you, and the seller will select an adapter for you, and perhaps even a beautiful case. Putting everything together we get a portable disk:

It can now be connected to a USB port. Or this option, without an adapter, just a connector screwed to the case, into which the hard drive is then inserted. The case itself can be secured in the system unit basket with screws:

This option is suitable for connecting an HDD without an adapter, inside the system unit. Read on.
Connecting a HDD without an adapter at home
You can easily connect the same 3.5 hard drive yourself. You will need an additional SATA cable for the hard drive and possibly an additional power plug (if there are not enough connectors on the power supply). On sale there are the following cable options where everything is in one:

We open the system unit after disconnecting all the wires from it, and unscrew the screws:

...remove the cover,

Connect the data cable to the motherboard...

...and the hard drive along with the power connector:

It is highly desirable that the 3.5 disk does not hang on the wires. If possible, it is better to secure it in a stationary state to avoid vibrations and shocks.
Then, we find a suitable place for it and secure it, if possible, with standard mounting screws in the basket, or at worst with plumbing tape, so that our disk is firmly and motionlessly fixed. We put the cover of the system unit in place.
How to connect a second, additional hard drive to a computer via a SATA connector
If you have a standard hard drive from your computer, you can just as easily connect it as a second drive. We do everything according to the same scheme. First, we secure the new disk with standard screws on both sides in the disk basket so that there is no vibration:

Then we connect the cable and the power connector. The disk is connected.
Connecting an IDE hard drive to the motherboard and SATA connector
If your computer's motherboard has connectors for connecting an IDE hard drive, you can try connecting such a drive. For a long time, all computers worked on the IDE interface, something like this until 2005. A disk with such an interface looks like this:

The connection socket looks like this:

Sometimes the connectors are multi-colored. And the cable for connecting to the motherboard looks like this:

The blue block connects to the motherboard, the black (topmost) to the hard drive, and the white to the DVD drive.
There is an important point when using IDE drives. If you are going to use such a disk, you need to correctly switch the jumper to the position Master or Slave. This option tells the system what role this disk will play. Master— this disk is considered the main one, and loading will take place from it. Slave— secondary disk.

Different manufacturers have their own jumper pinouts. The decoding of the switching modes is always indicated on the disk case:

By setting the jumpers to a certain position, we indicate the priorities - which disk is the main one. Previously, when there were several such disks, it took a lot of time to switch them. The SATA interface does not have these disadvantages. The IDE interface has long been outdated and is no longer used on modern devices. However, you can connect your existing IDE drive to the SATA socket on the motherboard using a special adapter. You need to connect the adapter to the IDE drive:

...and a SATA cable and power cable to the motherboard and power supply. In this way, you can increase disk space by some, albeit small (by modern standards) amount. Everything is more than a flash drive!

If you bought a new hard drive, you must initialize it before using it, otherwise Windows will not see it, even if it is connected correctly. This is done using special programs such as Acronis Disk Director 12. First, install the disk in the system unit, connect, and load Acronis Disk Director:

At first you will not see the new connected disk under Windows. However, if the Disk Management snap-in is available in your version of Windows, you can try to initialize the connected disk through this snap-in. In the photo, we first went to “Computer Management”, then to “Disk Management”.

However, I always use Acronis; it is guaranteed to see all disks connected to the computer.

You need to select the desired disk, right-click to open the menu, select “Initialize disk”, and then at the very top click “Apply pending operations”:

After initialization, we create a partition or partitions on the disk, formatting them in the NTFS file system. At this point, the operation of connecting the disk to the computer can be considered completely completed. We connected it physically and programmatically. After these steps, the disks can be used for their intended purpose - installing an operating system or making volumes out of them to store your data.
If you decide to install another operating system on a new drive, then after installation, when you boot your computer, you will need to select the drive on which you installed it. This is done through the BIOS. To enter the BIOS, first press the key DEL, and then select the desired disk:

I repeat, you need to select from the list that appears the disk that you need. You can then change the download at any time. In general, you can connect a hard drive yourself very easily, try everything and you will definitely succeed.
Good day.
For many users, one disk is often not enough for everyday work on a laptop. There are, of course, different options for solving the issue: buy an external hard drive, flash drive, etc. media (we will not consider this option in the article).
Or you can install a second hard drive (or SSD (solid state)) instead of the optical drive. For example, I use it very rarely (I’ve used it a couple of times over the last year, and if I didn’t have it, I probably wouldn’t remember about it).
In this article I want to look at the main questions that may arise when connecting a second drive to a laptop. So…
1. Selecting the required “adapter” (which is installed instead of the drive)
This is the first question and the most important! The fact is that many people do not suspect that thickness The disk drives in different laptops may be different! The most common thicknesses are 12.7 mm and 9.5 mm.
To find out the thickness of your drive, there are 2 ways:
1. Open some utility, such as AIDA (free utilities: ), then find out the exact model of the drive in it, and then find its characteristics on the manufacturer’s website and look at the dimensions there.
2. Measure the thickness of the drive by removing it from the laptop (this is a 100% option, I recommend it so as not to make a mistake). This option is discussed further down in the article.
By the way, please note that this “adapter” is correctly called a little differently: “Caddy for Laptop Notebook” (see Fig. 1).

Rice. 1. Adapter for a laptop for installing a second disk. 12.7mm SATA to SATA 2nd Aluminum Hard Disk Drive HDD Caddy for Laptop Notebook)
2. How to remove the disk drive from a laptop
This is done quite simply. Important! If your laptop is under warranty, such an operation may result in denial of warranty service. Whatever you do next, do it at your own peril and risk.
1) Turn off the laptop, disconnect all wires from it (power, mice, headphones, etc.).
2) Turn it over and remove the battery. Usually its fastening is a simple latch (sometimes there can be 2 of them).
3) To remove the drive, as a rule, it is enough to unscrew 1 screw that holds it. In a typical laptop design, this screw is located approximately in the center. When you unscrew it, it will be enough to lightly pull the drive housing (see Fig. 2) and it should easily “move out” of the laptop.
I emphasize that proceed carefully; as a rule, the drive comes out of the case very easily (without any effort).
Rice. 2. Laptop: disk drive mount.
4) It is advisable to measure the thickness using a caliper rod. If it is not there, you can use a ruler (as in Fig. 3). In principle, to distinguish 9.5 mm from 12.7, a ruler is more than enough.
Rice. 3. Measuring the thickness of the drive: it is clearly visible that the drive is about 9 mm thick.
Connecting a second drive to a laptop (step by step)
To begin with, I want to draw your attention to 2 nuances:
Many users complain that the laptop loses its appearance somewhat after installing such an adapter. But in most cases, the old drive socket can be carefully removed (sometimes small screws can hold it in place) and installed on the adapter (red arrow in Fig. 4);
Before installing the disk, remove the stop (green arrow in Fig. 4). Some people push the disk “from above” at an angle without removing the stop. This often leads to damage to the contacts of the disk or adapter.
As a rule, the disk fits into the adapter slot quite easily and there are no problems with installing the disk into the adapter itself (see Fig. 5).
Rice. 5. An SSD drive is installed in the adapter
Problems often arise when users try to install an adapter in place of the optical drive in a laptop. Most often the problems are as follows:
The adapter was chosen incorrectly; for example, it turned out to be thicker than needed. Forcing the adapter into the laptop can cause damage! In general, the adapter itself should “ride” into the laptop as if on rails, without the slightest effort;
On such adapters you can often find compensator screws. In my opinion, there is no benefit from them, I recommend removing them immediately. By the way, it often happens that it is they that rest against the laptop body, preventing the adapter from being installed into the laptop (see Fig. 6).
If everything is done carefully, the laptop will have its original appearance after installing the second disk. Everyone will “think” that the laptop has an optical drive, but in fact there is another HDD or SSD (see Fig. 7) ...
Rice. 7. The adapter along with the disk is installed in the laptop
I recommend that after installing the second disk, go into the laptop’s BIOS and check whether the disk is detected there. In most cases (if the installed disk is working and there were no previous problems with the drive), the BIOS correctly detects the disk.
How to enter the BIOS (keys for different device manufacturers):
To summarize, I want to say that the installation itself is a simple matter, anyone can do it. The main thing is to take your time and act carefully. Often problems arise due to haste: first they didn’t measure the drive, then they bought the wrong adapter, then they started installing it “by force” - as a result, they took the laptop for repair...
That's all for me, I tried to sort out all the pitfalls that may exist when installing a second disk.
Connect the second hard drive to the computer.The time has come when one hard drive in a computer is no longer enough. More and more users decide to connect a second HDD to their PC, but not everyone knows how to do it correctly themselves to avoid mistakes. In fact, the procedure for adding a second disk is simple and does not require special skills. It is not even necessary to mount a hard drive - it can be connected as an external device if there is a free USB port.
Connecting a second HDD to a PC or laptop
Options for connecting a second hard drive are as simple as possible:
- Connecting the HDD to the computer system unit.
Suitable for owners of regular desktop PCs who do not want to have external connected devices.
- Connecting a hard drive as an external drive.
The easiest way to connect an HDD, and the only one possible for a laptop owner.
Option 1. Installation in the system unit
HDD type determination
Before connecting, you need to determine the type of interface the hard drive works with - SATA or IDE. Almost all modern computers are equipped with a SATA interface, so it is best if the hard drive is of the same type. The IDE bus is considered obsolete and may simply not be present on the motherboard. Therefore, connecting such a drive may cause some difficulties.
The easiest way to recognize the standard is by contacts. This is what they look like on SATA drives:
And this is how the IDE does it:
Connecting a second SATA drive in the system unit
The process of connecting a disk is very easy and takes place in several stages:
Boot priority for SATA drives
The motherboard usually has 4 connectors for connecting SATA drives. They are designated as SATA0 - the first, SATA1 - the second, etc. The priority of the hard drive is directly related to the numbering of the connector. If you need to manually set the priority, you will need to go into the BIOS. Depending on the BIOS type, the interface and controls will be different.
In older versions, go to the section Advanced BIOS Features and work with the parameters First Boot Device And Second Boot Device. In new BIOS versions, look for the section Boot or Boot Sequence and parameter 1st/2nd Boot Priority.
Connecting a second IDE drive
In rare cases, there is a need to install a disk with an outdated IDE interface. In this case, the connection process will be slightly different.
Connecting a second IDE drive to the first SATA drive
When you need to connect an IDE drive to an already working SATA HDD, use a special IDE-SATA adapter.
The connection diagram is as follows:
- The jumper on the adapter is set to Master mode.
- The IDE plug connects to the hard drive itself.
- The red SATA cable is connected on one side to the adapter, and the other to the motherboard.
- The power cable is connected on one side to the adapter, and on the other to the power supply.
You may need to purchase a 4-pin to SATA adapter.
Initializing the disk in the OS
In both cases, after connecting, the system may not see the connected disk. This does not mean that you did something wrong; on the contrary, it is normal when the new HDD is not visible in the system. The hard drive must be initialized before it can be used. Read about how this is done in our other article.
Option 2. Connecting an external hard drive
Often users choose to connect an external HDD. This is much simpler and more convenient if some files stored on the disk are sometimes needed outside the home. And in the situation with laptops, this method will be especially relevant, since there is no separate slot for a second HDD.
An external hard drive is connected via USB in exactly the same way as another device with the same interface (flash drive, mouse, keyboard).
A hard drive designed for installation in the system unit can also be connected via USB. To do this, you need to use either an adapter/adapter or a special external case for the hard drive. The essence of the operation of such devices is similar - the required voltage is supplied to the HDD through the adapter, and the connection to the PC is made via USB. Hard drives of different form factors have their own cables, so when purchasing you should always pay attention to the standard that specifies the overall dimensions of your HDD.
If you decide to connect the drive using the second method, then literally follow 2 rules: do not neglect the safe removal of the device and do not disconnect the drive while working with the PC to avoid errors.
We talked about ways to connect a second hard drive to a computer or laptop. As you can see, there is nothing complicated in this procedure and it is absolutely not necessary to use the services of computer specialists.