The engineering menu does not open. How to enter the asus engineering menu
Often in Chinese (and probably not only Chinese) phones Android based in the engineering menu they are set far from optimal settings volume of the speaker, headset (headphones) and microphone, their correction will be discussed in this article.
How to get to the engineering menu of an Android phone
To get to the engineering menu, open the dialer and enter a special code: *#*#3646633#*#*
Also on some versions of Android the command may work *#15963#* and *#*#4636#*#*
If your phone's processor is not MTK, then different options are possible.
 I will give the codes known to me for opening the engineering menu on different phones and tablets:
*#*#54298#*#* or *#*#3646633#*#* – smartphones based on MTK processor
*#*#8255#*#* or *#*#4636#*#* –Samsung smartphones
*#*#3424#*#* or *#*#4636#*#* or *#*#8255#*#* – HTC smartphones
*#*#7378423#*#* – Sony smartphones
*#*#3646633#*#* – smartphones TEXET, Fly, Alcatel,
*#*#3338613#*#* or *#*#13411#*#* — Fly smartphones, Alcatel, Philips
*#*#2846579#*#* or *#*#2846579159#*#* – Huawei smartphones
*#*#2237332846633#*#* - devices from Acer
Immediately after entering, the command should disappear and the engineering menu should open. But on some devices you will still need to press the “Call” key
A list of sections of the phone's engineering menu will appear.
 Just in case, take a notepad and pen and take note of the settings that were set on your phone before your intervention. You never know, anything can happen.
On my phone (based on an MTK processor), in order to get to the engineering menu I had to install free utility(program) from Google Play « Mobileuncle MTK Tools “, which opens access to the engineering menu (that is, it works similarly to dialing the magic combination *#*#3646633#*#*).
I'm sure you'll find it there too free apps and for other phones.
Volume settings for the speaker, headset (headphones) and microphone of the phone through the engineering menu
 For clarity, let’s briefly look at setting the device’s volume level:
We go into the program or dial the magic combination to enter the engineering menu. Next, in the menu that opens, select the section “ Engineer Mode»
A section will open in which you can select the engineering menu of the Android system (we skip it), and the engineering menu of the phone itself.
We need the phone’s engineering menu, so select the “Engineer Mode (MTK)” section. This point is circled in the figure with a red marker.

A very long menu will open, through which you can get to almost any phone settings. But it’s not enough to get to them, you need to know how to manage them.
Therefore, do not change what you have no idea about.
At worst, write down the parameters that were before your intervention, so that you can return them back later. Let's continue!
 Since we are interested in adjusting the sound level, select the “Audio” item, I circled it with a red marker.
And... magic! The menu of interest to us for setting the parameters of the speakers and microphone opens.
Why did we actually go into this menu? Doesn't something work like that out of curiosity? Okay, let's continue to figure it out!
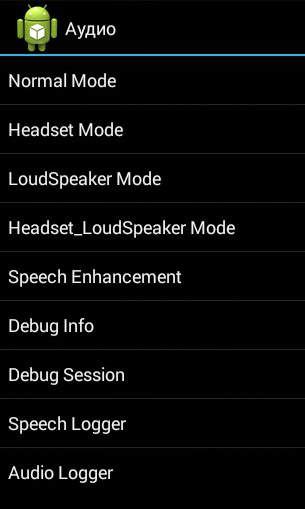
It’s worth stopping here and figuring out what all these menu items mean.
 Normal Mode(Settings section in normal or normal mode) – this mode is active when nothing is connected to the smartphone;
Headset Mode(headset mode) – this mode is activated after connecting headphones or external speakers;
Loud Speaker Mode(speaker mode) – it is activated when nothing is connected to the phone or tablet and you turn on speakerphone while talking on the phone;
Headset_LoudSpeaker Mode(speaker mode with a headset connected) – this mode is activated if you connect headphones or external speakers, and you turn on the speakerphone while talking on the phone;
Speech Enhancement(phone conversation mode) – this mode is activated in the normal mode of telephone conversations, and nothing is connected to it (headset, external speakers) and the speakerphone is not turned on.
Debug Info– it’s not clear why – information on backing up information or debugging it;
Speech Logger– I haven’t fully figured it out, most likely it was logging during negotiations or recording the conversation. If you check the box next to “Enable speech log”, then after completion phone call V root directory memory cards, corresponding files are created. Their name and structure take the following form: Day of week_month_year__hour_minutes_seconds (for example, Friday_July_2016__time17_12_53.pcm).
What these files serve and how they can be useful to us is unclear. The /sdcard/VOIP_DebugInfo directory (which is the storage location for files with backup information) is not created automatically; if you create it manually, it will remain empty after the conversation.
Audio logger– used to record sound that supports quick search, playback and saving it. 
When you enter any of the modes, you will have access to various settings volume (Type). Here is a list of basic settings you need to know:
- Sip – settings for Internet calls;
- Mic – microphone sensitivity settings;
- Sph – settings conversational dynamics(the one we apply to the ears);
- Sph2 – settings for the second speaker (I don’t have one on my phone);
- Sid – skip, if you change these parameters during negotiations on your smartphone or tablet, you can hear yourself instead of your interlocutor;
- Media – adjust the multimedia volume level;
- Ring – adjust the volume level of the incoming call;
- FMR – FM radio volume settings.
Under the settings selection item, a list of volume levels (Level) is available (see figure). 
There are usually 7 such levels, from level 0 to level 6. Each such level corresponds to one “click” on the volume rocker of your smartphone or tablet.
Thus, level 0 is the quietest level, and level 6 is the loudest signal level. Please note that each level can be assigned its own values, which are located in the Value is 0~255 cell. They should not go beyond the range from 0 to 255 (the lower the value, the quieter the volume).
To change this parameter, you need to erase the old value in the cell and write a new one, and then press the “Set” button (the one next to the cell) to assign. 
Finally, at the bottom you can see the Max Vol section. 0~255 (on my smartphone, for example Max Vol. 0~255, it all depends on the manufacturer). At this point it is specified maximum value volume level, it is the same for all levels.
Dear friends. Item names may vary depending on different models. This is an MTK platform, so be prepared to rack your brain and look for a match in your menu. I have a Jiayu G3 phone.
For me the changes were applied immediately, but someone may need to restart the phone for them to take effect.
Although, it seems like you shouldn’t break anything, and if you don’t like the changes, you can always enter the old value..
But still..
YOU MAKE ALL CHANGES AT YOUR OWN RISK!!! Don't forget to turn on your thinking!
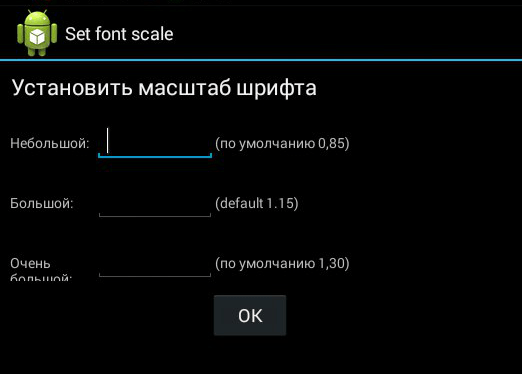
P.S.: I found a font size setting on my phone. It turns out you can increase it MORE!
P.P.S.: if something is still not clear, here is a video on setting up sound in the engineering menu:
Purchasing a new smartphone or tablet is a real holiday for many. Every owner expects that the gadget will bring joy for many years. reliable operation and the absence of any problems. Moreover, regardless of who the assembler is and what control system is installed.
However, as often happens, modern mobile devices can hardly be called ideal, since some time after the start of use, issues are identified that the owner wants to correct by modifying them in one way or another. software part his mobile assistant to the ideal. Of course, in my understanding. One of available tools- this is the engineering menu "Android".
Secret settings that everyone knows about
At the final stage of configuring the software component of the gadget running the Google system, developers use the so-called Android engineering menu. a special program that allows you to make adjustments to the operation of the device, perform technological tests, and view information from sensors. Since thoughtless use of this tool can lead to unpredictable results, access to it is most often hidden from users. However, in fact, the secret is already known to everyone - to learn how to call up the mentioned menu, you only need to spend a few minutes searching for recommendations.
A few important points
However, not all mobile devices ah, you can enter the “Android” engineering menu. In order to take advantage of its capabilities, you need to make sure that the gadget meets certain requirements.
Firstly, the central processor must be manufactured by MediaTek (or MTK). On inexpensive Spreadtrum models, for example, SC-6825, popular Snapdragon from Qualcomm, various Tegra NVidia and Intel, trying to launch the Android engineering menu is useless. It is not there. It will not be possible to achieve functionality, even if you carefully install the appropriate application.

Secondly, various modified operating systems, for example, CyanogenMod, popular in some circles, do not allow running the configuration program, since they were originally developed for devices with a Qualcomm processor that do not support the Android engineering menu. In addition, it is highly desirable that the operating system be original or created on a basic basis.
Thirdly, the application itself (file) must be present among programs, even if hidden from standard conductor. Thus, some mobile device manufacturers, after completing the software settings, simply delete the “Android” engineering menu. Descriptions and recommendations for use in this case are useless, which is obvious.
Secret combination
There are several ways to get into the engineering menu settings on Android. It is impossible to say which one is better, since a direct comparison is incorrect. Therefore, we will consider them one by one.

One of the most “ancient” options, which was used in the first models of smartphones and tablets, is that the user in the dialer program (the so-called dialer) dials not the subscriber’s number, but a special code of the Android engineering menu, similar to checking funds in the account. If the combination is recognized and accepted, the configuration application is launched. Some mobile device companies use their own modified code, so the standard set does not always work. Otherwise, to call the menu, you should type the following character order without spaces - * # * # 36 46 633 # * # *. It's that simple.
Traditional access method
Usage secret combination not always convenient, if only because the order of the characters is easy to forget. Also, in the case of a changed set, it is easier to use the program rather than looking for the correct order of characters. One of the most famous applications- this is the so-called “Mobile Uncle”, or MobileUncle Tools. It is free, so there are usually no problems with finding and installing it. At the time of writing current version is the official 2.9.9 or assembly 3.1.4, which has additional support some new processors.

In order for the program to work, the user must first obtain root rights on his gadget. There are a lot of applications for this, for example, KingRoot, SuperSu, etc. In this article we will not talk about the nuances of working with a rooted device, since this is a separate voluminous topic. After launching the application, you should select the third item called Engineer Mode (both in Russian and in English versions), and in the window that opens - “Work with MTK”. When prompted to provide root access, you must answer in the affirmative.
How to restore access to the engineer mode
If the manufacturer mobile gadget If you took care of the security of the operating system by prudently deleting the configuration program, you can reinstall it. To do this, you need to find an installer on the Internet that restores EngineerMode.apk and install it.

We do not indicate the exact name due to the abundance of analogue clones. For example, one of them is called “Engineering Mode”. You can also just copy missing file to the system folder located on the path system\app. After this, you can use any method for access: either dialing a number or directly calling from the program interface. Please note that these operations require
Features of the miracle program
Through the engineering menu, despite the ambiguous attitude of gadget owners to this, it makes it possible to solve several important problems. In particular, adjust the sensitivity of the microphone, cure a “childhood disease” manifested in insufficient volume of the system speaker, reduce battery power consumption by disabling scanning of “extra” ranges, and reduce the time the receiver searches for satellites global system positioning. Let us dwell on the above functions in more detail, since they are the ones that are most in demand.
Ringer volume
Raising the ringer volume is very easy. To do this, select the “Audio” section by swiping to the right. A list of modes will appear. LoudSpeaker Mode, Ring subsection, is responsible for the system speaker. The parameter in the first window should not be changed, but in the second you can enter a higher value. The developers may initially set the indicator to 130, which is quite quiet, but 156 is already close to the limit. The maximum is 160. After editing, you need to press the Set button, located here, and reboot the device, correctly exiting the program.
Mobile operator frequencies
To optimize the power consumption of a mobile communication device, you can disable scanning of “extra” frequencies. In our country, when working in regular 2G/3G networks standard frequencies are 900 and 1800 MHz. The other pair, 850 and 1900 MHz, represents American standard. To enable or disable it, you need to select the Band Mode item, go into the settings for SIM-1 and SIM-2 one by one and uncheck/check the desired boxes. Confirmation is by pressing the Set button.

How to improve GPS? To improve performance, you need to turn on Wi-Fi, select Location in the Android engineering menu, go to Location Based Service and open EPO. Here you need to make sure that the Enabled and Download checkboxes are checked (if present). After this, you should return to YGPS and in the information section, alternately click “Full”, “Cold”, “Restart”. Next, you need to select the “Satellites” item and wait until the answer is recorded (green dots on the map). Everything takes from 2 to 5 minutes. After this, all that remains is to exit the menu, close the program and restart the gadget.
Summing up
Engineering menu devices operating under control opens up opportunities for the owner of the gadget, the use of which allows you to configure the device in an optimal way. This is often the only way to delay the purchase of a new mobile assistant. This menu It is contraindicated only for those who are already completely satisfied with the performance of their tablet, navigator or smartphone.
AND interesting features, hidden from prying eyes.
Why are they hidden? Firstly, so that an inexperienced user does not break anything, and secondly, they are needed in especially rare cases and are not used regularly. Today we will talk about the engineering menu - a section for programmers, testers, geeks, experienced users and those who want to get into the very “heart” of the gadget’s settings.
What is an engineering menu?
It's about special program or system partition, which developers usually use at the final configuration stage software platform mobile device. With its help they contribute latest changes into operation of the device, check the functioning various sensors and perform testing of system components. Also hidden functionality service menu used to obtain large quantities system information, conducting various tests (about 25 pieces) and setting up any Android settings- various sensors, mobile networks, equipment, etc.
Engineering, service or system menu available on smartphones and tablets powered by MediaTek processor. On the Qualcomm chipset it is either reduced or absent altogether.
Attention! This section is intended for experienced users who take full responsibility for the consequences. Careless actions can cause harm file system and bring their smartphone out of order.
How to enter the engineering menu?
To enter the engineering menu, in the dialing application you need to enter special team: *#*#3646633#*#*. On some versions the code *#*#4636#*#* or *#15963#* may work.
If the engineering menu code on Android does not work, or there is no dialing application on the phone (relevant for tablets that do not support calls), the MobileUncle Tools or MTK Engineering applications, which can be downloaded for free via Google Play, will help.
After entering the command or launching the application, it will open required section. It may close immediately - you need to have “Developer Mode” activated on your smartphone. To do this, go to the gadget settings, find the kernel version there and quickly click on it 5-10 times in a row.
Engineering menu functions
The engineering menu is divided into several categories, each of which will be discussed separately.
- Telephony. Here are all the settings related to mobile communications. For example, you can activate or disable certain BandModes (frequencies for 2G/3G/4G operation), check the operation of SIM cards, and even disable mobile data transfer in the background.
- Connectivity: Configure Bluetooth, Radio, Wi-Fi and Wi-Fi CTIA settings. For example, in the radio settings you can specify the radio wave, antenna type (you need to use headphones) and sound format (mono or stereo). The radio will play straight from this section.
- Hardware Testing. In this section you can configure the operation of various device components, in simple words, hardware: sound levels of headphones and speakers, setting microphone sensitivity, various camera parameters (photo aspect ratio, adjusting ISO, HDR, focusing and much more), operation of the touchscreen, sensors (calibration right there) and so on. This category is very large and global; you need to understand each section separately and have serious knowledge and skills.
- Location. In this category, you can configure GPS operation, see how many satellites the gadget has picked up, and simply conduct testing.
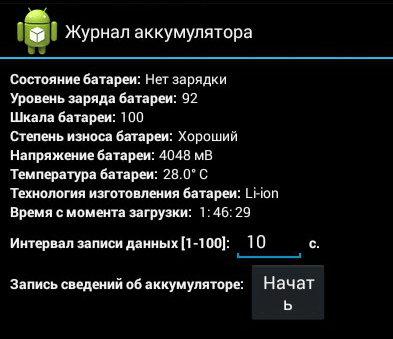
- Log and Debugging. Here logs (logs) of the battery are kept (percentage of charge, voltage, operating time, temperature) and other little-known to a simple user functions.
- Others. Contains two functions also unknown to the average user.
Engineering menu settings
The engineering menu opens up enormous possibilities for customizing the phone; we will consider the most interesting ones in detail.
- SAR Test - level determination harmful radiation from a smartphone or tablet.
- Connections - testing available types wireless connection: Bluetooth, Wi-Fi, WLAN CTIA and FM receiver.

- Audio - adjusts the sound in the speakers, microphone and headphones. How to increase Android volume through the engineering menu, .
- Camera - configure various camera settings.

- Turning on the current camera - the operating current of the camera is displayed (in our tablet it is 2 mA).
- CPU load test ( central processor) - checking the stability of its operation, identifying errors in the operation of the processor-memory channel, testing the cooling system and power supply of the processor.
- Device Manager - Activation automatic registration SMS, configuration parameters management.
- Disable detection - adjust the signal frequency.
- Display - setting the indicator cycle pulse width modulation, which affects the perceived brightness of the screen by quickly turning the backlight on/off; backlight adjustment; controller for vertical and horizontal lines display.

- Wake mode - its activation will not allow the device to “go” into sleep mode.
- IO - management of data input/output operations.
- Memory - detailed information about the RAM module.
- To a certain extent - detailed information about the battery (the strange name of the section is most likely explained by errors in automatic translation titles in the application, but the ability to switch to English language absent).
- SD card test - the name of the tab speaks for itself.
- Touch screen - checking the sensitivity and response of the display when pressed, as well as setting its additional settings.
- USB - testing the operation of the USB port.

- UART/USB switch - switching between two data transfer modes.
- Sensor - calibration (adjusting clarity and sensitivity) touch screen. Standard Methods.
- Location - testing GPS operation and determining the exact location.
- Battery log - detailed information about the battery and the ability to activate the recording of battery consumption information.
- MTKLogger - collection of system logs (MobileLog, ModemLog and NetworkLog).
- Temperature sensor - shows the battery and processor.
- Font parameter - change the font size.
When installing the application, some features may not be available without .
Xiaomi engineering menu
Despite the fact that our test Redmi 2 runs on a Qualcomm Snapdragon 410 processor, it also has the functionality that interests us. To enter it, you need to tap on the “Kernel version” item several times in a row.

The menu is represented by five items:
- Automatic Test. Automatic test of all device parameters.
- Single Item Test. Each of the 25 tests is taken separately. We will talk about this in detail below.
- Test Report. Report on the completed texts and their results.
- SW add HW version. Information about the smartphone version, IMEI and other numbers.
- Device View. Smartphone hardware data.

Of course, the most interesting point is the Single Item Test, where you can take huge amount tests.

Let's make a reservation right away that there was no way to configure anything in the device we tested - only a functionality test. At the end of each procedure, you need to note its status: successful (success) or not (failed).
- Key - functionality of physical buttons. Interestingly, it was not possible to complete it successfully, since when checking the power button, the smartphone turns off.
- Backlight - display brightness.

- TouchPanel. The touch screen test includes two procedures: “Crossed calibration” and “Touch panel calibration”. The first checks so-called “swipes”, the second – single taps on the screen. An easy way to calibrate your display.

- TFlash. Testing a memory card with two results: either everything is fine, or the card is damaged.
- Bluetooth. Searches for available devices.
- SIM Card. Test for the presence of SIM cards.

- Vibration. The gadget vibrates - everything is ok.
- RTC (Real Time Clock) - operation of the built-in clock.
- Speaker. Testing the conversational speaker. We didn’t understand how to get through it. We will be grateful if you can tell us in the comments.
- Receiver. Translated as receiver, receiver, but music plays during testing.
- Headset. Testing the 3.5mm jack to detect headphones, play sounds, and support headset control buttons.

- LED. Notification indicator, everything is obvious here.
- FM (radio). Click Search, and if you hear noise in the headphones, then everything is working properly.
- Camera. Everything is obvious: a test of the main and front optics, as well as the flash.
- Battery. Informative section with information about correct operation USB cable (charging), battery condition, charge level and temperature. Similar data can be obtained more.

- Wi-Fi. Detection of nearby access points. There are no settings.

- Torch (flashlight): shines/does not shine.
- The loopback test includes a test of the spoken microphone. First, click Recording, then Playing.
- LCD. Screen colors.
- GPS. Detection of available satellites.
- Gyro (gyroscope). Three parameters - X, Y, Z - change depending on the position of the device in space.
- G-sensor (Accelerometer). Rotate the gadget in all planes and turn it over. The three parameters should be ok.
- Proximity Sensor. It is usually located near the speaker and is designed to dim the gadget screen during a conversation, thereby eliminating accidental clicks.
- Optical and Magnetic Sensor (optical and magnetic sensors) - points we don’t understand, share your knowledge in the comments.
After passing all tests, you can go to the Test Report section. As you can see, our “animal” is in excellent shape and has passed all the tests, which is very pleasing.

Conclusions
Above we have listed the main sections of the engineering menu available on the tested devices. Now let’s summarize what features the user gets during installation:
- Formatting, restoring to factory settings.
- Testing work individual elements smartphone or tablet, e.g. sensors, sensitivity touch display and calibration accuracy.
- Detailed information about the device and its parts. For example, you can track battery consumption since the last charge and view statistics on the programs used.
- Energy optimization. Alternatively, unnecessary frequency ranges are turned off. In Russia, the standard indicators for working in 2G and 3G networks are 900 and 1800 MHz, while in the USA they are 850 and 1900 MHz.
Using the engineering menu, the user can carry out advanced configuration of the device. This feature is little known, so you should look at all the ways to access it.
The ability to open the engineering menu is not available on all devices. On some of them it is absent altogether or replaced by a developer mode. There are several ways to access the features you need.
Method 1: Entering the code
First of all, you should consider devices that have this function. To access it, you must enter a special code (depending on the manufacturer).
Attention! This method is not suitable for most tablets due to the lack of a dialing function.To use the feature, open the number entry app and find the code for your device from the list:
- Samsung – *#*#4636#*#*, *#*#8255#*#*, *#*#197328640#*#*
- HTC – *#*#3424#*#*, *#*#4636#*#*, *#*#8255#*#*
- Sony – *#*#7378423#*#*, *#*#3646633#*#*, *#*#3649547#*#*
- Huawei – *#*#2846579#*#*, *#*#2846579159#*#*
- MTK – *#*#54298#*#*, *#*#3646633#*#*
- Fly, Alcatel, Texet – *#*#3646633#*#*
- Philips - *#*#3338613#*#*, *#*#13411#*#*
- ZTE, Motorola - *#*#4636#*#*
- Prestigio - *#*#3646633#*#*
- LG - 3845#*855#
- Devices with MediaTek processor - *#*#54298#*#*, *#*#3646633#*#*
- Acer - *#*#2237332846633#*#*

This list does not represent all devices available on the market. If your smartphone is not there, consider the following methods.
Method 2: Specialized programs
This option is most relevant for tablets because it does not require entering a code. Can also be used for smartphones if entering the code does not produce results.
To use this method, the user will need to open " Play Market " and in the search window enter the query " Engineering menu" Based on the results, select one of the presented applications.

An overview of several of them is presented below:
The application is designed to launch the engineering menu on devices with a MediaTek (MTK) processor. In number available functions includes management of advanced processor settings and directly Android systems. You can use the program if it is not possible to enter the code every time you open this menu. In other situations, it is better to opt for special code, since the program can give extra load on the device and slow it down.

The program is suitable for most devices with Android OS. However, instead of the standard engineering menu, the user will have access to advanced settings and codes for already installed applications. This can be a good alternative to engineering mode, since the chance of harming the device is much lower. The program can also be installed on devices for which it is not suitable standard codes opening the engineering menu.

When working with any of these applications, you should be as careful as possible, since careless actions can harm the device and turn it into a “brick”. Before installing a program that is not listed, read the comments for it to avoid possible problems.
Method 3: Developer Mode
On a large number of devices, instead of the engineering menu, you can use the developer mode. The latter also has a set of advanced features, but they differ from those offered in engineering mode. This is due to the fact that when working with engineering mode There is a high risk of problems with the device, especially for inexperienced users. In developer mode this risk is minimized.
To activate this mode, do the following:
1. Open your device settings via top menu or application icon.

2. Scroll down the menu, find the section " About the phone" and run it.

3. You will be presented with the basic data of the device. Scroll down to " Build number».

4. Click on it several times (5-7 taps, depending on the device) until a notification appears saying that you have become a developer.
5. After this, return to the settings menu. A new item will appear in it: “ For developers", which you need to open.

6. Make sure it is turned on (there is a corresponding switch at the top). After this, you can start working with the available functions.

Developer menu includes large number available functions, which include creating backup copies and USB debugging capability. Many of them can be useful, however, before using one of them, make sure that it is necessary.
Users of mobile devices often confuse the Android engineering menu with the developer menu, although the vast majority of users know nothing and are not even aware of its existence.
But those who don’t chase new products and don’t buy every time a new one appears Android versions, also dream of expanding the capabilities of their device.
To solve the problem, you can go in several ways:
Contents:
How to log in
The most common calling option on an Android device is to enter a combination "*#*#3646633#*#*".
Attention! There are a couple of nuances here:
- firstly, after entering the combination, you do not need to press the call button, a couple of seconds after entering last character asterisks, the required interface will appear on the smartphone screen;
- The method is applicable to most, but not all devices and firmware versions, especially to Chinese devices;
- appearance and the functions provided on different devices may differ (number of categories, names, differences in versions, etc.).
On other models you should try entering *#*#4636#*#* or *#15963#* . Combinations for mobile devices from the most popular manufacturers are shown in the table below.
| Samsung | [*#*#4636#*#*] [*#*#8255#*#*] |
| LG | [*#546368#*818#] |
| Sony | [*#*#7378423#*#*] |
| Huawei | [*#*#2846579#*#*] [*#*#2846579159#*#*] |
| Acer | [*#*#2237332846633#*#*] |
| HTC | [*#*#3424#*#*] [*#*#4636#*#*] [*#*#8255#*#*] |
| Fly Philips Alcatel | [*#*#3646633#*#*] |
If you can't call
It is very rare, but it may be that none of the above combinations resulted in the required window being called. In this case, download the Mobileuncle MTK Tools application (removed from).
It works similarly to the methods described above, with the difference that the commands for entering codes are sent to the mobile operating system automatically, determining its version and gadget model after calling the “Engineer Mode” command.
It is strongly recommended before using the program, it is not for nothing that it has been removed from the application store - many dozens of users have “killed” the firmware of their devices due to inept and careless handling of the software.
In addition to calling options, the program allows you to:
Composition of the extended interface
Engineer Mode for the user is presented in the form of a multi-tab window, where each tab contains certain types of functions.
Telephony
The first tab contains functions to perform general settings phone: testing the network and obtaining information about the used network technologies, changing GPRS parameters, configuring the camera and a lot of sub-items that are incomprehensible to a beginner.

Connectivity
Responsible for changing parameters and displaying information about ports for communication:
You can request comprehensive information about each module, test its operation, change the configuration and look through the logs.

Hardware Testing
The title of the section indicates that there are tools for working with hardware: testing it, extracting any information about hardware components, changing their operating modes.
On Android it supports more than a dozen audio playback modes for various conditions( , call, ).
As for the camera, a huge range of parameters is available here, which includes changing preview videos and specifying the default video frame rate and many other items.
To check stability and through it, you can run a processor stress test.
Changing its voltage and operating frequency in order to overclock or save the battery should be done with extreme caution and being aware of the possible risks.

The processor has the option of putting it into sleep mode under certain conditions, as well as turning off the display.
Engineer Mode also contains a huge number of items for retrieving information and debugging the operation of the processor, touch display, and sensors.
There are functions for stopping and changing the operating mode.
Location
For those who like to use GPS capabilities, who sometimes lack its settings, there is an abundance of items available in this tab.

Log & Debugging
Logs and files with information about modes for battery, memory and a large number settings for exclusion unnecessary information from logs, changing their storage directory.

Other
Last tab collected in itself everything that had no place in the previous ones. This includes (changing font size, size) and several functions that are inaccessible without root privileges.