How to open img firmware file. Editing Android firmware using Samsung Root Firmware Replacer
The main purpose of any phone is to communicate with another person. If during a conversation the interlocutor is hard to hear or the speech is cut off and interference appears, then, accordingly, the usefulness of such a conversational device sharply tends to zero.
On modern mobile devices, in addition to communication, there are many other functions. So with their help you can listen to music, watch movies, play games, and use various applications. All this entertainment will be less interesting without accompanying audio effects.
Let's try to figure out why the sound on the phone doesn't work? What can cause this type of malfunction and how can it be eliminated? Although all mobile phones have their own device, common signs of problems are observed in all models.
Signs of missing or unstable sound
Let's look at the main signs by which we can say that the audio signal has disappeared on the mobile phone.
- the first sign can undoubtedly be called the complete absence of any sound signals;
- during a conversation you can hear extraneous noises or creaks coming from the speaker;
- the interlocutor’s voice periodically rises, falls or is interrupted;
- melodies are not produced or their sound changes, crackling sounds are heard.
If the signs are not so obvious or occur periodically, this may mean either an accidental failure or the beginning of the speakers or other parts of the cellular device to fail.
Let's check
To figure out why the sound on your phone doesn’t work, you don’t have to immediately run to the service center. Perhaps the cause of the problem is trivial. To do this, you should first check the external regulators or check the settings in the mobile phone menu.
Both operations will not take much of your time. Although each mobile has its own design features, all of them have an external volume control and menu subsections responsible for audio.
Video: Setting up sound through the engineering menu
Volume control
The first thing you should do if you have a problem with poor sound on your mobile device is to check the regulator.
It is usually located on the right side of the mobile phone body. There may be several types:
- in the form of a solid button. The sound is adjusted depending on the pressing of a certain end. On the one hand it decreases, on the other it increases;
- in the form of separate buttons with plus or minus icons.
Make sure the slider is set to the correct level. Move it if necessary. If the problem was in the regulator, then the adjustment should fix it.

In the normal state, the audibility of the bell and system commands changes. In order to increase the voice of the interlocutor during a conversation, you need to make adjustments precisely at the time of the conversation or during a call.
To increase the sound when playing video or music, as well as in games and applications, adjustments should be made specifically with open multimedia files.
Volume in the setup menu
If external adjustment does not bring results, it is quite possible that the reason lies in the system settings.
To check you need to do several steps:
- go to the “Menu” section on your device;
- in the window that opens, find the “Sound” subsection;
- On the “Volume” tab, move the slider in the desired direction.
By these actions we will increase the overall audibility of the phone. Like the external control, the sound settings can be divided into separate parameters: for multimedia, for conversations. Depending on the symptoms of the problem, make the necessary settings.
The reason for the silent sound may also be one of the modes of your device. There are “silent”, “quiet”, “on the plane” and others. Accordingly, if you replace one of these modes with a simple one, the problem may be resolved.
Main causes and solutions
If checking the regulators and system settings does not eliminate the problem, then the reason lies elsewhere. This could be either software failures or mechanical damage or a breakdown of one of the device parts.
Accordingly, depending on the type of malfunction, there is a method for eliminating it. In some cases, you can do it on your own and with minor manipulations, and sometimes you can’t do it without the help of a specialist.

In any case, first of all you should find the original source of the breakdown and only then decide how to fix it and whether it would be advisable to do so.
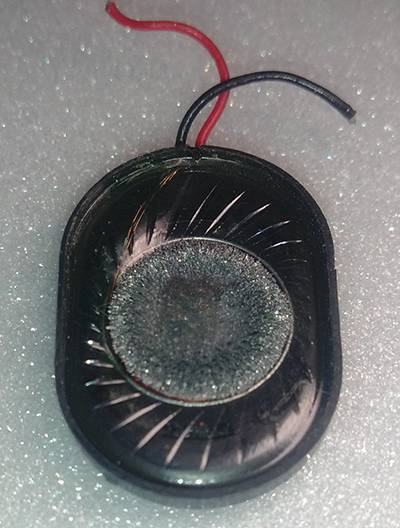
The speaker is broken
One of the reasons for the loss of any audio signals is a broken speaker. This is a serious malfunction and in most cases can only be solved by replacing the part.
It should be said that modern mobile devices have 2 or even more speakers. Usually one is responsible for music, games, applications, the second is responsible for conversations.

If sound is not produced from any of them, then most likely the problem lies in other causes.
One of the easiest ways to check whether the speaker is broken is to switch the conversation to the loudspeaker. If the interlocutor can be clearly heard, it means that a breakdown has been detected.
- Types of breakdowns and ways to solve them.
One of the reasons for the deterioration of audibility from the speaker may be its clogging. The sound in such cases decreases, but does not disappear completely. You can try to clean the speaker using a thin needle, a cotton swab or a toothbrush. This is best done with compressed air;
- Important! The main thing is not to overdo it and not damage the membrane during cleaning.
- There is a short circuit in the speaker coil or it is burnt. It is difficult to hear a person or sometimes crackles. Solved by installing a new spare part;
there is a break in the coil. The sound disappears completely. It can only be fixed by replacing the component.
Important! In cases of decreased audibility in a mobile device, problems with the speaker occur in 80% of cases.
Audio amplification circuit malfunction

It often happens that a mobile device's audio amplification circuit fails. In such cases, when adding or decreasing the volume, audibility will not change. It is quite difficult to fix this problem yourself. It is best to contact a service center, where they will carry out diagnostics and replace the amplification circuit.
- Reasons why the amplification circuit may burn out:
- mechanical damage;
- when the mobile phone is operating in a heavily overloaded mode and its temperature has risen significantly;
- liquid ingress;
factory malfunction of the amplification circuit.
Broken cable
One of the most common breakdowns is the failure of the cable. Most often, such a malfunction occurs in sliders and clamshells. Since every time you open the device, the cable itself moves, which leads to rubbing of the contacts.
The main symptoms are loss of audio signals and failure of volume controls. When replacing the part, all problems should disappear.

In addition to chafing of the cable connection, physical damage or moisture on the contacts can also cause its malfunction.
The number of useful applications for mobile phones is increasing every day. Unfortunately, not all of them undergo a sufficient level of testing for compatibility with various models of mobile devices. Not to mention obviously harmful programs.

Some software glitches can be simply fixed by uninstalling the installed application. Some require a factory reset. More complex conflicts that started a chain of failures will require reflashing your cellular device.
Mechanical damage
Happen quite often. Not every device can withstand being dropped or hit by a heavy object.
Mechanical damage can be divided into three groups::
- external faults. If dropped, the speaker or volume control may be damaged. In this case, the visible faulty part should be replaced;
- damage to microcircuits. After an impact, both the cable and the sound card or other fragile elements of the device may fail, the defects of which are visually impossible to see without opening it. You need to disassemble and then understand which element is damaged and, if possible, repair or replace it;
- cracks in the main board. The worst of the options. Depending on the model of the device, it may be more advisable to buy a new mobile phone than to have it repaired.
Pollution
If dust or small debris gets on the phone contacts, the boards or parts may burn out. An easier option is to contaminate the external parts. This could be the speaker grid, by cleaning which you can remove the negative effect.
It is better to do cleaning with special devices and tools, or even better to entrust this task to professionals.
Moisture has entered
Rain, snow, dew or any other liquid that gets on your mobile phone is unlikely to prolong its life. This also applies to any parts of the device responsible for playing audio signals. Excess moisture can cause any components to burn out or contacts to oxidize, which will ultimately lead to loss of voice or music
If you manage to notice the problem in time, the consequences can be minimized. You should turn off the phone, carefully disassemble it and leave it to dry.

Losing sound on your phone is of course an unpleasant situation, but in no case should you panic. Perform an initial check of the volume controls and settings in the menu.
Then check various programs and applications that may be muting the volume or causing a crash.
>If the malfunction lies inside the device, then it is better to turn to professionals who will carry out comprehensive diagnostics and return your mobile device to working order without any problems.
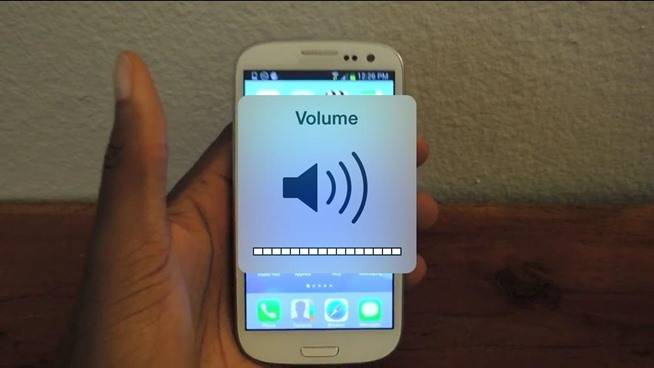
On Android there is usually more than one volume control. You can adjust the volume of ringtone, media, alarm and notifications separately.
Often the phone on one of these controls is set too quietly or is completely turned off. But this is not immediately noticeable, because the notification panel only shows one icon.
Android Volume Controls
If you need to change the volume of media files such as games or music, play any music while pressing the volume keys on your smartphone. This also works with videos or games.
Additionally, you can find detailed settings in Alerts by first opening Settings and then selecting Alerts itself. Make sure none of the volume controls are turned all the way to the left.
 If your phone's volume settings are set normally, check whether there should be any sound at all in your particular case. Sometimes, for example, a game's audio track was muted by mistake because many apps have their own volume settings and may be muted by default.
 Sound rocker on a smartphone
The lack of sound could also be caused by a bug in Android itself. Restart your smartphone - in many cases this will solve the problem. If this doesn't work, you can also restart the machine for a test with headphones connected.
Recently installed applications can also cause the error. Therefore, uninstall those programs that were installed since the problem occurred, and then restart your smartphone.
In rare cases, Android may not be able to switch between headphone output and speaker output correctly. To fix the problem, play a long audio file and connect your headphones to your smartphone while playing. Wait a minute and disconnect the headphones.
Make sure your smartphone has the latest version of Android and check for any updates.
If the sound is still not working, the last solution is to reset your smartphone to factory settings. Be sure to back up all important files first.
If your phone still has no sound, the problem may be with the hardware itself. You can fix this by sending your smartphone to the manufacturer or workshop for repair and service.
Reset your Android phone
As mentioned, before you reset everything, we recommend backing up all the data on your device. If you saved your contacts in your Google account, they will be automatically copied to your device the next time you set up. If this is not the case, use a third-party application such as G Cloud Backup. You can use the SMS Backup+ app to create SMS and email backups. You can save images and videos by simply copying them to your computer. To do this, connect your smartphone to your PC and copy the necessary files to your computer’s hard drive.
All data synced with Google, such as your emails or calendar entries, can be saved in this account. You can manually create a backup through “Settings” → “Accounts” → “Google”. Now go to your account and click on the menu symbol. Click on "Synchronization".
Once you have backed up all your data, you can “roll back” your smartphone back to factory settings. Again, your data will be lost during this process, so double-check that you have made copies of all necessary information.
Go to settings and open the “Backup and reset” menu item. Scroll to the bottom of the list that opens and click on the “Reset settings” item (the name of this item may look different on different smartphones: “Reset phone settings”, “Master reset”, “Erase all data”, etc.) Confirm Perform a reset operation by selecting “Erase everything”.
If your smartphone has an SD card and you want to format it, connect the device to your computer so that the card is recognized as a removable drive. Right-click on it and go to formatting. Uncheck the Quick Format option and start the process.
Once you have completed these steps, you can configure your smartphone again. Any saved backups, such as contact data, will be restored. You will also be able to reinstall all the necessary applications, return all saved data and thus restore the functionality of your smartphone.
If the volume provided by the device is not enough for you, you can stream the sound through Bluetooth speakers.
Smartphones and tablets running an operating system, at this stage of development of technology and wireless networks, are primarily multimedia devices. Millions of users around the world use their mobile gadgets to watch videos, listen to music and communicate on social networks and instant messengers. However, a situation may arise when you have no sound when watching videos or movies. We will tell you what this problem may be related to and how to solve it.
Make sure the problem is in the video
Before starting any manipulations, you should find out whether the problem is only the lack of sound in the video or there is no sound at all. Try turning on music or going into settings and playing system sounds. You may have just accidentally set it to silent mode or lowered the volume to minimum. If there is no sound everywhere (it is not in music, settings, video), then it is likely that the problem lies in the dynamics of the smartphone.
Lack of required codecs
Just like on a computer, programs for viewing video files on Android require special codecs for correct audio processing. You can try installing free codec packs from the official Google Play app store.

Lack of AC3 codec
From personal experience I can say that most often there is no sound in large .mkv files in which the sound is encoded in AC3 format. The easiest and fastest way to solve this problem is to install the program. When playing a video file in this player, there is almost always sound.
If all of the above methods did not help and there is no sound in the video, then you can proceed to drastic methods - resetting the settings and flashing the smartphone. However, before doing this, we strongly recommend checking whether the audio track is present in your video; try playing it on your computer.
MTwinTools is a utility that allows you to work with firmware files and images boot.img, recovery.img and system.img. The author of the utility is vin2809 from the 4pda forum. MTwinTool will be useful to owners of Huawei smartphones based on MTK processors.
User's Guide for working with MTwinTools
1. Introduction.
1.1. Purpose.
The MTwinTools tool is intended for disassembling/assembling images of devices based on MT chips.
It is built for use on the command line based on the RKwinTools tool, designed to work with devices on RK29xx-RK31xx chips, and some freely distributed programs.
It only works under Windows 7 and higher without installing CYGWIN, and also does not require any additional entries of paths in OS environment variables.
The tool allows you to:
- unpack and pack the Boot.img image;
- unpack and pack the Recovery.img image;
- unpack and pack the Kernel.img image;
- unpack and pack the System.img image, both yaffs type and ext2-ext4;
- convert a sparse file of type sparse into an image of type ext4;
- calculate the checksum of a file in md5 format;
- initiate SuperUser.
1.2. Installing MTwinTools.
Installation of the tool is carried out by unpacking the archive in any place convenient for you. This will create an MTwinTools folder containing:
- folders _In/, App/ and Cygwin/;
- as well as Readme.txt and menu.bat files.
The _In folder is empty and is intended to contain source images for processing. The App/ folder contains a set of command files that process images. The Cygwin/ folder contains freely redistributable utility libraries and files. The Readme.txt file contains user instructions, i.e. the text you are currently reading. The menu.bat file is used to create the menu for the MTwinTools tool.
ATTENTION. There is NO REQUIRED for specifying access paths to service files in Windows OS environment variables.
As you work, other necessary folders will appear:
- Pack, which will contain the Boot, Recovery and System files after
packages, an md5 folder containing files with a checksum, as well as a folder
Firmware, in the Image subfolder of which the assembled Boot files will be located,
Recovery and System; - Unpack, in which Boot, Recovery and System files are COMPLETELY unpacked
will be located in the Firmware folder, in the Image subfolder.
1.3. Uninstalling MTwinTools.
The tool is uninstalled by deleting the root folder of the tool, i.e. MTwinTools folders.
2. Basic rules of work.
2.1.To get started, you need to run the menu.bat file, which will launch the tool’s menu.
2.2.Images intended for unpacking must be placed in the _In folder of the tool. The names of the input files MUST contain keywords and can have names like the following:
- *boot*.img;
- *recovery*.img;
- *kernel*.img;
- *system*.img.
2.3.When starting for the first time, initialize the tool. When the tool is initialized, ALL files located in the _In folder will be copied to the working input folder Unpack/Firmware/Image. This is done in order to preserve the original files.
2.4.After disassembling the image, its contents will be placed in the Unpack folder, in which the following folder structure will be created:
Boot(Recovery)/cfg/
kernel/
ramdisk/
The cfg/ folder will contain the image settings, in the kernel folder you will find the kernel, i.e. zImage binary file, and the ramdisk folder will contain everything else. To assemble the image, its component parts, i.e. Place ramdisk, kernel, and possibly settings in the appropriate folders in Unpack. The created image will be located in the Pack output folder.
3. Description of the product.
3.1. Main command menu.
The main menu of tool commands looks like this:
**************************
* MTwinTools_V_0.6 *
**************************
*Image commands:*
* ————— *
*1-Boot*
*2-Recovery*
*3-Kernel*
*4-System*
*5-Other commands*
* *
**************************
* Tools commands: *
* ————— *
*6-Init Tools*
*7-Clean*
* *
**************************
*8-Exit*
**************************
Please choose command:
A command is selected by entering the number indicated in front of it. In the current version you can do the following:
— go to the Boot image processing menu by typing the number “1”;
— go to the Recovery image processing menu — “2”;
— go to the Kernel image processing menu — “3”;
— go to the System image processing menu — “4”;
— go to the menu of other commands — “5”;
— initialize the working area of the tool — “6”;
— clean the working area of the product — “7”;
— complete the work, i.e. exit the facility - “8”.
3.2. Boot menu.
To proceed to processing the Boot image, run the “1-Boot” command. This will take you to the “Boot commands” menu.
The Boot image processing menu looks like this:
**************************
* Boot commands: *
* ————— *
*1-Boot unpack*
*2-Boot pack*
* *
**************************
*3-Return*
**************************
Please choose command:
Command “1” unpacks Boot images, command “2” packs Boot images. The command “3” returns to the main menu of the tool.
2.2.1. Disassembling the boot.img image.
2.2.2. Build the boot.img image.
When building the boot image, a menu for selecting a data source will appear.
**************************
* Choice source image: *
* 1. Unpack dir *
* 2. Pack dir *
*3.Return*
**************************
Please choose source:
You have the opportunity to build an image from an unpacked image located in the Unpack/Boot folder; to do this, select the menu item “1. Unpack dir." If you select the menu item “2. Pack dir", then the image will be created from the data located in the Pack/boot folder. To cancel the operation, select the menu item “3. Return". At the same time you
return to the “Boot commands” menu.
3.3. Recovery menu.
To proceed to processing the Recovery image, run the “2-Recovery” command. This will take you to the “Recovery commands” menu. The Recovery image processing menu looks like this:
**************************
* Recovery commands: *
* —————— *
* 1-Recovery unpack *
* 2-Recovery pack *
* *
**************************
*3-Return*
**************************
Please choose command:
Command “1” unpacks Recovery images, command “2” packs Recovery images. The command “3” returns to the main menu of the tool.
2.3.1. Disassembling the recovery.img image.
All actions are performed automatically, i.e. There is nothing to describe here without your participation.
2.3.2. Build the recovery.img image.
When building the recovery image, a menu for selecting a data source will appear.
**************************
* Choice source image: *
* 1. Unpack dir *
* 2. Pack dir *
*3.Return*
**************************
Please choose source:
You have the opportunity to build an image from an unpacked image located in the Unpack/recovery folder; to do this, select the menu item “1. Unpack dir." If you select the menu item “2. Pack dir", then the image will be created from the data located in the Pack/recovery folder.
To cancel the operation, select the menu item “3. Return". This will return you to the “Recovery commands” menu.
3.4. Kernel menu.
To proceed to processing the Kernel image, run the “3-Kernel” command. This will take you to the “Kernel commands” menu.
The Kernel image processing menu looks like this:
**************************
* Kernel commands: *
* —————— *
* 1-Kernel unpack *
*2-Kernel pack*
* *
**************************
*3-Return*
**************************
Please choose command:
Command “1” unpacks Kernel images, command “2” packs Kernel images. The command “3” returns to the main menu of the tool.
3.4.1. Disassembling the kernel.img image.
All actions are performed automatically, i.e. There is nothing to describe here without your participation.
3.4.2. Building the kernel.img image.
When building the kernel image, a menu for selecting a data source will appear.
**************************
* Choice source image: *
* 1. Unpack dir *
* 2. Pack dir *
*3.Return*
**************************
Please choose source:
You have the opportunity to build an image from an unpacked image located in the Unpack/Kernel folder; to do this, select the menu item “1. Unpack dir." If you select the menu item “2. Pack dir", then the image will be created from the data located in the Pack/Kernel folder.
To cancel the operation, select the menu item “3. Return". This will return you to the “Kernel commands” menu.
3.5. Menu System.
To proceed to processing the System image, run the “3-System” command. This will take you to the “System commands” menu.
The System image processing menu looks like this:
* System commands: *
* ——————————————— *
* 1-pack yaffs * 2-pack yaffs *
* 3-unpack ext3 * 4-pack ext3 *
* 5-unpack ext4 * 6-pack ext4 *
* 7-sparse to ext4 * *
* * *
***************************************************
*8-Return*
***************************************************
Please choose command:
3.5.1. Disassembling a system image like yaffs.
The “1” command unpacks System images of the yaffs type into the Unpack/System folder.
3.5.2. Building a system image like yaffs.
Command “2” packs System images of the yaffs type. A menu for selecting a data source will appear.
**************************
* Choice source image: *
* 1. Unpack dir *
* 2. Pack dir *
*3.Return*
**************************
Please choose source:
You have the opportunity to build an image from an unpacked image located in the Unpack/system folder; to do this, select the menu item “1. Unpack dir." If you select the menu item “2. Pack dir", then the image will be created from the data located in the Pack/system folder.
To cancel the operation, select the menu item “3. Return” and you will return to the previous “System commands” menu.
3.5.3. Disassembling the ext3 type system image.
Command “3” unpacks System images of type ext2-ext3 into the Unpack/System folder.
3.5.4. Building a system image of ext3 type.
Command “4” builds the System image of type ext2-ext3. Packing is carried out similarly to clause 3.5.2. only the output image will be of type ext3.
3.5.5. Disassembling the ext4 type system image.
The “5” command unpacks ext4 System images into the Unpack/System folder.
3.5.6. Building a system image of ext4 type.
Command “6” builds the System image of ext4 type. Packing is carried out similarly to clause 3.5.2. only the output image will be of type ext4.
3.5.7. Convert sparse compressed image to ext4.
The “7” command converts (converts or transcodes) compressed images of the sparse type into images of the ext4 type (analogous to the simg2img operation).
3.5.8.Return to the main menu.
The command “8” returns to the main menu of the tool.
3.6. Menu of other commands.
To move on to executing other commands, execute the “5-Other commands” command. This will take you to the “Others commands” menu. The menu for executing other commands looks like this:
**************************
* Other commands: *
* —————- *
*1-Init SuperUser*
* 2-Calculate md5 *
* *
**************************
*3-Return*
**************************
Please choose command:
Command “1” initializes SuperUser in the System image, command “2” calculates the file checksum. The command “3” returns to the main menu of the tool.
3.6.1. Initializing SuperUser.
When initializing SuperUser, a source selection menu will appear:
**************************
* Choice source init: *
* 1. Unpack dir *
* 2. Pack dir *
*3.Return*
**************************
Please choose source:
You have the opportunity to initialize the unpacked image located in the Unpack/system folder; to do this, select the menu item “1. Unpack dir." If you select the menu item “2. Pack dir", then the image located in the Pack/system folder will be initialized. To cancel the operation, select the menu item “3. Return".
Initialization is done by copying the necessary files (su and SuperSU.apk) into the disassembled System.img image. To obtain Root access you need:
— unpack the System image using command “3” of the main menu
tools or place the unpacked image in the Unpack (or Pack)/System/ folder;
— execute the command “1-init SuperUser” in the “Others commands” menu.
After flashing the System.img image, you will have Root access on your device. If files of a different version are used to obtain Root access on your device, then you just need to update (replace) the su and SuperSU.apk files in the App/ folder.
3.6.2. Checksum calculation.
To calculate the checksum of a file or files, place them in the Pack/md5/ folder. After executing the “2-Calculate md5” command, a checksum calculated using the md5 algorithm will be added to all files located in the Pack/md5 folder. Only files without extension or with extension .img, .tar, .zip are processed.
3.7. Initialization.
To carry out initialization, run the “6-init Tools” command. This will create all the necessary folder structures for MTwinTools to work and copy the input images to the working folder Unpack/Firmware/Image.
3.8. Cleaning the product.
To clear the work area, type “7-CLEAN”. In this case, ALL additional folders along with their contents will be deleted, MTwinTools will complete its work and take the form it had immediately after installation.
3.9. Exit.
To exit, dial “8-Exit”. In this case, ONLY the product will come out without any cleaning.
For those who want to start the journey of creating their own firmware for Sony based on official ones, you need to know how to unpack Sony firmware in FTF format.
What is necessary?
1. Computer
2. Download the latest version not an official flasher FlashTool and install
3. Download Unix image manager ext2explore.exe
3. Download and install the free 7-zip archiver
4. Sony firmware in FTF format
Instructions on how to unpack Sony firmware in FTF format
1. Right-click on the FTF firmware - open the archive or unpack from the archive
2. After installing FlashTool, go to the path C:Flashtool  3. Launch the FlashTool program and select the menu in the panel Tools -> Sin Editor
4. Select the sin file extracted from the ftf firmware in the Sin Editor and click Extract data. After this, the process of converting the firmware file into readable form will begin.  5. As a result, you can get a new file with the extension yassf2 or ext4 or elf
If the file *. yassf2
Select Tools -> Yaffs2, after which a window will appear to select a file, select a file with the extension *.yasff2

In a couple of minutes you will receive a folder with files that were in the firmware

If the file is *.ext4 or *.elf
1. If you have a file with the extension *.elf, then rename it to *.ext4
2. Run the previously downloaded ext2explore program, select the firmware file, after which the contents of the firmware will appear in the window, now you can save the contents. 
What's next?
If you plan to create a flashable update.zip in the future, then you should go to the article - creating an Updater Script
How to correctly extract the kernel from FTF firmware?
In order to get the “correct” kernel for flashing using update.zip, you will need the same Flashtool.
1. Open the FTF firmware with an archiver and extract kernel.sin 