How to delete old Windows files. How to delete the windows old folder (old Windows)
Quite recently, when a new version of the OS and a system update first appeared, many people became interested in the question of how to remove old windows in Windows 10, and today we will talk about all the ways to delete an archive folder.
Windows.Old is a storage of components and files of the “previous” previously installed system. This folder is created when installing the system on the same partition where the operating system was previously installed or when updating to a new build. Also, this is a backup copy of the data necessary to return to a previous version of Windows (in case of an update) or restore personal files when reinstalling the system on the same partition.
Unfortunately, it is not possible to restore applications in case of reinstallation (by standard methods). Basically, personal data will be stored here (Users folders, respectively Downloads, Documents, Photos, desktop, etc.), application settings (*Outlook pst files, saved games, application configurations), application data (databases) .
The folder is stored from 10 to 28 days, depending on the actions performed.
- 10 days – update of the “tens” to the new build (1511->1607, 1607->1703). This period is necessary for a painless return to the previous version of the system.
As part of the cleanup, these applications may delete or clear the Windows.Old folder, making it difficult or impossible to return to a previous version of the operating system.
- 28 days – this period is provided after an update (7 -> 8; 8.1 -> 10, etc.), as well as in case of reinstallation to the same partition (where the OS was previously installed or there was a system folder with files).
If all files have been transferred or the OS update was successful, and this folder is simply in the way and takes up free space on the disk, then use the following recommendations to delete it:
- Uninstalling via the Options window
- Removing via Disk Cleanup
- Uninstall via Command Line
Uninstalling via the Options window
To clear your disk of an unwanted folder through the Options menu, follow these steps:
Removing via Disk Cleanup
Also, cleaning the disk can help you, to do this you should follow these steps:

Uninstall via command line
If the above methods did not help, then we will delete it through the command line window:
Call window Command line by entering cmd in the search or Command line, run the application as Administrator and enter the following commands one by one:

- takeown /F C:\Windows.old\* /R /A
A lengthy redefinition of rights to the contents of the folder will take place. You will be asked to confirm your actions by pressing the Y key. - cacls C:\Windows.old\*.* /T /grant Administrators:F
You will be asked to confirm your actions by pressing the Y key. - rmdir /S /Q C:\Windows.old\
Removing the Windows.Old folder

Windows.Old can store both personal data from past Windows installations and can store a “backup” copy of the operating system so that it can be returned to a working state in case of an update error or unforeseen situations, such as turning off the lights. If you are sure that you will no longer need this folder, then feel free to delete it, according to the instructions that were described in this article.
Although the Windows operating systems are incredibly popular, they still cannot boast of long-term stable operation. So, in some cases, the need to reinstall occurs several times a month - it all depends on the programs the user is working with.
In light of this, it is not surprising that many are interested in the question of how to remove old Windows. The fact is that installing a new system on top of an existing old one is highly not recommended, since this rarely eliminates software errors and failures; rather, it adds new ones. Starting with the Vista operating system, Microsoft developers took into account the wishes of users and added a special feature to the installer, which made it much easier to figure out how to remove old Windows.
Advanced installation mechanism
Before we tell you how to uninstall old Windows, let's analyze the behavior of the installer on Win XP (and earlier) and Vista (and later) systems.

When installing old systems on a hard disk partition where a copy of the system was already present, the installer prompted the user to make a choice - erase the existing Windows folder or start installation in a directory with a non-standard name. In both the first and second cases, all data from the “Documents” section, “Desktop” and other key folders were lost. I had to learn how to remove the old Windows while keeping the files I needed. With the advent of Vista, the situation changed: the installer, having discovered a copy of the system, renamed it to Windows.Old and moved all related folders there. The significance of this small innovation for end users cannot be overestimated - it is revolutionary.
How to remove the old oneWindows 7
Depending on the system being installed, the preparation also changes. Let's consider a more complex option, when Win XP is installed on the hard drive. The easiest way to save any files from your previous system is to prepare media with a bootable version of the LiveCD.

There are quite a lot of these solutions, so there shouldn’t be any problems with choosing. You should download a LiveCD from the Internet. According to the instructions provided with it, write it to a disk/flash drive. Then boot into this mini-system and copy the necessary data. The next step is to delete the Windows, Program Files folders. If we are talking about Win 7, then you can also erase ProgramData, Users. All that remains is to reboot and start the installation. If you are installing a new version of the system, you will not need a LiveCD: after the installation is complete, there will be a Windows.Old directory on the disk, where all system data will be transferred. What you need from here must be copied, and what is unnecessary must be erased. Removing remnants of the previous system can be done through the "Disk Cleanup" function in the "Start" - "Accessories" - "System Tools" menu, indicating "Previous installations" in the list. Sometimes people who want to use the system for free are wondering how to remove the old Windows 7 activator. To do this, you need to re-run this program and select the uninstall option. Another method that is no less effective is to install a new solution simply on top of the old one. All key links will be automatically overwritten.
Sometimes users install a new Windows 7, but forget to remove the old one. There is nothing critical about this, but old Windows takes up a lot of space. This article contains information on how to remove old Windows 7.
There are several ways to remove old Windows:
1. Removing old Windows using Disk Cleanup
You need to run Disk Cleanup. You can find it through "Start". Click “All Programs”, then “Accessories”, then “Utilities” and find the required component in the list.

It is the “Previous Windows installations” item that we need. Select the checkbox if it is not there and click OK. When asked about permanent deletion, answer “Delete files.” After some time, the old Windows 7 files will be deleted.
2. Removing old Windows without programs
If for some reason the program cannot be found or there are problems with it, you can remove it from Windows manually. To do this, find the folder Windows.old and set the rights necessary for deletion.
Go to the folder properties (RMB - Properties) and go to the "Security" tab

Click on "Advanced". On the "Owner" tab, select the current user and check the "Replace owner of subcontainers and objects" checkbox and click "Apply".

Now on the “Permissions” tab, select the account that you made the owner of the folder and change it (the “Change” button)
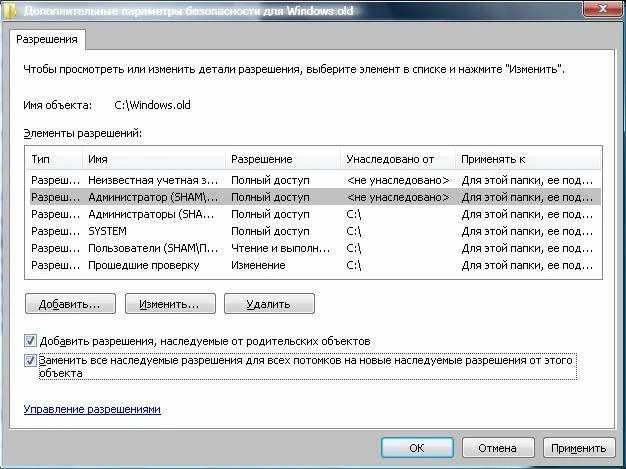
A window appears with Permission element, where we put a check mark where highlighted in the screenshot below. Then click OK and with a safety warning.

After the manipulations have been done, it will be possible to delete the Windows.old folder without difficulty and the question of how to remove old Windows 7 is resolved.
3. Removing old Windows by formatting the disk
This method is more drastic, but as they say, “fail-safe.” The bottom line is that you need to boot from the installation disk or flash drive and start installing clean Windows. At the time of selecting a disk, you will need to delete all partitions, partition the hard drive again and format all partitions. This way we get a clean system, without any signs of old operating systems.
Attention! This method will delete all data that is on the computer, so it is recommended if you don’t mind it.
This article will talk about removing Windows.old in Windows 10 and below. Typically, after updating the operating system, an additional folder called Windows.old is created in the root directory of drive C:, containing data about the previous release of the operating system. Over time, when the need for them passes, the files become unnecessary and there is nothing to do with them. Accordingly, one cannot overlook the fact that they take up a lot of disk space and it will not be possible to delete such a directory using the usual method for security reasons. Further information will help users of the OS under discussion who have recently updated their system to a new release and do not know how to remove the Windows.old folder from the main directory of the disk.
Removing the Windows.old directory
Of course, using the programs described above, you can destroy the folder in question, but it is best to use the available methods in Windows, and only then, if the attempt is unsuccessful, use third-party software. To do this, you need to open Explorer on the “This PC” tab, put focus on the system drive, right-click and select “Properties” in the menu that appears. Next, a window will open, where you will need to make sure that you are on the “General” tab, and then click on the “Disk Cleanup” button.
Then, the system will evaluate the files that are suitable for destruction. At the end, a new window will appear displaying the removal options, in which there will be a “Clean up system files” button at the bottom left, which must be clicked.

The file rating window will reappear, followed by a new one. There, in the window under the inscription “Delete the following files,” among other things, there will be an item offering to delete files from the old Windows installation (it will be called that, or something very similar to this - previous Windows installations). Opposite the found line you will need to put a tick in the box; also, if you wish, you can select additional ones to delete, and then click on the “OK” button located at the bottom right.
Method using the Run utility
You can get to the disk cleanup window using . To do this, you need to call the above program using the hot keys Win + R, or using the context menu of the "Start" desktop icon, in which you will need to select the "Run" line. In the search field of the system utility, enter the cleanmgr command and click on “ENTER” or the “OK” button located at the bottom right. If you have more than one drive in your system, then first a window will pop up where you will need to select the main drive and click on the “OK” button. Next, follow the instructions described in the previous section of the article.
A method introduced in Windows 10
The Windows.old folder can be deleted using the updated, improved cache clearing feature that Microsoft developers have included in the latest releases of Windows 10. In fact, this is the same procedure, only it has become faster, and some improvements have also been added. To do this, you need to get into the settings window, the most common way is to select the “Settings” line in the context menu of the “Start” button (right-click on the “Start” desktop icon and then the required list will appear) or use the hot keys Win + I.
Then, you should go to the “System” section, and in it select the “Device Memory” item. Then you need to click on the line “Free up space now”.

A newly opened window will prompt you to delete the existing cache in the system. Among other things, there will be an item called - previous Windows installations or something like that. All that remains is to mark this section with a tick in the checkbox next to it, and click on the “Delete files” button located at the top.

An operation similar to the one built into the system can be carried out by the well-known one, in which you will also need to put a checkbox next to the inscription indicating the deletion of the Windows.old folder in Windows and start cleaning in the normal way. This line is located in the last section "Other" at the bottom. You can always ask your questions in the comments to the article, or from the “Contacts” page you can fill out and send me the form.
More articles that may be of interest:
Some users love Windows 7 and don’t even want to talk about any other operating system. And someone, apparently obsessed with the spirit of conservatism or due to the remarkable abilities of their PC, abandons the “seven” and returns to the old XP. This is despite the fact that it is no longer supported by Microsoft. However, lovers of everything new also agree with these comrades. Without delay or any doubt, they remove Windows 7 and install the new distributions of Windows 8.1 and Windows 10.
All these zeal, in principle, are understandable and justified. And then, according to taste and color, when choosing an operating system, there are no comrades. The question is different. How to remove Windows 7 so that there are no elements left of it on the hard drive, and so that it does not interfere with the installation of another system?
The solution to this problem depends on the specific situation and user intentions. Let's look at the most common methods of removing Windows 7 from a computer.
Disk formatting
With this approach, Windows 7 is completely neutralized during the installation of another system by completely formatting the disk (that is, its contents are completely erased). The installation disks for both XP and Windows 7/8 contain all the necessary tools to implement this function. Let's learn how to use them.
Note. If you do not want to switch to a new system, but simply want to reinstall Windows 7, correctly remove the old distribution and install a new one, you can also use the instructions below.
1. Insert the installation disc of the operating system you want to install (XP, 7, 8 or 10) into your DVD drive.
Attention! Before following the next step in the instructions, find out which key on your computer activates the menu for configuring the boot of disks and devices, or the BIOS (add-on shell) into which this menu is integrated.
2. Click "Start". In the drop-down menu (shutdown), click the left arrow icon and select Restart.
3. During the reboot process, hold down “F2”, or “F8”, “F9”, “F12” (depending on the computer manufacturer! see note).
When the “Please select boot...” window appears:
- use the cursor arrows to select CDROM from the list;
- press "Enter".
If disk boot order is performed in the BIOS, do the following:
in the “BIOS SETUP UTILITY” menu, go to the “Boot” tab;
open the “Boot Device Priority” subsection;

in the additional “Options” window, use the “up” and “down” keys to select “CDROM”.

After completing this setting, when you restart the PC, first of all turn not to the system partition, but to the installation disk. Which is what is required in this case.
Windows XP:

- upon completion of the preparation procedure, when the XP installation menu appears, press “Enter” (thus, you select the first item - “Proceed with installation”);
- press "F8" to accept the agreement;
- select the system partition (the partition on which Windows 7 is currently installed) and press “Enter”;
- select the “Format partition... NTFS” function from the list or the same function marked “Quick”. And press "Enter" again.

Upon completion of formatting, Windows 7 will be completely removed and the installation of Windows XP will begin.
Windows 7/8:
- wait for the installer components to load into the PC memory;
- select the system interface language;
- in the new window, click “Install” (the message “Starting installation” will appear);
- enter the license key, click “Next”;
- accept the agreement;
- in the “Windows Installation” window, click on the system partition (on which Windows 7 is located);
- at the bottom of the same window, click “Format”;
- When formatting is complete, click “Next” and continue the installation.

These steps will allow you to correctly remove the old OS (in this case, “Seven”) and install a new one.
Removing a second system
This method of removing Windows 7 is suitable if several systems are installed (for example, XP and 7). Either the “seven” was uninstalled or installed incorrectly and when the PC starts, it displays a menu asking you to load one of the existing systems, although one of them is not working. (For example, a copy of Windows 7 is listed.)
To remove an unnecessary distribution from the disk (or a non-working copy of Windows 7), do the following:
1. Press the “Win+R” keys simultaneously. (The Run window will appear on the display.)
2. In the “Open” line, type - msconfig.
3. Click "OK".
4. In the “System Configuration” settings panel, go to the “Download” tab.

5. Select the OS you want to remove from your computer by clicking the mouse.
6. Click the “Delete” button, and then “Apply” and “OK”.
All. The system has been neutralized. Now, when you start your PC, the system selection menu will no longer appear.
How to delete the Windows.old folder?
The Windows.old folder is automatically created by the system when updating or reinstalling the OS without formatting the system partition. Takes up about 2-15 GB of disk space. It stores backup copies of important system components, which are used when rolling back (restoring) Windows 7 to its previous settings.
To remove it from your computer, follow these steps:
1. Press the “Win+E” keys.
2. Right-click on the system partition (drive C).
3. Select “Properties” from the context menu.
4. On the General tab, in the properties window, click Disk Cleanup.

5. In the cleaning settings window, click “Clean up system files.”
6. When the procedure is complete, return to the list of items and check the box next to the “Previous Windows installations” object.

7. Click OK.
8. In an additional window, confirm your intention to delete the Windows.old folder: click “Delete files”.
If all the operations in this instruction are performed correctly, then Windows.old will safely disappear from the hard drive, and there will be more free space on drive C.