How to make any color picture black and white in Photoshop? How to make a photograph, picture, image black and white.
Have you ever wondered how to create beautiful black and white photographs? Well, there's good news and bad news. First of all, shooting in black and white is still photography. This means that if the image is unsuccessful, then no amount of black and white magic will save it, that’s a fact. But the good news is that by following a few rules when creating black and white photos, you will have a lot of control in post-processing. Here are three that you might find useful.
№1 Initially do correct settings
Let's get started. There is only one requirement to create black and white photographs – raw format. If you can't shoot in raw, shoot JPG in color. Ironic, I know, but I'll explain why later.
This is not an ironclad rule, but it is better to lose detail in the shadows than in the highlights. This means that it is better to underexpose than to overexpose, as this will cause a lot of damage. black and white photography. But this of course remains at your discretion and intention. If you want to overexpose for a specific reason, then do it! Depending on the image below, you may want the highlights to be blown out.
Most modern cameras can shoot in pure RAW and display the image on the screen in black and white. If this is possible in your camera, then take advantage of it! This way, when you shoot, your image will be closer to the final result you had in mind.
#2 Two things to look for
Black and white photographs are usually considered last. If the image doesn't look good, convert to black and white and get a good shot. But it doesn't work that way. If an image looks good in black and white, it means all the necessary elements were there to begin with. In any case, intentional black and white photographs will always be superior to those taken as a fallback.
When you're filming black and white photograph, then there are two things to look for, contrast and shapes.

Contrast in light and color
Look for contrast in highlights (light versus dark) as well as contrast in color (ironic again!). Once again, these rules are not mandatory. But if you are just starting out, it is better to first understand the rules and then break them.
Let's look at the graphs:

On color wheel shades that are close to each other will tend to look flat (like the two orange shades above). And colors that are far apart, like opposite sides of a circle, will appear more contrasty (blue and orange).
Search forms
In black and white photography, objects are reduced only to their essence, since there is no color to distract attention from form. This means that the composition must be strong as the elements of the photo become more obvious. Black and white photography doesn't seem so simple anymore, does it? Let's look at another example using the colors above.

The blue bunny stands out more than the dark orange one due to the color contrast.
INLightroom
This is where black and white photography really comes to life. First, I'll explain why I recommend shooting in color (or raw). The thing is, if you shoot straight in black and white, you'll get many shades of gray that the camera captures. But if you're shooting in color initially, you'll have much more control over tones in post-production. See below:

One stripe of color creates three different stripes of black and white ( gray shades). The black and white shades you get are malleable. See how the red spot gives you three different shades of grey.
When shooting in color, you can say "red becomes very dark and blue becomes very light." You can do the opposite and say “the blue becomes very dark and the red becomes very light.” Now do you understand why it's so important to shoot in color? You lose these options when shooting in black and white.
PanelB& W VLightroom
In Lightroom, go to the Adjustments module, scroll down and click on B&W (right in the HSL/Color/B&W panel). All the color sliders are at your disposal here. Take the first slider. Moving red to the left will make all shades of red darker. The same goes for the rest of the sliders; orange, yellow, green, cyan, indigo, violet and magenta.

The good news is that you can work directly on the image. See that weird circle in the top left corner? If you click on it and hover over any part of the image, click and drag up, down, left or right, it will automatically sample the color and allow you to edit the black and white mix from there. You will see the corresponding sliders move and all similar colors (shades) in your image will be adjusted.

The image on the left is straight from the camera in formatRAW. On the right, all I did was darken the blues using the blue slider.
Once you've completed the black and white conversion, tweak the clarity and contrast. Again, this won't magically make the image beautiful, but if the composition is right, then you should get good result. Here's the final image:

Conclusion
As you can see, good black and white photography is based on the same rules that make a good photograph. But otherwise, this special black and white aspect is about understanding how color transforms into monochrome. A good exercise is to convert color images and experiment with conversions to better understand how it works. Be yourself, stay focused and keep shooting.

Many people have at least once thought about restoring old black and white photographs. Most of the pictures from the so-called soap boxes were transferred to digital format, but never found color. The solution to the problem of converting a bleached image to a color one is very difficult, but to some extent accessible.
Converting a black and white photo into color
While it’s easy to turn a color photo into black and white, solving the problem in the opposite direction becomes much more difficult. The computer needs to understand exactly how to color this or that fragment consisting of large quantity pixels. Recently, the site presented in our article has been dealing with this issue. So far this is the only high-quality option that works in automatic processing mode.
Colorize Black was developed by Algorithmia, a company that implements hundreds of other interesting algorithms. This is one of the new and successful projects that managed to surprise network users. It is based on artificial intelligence based on neural network, which selects the necessary colors for the loaded image. Frankly speaking, the processed photo does not always meet expectations, but today the service shows amazing results. In addition to files from a computer, Coloriz Black can work with pictures from the Internet.

- Save the image divided in half by the purple line (1);
- Save the fully colored photo (2).
Your picture will be downloaded to your computer via your browser. It looks something like this:

The results of image processing show that artificial intelligence based on a neural network has not yet thoroughly learned to turn black and white photos into color ones. However, it works well with photographs of people and paints their faces more or less well. Although the colors in the example article were chosen incorrectly, the Colorize Black algorithm still selected some shades successfully. For now, this is the only current option for automatically converting a bleached picture into a color one.
Instructions
Do not think that only bulky and clumsy on low-power Photoshop computers can cope with the task you set. There are many more affordable and simple programs, which are capable of performing this operation no worse than the famous and “almighty” Photoshop. One of them is installed by default with Microsoft package Office and is perfect for your purposes. The convenience is that you don’t need to download and install anything - if you have Word and Excel on your computer, in most cases there will be Microsoft Office Picture Manager. This is the program you need.
You can find the icon to launch the program in the Start menu or start editing photos in this program in another way. To do this, click right click mouse over the image file that needs to be converted to black and white. IN context menu select the "Open with..." command and click the Microsoft Office Picture Manager line. The program will start and the photo will be added to it. You can move on to working on color.
Find the “ Change" button on the program panel and click it. In the right area of the window, click the “Color” button. You will see three scales, by dragging the sliders on which you can adjust parameters such as color intensity, hue and saturation. All you have to do to turn a photo into black and white is move the Saturation slider all the way to the left. The photo will immediately turn black and white!
All that remains is to press the button with the floppy disk icon to save the changes. However, if you want to save the original file with a color photo, select the “Save As” command from the “File” menu, and then save the resulting black and white photo under a new name in any folder on your computer.
Sources:
- how to make black white photograph
Wanting to give a certain area photos-white tint, you can use the capabilities of the graphic editor Adobe Photoshop. This application will allow you to change a photo almost beyond recognition. It should be noted that you do not need to have any skills in working with the program to perform all the steps.
You will need
- Computer, graphic editor Adobe Photoshop.
Instructions
Most simple tool V Adobe program Photoshop's way to change colors is Replace Color. User sets required parameters brushes, after which, performs further actions on image processing. What do you need to do to do this? Part photo black.
Before you have access to the design photos in the program, you need to open it in Adobe application Photoshop. Today there are two ways to perform this action. The first method involves opening a photo of the application itself (the user needs to execute the commands in the program: “File” - “Open”, and then download). The second method involves opening photos through image properties. Right-click on the photo, then select the “Open with” function. Next, you need to go to select a program by clicking the appropriate link in the window that opens. By selecting
Good day to you, my dear readers. I was recently looking through my childhood photographs (up to 6 years old) and how many of them were in black and white. Previously, this was a common thing, but now there are no purely black and white cameras, but it is still sometimes very nice to look at a photo without color. In some cases, it is even more pleasant to look at. Don't you think so?
Many cameras have a non-color shooting function (b/w, sepia, etc.), but in this article I would like to tell you how to make a picture black and white in Photoshop. And it doesn’t matter what kind of picture it is. The main thing is that this function still remains and no one is going to give it up. By the way, in my article about I actually used the effect of turning a color photo into black and white. Remember?
So let's get started! What do you want to convert to b/w color? Personally, I want to desaturate the car that I showed you in the tutorial about.

The easiest way to desaturate an image is through the Image menu. To do this, go to the menu “Image” - “Correction” - “Desaturate”. After this, the photo instantly removes all colors.

Grayscale
This method is similar to the first and will be just as easy to complete. You need to enter the “Image” menu, then select “Mode” from the drop-down menu, and only then "Grayscale".
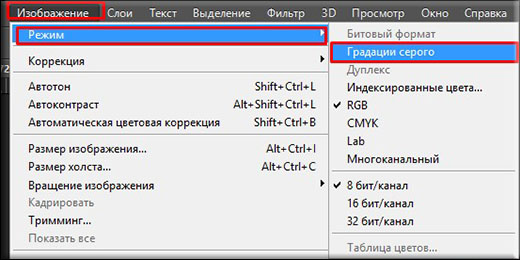
Voila! Your black and white image is ready.

Both methods are the simplest, but not the best. For a more subtle transformation, it is better to use other methods.
Black and white
This method is convenient because we can adjust the image as we need, so the quality of the resulting photo will be better.
Go again to the “Image” menu, then select the familiar word “Correction”, and at the end feel free to select “Black and white...”.

As you can see, our image has become black and white, and at the same time various sliders with the names of colors have appeared. With the help of them we will correct our b/w image. Try moving different sliders in turn and you will see that the contrast and image quality change, and in separate areas. Each area has its own color.

In this way, adjust all the colors until the image has better saturation and contrast. Voila.

Just don’t click on “Tint”, otherwise you won’t get any black and white image. If you don’t want b/w, but want it in yellow or other tones, then please.
Adjustment Layer
Most best way to create a black and white image from a color one - create an adjustment layer. But there are several here too different ways such a transformation.
Channel mixing

Black and white
Here I will go over briefly, since this method is identical to the “Black and White” method, which we did above. Only here everything happens through an adjustment layer.

Well, in general, these are the methods I wanted to show you. I hope that they will be enough for you). If you have any questions, then ask. I will be happy to answer them.
In addition, I would like to recommend the wonderful Photoshop video tutorials for beginners. Everything a beginner needs is collected here, the material is presented superbly and everything is explained in great detail. Each element is broken down into pieces, so you will know Photoshop completely. So be sure to check it out.
Well, for today I say goodbye to you. Tomorrow will be a new day and new lesson. And get a good night's sleep today. Most importantly, don’t forget to subscribe to updates on my blog articles. Good luck with your learning and everything else. Bye bye!
For more than a century, monochrome photography has been dominant. Until now, black and white shades are popular among professionals and amateur photographers. In order to make a color picture decolorized, it is necessary to remove information about natural colors. The popular online services presented in our article can cope with this task.
The big advantage of such sites over software is ease of use. In most cases, they are not suitable for professional purposes, but they will be relevant for solving the task at hand.
Method 1: IMGonline
IMGOnline is an online service for editing images in BMP, GIF, JPEG, PNG and TIFF formats. When saving the processed image, you can select the quality and file extension. Is the simplest and in a fast way applying a black and white effect to a photo.

Method 2: Croper
Online photo editor with support for many effects and operations for image processing. Very convenient for reusable the same tools, which are automatically displayed in the panel quick access.
- Open the tab "Files", then click on the item "Load from disk".
- Click "Select file" on the page that appears.
- Select the picture to be processed and confirm with the button "Open".
- Send the image to the service by clicking "Download".
- Open the tab "Operations", then move the cursor to the item "Edit" and select an effect "Translate to b/w".
- After the previous action, the tool you are using will appear in the quick access panel at the top. Click on it to apply.
- Open menu "Files" and press "Save to disk".
- Upload the finished image using the button "Download file".


If the effect is successfully applied to the picture, in the window preview it will turn black and white. It looks something like this:


Upon completion of this process in quick panel downloads a new mark will appear:

Method 3: Photoshop Online
A more advanced version of the photo editor, equipped with the basic functions of the program. Among them there is the possibility detailed settings color tones, brightness, contrast and so on. You can also work with files uploaded to the cloud or social networks, for example.
- IN small window in the center of the main page, select "Upload image from computer".
- Select the file on disk and click "Open".
- Open a menu item "Correction" and click on the effect "Bleaching".
- On top panel select "File", then click "Save".
- Set the parameters you need: file name, format, quality, then click "Yes" at the bottom of the window.
- Start downloading by clicking the button "Save".


If you successfully use the tool, your image will acquire black and white shades:


Method 4: Holla
A modern popular online service for image processing, with support for Pixlr and photo editors. IN this method The second option will be considered, since it is considered the most convenient. The site's arsenal includes more than a dozen free useful effects.
- Click "Select file" on home page service.
- Click on the image to process it, and then on the button "Open".
- Click the item "Download".
- Choose from the presented photo editor "Aviary".
- In the toolbar, click on the tile that says "Effects".
- Scroll to the bottom of the list to find the right one using the right arrow.
- Select an effect "B&W" by clicking on it with the left mouse button.
- Confirm the application of the effect using the item "OK".
- Finish the image by clicking "Ready".
- Click "Download image".


If everything went well, your photo will appear in black and white in the preview window:


Method 5: Editor.Pho.to
A photo editor that is capable of performing many image processing operations online. The only site on which you can adjust the intensity of the selected effect. Able to interact with cloud service , social networks Facebook,