How to upload a file to an ftp server. Troubleshooting and troubleshooting when working with FTP
Hello friends! Now we will talk about how to access the FTP server through a browser or Windows Explorer. After all, there are cases when you need to use this technology, for example, not on your computer.
Of course, one cannot help but say that working with files using the FTP protocol is a pleasure. This is the case when the Germans say: kvadratish, praktish, gut. You can also recall a similar solution for .
Well, okay, let's not make unnecessary demagoguery, but let's get straight to the point. So, to connect to such a server regular means Windows systems we do the following.
Open the browser and address bar enter an address like:
That is, in in this case we need to substitute the IP address value remote server. For example, it might look like this:
Also instead of digital value can be entered Domain name, if any. In the next step, an authorization window will appear in which you must enter your login and password for access:

If everything is done correctly, then at the next step we find ourselves in root directory FTP servers:

Just like that, it’s easy and simple, we went to it using a browser. But there is another entry option. Let's say a few words about him. The whole point is that you need to enter the following into the address bar:
In real life the whole thing looks like this:

The undeniable advantage of this method is the lack of authorization at login, since all the necessary data has already been entered by the user.
Now let's try to do all the above procedures with the standard Windows 10 Explorer. Open it in top line enter a familiar combination with the server IP address:


Hooray! The contents of the remote node open before us:

Great, but now let's try entering the second combination just in case:

I must say that even in this situation no problems arose. By the way, the author personally liked the option of connecting via FTP protocol through Explorer more than using a browser. It’s somehow more familiar to work with files in it.
Well, friends, now you know how you can access an FTP server through a browser or Windows Explorer. I think that in this simple process There shouldn't be any questions. But if anything happens, feel free to knock on the comments to the article.
Hello, friends!
You've probably already prepared your website files for uploading to your hosting and want to know how to do it quickly and easily?
You've arrived just in time the desired topic! But first we will establish special software, and then let's talk about how to upload a site to hosting via ftp? Begin!
Installing a file manager
In order to download the manager for transferring files, go to the filezilla.ru resource and click “ Download FileZilla ».
On the loaded page, select the version accordingly operating system, which you have.
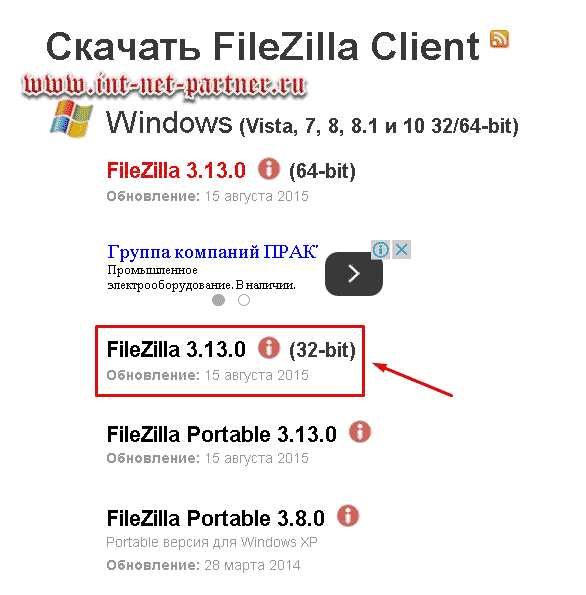
Let's download it. We find the resulting file:

And click on it. The program will be installed.
Uploading WordPress to hosting
After the installation is complete, launch Filezilla.
In the program that opens, at the very top you need to fill out three fields.
We take the data that the hoster provided when you registered tariff plan.
Look: among them there should be information for FTP access. This is what we need.
In field " Host» write the address data (in Makhost I have a123456.ftp.mchost.ru) or IP address (for example: 77.221.323.71). No difference. Filezilla “digests” everything normally. The main thing is that the data you enter is exactly what the service provider gave you.
In the second field, " Username ", write the login (username) for FTP.
Third, " Password", fill in with a password.
Then press the button “ Fast connection "(as you may have noticed: everything goes in order).
When the connection occurs, you will see that files will appear in the windows on the right. Find the root folder ( httpdocs) of your sites (after all, in the future you will install several of them):

And click on it (the actions occur in a similar way as in the computer explorer).
ATTENTION! The name of your root folder may be different. It depends on the hosting. For example, there is also the name “public_html”. Check with technical support! I wrote about the root folder in the article “”
Remember that our task was to download WordPress content to the server? Have you already seen in the screenshot above that the program contains computer files on the left side, and server files on the right?
So now Right side ours is empty. You don't need everything you see inside the (httpdocs) folder. You can delete it.
STOP! Be careful! Make sure you are exactly where you need to be (httpdocs). Are you sure? Now delete.
Let's move on to the left. Our task is to open the necessary folders on the right and left. On the right we have already opened. And on the left you will find the unzipped installation package WordPress. Let me remind you that the folder is called wordpress-4.2.4-ru_RU (your numbers may be different, since versions are constantly updated).
Download current version you can from the official Russian-language website wordpress.org
Come inside. There's another subfolder there. Let's open it. As a result, we see the following picture in Filezilla:

I didn’t fit everything on the screen, but the main thing: you noticed three characteristic folders, the names of which begin with the letters “ wp" Select all the contents in the same way as in Explorer and “throw” it into right side programs, i.e. to the server.
For example, I do this: I click on any file on the left, and on the keyboard do “ Ctrl+A »:

Then I click on the right mouse button and select “ Upload to server ».
The download process begins, which you can watch in the lower window:

Soon you will have the same files on the right as on the left. When the bottom window becomes empty, the process is over. Congratulations! You have uploaded the site to the server!
In this case, we downloaded the WordPress CMS, for which a simple download is not enough to function. For CMS work WordPress needs to create a database, make changes to the wp-config.php file and other nuances that we will not touch on in this article. You can read about these nuances in.
At the end of the article, you can watch a video where I spoke in great detail about installing a site on WordPress and this moment of loading is discussed.
A simple website consisting of an html document and files loads exactly the same way.
After loading the site, whether on a CMS or consisting of simple document, you need to link a domain to it and the site installation will be completed.
Now, friends, you have become acquainted with another procedure necessary for a site administrator. Through filezilla you can both upload files to the server and upload them to your computer. This can come in handy when you learn how to edit the content of your site. Remember that your colleagues communicate in my VK group and are waiting for you too!
And so that I know what is interesting to you and write the corresponding article - subscribe to blog updates. Your comment on this article may be useful to other visitors! Grow together with your web resource! Good luck!
Video on installing a website on WordPress (one of my first videos):
Domains for 99 rubles Hosting timeweb
P/S
Best regards, Alexander Sergienko
Date: 2009-05-20
I recently received a letter from e-mail from a visitor to my site. I won’t go into details, I’ll tell you the essence. The man asks: A what does it mean to upload files to a server via FTP? And how to do this practically? To be honest, before this I never thought that this process could raise questions :-(. Well, let me correct myself and tell you what it is and how it is practically done.
If your hosting is free, then you can usually upload site files to the server through the upload form provided by the hosting itself. If the Hosting is paid, file uploading is almost always done via FTP.
FTP ( File Transfer Protocol) - file transfer protocol, used to transfer files from one machine (computer, server) to another. For using FTP You need to install the so-called FTP client, which connects to the FTP server (where you want to upload files or download files).
Anonymous FTP allows you to connect to a server without having to personal login and password. Usually, “anonymous” is indicated as the login, and your e-mail is indicated as the password. This is done on large servers so that everyone can download some useful programs.
In order to start using ftp, download some FTP client, for example Cute FTP, WsFTP. For example, I use the FTP client built into Total program Commander. Very convenient file manager And I don’t see any point in installing anything else. In the following, all explanations are given for the program Total Commander. Perhaps you will use another FTP client, for good measure - the principle of operation is the same for all of them.
All FTP clients require the following information:
Username(Username) is your control panel username.
Password is the password to access your control panel.
Address is the server address. For example ftp.yourdomain.ru
Port - Use the default port number (21).
When purchasing hosting, the provider will send you this data in a letter. For example:
Your login (Username): XXXXXX
Your password (Password): yyyyyyyyyyy
Your FTP host: ftp.yourdomain.ru or something like this: 67.225.137.102
If there is no data on the port, then don’t bother, it means the default port is 21 and you don’t need to register anything.
So, we assume that you have Total Commander installed, launch the program, two panels open in which you see listed folders depending on the selected disk of your computer. And we see this picture:
Picture 1
Now you need to set up an FTP connection to the server. Click on top panel the FTP button (circled in red in the figure), if you hold the mouse on it, the message " Connect to FTP server"the following window opens:

Figure 2
In the window that opens, we see all existing connections (if they exist and are configured). In the right panel, click on the "Add" button. The following window opens " FTP setup connections":

Figure 3
Here we enter the data that Hoster provided to us when purchasing hosting:
In the "Title" field we write an arbitrary name (just so that we can distinguish it ourselves if there are several such connections) - for example, I write the name of the Hosting company, in this case I have a connection set up with Hudson - the hosting on which it lives, very worthy Hosting - I recommend " ".
In the “Server name” field we enter the FTP host: 67.225.137.102 or it can be in this form ftp.yourdomain.ru.
In field " Account"We register the Login (Username) issued by the Hoster: XXXXXX.
In the "Password" field enter the Password (Password) issued by Hoster: yyyyyyyyyyy
In field " Remote directory"you can register your root folder on the server where the site files will be located, in this case public_html, then it will immediately open The root folder, or you can leave this field empty.
Put a tick in the checkbox " Passive mode exchange" and click "OK".
The entire FTP connection is configured and you can send (upload) files to the server.
Returning to Figure 2, click the “Connect” button, in active window Figure 1 opens a remote directory where we will upload the site files. Select the required files and simple drag and drop mouse from one window to another, we upload files to the server. Or select the required files and click “F5 Copy” in the bottom panel.

Figure 4
When installed FTP connection with the server, at the top, an additional horizontal panel(see Figure 4), in which you can select “File sharing mode” from the drop-down list:
Auto detection,
Binary
Text (ASCII) .
Attention! Important! For some scripts and programs uploaded to the server, this parameter"Share mode" very important. Usually, if this is critical, the script description indicates in which mode to transfer files. If this parameter is not specified in the description of the script or you are unsure, put Auto detection.
After uploading files and folders to the server, sometimes it is necessary to set the “Access Rights” for these files and folders, for example, usually the rights for folders are set to 755, for files 644, but this is the default. If your script, for normal operation other rights are required, change them, this is done simply:
Select (highlight) required file(folder) or group of files (folders), go to the menu File/Change Attributes, The following window opens:

Figure 5
Here we set the necessary parameters for this file(folders), click "OK", everything - access rights are set. The files are uploaded, access rights are set, the script is ready to work.
After finishing the “Uploading” of files and folders, click the “Disable” button ( figure 4) and disconnect from the server.
Advice: Always carefully read the description of the script you want to deploy on the server. Usually 80% of problems arise due to our carelessness, downloading in the wrong mode or incorrectly set access rights. This is very relevant for Unix OS. If all else fails, contact your Hosting technical support. Very fast, responsive and adequate support service on Hudson, my website lives here.
Comments on this article (lesson):
I heard you can upload programs to the server so that they do not take up space on the gesture, and launch them from there. Really not????????
"How to upload a file to ftp"
Just a warning - all the described methods are effective for a “pure” connection to the Internet, without taking into account possible firewalls (in offices, etc., access to the Internet is often organized using a proxy and closed by a firewall). Therefore, if the described methods do not work for your work ( educational institution) - talk to your local network administrator.
ATTENTION! All methods are discussed using the example of connecting to AKROSS ftp in " " (for details, see the topic). See the current connection parameters there, in the very first message of the topic; they may have changed since the article was written. In the article such parameters are highlighted brown, and examples for them are gray.
First you need to decide what you will upload.
METHOD 1: DOWNLOADING USING AN INTERNET BROWSER
The easiest way to download a file is to use a browser Internet Explorer 6, which comes with the Windows operating system. The disadvantage of this method is that the entire channel will be used for downloading, and working with the Internet at this time will become quite difficult. If you managed to upgrade to Internet Explorer 7, this trick no longer works so easily. Use it instead Windows Explorer. Better yet, learn to use normal programs from the following points.
So, you have a certain file “my-clip.avi” that needs to be “uploaded” to ftp, and you are connected to the Internet. Open an Internet Explorer window and in the “address” line type the ftp address according to the following scheme: ftp://login : password @server :port (in the case of AKROSS ftp, the address will be: ftp://examen :examen @siteweb.net ), then press "Enter". The "flashlight" icon (overview) will hang in the browser for some time and, as a result, the ftp root folder will be displayed. Now simply copy your file to the desired location on ftp, as you would normally do in Windows. All that remains is to wait for the copying to finish.
METHOD 2: INJECTION THROUGH THE OPERATING CELL
The next way is to use some kind of “commander”. Let's consider this method using the example of Total Commander shells (previously called Windows Commander) and Far.
In the Total Commander program, launch the ftp module (Ctrl-F). If there is no configured connection with ftp yet, then create it by clicking the "Add" button (in the case of AKROSS ftp, the settings will be as follows: title - AKROSS, server name - siteweb.net (dots, NOT commas), login - examen, password - examen. The rest is blank fields). Click "OK". Now it will appear new line with a given title and, by selecting it, we connect to the server (you should already be connected to the Internet). Then, on the next panel, find the file “my-clip.avi” and press F5 (copy). If you check the "background copying" box, you can specify the acceptable bandwidth for downloading.
After launching Far, open the ftp tab (Alt-F1, 2). To set up an ftp connection, switch to the ftp panel and press “create” (Shift-F4). In the first line, type the address according to the following scheme: ftp://login:password @server:port. The rest should be empty (both lines and checkmarks). Press "Enter" - a new connection will be added. Now select the line pointing to the FTP server you need and press "Enter". In the next panel, find your video file and press F5 - copying will begin.
METHOD 3: UPLOADING VIA FTP MANAGERS
Let's look at the method using a free program as an example. FTP Commander, which can be downloaded from here(total 644 KB). The steps are as follows:
1. Launch the program. Next, switch the language to Russian. [rice ]
2. Add a new ftp server using the corresponding “New server” button. [rice ]
3. Enter the server address, login and password in the appropriate fields. [rice ]
4. Click the “Connect” button, selecting the server we previously created. [rice ]
5. As soon as the connection is established, we find our clip, which we are going to “upload,” on our computer (“Local Computer”), through the navigation panel. [rice ]
6. Select the file we need and click on the arrow -> “Overwrite files to FTP server”.
All that remains is to open a new topic about your creation in " ", be sure to follow the rules, and wait for reviews =).
Additions: Rick Junker, Esc
To download files from FTP servers, in principle, a browser is enough. When you follow a link to an FTP server (or when you enter the server address in the browser's address bar), a folder structure in the form of links appears on the browser page. To go to the folder, you need to click on the link. The contents of this folder will appear on the page, again in the form of links. These can be links to files or subfolders.
If you login to an FTP server password protected, then when you follow the FTP link, a dialog box will appear in the browser window in which you need to enter your login and password. Login and password can be obtained from the server administrator. If this is not possible, you will not be able to connect to this server.

Everything else is simple. The links on the FTP server web page require you to go to the desired folder, find the file you are interested in, then click on it (or select the appropriate command in context menu that appears when you click right click click on the link to the file). The file will be downloaded by the browser in the same way as from a direct link on a web page.

It is worth noting that connecting to FTP servers from browsers is not always possible. And even if it succeeds, then, as a rule, logging into folders is not very fast. Also, the file download will be interrupted if you accidentally close the browser. Therefore, to download files from FTP servers, they usually use special programs, called FTP clients. We will look at one of these programs in this chapter.