Strengthen the work of the cooler in a laptop. How to increase the rotation speed of a computer cooler
Typically, middle-class laptops have only one cooler, which is responsible for cooling the entire system. For this reason, its rotation speed will affect the performance of not only the processor, as is the case in desktop computers, but also the entire system, including the video card, RAM and hard drive.

Automatic setup
Correctly configured drivers in the operating system will allow you to both increase the speed of the cooler on a laptop during its maximum load, and reduce it when working in the system itself or in undemanding applications. This will not only provide extra battery life due to lower power consumption, but will also extend the life of the cooler.

Manual adjustment of laptop cooler
The question of how to increase the speed of the cooler on a laptop manually may arise for several reasons. One of them is incorrect driver settings in the operating system. This happens to users after reinstalling it themselves. Quite often, similar questions arise for people using new versions of Windows, where the system and drivers have not yet been optimized for all equipment. Also, a problem with the rotation speed may appear when the gadget has not been disassembled for cleaning for a long time. It is worth switching to manual adjustment of the cooler only if the solution does not lie in the options described above.

Required Software
Since it is not possible to increase the speed of the cooler on a laptop using standard means, first you will need to download the necessary software. First of all, it includes the SpeedFan application, which will regulate the number of revolutions of the blades per minute. You will also need to download one of the programs to view the temperature level of various computer components. This could be Everest or any application with less functionality. On the laptop itself, you must have an operating system from Microsoft of any edition installed, on which the above programs will be launched.

Computer diagnostics
Increasing the speed of the cooler on a laptop will not always be the best option in terms of performance and noise. To avoid wasting additional time, it is first worthwhile to carry out a small diagnostic of the equipment.
To determine the temperature of each computer element, you must use one of the pre-installed programs. All necessary measurements can be performed using Everest by finding the corresponding indicators for each of the elements. If they are outside the norm and this is not related to drivers or excessive contamination of the laptop, it is worth starting to adjust the rotation of the cooler. It makes sense to set the maximum speed in the summer, when the room temperature is equal to or exceeds the thermometer mark of 30 degrees, or when overclocking equipment.

Changing speed using SpeedFan
If you need to increase the speed of the cooler on your laptop, SpeedFan is one of the most versatile options. The application, which regulates the speed of all coolers installed in the system, is distributed absolutely free of charge, has a convenient interface without advertising and is fully Russified. After installing the program, the main menu will display the cooling systems found on the user’s equipment. Their maximum number is limited to six. On many laptop models, switching the rotation speed of the blades will occur immediately after confirming the actions without rebooting the device.
How to increase the speed of the cooler on an HP Pavilion G6 laptop
For the HP Pavilion G6 line of laptops, there is an optimal option that will provide both a high degree of cooling of computer components and low noise levels. On the manufacturer's official website, in the drivers section, every owner of Hewlett-Packard equipment will be able to find the Power manager application for automatically adjusting the power supplied to the cooler and other elements. To do this, you will need to be on the main page of the site, hover your mouse over the “Support” item located in the top horizontal menu, and select “Download drivers” from the drop-down list. Next, the HP website will offer several options for determining the laptop model. The first is automatic, allowing you to download a special application that independently recognizes the laptop. The second is manual, where the user will personally select the required category and register the model for selecting drivers. After this, the download page for all software for the selected device will be available.
Increasing turnover using BIOS
Before increasing the speed of the cooler on a laptop through the BIOS, it is worth determining the need for this process, since the consequences can be not only in the form of excessive noise, but also premature battery discharge. For this reason, on many laptop computers this function is simply cut out of the basic I/O system.
Manually adjusting the rotation speed can be useful for geeks who want to start overclocking their own equipment. Although this is not very popular on laptops, some models still have quite a good amount of power.
When starting overclocking, the first thing you need to do is increase the speed of the cooler on your laptop. You will need to learn how to configure it through the BIOS from the instructions included with the laptop. If a manual for making changes is not included in the kit, information can be found on the official website of the laptop developer. In general terms, the setup is reduced to several steps. First, you need to press the appropriate button before booting the system (depending on the motherboard manufacturer) and go to the main menu of the basic I/O system. Next, you will need to find the power section, where the menu with cooler settings will be located. Save changes before exiting BIOS, and the required speed will be selected permanently.
Cleaning the cooler from dirt
When answering the question of how to increase the speed of the cooler on a laptop, we must not forget about regular cleaning. This is the best way to increase the efficiency of cooling and rotation of the blades due to the fact that the bearings will not be hampered by contamination in the form of dust or something more serious.

Of course, not every user will find the necessary tools, time and patience to clean equipment. Therefore, if there is a clear drop in computer performance, it is recommended to contact a service center, even if the free service period of one or two years has already expired.
Question from a user
Good afternoon.
After playing one computer game for 40-50 minutes (note: the name has been cut out), the processor temperature rises to 70-80 degrees (Celsius). I changed the thermal paste, cleaned it from dust - the result was the same.
So I’m thinking, is it possible to increase the rotation speed of the cooler on the processor to the maximum (otherwise, in my opinion, it rotates poorly)? Temperature without processor load - 40°C. By the way, is this possible due to the heat? Otherwise it’s about 33-36°C outside our window...
Arthur, Saransk
Good day!
Of course, the temperature of the components and the load on the cooling system greatly depend on the temperature of the room in which the computer is located (therefore, overheating is most often encountered in the hot summer months). The fact that your temperature reaches 80 degrees is not normal (although some laptop manufacturers allow such heating).
Of course, you can try setting the cooler rotation settings to maximum (if this is not already the case), but I would still recommend taking a set of measures (you can learn about them from the article on measuring and monitoring the temperature of the processor, video card, HDD -).
By the way, the other side of the coin also often arises: coolers spin at maximum and create a lot of noise (while the user does not load the computer with anything at all, and they could spin much slower and quieter).
Below I will look at how you can adjust their rotation speed and what to pay attention to. So...
Increasing/decreasing the rotation speed of coolers
In general, on a modern computer (laptop), the rotation speed of the coolers is set by the motherboard, based on data from temperature sensors (i.e., the higher it is, the faster the coolers begin to rotate) and loading data. Parameters from which the mat is based. The board can usually be set in the BIOS.
How is the rotation speed of a cooler measured?
It is measured in revolutions per minute. This indicator is designated as rpm(by the way, it measures all mechanical devices, for example, hard drives).
As for the cooler, the optimal rotation speed is usually about 1000-3000 rpm. But this is a very average value, and it is impossible to say exactly which one should be set. This parameter greatly depends on the type of cooler you have, what it is used for, the room temperature, the type of radiator, etc.
Ways to regulate the rotation speed:

SpeedFan
A free multifunctional utility that allows you to control the temperature of computer components, as well as monitor the operation of coolers. By the way, this program “sees” almost all coolers installed in the system (in most cases).
In addition, you can dynamically change the rotation speed of PC fans, depending on the temperature of the components. The program saves all changed values, operation statistics, etc., into a separate log file. Based on them, you can see graphs of temperature changes and fan speeds.
SpeedFan works in all popular Windows 7, 8, 10 (32|64 bits), supports Russian language (to select it, click the "Configure" button, then the "Options" tab, see the screenshot below).

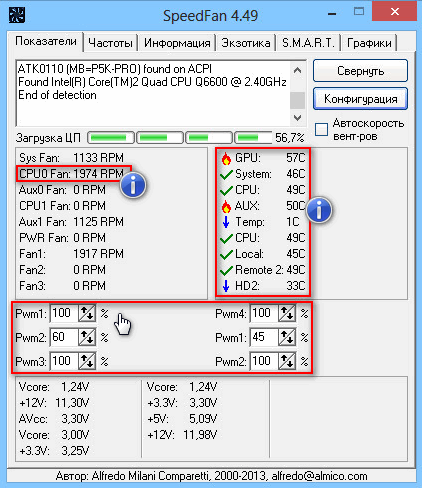
Main window and appearance of the SpeedFan program
After installing and launching the SpeedFan utility, the Readings tab should appear in front of you (this is the main window of the program - see the screenshot below). In my screenshot, I conditionally divided the window into several areas to comment and show what is responsible for what.

- Block 1 - the "CPU Usage" field indicates the load on the processor and its cores. Nearby are also the “Minimize” and “Configure” buttons, designed to minimize the program and configure it (respectively). There is also a checkbox in this field “Automatic fan speed” - its purpose is to automatically regulate the temperature (I’ll talk about this below);
- Block 2 - here is a list of detected cooler rotation speed sensors. Please note that they all have different names (SysFan, CPU Fan, etc.) and opposite each has its own meaning rpm (i.e. rotation speed per minute). Some sensors show rpm at zeros - these are “junk” values (you can ignore them *). By the way, the names contain abbreviations that some may not understand (I’ll decipher them just in case): CPU0 Fan - fan on the processor (i.e. a sensor from a cooler plugged into the CPU_Fan connector on the motherboard); Aux Fun, PWR Fun, etc. - the rpm of the fans connected to these connectors on the motherboard is similarly shown. board;
- Block 3 - the temperature of the components is shown here: GPU - video card, CPU - processor, HDD - hard drive. By the way, there are also “garbage” values here that you shouldn’t pay attention to (Temp 1, 2, etc.). By the way, it’s convenient to take the temperature using AIDA64 (and other special utilities), about them here:
- Block 4 - but this block allows you to reduce/increase the rotation speed of coolers (set as a percentage. By changing the percentages in the columns Speed01, Speed02- you need to look at which cooler has changed speed (i.e. what is responsible for what).
Important! The list of some indicators in SpeedFan will not always match the cooler it is signed with. The thing is that some computer assemblers connect (for one reason or another), for example, a processor cooler not into the CPU Fan socket. Therefore, I recommend gradually changing the values in the program and looking at changes in the rotation speed and temperature of the components (even better, open the roof of the system side and visually see how the fan rotation speed changes).
Setting the fan speed in SpeedFan
Option 1
- As an example, it will try to adjust the rotation speed of the processor fan. To do this, you need to pay attention to the column "CPU 0 Fan" - this is where the rpm indicator should be displayed;
- Next, change the values in the columns “Pwm1”, “Pwm2”, etc., one by one. When the value has been changed, wait a while and see if show has changed rpm, And temperature (see screenshot below);
- When you find the right one Pwm- adjust the cooler rotation speed to the optimal number of revolutions (about the processor temperature I , I also recommend for review) .
Option 2
If you want the smart operating mode to be enabled (i.e., so that the program dynamically changes the rotation speed, depending on the processor temperature ), then you need to do the following (see screenshot below):
- open program configuration (note: "Configure" button) , then open the "Speeds" tab;
- then select the line that is responsible for the cooler you need (you must first find it experimentally, as recommended in option 1, see just above in the article) ;
- now in the “Minimum” and “Maximum” columns, set the desired percentage values and check the “Auto-change” box;
- In the main program window, check the box next to "Auto fan speed". Actually, this is how the rotation speed of coolers is regulated.

Addition! It is also advisable to go to the “Temperatures” tab and find the processor temperature sensor. In its settings, set the desired temperature that the program will maintain and the alarm temperature. If the processor heats up to this alarming temperature, then SpeedFan will start spinning up the cooler at full power (up to 100%)!
For those who do not have SpeedFan
Setting up automatic adjustment of cooler rotation in the BIOS
The SpeedFan utility does not always work correctly. The fact is that the BIOS has special functions responsible for automatically adjusting the rotation speed of coolers. They can be called differently in each BIOS version, for example, Q-Fan, Fan Monitor, Fan Optomize, CPU Fan Control etc. And I’ll immediately note that they do not always work correctly, at least SpeedFan allows you to very accurately and subtly adjust the operation of the coolers, so that they perform the task and do not interfere with the user ☺.
To disable these modes (the photo below shows Q-Fan and CPU Smart Fan Control), you need to enter the BIOS and set these functions to Disable. By the way, after this the coolers will operate at maximum power and may become very noisy (this will happen until you adjust their operation in SpeedFan).
Hotkeys to enter the BIOS menu, Boot Menu, restore from a hidden partition -

That's all for today, good luck to everyone and optimal fan operation...
If the cooler (fan) on any PC device does not accelerate to maximum speed automatically, which leads to overheating, it makes sense to use the SpeedFan utility. This application allows you to set a constant speed of rotation of the screws or set it to change depending on the temperature read from the main sensors. The SpeedFan utility only works with coolers whose speed can be adjusted through the BIOS.
Brief description of SpeedFan
The SpeedFan cooler overclocking program is distributed free of charge. It is suitable for changing the speed of fans installed on the video card, central processor, or motherboard chipset. Before installing and running the utility, you must disable automatic adjustment in the BIOS. If this condition is not met, the utility may incorrectly read information about the maximum possible speed of the screws and will not be able to spin them to the maximum level in a critical situation.
For example, if the BIOS locks the CPU cooler speed at 700 rpm during program startup, the SpeedFan application will take this value as the maximum. When the CPU temperature rises, the PC fan will not speed up. This will force the computer to shut down or damage the CPU.
Installation and first launch
The installation distribution should be downloaded only from the official resource of the software manufacturer. In any case, it is advisable to check the downloaded file for viruses. In general, the installation process is standard. In the first step, you will be asked to accept. In the second, you will be able to select places to create shortcuts. On the third step, specify the directory for unpacking the utility files.

During the first launch, the cooler overclocking program will search for all available temperature sensors and fans. When this process is complete, a small help window will appear on the screen. If you do not want it to appear after each launch of the program, you need to tick the only checkbox and click on “Close”.
When the help window is closed, you will see the main application tab. Initially, the program is set to English localization. To switch the interface language, follow these steps:
Click on "Configure" in the upper left part of the main window.
Go to the "Options" tab.
In the "Language" menu, select the desired language. Russian localization is already built into the utility.
Main window
The blocks of the main window display basic information. On the right is information about the temperature of the main components of the computer, such as the graphics processor, video card, chipset, central processor, and hard drive. In addition to the real ones, the program for overclocking coolers will also show “garbage” here. To determine indicators that you should not pay attention to, you need to use the AIDA64 utility. To do this, compare the indicators in SpeedFan and AIDA64. If the latter does not contain any values, then there is no need to take them into account.

On the left is a list of cooler controllers. The list usually shows more fans than are installed in the computer. Some of them display the speed of real coolers. Others, as in the case of temperature data, contain “garbage”. Incorrect data in blocks is the only drawback of the utility, which is included in each new edition.
Determining the correspondence between sensors and coolers
At the bottom of the program there are screw speed controls. Their names are "Speed01", "Speed02", etc. (in SpeedFan in Russian - "Fan1", "Fan2"). But before setting the speed, you first need to determine the correspondence between the regulators and coolers.
The easiest way to do this is on a desktop computer. Remove the left cover of the system unit. Change the value of the first regulator by several tens of percent. Observe which cooler starts spinning - faster or slower. Also write down or remember the line in the left block where the value changed.
The easiest way for laptop users to determine compliance is using the AIDA64 utility. At the same time, AIDA64 and the program for overclocking SpeedFan coolers must be launched. After changing the value of one of the regulators in SpeedFan, see in AIDA64 which device page the fan speed indicator will change.
Settings
In order to change the names of sensors and speed indicators to understandable ones, click on the “Configuration” line. To do this, just select any element of the list and then click on it with the left mouse button. Here, at the bottom of the tab, you can set the desired temperature of the device and the critical one.

If the component heats up to a critical level, the utility will automatically spin the PC fan at maximum speed. When the device has cooled to the desired temperature, the cooler speed will be reduced. If you have difficulty filling out the form and you do not understand what specific values need to be entered in these fields, read the instructions that came with the device, or find the latest information on the equipment manufacturer's website.
After this, click on the “+” icon located next to the device name. In the expanded list, leave a checkmark only opposite the fan that corresponds to this equipment. Any cooler (fan) can be renamed. To do this, go to the "Fans" tab.
If you want to configure automatic change of cooler rotation speed, switch to the "Speeds" tab. Select the desired fan. At the bottom of the window, enter the minimum and maximum speed percentages. Never set the upper limit to 100%, because the cooler itself will accelerate to maximum when it reaches the peak temperature specified on the main settings tab. Once entered, check the box next to the "Auto Change" text.

Conclusion
The program for overclocking coolers on a SpeedFan computer will appeal to advanced users and overclockers. Everyone else will find it difficult. It will not be easy for an inexperienced user to establish correspondence between fans and sensors and understand all the parameters. In addition, the normal and critical temperatures of devices are not always indicated on manufacturers’ websites and in instructions.
How to increase the speed of the cooler on a laptop if over time it starts to work a little slower, more noisy and sometimes even overheats. Overheating is one of the most inconvenient and harmful incidents for a computer because it causes additional wear and tear on the hardware and increases the chances of failure.
To eliminate this situation, you can replace the thermal paste and increase the cooling. If replacing thermal paste is not a very difficult matter, then in order to strengthen the cooling system (CO), you need to either buy a cooling pad or increase the speed of the cooler. The cooling pad is quite noisy, costs extra money, and takes up space, but you can speed up the standard cooling system absolutely free.
There are two options for how to speed up the cooler speed on a laptop:
- Using the software
- Using BIOS\UEFI
Before overclocking
First, let's determine what the speed of the cooler will affect:
- The higher it is, the more noise the laptop makes when operating, the faster it discharges (slightly), but at the same time the temperature of the CPU and the system as a whole is lower, which means there are fewer freezes and slowdowns due to throttling (lowering the processor frequency to reduce the thermal load). The power supply design is High Performance.
- The lower, the quieter the laptop operates, the slower the battery discharges, but under high loads there is a possibility of the device overheating. The power supply scheme is Energy Saving.
In most cases, cleaning the cooling system and replacing the thermal interface solves the problems of overheating and throttling. But if these manipulations are difficult to perform due to the complexity of disassembling or the warranty of the laptop (which prohibits disassembling the device), then to obtain the desired cooling it is better to speed up the cooler.
Overclocking a cooler via software
One of the most popular programs for monitoring and tracking system temperature - Speedfan - will answer the question of how to increase the speed of the cooler on a laptop. You can download the program on the website or via a direct download link.
Please note that not all laptops are supported by this program. It is likely that very old devices, or, conversely, new generation devices, may not display information on temperature and cooler speed. You can view the list of supported buses or axles (BUS) on the utility website.
Install and open the SpeedFan application. The main window will display main information on the temperature and rotation speed of the coolers. Click on Configure, which will open the configuration window. Select the required tracking component - for example, this is the CPU (CPU) and set the desired temperature, the cooling system will work with priority at this parameter.
The next parameter in the Speeds tab determines the speed of the coolers.
- Minimum value – minimum value (%)
- Maximum value – maximum value (%)
- Automatically varied – automatic selection based on temperature

After using the utility, check the temperature readings; if they have not changed within a few minutes\hours, try changing them through the BIOS.
How to increase the fan speed on a laptop via BIOS
BIOS allows you to configure various device parameters - from boot parameters to login password and regulation of processor or memory frequency. Not all laptops have the ability to overclock CO, so you need to check this option on your laptop.
To enter the BIOS\UEFI of your computer when rebooting, press the corresponding key:
| Manufacturer | Key | Manufacturer | Key |
|---|---|---|---|
| Acer | DEL, F2 | Lenovo | F1, F2 |
| Asus | F9, DEL, F2 | Lenovo | DEL |
| Dell | F2 | Samsung | F2, F10 |
| Fujitsu | F2 | Sony | F1, F2, F3 |
| HP | ESC, F10, F1 | Toshiba | F1, F2, F12 |
If you have a classic BIOS, open the Power tab and select Hardware Monitor

Then, if you have the ability to control the minimum cooler speed or set a target temperature value, set the necessary settings.
- For temperature - the lower the better - 40-55 C°
- For speed - it is better to test on your device - select from 100% to 35% in steps of 5-10% to determine the acceptable noise level and temperature.

For owners of laptops with UEFI, the interface is slightly different, but the functionality is much richer.

The desired settings will be in the Monitor, Hardware or Advanced tabs. Settings may vary depending on manufacturer and UEFI version.
Additionally
How else can you increase the speed of the cooler on a laptop:
- For older devices, special utilities AMD OverDrive or Riva Tuner may be suitable. The list of supported devices is extremely small and mostly consists of outdated laptops based on Windows XP, Vista or sometimes version 7.
- There have been cases where dust interfered with the cooling system so much that the bearings needed to be lubricated
- Don't rule out the possibility of replacing the cooler if the speed is very different from the advertised speed.
Have a great day!
The cooler is one of the most important components of a laptop or computer. It helps cool all elements of the device and removes hot air through special holes.
Some laptops use only half the power of the built-in fan or even less. A weak cooling system leads to overheating of the device, which is very dangerous for its overall operation. If you begin to feel that the laptop is getting hot during operation, then the problem lies precisely in the operation of the cooler.
This factor is due to the fact that the operating system does not specifically activate all the fan capabilities to save energy. It is possible to fix this on your own, and below we will discuss how to speed up the fan on a laptop.

Increasing laptop fan speed
To configure, you will need to download the Speed Fan program. Launch the application and follow the instructions below.
- Initially, analyze the temperature parameters. In the window, find the device whose indicators are noticeably above normal temperature. Click several times on the “Up” arrow, which is located next to the name of the fan built into the device. Next, wait until the desired temperature is normalized for the cooler rotation speed. Then minimize (do not close!) the program.
- It is possible that this program does not interact with your operating system. In this case, download the AMD OverDrive application. This application is especially suitable for laptops with an AMD processor. Wait for the main menu to load and open the Fan Control tab (located in the Performance Control subsection). Below the image, drag the sliders to 100% and click Apply to set the values.
- Then click on Preferences and then on Settings. In the menu that appears, check the Apply my last settings checkbox. This function allows the program to automatically include the parameters you specify every time you start the device. All you have to do is click OK and close the application.

For an Intel laptop, it is ideal to use the Riva Tuner app to increase the fan speed. Below we will tell you how to configure settings in version 2.24c of the program. However, it is likely that the manual will also work for other versions. For proper operation, you must have an NVIDIA video card and the appropriate driver installed on your laptop.
- Install and activate the program.
- Next, go to the “Register” and next to AutoFanSpeedControl put the number 3.
- Close the program using the cross or press exit. Launch Riva Tuner again.
- In the “Home” tab, left-click on the triangle next to the name of the video card and in the menu that opens, check “Low-level system settings.”
- A window will open again in which you should check “Enable low-level cooler control.” Next, select “Define”, set it to 100% and confirm with the “Ok” button. After rebooting and checking the operation of the cooler using the new parameters, you can set the automatic mode in the “Auto” section.
Important: At least once a year, the device must be disassembled and cleaned from the inside. It is also necessary to lubricate the bearing. Thus, you will significantly extend and increase the speed of the fan and the laptop as a whole.
