Burning a hard drive image to a flash drive. How to make a bootable USB flash drive using UltraIso
Greetings to all readers. It's about recording ISO image on USB flash drive , not just recording, but also loading from a USB drive with the function BOOT. Because just unpack ISO image and copying to a flash drive is easy. To do this, it is enough to have a program WinRAR, because ISO image partially considered an archive file. Well, the most main question- why on USB drive? The answer to this question is very simple - a USB drive does not scratch like a disk, lasts longer with constant use of the device, capacity in a small pocket and other little things.
Method one:
In this method, the most important thing is that ISO image there must be a file bootmgr(without any extension). To do this, just open ISO image any archiver (for example WinRAR). To do this, use the context menu right click mouse (if there is no file association to this extension) and select nm item " To open with" Further " Select another application", or choose from existing list or by clicking the " Review" (alternative - More app > Find another app on this PC, everything depends on Windows OS) and selecting the path to the software (in our case WinRAR) press the button " Open"(cm. Windows drawings 10).
 |
 |
 |
 |
 |
We see that such a file exists.
Download the simplest utility for recording ISO image to a USB drive and open it. In the window that opens, click the button " Yes" and selecting ISO image and press " Open"

Don't forget to insert the USB drive into the appropriate slot and press the " Installation". After which formatting will begin in a certain format, and then copying of files to the USB drive will begin.

After completion, the utility will not inform you about this, but will simply close the process of copying files, and the utility will remain open. Press the button " QemuTester"and we see that our flash drive is working.

Method two:
This method must also contain the file bootmgr V ISO image, without it as we understand BOOT function will not work. Open the program, select from the menu File > Open... and choosing our ISO file press " Open".
In the first upper part we have files and folders with the name of the image. Go to the Boot menu > Burn Hard Disk Image...

In the window that appears, select our flash drive, set the recording method USB-HDD+ and press the button " Write down"

We are warned that all data on USB storage device will be erased, so if there is important information copy it to your computer and agree with the appropriate button.
The recording process is not that fast, so you can calmly drink tea.

The recording is complete, the flash drive is ready. Unfortunately, UltraISO does not have testing like the utility in the first method, so to check it we will need to restart the computer or use the USBboot Installer++ utility.
Method three:
In this method we will use the utility and will not look to see if the file exists bootmgr V ISO image.
Download (pictures may differ depending on the version).
We unpack the archive to a place convenient for you.

We go to the unpacked folder and launch it, depending on the bit depth of the OS, and in the window that opens, select our flash drive and click .

Check the boxes as shown in the figure and click " Prepare disk".

After which it will open command line and the preparation of your flash drive will begin, after completion the command line will close itself.

In the same window, click " Install Grub4DOS".

A window will appear with installation information install grub4dostoMBR.

We agree with the " YES".
The bootable USB flash drive is almost ready. Now let's copy our ISO file to the root of the flash drive and create Text Document(with any name for now), open it and paste the following text
title Start WXPOEM RU
map --unmap=0:0xff
map --unhook
root(hd0,0)
map /WXPOEM_RU.iso (0xff)
map --hook
root (0xff)
configfile /grub4dos.lst || chainloader (0xff)
map --unmap=0:0xff
Where you just need to know" title Start WXPOEM RU" is the name of the downloaded image (shown in boot menu, title do not wash). " map /WXPOEM_RU.iso (0xff)" way to ISO image, i.e. you just need to change the name ISO file.
Now we rename the text document with the name menu and change the extension txt on lst, it should work menu.lst.

Return to , check the box Test in QEMU and press the button GO.

Testing our bootable USB flash drive. A window will appear with a test download and with only one inscription " Start WXPOEM RU"

Click " Enter"As we can see, everything worked out.

Hello, friends! Today we’ll talk again about creating a bootable USB flash drive.
How to create a bootable USB device? For what purpose should I use it and what program should I use to record it?
A brief overview of the five most popular and free programs to create a bootable USB flash drive.
Modern developments do not stand still, and yesterday's technologies are slowly but surely losing their relevance. So the once popular CDs and DVDs no longer seem like such a clear solution for storing, transferring and working with information. High data reading speed, versatility and reusability are just a small part of all the advantages of a flash drive as a bootable medium over disks. Today almost everything personal computers and laptops, if they are less than ten years old, support the ability to boot from USB devices. And in some cases (for example, a netbook), a flash drive may be the only boot device from an external drive.
By the way, the new Windows 10 operating system will be the first axis, the distribution of which will be officially distributed on a USB drive. And if you suddenly need to recover files from a flash drive, read about it. I also recommend paying attention to, which will help you take your mind off everyday work and lift your spirits.
With the help of additional software, a flash drive can be used not only as a boot device for installing, reinstalling and restoring the operating system, but also to create an emergency device (Multiboot). This is a kind of resuscitator, a tool from which you can boot at any time and cure your computer of viruses, restore system files or save important data. I described how to create such a flash drive-reanimator in the article “Creating boot Live CD/DVD/USB devices and its application." You can read this article.
Despite all the obvious advantages and the growing popularity of a flash drive as a bootable device, there are not so many programs for creating it. Nevertheless, they exist, and today I will introduce you to them in more detail, but first a few words about the preparatory stage.
Preparing a flash drive
We will need the flash drive itself, plus knowledge of some important aspects. First, you need to make sure that your computer supports booting from USB devices. There is a misconception that if in the bios (boot section) there is no option to select boot from usb (there are only floppi, hdd and dvd-rom options), then boot from usb is not supported. This is wrong!
More precisely, this is not always the case. The only correct solution is to refer to the manual (user manual) of your motherboard or using specialized software (as an option - AIDA64) to obtain a detailed report on the hardware used.
The second point is the size of the flash drive. Here everything will depend on what we write on it. For example, to create Live-USB, installation disk For Linux or Windows 7, a 4 GB flash drive is enough. To create a boot device with latest versions For Windows, it is advisable to have a flash drive of at least 8 GB on hand.
The third point is transferring files from a flash drive. Typically, the process of creating a boot device involves full formatting. If there is a flash drive important files, transfer them to another device in advance. To create a bootable USB flash drive and then work with it as a boot device, use the USB-2.0 port (Windows 7 does not support USB 3.0).
How to create a bootable USB flash drive
Let's consider five in various ways using the example of five free programs for Windows.
A small but quite functional utility with the self-explanatory name WinSetupFromUSB. Equally well suited for recording bootable and/or multiboot flash drives (up to 10 operating systems) and creating Live devices. Official site .
Among the shortcomings is the lack of support for the Russian language. Among the advantages, as I already said, is its versatility. The utility can work not only with Windows distribution, but also suitable for burning an installation disk with Linux.
The usual option for creating a bootable flash drive, for example, with a Windows distribution, involves selecting the flash drive itself, the option to automatically format the media, and the ISO image of the operating system in the appropriate boxes. The recording process starts after pressing the “Go” button. You can read more about how this program works.
To create a multiboot flash drive (several OS), you need to specify the path to the ISO images of the operating systems. Paragraph Windows selection 10 at the time of writing this article is not available by default, but in reality everything is written and works, you just need to select the appropriate column with the available versions - Vista, 7, 8.
2. Rufus
Perhaps the simplest solution for creating bootable USB drives. Everything is simple and intuitive. Suitable for working on systems that do not have an installed OS. Official site rufus.akeo.ie.
The main advantages are speed, simple interface, Russian language. Perfect solution, if there is a need to create a bootable Windows flash drive 10 s UEFI support. By the way, I wrote in detail about how to do this in.
Distributed in the format of a regular installer and portable version. To create a bootable USB flash drive, in the utility window you need to specify the path to the ISO image to be written and click the “Start” button.
On new systems that use UEFI instead of BIOS, in the "Partition Scheme and Type" menu system interface» set the value to "GPT for computers with UEFI".
In other cases, the default settings will be sufficient. The option to format the flash drive is assigned by default.
3. Windows 7 USB/DVD Download Tool
This utility is official app from Microsoft. The interface is minimalistic, simple and clear, it is easy to work with. Download from the official website wudt.codeplex.com.
Perhaps the name of the utility (Windows 7 USB) will mislead many people into thinking that with its help you can only write the Windows 7 distribution to removable media. However, this is not the case. In addition to the seventh version, Windows 8.1 and 10 distributions can be stored on a flash drive.
The downside is that the utility is not Russified, but the simple and intuitive interface is designed to offset this drawback.
All that is required from the user is to insert a USB drive in advance, select an ISO image with the operating system and specify the path to the media (flash drive) to which this image should be deployed.
The operating principle of this program is based on standard tools Windows operating system is “diskpart”, “bootsect /nt60”, ISO unboxing to a flash drive. The program acts only as a graphical interface.
UltraISO is one of the best and most functional programs for working with disk images. A universal “harvester” that supports work with almost any known formats. Can work in tandem with Nero Burning Rom and integrates with virtual emulators. It will help if the image boot disk not in ISO format.
The program can convert other image formats into ISO files - NRG, MDF, MDS, IMG, CCD, etc. With UltraISO you can edit ISO files without unpacking them. The UltraISO interface has been translated into many languages, including Russian. For downloading, you are offered several editions of UltraISO, adapted for individual Windows versions, as well as a portable version of the program. Download link www.ezbsystems.com.
By and large, the program does not care what boot devices will be created with its help, with what operating system, what software and from what manufacturer. The ISO image to be burned must be opened in the program window either using the Open command in the File menu or using the browse button on the toolbar. This can also be done using a combination Ctrl keys+ O.
Then in the window that appears, if the program automatically selects required flash drive, click the “Record” button.
Daemon Tools Ultra is a professional tool for working with images. The program itself is familiar to many users because it is free. Lite versions, which allows you to mount virtual drives for reading disk images. Its more functional version- Daemon Tools Ultra - among other features, offers the creation boot devices.
Among the disadvantages, it is worth noting that it is paid, but to create a bootable flash drive, you can download a free 20-day trial version on the program’s official website. Official website of the program.
Go to the official website and download the program. During installation, you must select a trial license type.
The program works with huge number disk image formats and can be used both to create a boot device with subsequent installation of the operating system, and to restore it (Live disk).
To create a bootable flash drive, in the main window of Daemon Tools Ultra, select the “Tools” menu item, and among its commands is “Write bootable image to USB”. Or the hotkey combination Ctrl+B.
In the recording parameters window, specify the path to the image, enable the MBR overwrite option and click “Start”.
When the flash drive is ready, all that remains is to boot from it. The easiest way is to use the boot menu keys. The table below shows clear example such keys.
Of course, this is not the entire list of programs designed to create bootable devices, but for the vast majority of users, the capabilities and functionality of the listed software will be sufficient.
Eg, Rufus program can be used as the simplest and quick tool to create a bootable USB drive with one Windows distribution or to BIOS firmware from under DOS.
In some cases, users need to write a file to a flash drive in ISO format. In general, this is a disk image format that is recorded on regular DVD discs. But in some cases you have to write data in this format to a USB drive. And then you have to use some unusual methods, which we will talk about later.
Typically, operating system images are stored in ISO format. And the flash drive on which this very image is stored is called bootable. The OS is then installed from there. Exist special programs, which allow you to create boot drive. You can read more about this in our lesson.
But in in this case We are dealing with a different situation when it is not the operating system, but some other information that is stored in the ISO format. Then you have to use the same programs as in the lesson above, but with some adjustments, or even other utilities. Let's look at three ways to complete the task.
Method 1: UltraISO
This program is most often used to work with ISO. And to burn the image to removable storage media, follow these simple instructions:

As you can see, the whole difference between the process of transferring an ISO image to a disk and to a flash drive using UltraISO is that different storage media are specified.
Method 2: ISO to USB
ISO to USB is a unique, specialized utility that performs one single task. It consists of recording images on removable media information. At the same time, her capabilities within the framework of performing this task are quite wide. This way the user has the opportunity to specify a new drive name and format it to a different file system.
All the best!
Quite often you need to record some image ISO disk to a flash drive, for example, when installing Windows, when creating an emergency flash drive, for, hard drive etc.
Moreover, the same Windows installation from CD/DVD disc takes longer(and they fail more often than flash drives). Not to mention the fact that not every new PC/laptop has a disk drive installed. That is why using a flash drive is preferable (and more universal - it can be connected to any PC with a USB port).
In this article, I will look at a couple of programs that can easily and quickly burn any disk image in ISO format to a USB flash drive.
Note: ISO is the most popular disk image format. More than half of all possible images are distributed in it.
Burning an ISO image to a USB flash drive
Method No. 1 - PowerISO
![]()
PowerISO - very powerful program for working with ISO images. Allows you to open them, edit them, extract files from them, add files to ISO images, compress them, burn them to CD/DVD disks and flash drives, etc. Also in PowerISO you can make an image of any of your disks, test it, get checksum(to assess whether the file is broken...).
In general, how to write an image to a flash drive using PowerISO.
1) The first thing you do is open the image. To do this, click the button "Open", or open the file menu, and then specify the image file. You can also use keystrokes Ctrl+O.
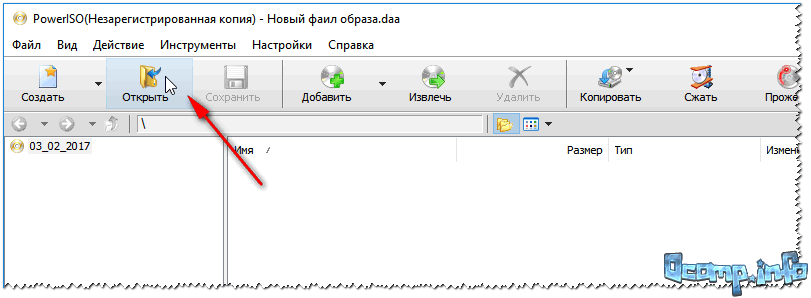
2) If the image was opened and the program did not issue any warnings, go to the menu "Tools". Select a feature such as "Create bootable usb drive unit" (see arrows in the screenshot below).
3) In some cases, the program will ask you to give it administrator rights. We just agree: the program will restart and you will continue the recording process.

4) In the recording settings window, you need to:
- in the column "USB drive" indicate your flash drive (Caution! Do not mix up the letters, because during the recording process, all data on the flash drive will be deleted;
- burning method: if you are burning a bootable ISO image, select the burning method "USB - HDD"(for example, for recording images from Windows);
- the file system column can be left as default;
- next click "Start";
- By the way, please note that at the bottom of the window there are links to instructions (several links, depending on the image being recorded).

Burn Settings // PowerISO
5) The program will warn you again that all data on the selected flash drive will be deleted!

- loading your PC with extraneous tasks (I recommend turning off everything unnecessary: by at least, torrents, games, video editors, etc. programs that heavily load the PC);
- size of the recorded image;
- speed of the USB drive and the flash drive itself.
7) If the recording went well and without errors: you will see a message "USB recording drive completed successfully" , as in the screenshot below.

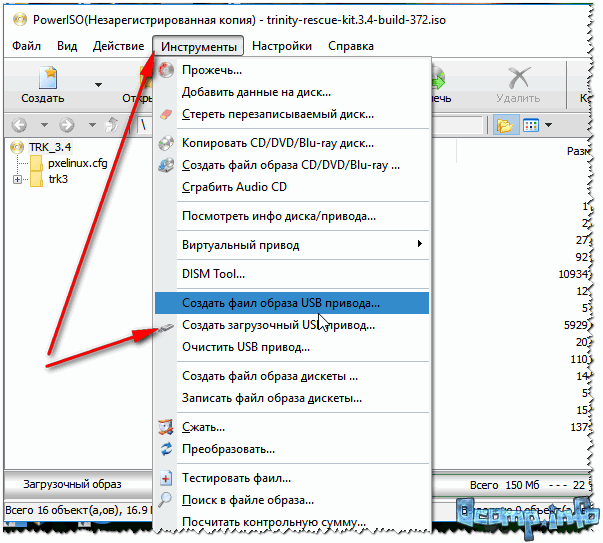
Method number 2 - UltraISO
![]()
UltraISO is the most famous program for working with ISO image ami. It can do almost everything the same with them as the first one: open, mount, edit and change, write bootable flash drives, external hard drives, CD/DVD discs, etc.
It is as easy to use as the first one. Both, by the way, fully support the Russian language.
And so, let's start working in UltraISO
1) First, download (link above), install and run the program. There is nothing special to comment here, except for one thing - run the program as an administrator (otherwise the option to write a USB flash drive may not be available!).
Note! To run as administrator: just click on the icon with UltraISO program- and in context menu select "Run as administrator" as shown in the screenshot below.


3) If the image has opened, open the menu (see screenshot below).

4) Then you need to set the recording settings:
- disk drive: select the letter of your flash drive (the data on it will be deleted, so be careful and attentive!)
- recording method: either USB-HDD+ or USB-HDD (this is for the record bootable media, which is what is required in most cases) . It’s quite difficult to say specifically what to choose; in most cases, USB-HDD+ works - but if suddenly your BIOS version will not see it, rewrite the flash drive in USB-HDD mode;
- then click the button "Record" .

Note! IN normal mode UltraISO automatically formats the media to the FAT32 file system (even if the flash drive was previously NTFS). In order for NTFS to remain, you need to select ExpressBoot, then click on ExpressWrite. Bottom line: when you unpack the image onto a flash drive, the file system will remain unchanged.

6) If everything went well, you will see the following message in the program message: "Cache synchronization. Writing complete!" . Please make sure that there are no errors in the list of program messages, otherwise your boot image will simply throw an error when Windows installations(For example ).
An example of a successful recording is shown in the screenshot below.

After burning the flash drive, they usually proceed to install Windows...
All the best to everyone.