How to remove page number from last pages. How to remove page numbers in MS Word editor
If you don’t know the answer to this question yet, read our article carefully. We will tell you how to remove page numbers from the entire document, remove numbering from the title page (starting page), how to do this in various versions of the Word text editor. Rest assured, even a novice Word user can handle this.
Page numbering in a Word document can be located in both the header and footer. Removing page numbers may be necessary when creating any text document, be it an official paper or some kind of scientific work. How to do it? We'll tell you now.
Removing page numbers in Word 2011
So, what is required from the user to remove numbering from the entire document:
- First, on the toolbar, find the “View” tab, then select the item called “Page Layout”.
- Then, in the same tab we find the “Header and Footer” item.
- Select the number of the required page.
- Press the DELETE key on the keyboard.
How to remove numbering from the initial page in Word 2011?
Hiding the numbering on the first page of a document is necessary if it is a title page where page numbers are not required. In order to change the numbering of the very first page in a document, the user is required to do the following. The user goes to the “Document Elements” tab, which is located in the “Header and Footer” section. Then you need to click on “Page.” The section called “Number on the first page” must be unchecked. After this, the numbering from the initial sheet of the Word document will disappear.
By the way, if your document contains sections and subsections, then you can remove the numbering from the first pages in them too.
To do this, just do the following. First, find an item called “Insert” in the main menu of Word. Next, select the section we need: “Header” or “Footer”. Next, find the item “Change...footer”, click on it.
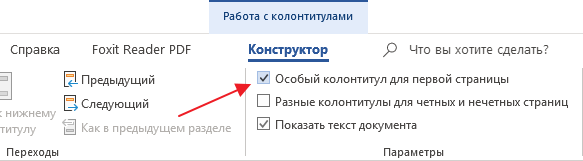
To prevent a number from being displayed on the title page of your document, on the “Designer” tab you need to check the box called “Special header and footer for the first page.” The last step is to finish the job by closing the header and footer window.

Is it possible to start numbering from the second page?
Can. And there is nothing complicated about this either. How to remove a number from the second page? To do this, you need to place the cursor at the very end of the initial page of the document. Next, go to the “Markup” tab on the toolbar, then open the “Breaks” section, click on “Next”. After adding a break to the document, the number on the second sheet should disappear, provided that it was also missing on the initial sheet of the document.
If there is a number on the initial sheet and there is no way to remove it, then the user needs to place the cursor on the second page. Next, you need to go to the “Insert” section, go to the “Header or Footer” item. Next, click on the “Change” item and check the box next to the “Special footer” item. We finish the work by closing the header and footer window.
How to completely remove numbering?
Method number 1.
The user needs to double-click on the page number, which one you decide for yourself. Then hold down the left button, highlight the number and press the “Delete” button.
Method number 2.
How to remove the page number in Word, but not from all pages?
In this section we will talk about selective numbering, which allows you to put numbers only on some pages of a Word document. To do this, you need to break your document into several sections; to do this, place the mouse cursor at the end of the page, where the end of the first and the beginning of the second section will be located.
Next, open the “Sections” tab, click on the “Breaks” item, select the “Next...” option. Next, click on “Tab”, then on “Number...”, then select the template we need (“Top”, “Bottom”). The user must then go to the very beginning of the section where the numbering format needs to be changed.
In this article we examined the question “ how to remove page number in Word" As you already understand, there is nothing complicated about this. The main thing is to strictly follow the specified algorithm of actions. Only in this case the result of the work will not disappoint you, and the process itself will not cause any hassle or difficulties.
But many users are interested not only in how to set up numbering, but also in how to remove it. This may be necessary in cases where the requirements for the document have changed or you are editing someone else's document.
If you are interested in how to remove page numbers in Word, then you have come to the right place. In this article we will talk about this using the example of Word 2019, 2016, 2013, 2010, 2007 and 2003.
In Word 2007 (as well as in more modern versions of Word 2010, 2013, 2016 and 2019), we can remove page numbers in two ways.
The easiest way to remove page numbering in Word is to use the corresponding function on the “ Insert” tab. Go to the “Insert” tab and find the “Page number” button there. After clicking on this button, a drop-down menu will open, in which there will be an item “ Remove page numbers" Select this menu item and page numbering will disappear from all pages of this Word document.
An alternative way is to remove the numbering manually. You can remove page numbering in Word by simply deleting the page number manually on any page of the document. To do this, double-click on the page number. After this, the Word program will offer to edit the page number.

Next, you need to erase the page number using the Backspace key and exit the header-footer editing mode (Escape key or double-click on an empty space on the page). If everything was done correctly, the numbering will be removed throughout the Word document.
How to remove numbering from the first page only
You can also remove page numbers from just the first page of a Word document. This may be necessary when designing title pages of scientific articles, abstracts, coursework or dissertations.
To do this, double-click on the first page number. As a result, you will enter the header and footer editing mode and a tab called ““ will appear at the top of the screen. Open the “Design” tab and check the box next to the ““ option. This will remove the number from the first page of the document. To exit the header-footer editing mode, simply double-click in the center of the page.
As a result, there will be no document number on the first page, but on the second page you will have the number “2”. If this option suits you, then you can stop there. If you need the number “1” to be displayed on the first page of the document, then go to the “Insert” tab, click on the “Page number” button and select the option “ Page number format«.

After this, a small window with page numbering settings will appear. Here you need to start numbering from scratch, this will allow you to get the value “1” on the second page of the Word document.
How to remove numbering from the first two pages
In some cases, you may need to remove the numbering from the first two pages of a Word document. For example, such a need may arise if after the title page there is a table of contents and there should not be a page number on it.
To do this, you need to double-click on the first page number and thus enter the header and footer editing mode. After this, you need to go to the “ Working with headers and footers - Constructor", enable the option there " Special header and footer for the first page» and exit the mode of working with headers and footers by double-clicking in the center of the sheet. This will remove the numbering from the first page.
After this, you need to place the cursor at the end of the text of the first page of the Word document and go to the “Layout” tab (or to the “ Page layout"). Here you need to click on the “Breaks” button and select the option “ Next page». 
As a result, you will remove the number from the second page of the document. And on the third page of the document, the numbering will begin with the number “3”. If this option is not suitable, then you need to open the “Insert” tab, click on “Page number" and in the menu that appears select " Page number format". As a result, a window with numbering settings will open.
In this window you need to set the value to “0” and save the settings. This will allow the third page of the document to start numbering from the number “1”.
How to remove page numbers in older versions of Word
If you are using Word 2003, then in order to remove page numbering you need to go into header and footer editing mode. This can be done in two ways: open the menu " View - Header and Footer", or double-click on the page number.

After you have enabled the header and footer editing mode, you need to delete the page number on any of the pages.

After deleting the page number, you need to exit the header and footer editing mode; to do this, click on the “Close” button in the “Header and Footer” pop-up panel. You can also simply double-click on empty space on the page. Once you remove a page number from one page, the numbers on the remaining pages of that document will also disappear.
It should be noted that if your Word document has several sections, then you need to remove the page numbering for each section separately. Since deleting numbering in one section does not affect the numbering in other sections of the document.
As a rule, pages in Word are numbered. This is done not just for the visual appeal of the document, but in order to better navigate it, especially if we are going to print it. After all, if you just mix up the sheets, it will be quite difficult to arrange them in the right order. In the article we will look at how to do and how to remove page numbers in Word (in versions 2003, 2007 and 2010).
Numbering in Word 2010
Let's start with one of the most popular versions of this text editor:
- To create page numbers in Word 2010, you need to go to the “Insert” tab and select the “Page Number” menu.
- A window will pop up in which you should select the numbering location that you prefer: at the top of the page or at the bottom, in the center, on any edge or on any of the fields of the page.
- When you select the desired option, the numbering in Word will appear automatically.

Removing numbering in Word 2010
Removing numbering is accompanied by even simpler actions:
- To do this, open the “Insert” tab.
- Open the “Page Number” item and left-click on the “Delete Page Numbers” item.
As a result of these actions, all numbering in the document will be deleted.

Numbering in Word 2007
Now let's look at an earlier version - Word 2007. Inserting page numbers in it is also not difficult:
- Here we still have the same “Insert” tab and the “Page Number” button with a drop-down menu containing the same lines.
- Here we can choose the future position of the page numbers: in the margins, at the top or bottom of the document pages, in the center or on the right and left edges.

Removing numbering in Word 2007
As in Word 2010, deleting page numbers in Word 2007 is very simple. Still in the same “Page Number” menu, click on the “Delete page numbers” item. Page numbers will be automatically removed.

Numbering in Word 2003
Let's look at how to make it and how to remove it numbers in Word pages for the 2003 version. Almost everything is the same here, just a slightly different design of menu items.
- So, in order to insert numbering, we will use the “Insert” tab.
- In the drop-down window, select the line “Page numbers...”.
- As a result of this, we will have a window where we can select the required numbering position.

Unlike subsequent versions, there are the following options:
- at the bottom or top of the page;
- left, center, right, inside, outside
It is worth noting that there is no option to put a page number on the side margins of the document, which may make some users refuse to use this version of this text editor.

Removing numbering in Word 2003
Now let's look at how to remove numbers in Word pages. Unlike subsequent versions, Word 2003 does not have a special button that allows you to automatically remove numbering. Therefore, you will need to double-click the page number with the left mouse button and manually delete it by clicking the Delete button. But this action only needs to be done on one page, after which the numbering will disappear throughout the document.

It is also worth noting that in all versions of Word presented in this article, from the 2003 version to the 2010 version, there is a “Page Number Format” item in the “Page Number” menu.

In versions of Word 2007 and 2010, this item is located in a pop-up window after clicking on the “Page Number” menu, immediately after the numbering placement options and before the “Deleting page numbers” item. When you click on it, the “Page Number Format” window appears.
In the Word text editor version 2003, this window can be opened in the “Page Numbers” menu of the “Insert” tab by clicking on the “Format...” button.

Formatting Types
In this window, absolutely the same actions are available in all versions of Word. For example, you can choose the following number format:

In addition, here you can include the chapter number by checking the box next to the line of the same name. After this action, the following items will become active: “Starts with style” and “Separator”. In these paragraphs you can also select the desired option. If we don’t need chapter numbers, then the checkbox can be unchecked.

You can also select numbering options. There are two points here:
- "Continue". This item indicates sequential numbering from the first page of the document.
- “Start with” - this item allows you to start numbering the document with an arbitrary number, which can be specified here. For example, you can start numbering from the 5th page, in which case the number “5” will be located on the first sheet of the document, “6” on the 2nd sheet, and so on.

Finally
We looked at how to do and how to remove page numbers in Word for versions 2003, 2007 and 2010. a very useful function that allows us not to get confused in sections of the document, especially after we have printed it. An important advantage is that it is quite simple to make and remove page numbers in Word in almost any version, since the design of these text editors is very similar.
Word is a text editor created by Microsoft. This processor allows you to create a huge number of documents: diplomas, essays, final qualification papers, etc. The program is easy to use, which is why it is so popular. However, not all users know how to work in this processor. So in this article you can learn how to remove page numbers in a document.
Word 2003
- Double-click on the word processor icon to open it.

- In the program's GUI, find "Insert". Click on it.

- In the window that appears, click the main button of the coordinate device on the phrase “Page numbers”.

- Uncheck the box next to “Numbers on the first page.”

Note! To configure sheets, click on “Format”.

- Click on “Ok” to confirm your actions.

Word 2007
- Double-click the editor icon with your pointing device.
- In the GUI, find "Insert". Click.

- In "Header and Footer" find "Page Number". Click the button.

Note!– a line in a document containing the title of the text, the author’s full name, page numbering, etc.
- If the column numbers should be at the end of the sheet, click on “Bottom of Page”. If the signs should be at the beginning of the page, click on “Top”.

- All sheets of the document contain numeric characters. You need to delete the number on the first page. Click on "Insert", located between "Home" and "Page Layout".

- In the "Header and Footer" group, select the line you previously preferred.
- At the very bottom of the interface that opens, find the phrase “Change header and footer.” Click on it.

- In the “Designer” that opens after clicking on “Change Header and Footer”, find the line “Special header and footer for the first page”. Place a check mark next to this phrase.

- Double-click the main pointing device button on the document sheet. There is no pagination on the pages.
Note! Pagination is the sequential numbering of pages.
Word 2010
The column number on the first sheet of the document has been removed.
Note! Colonnumeral – page number.
Removing all numeric characters in headers and footers
Word 2003

There is no pagination.
Word 2007

Word 2010

How to remove a number on a specific page
- Scroll through the document until the page you want appears.

- Place the carriage at the end of the previous page. Note! The carriage is a symbol for returning the device position to the beginning of the line.

- In the CPU GUI, find the Page Layout tab. Click on it.

- In Page Setup, click the Breaks button.

- A window will open. Find the "Next Page" line. Click on it.

- The carriage will go down. Double-click the number digit with the main mouse button. Select it.

- In “Transitions”, click with your input device on the “Same as in the previous section” button.

- Re-select the number in the header and delete it.

- Click on “Close the header and footer window”.

The numeric sign has been removed.
If you want to know detailed instructions, read the new article on our website.
Video - How to remove a number from the first page in Word 2010
Not every document needs page numbers. Therefore, when users get their hands on typed text, many of them begin to be interested in the question: how to remove page numbering in Word.
There is nothing complicated about this. And after reading this article, you can be convinced of this.
Typically, page numbers are placed in the header and footer area. Therefore, to remove page numbering in Word, you need to go to header and footer editing mode.
If the document is numbered at the top or bottom of the page, move the mouse pointer over the page number so that it becomes an arrow and double-click on it with the left mouse button. The header and footer area will be delimited by a blue dotted line with the text on the left side: "Page header" or "Footer".
Select the page number and press the “Delete” or “Backspace” button on your keyboard.
If the numbering in the document is placed in the page margins, then clicking on it will not switch to the header and footer editing mode. To remove this type of numbering, open the “Insert” tab and click on the button "Page header" or "Footer". Select from drop down menu "Change footer".

The header and footer editing mode will open. Select with your mouse the area that limits the page number and press “Delete” or “Backspace”.

To exit the header-footer editing mode and return to working with text, double-click on the text with the left mouse button.

There is another way that will help remove automatic page numbering in a document. To do this, open the “Insert” tab and in the “Header and Footers” group, click on the button "Page number". Next, from the drop-down menu select "Remove page numbers".
Page numbers in the document that appear at the top, bottom, or in the margins of pages will be removed.

To remove numbering from the first two pages in Word, do the following. Go to header-footer editing mode: double-click on the number at the top or bottom of the page with the mouse. Next on the tab "Working with headers and footers"– “Designer” check the box "Special footer for the first page". Exit header and footer editing mode.

After this, place the cursor at the end of the text on the first page of the document. Go to the tab "Page layout"– “Breaks” and select from the menu "Next page".

As a result, the numbering from the second page in Word will be removed.

Now you should not have any questions about how to remove page numbering in Word 2007, Word 2010 and later versions. In addition, we figured out how to remove numbering from the first page or from the first two pages in a document.
Rate this article: