A program for changing disk memory. MiniTool Partition Wizard - a program for partitioning a hard drive
When working with a computer, situations may often arise when you need to resize partitions hard drive, or even combine them into one. For example, you need to install a new operating system, which is larger in volume than the previous one. Also, if the system has 2 or more logical volumes (not counting the partition with the operating system installed), it makes more sense to combine them into one. To do this you can use like regular means Windows and third party software. Let's consider both options.
Method 1: merging disk partitions using standard Windows utilities.
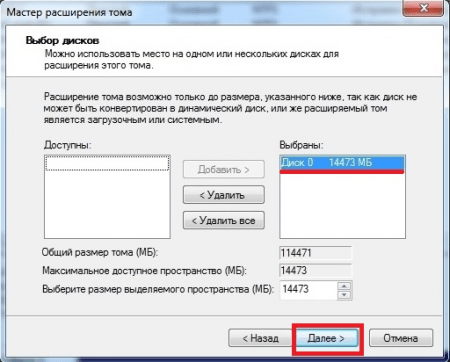
Before starting the procedure in this way, you need to copy all the data from the partition that needs to be attached to another, since the volume is deleted before the operation and, accordingly, all information from it is erased. In Windows OS, there is a disk management console to perform such operations. To open it click right click mouse over the “Computer” icon and select “Manage”. The computer management console will open, where you need to select “Disk Management” in the left menu.The console displays all available drives. Now you need to select a section that is combined with some other. After that, right-click on it and select “Delete Volume”. We confirm the operation, after which the unallocated space will appear in the menu. Then open the context menu of the volume to which you want to attach the unallocated space, and select the “Extend partition” item.

Next, the Volume Expansion Wizard opens, in which you will be asked to select the disk through which you want to increase the space on local section. In our case, this is just one volume, which was previously a hard disk partition.
Method 2: merging disk partitions in Acronis Disk Director.
This method is more reliable, since it is not necessary to transfer data from one disk to another in Windows: the program will independently merge the partitions. Acronis Disk Director has an intuitive interface that makes it easy for any user to understand.Note: There are 2 versions of this program: for Windows OS and boot version. It is recommended to use the second version to avoid errors that may occur during the procedure. If this is not possible, then first make sure that your operating system is running without errors or failures.
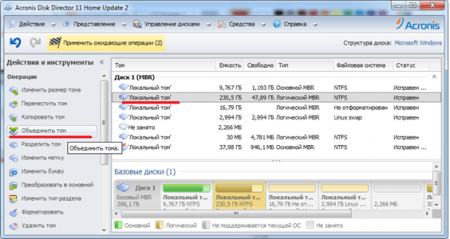
The main window of the program will display information about all partitions of the hard drive. To perform a merge, select the section you want to merge into side menu Click "Merge Partitions".
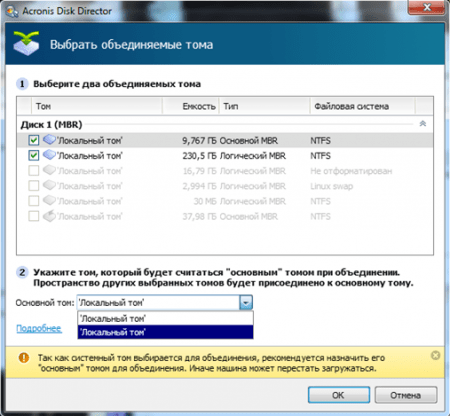
A wizard will open in which you need to select the disks to merge, and also indicate which of them will be the main one, that is, which disk will be connected to which.
Having completed the necessary manipulations, you need to fix them by clicking the “OK” button. Now it will appear in the main window new section volume as the previous 2. However, this does not mean that it has already been created. In Acronis Disk Director transaction confirmation is used to avoid incorrect user actions. After performing the necessary manipulations, in top corner A checkbox will appear with the number of operations to be performed.

When you click on it, a window with a list of operations will appear. Here the user can once again check the correctness of his actions. If everything is correct, then clicking the “Continue” button will start step-by-step disk partitioning according to the instructions, by specified user.
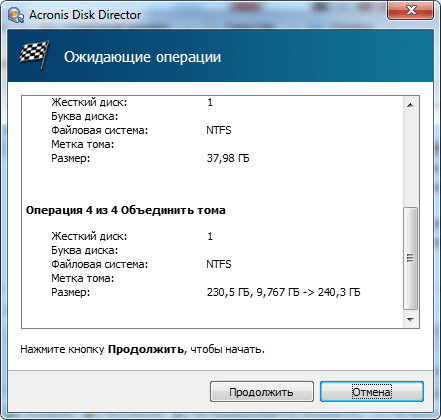
This process is irreversible. If the program is running under Windows OS, the computer will be rebooted to complete the operation.
You can also use the Partition Magic and Paragon Partition Manager programs to combine hard disk partitions. They are similar in functionality to Acronis Disk Director, so you can use either of them. All of these disk merging programs work well for any version of Windows.
From time to time users want to redistribute free place on your hard drive. This happens in cases where, for example, one has already run out of space, while the other still has quite a lot of it. To divide free space without any problems, it is recommended to look at special editing software. In principle, you can try to do all the work using standard Windows tools, however, it is better to use software that was developed specifically for these purposes. Although you can download many various applications, we will describe only a few of them that have gained enormous popularity.
One of the best, undoubtedly, is the program for division of hard disk called Partition Magic. The software boasts many positive qualities and advantages, among which are a convenient and intuitive interface, as well as rich functionality. Its capabilities are very great; it can move information, change, merge, delete, and also create new sections.
Among other things, free Partition program Magic is designed to work with all known file systems, including NTFS, FAT and FAT32. You will be able to convert one system to another without losing data. In general, if you need a high-quality and useful software that will quickly cope with any tasks related to working with hard drives, then you should definitely study Partition Magic - you will really like the software.

Also called Paragon Partiton Manager. The software is different high speed performing all separation operations. At the same time, its functionality allows you to convert file systems, solve loading problems, perform backup separate files and whole disks. Unfortunately, it can only be installed on Windows, which forces all other users to find an alternative.

Finally, let's talk about the cool Acronis Disk Director utility - a full-fledged software package that includes a large number of important components– section manager for moving, copying, deleting, merging. In addition, if installed, users will be able to recover partitions on the hard drive if they were lost as a result of a system failure.
Partitioning a disk into several partitions is a very common procedure among users. Using such a HDD is much more convenient, since it allows you to separate system files from custom ones and manage them conveniently.
Smash HDD You can split partitions into parts in Windows 10 not only during system installation, but also after it, and for this it is not necessary to use third-party programs, since such a function is available in Windows itself.
In this article we will look at how to divide a HDD into logical partitions. This can be done in an already installed operating system and when reinstalling the OS. At his discretion, the user can use the standard Windows utility or third party programs.
Method 1: Using programs
One of the options for dividing the drive into partitions is to use third party programs. Many of them can be used in running Windows, and as bootable flash drive, when it is impossible to partition a disk while the OS is running.
MiniTool Partition Wizard
Popular free solution, working with different types drives is . The main advantage of this program is the ability to download an image with an ISO file from the official website to create a bootable flash drive. Partitioning a disk here can be done in two ways at once, and we will look at the simplest and fastest one.

The letter of the new volume can later be changed manually via "Disk Management".
Acronis Disk Director
Unlike the previous program, - paid option, which also has big amount functions and can split the disk into partitions. The interface is not very different from MiniTool Partition Wizard, but it is in Russian. Acronis Disk Director can also be used as boot software if you cannot perform operations while running Windows.

EaseUS Partition Master
- a program with a trial period, like Acronis Disk Director. Its functionality includes various features, including disk partitioning. In general, it is similar to the two analogues listed above, and the difference mainly comes down to appearance. There is no Russian language, but you can download a language pack from the official website.

Method 2: Windows built-in tool
To perform this task you need to use the built-in utility "Disk Management".
- Click on the button Start right click and select "Disk Management". Or press on your keyboard Win+R, enter diskmgmt.msc in the empty field and click "OK".

- The main hard drive is usually called Disk 0 and is divided into several sections. If 2 or more disks are connected, then its name may be Disc 1 or others.
The number of partitions themselves may vary, and usually there are 3 of them: two system and one user.

- Right-click on the disk and select "Shrink Volume".

- In the window that opens, you will be asked to compress the volume to all available space, that is, create a partition with the number of gigabytes that is free. this moment. We strongly do not recommend doing this: in the future, for new Windows files there may simply not be enough space - for example, when updating the system, creating backup copies(restore points) or installing programs without the ability to change their location.
Be sure to leave for C: additional free space, at least 10-15 GB. In field "Size" compressible space in megabytes, enter the number you need for the new volume, minus the space for C:.

- An unallocated area will appear, and the size of C: will be reduced by the amount that was allocated in favor of the new partition.

By region "Not distributed" right click and select "Create Simple Volume".

- Will open "Master of Creation" simple volumes» , in which you will need to specify the size of the new volume. If from this space you want to create only one logical drive, then leave full size. You can also split the empty space into multiple volumes - in this case, specify right size volume you are creating. The rest of the area will again remain as "Not distributed", and you will need to do steps 5-8 again.
- You can then assign a letter to the drive.

- Next, you will need to format the created partition with empty space; none of your files will be deleted.

- The formatting options should be as follows:
- File system: NTFS;
- Cluster size: Default;
- Volume Label: Enter the name you want to give to the disk;
- Quick formatting.
After this, exit the Wizard by clicking "OK" > "Ready". The newly created volume will appear in the list of other volumes and in Explorer, in the section "This computer".

Method 3: Partitioning the disk when installing Windows
It is always possible to divide the HDD when installing the system. This can be done using the Windows installer itself.

Now you know how to partition a HDD into different situations. This is not very difficult, and will ultimately make working with files and documents more convenient. The fundamental difference between using the built-in utility "Disk Management" and there are no third-party programs, since both options achieve the same result. However, other programs may have additional functions, for example, transferring files, which may be useful for some users.
Sometimes there comes a time when the user is not satisfied with the volume indicators logical partitions on your hard drive. Of course the easiest way to make a change is hard dimensions disk during Windows installations, but it is not always possible to reinstall the operating system. A hard drive partitioning program will help with this. There are various software that allow you to change the structure of your hard drive without losing data or reinstalling the OS. Let's look at the most popular programs for hard disk partitioning and built-in Windows application « ».
If you need to make simple steps by changing the disk structure, then the standard Windows tools will be quite enough. In Windows 7 and 8 similar utility can be called by running the following actions: Right-click on “My Computer,” select “Manage,” and then “Disk Management.” Then a program window will open.
To make changes to the structure, you need to open the context menu by right-clicking. In the list that appears, you need to use the following functions:
- Shrink volume. This operation Shrinks an existing partition to provide more memory for another partition.
- Expand volume. Using this function, you can increase the performance of a disk partition. It is important that there is unallocated disk space on the hard drive.
- Change drive letter. This function allows you to change the drive letter to any free one.
If you need to shrink or expand a volume, you need to select the appropriate operation in the menu and specify the new size in megabytes.
EaseUS Partition Master Home Edition
EaseUS Partition Master utility Home Edition is powerful software, which is used for hard control disk in personal computer. The utility has the following functionality:
- Checking the hard drive for bad sectors.
- Hide sections from My Computer.
- Recovering and deleting data from partitions.
- Changing partition letters.
- Changing volume partitions.
- Removing and creating partitions.
Similar software is free for home use and is great tool to control the hard drive. The utility has no analogues among free software.
The only drawback of the program was the lack of Russian language. So let's look at the controls.
When starting the program, select “Partition Manager”. Then the utility window for dividing the hard disk will open.
Then the required partition on the hard drive is selected. All possible operations are presented in the Operations menu. Let's look at the most important of them:
- Surfacetest. Checking the hard drive for bad sectors.
- Deleteallpartitions. Delete all used partitions.
- Copydisk. Copying all information from one hard drive to another.
- Wipepartition. Deletes all files from the specified hard drive partition.
- formatpartition. Formatting a section.
- Deletepartition. Deleting a section with all the information on it.
- Hidepartition. Hiding partitions in the My Computer folder.
- Changedriveletter. Changing the letter of logical partitions hard drives.
- Mergepartitions. The process of merging several sections into a single one. All available information is saved.
- Copypartition. The process of copying one hard drive partition to another. All data is saved. The operation is effective for creating a backup or before installing the OS.
- Resize/Movepartition. Resizing hard drive partitions. Move logical volumes within disk space.
Now you can begin the process of changing hard drive partitions. To do this, select the Resize/Movepartition item.
In the window that opens, select the desired volume size in the “PartitionSize” menu and click “OK.” Then in the working window of the utility, select “Apply”. After this, the process of resizing the partition will be shown.
If a resize is made on a non-system partition, the changes will take effect without a reboot. If the partition where Windows is installed changes, you need to reboot.
Paragon Partition Manager
This program will be quite effective for working with hard drive partitions. The utility is free and is an analogue of the previous program. Changes only in the interface.
The application is styled for Windows 8. The main points of the program:
- DeletePartition. Removing partitions.
- FormatPartition. Formatting sections.
- ResizePartitions. Resize existing partitions.
- CreateNewPartition. Creating a new section.
Let's look at the process of resizing a hard drive. You need to select the “ResizePartitions” item, then click on “Next” twice.
In the window that opens, you need to move the slider to the required location. As alternative solution Enter the desired partition volume in the right or left field, then click “Next” again.
After that, check “Yes, apply the changes physically” and click “Next” again, then “Restart the computer”.
After you press this button, the computer will restart. You should save your documents and close all applications beforehand.
After the reboot, the software will begin resizing the volume. This process approximately takes about 15 minutes. When performing the procedure, it is not recommended to press the keyboard buttons and restart the computer. When the resizing task is completed, the computer will boot as normal.
In this article we looked at three free programs that can be used to perform hard division disk. For this process don't buy expensive ones software packages or look for them on torrents.
Paragon Partition Manager 14 Free – free program, which will allow you to easily manage hard drives computer. The main function of the program is splitting hard disk into partitions.
The program interface is in English, but simple and will be understandable to any user. The program has many various functions, the main ones are available in a free version and should be sufficient for home use. If you want to use the program “to its fullest,” you must purchase a license.
Download free version programs from Yandex.Disk by clicking on the link below. Run the installation file and go through all the suggested steps - the process is very simple.
After installation is complete, launch the program on your computer. You can use the program either in simple mode, or select the mode for advanced users.
In simple mode the program is displayed as a menu quick launch. It allows you to launch product components, access help system, go to home page. To open the main program window, click on the “Partition Manager Free” button.
From the Quick Launch menu, you can perform the following operations with hard drive: “Create New Partition” – create a new partition, “Resize Partition” – change the size of the partition, “Format Partition” – format the partition, “Delete Partition” – delete the partition, “NTFS-HFS Convert” – convert the file system of the selected partition.
Go to the main program window. The disk map is displayed here. The color of the disk - blue, light green - depends on the current file system. On the right you can see information about the selected disk: drive letter, volume label, type, file system, volume occupied space on disk. There you can also select the operation that needs to be done with the hard drive.
If you want to return to the previous view of the program, click “Express Mode”.

To create a new partition on the selected hard drive, click “Express Create”.

Next the Master will ask you to choose "Partition Creation Method", that is, select the amount of space for the new partition. I have two methods available, yours may be different - it all depends on hard state disk.

As a result, a new partition will be created on the hard drive. To save the settings, click “Apply”.

It is better to create a new partition on your hard drive manually. To do this, right-click on the hard drive and from context menu select “Move/Resize Partition”.

Now select the amount of memory for the new partition. If you select “Free space after”, the new partition will be created after the partition from which it is created. Click “Yes”.

Now right-click on the created partition and select “Create partition” from the context menu.


To finish creating the new partition, click Apply.

By using Paragon programs Partition Manager 14 Free we partitioned the hard drive. This is done quickly and there should be no difficulties.
Rate this article: