Install the fan control program. Controlling the CPU cooler is the best way to get rid of noise in the system unit
Noisiness and slow work laptop - perhaps the result of an increase in temperature and subsequent hard work cooler of the laptop cooling system, which cannot cope with the emerging load due to a decrease in its own efficiency.
Thus, a slowdown in the operation of applications can be noticeable after the temperature rises above 70-75 degrees. This is a consequence of dynamically reducing the frequency of the laptop's central processor (so-called CPU throttling or throttling).
If the temperature rises further, the laptop may shut down to protect the system from overheating.
Permanent use of a laptop with such a malfunction will lead to failure motherboard. Most often it fails north bridge or video card. I must say that the service is not cheap. Therefore, it is better to carry out express diagnostics and prevent expensive repairs.
Common signs of an overheating laptop:
- the laptop begins to make more and more noise;
- the keyboard gets hot;
- Windows, games and other applications begin to slow down.
Some inconveniences while working on a laptop that overheats (can help with diagnostics)
- The laptop is very noisy. This is how the cooler constantly operates at high speeds, which shortens its service life;
- The keyboard, touchpad and case get noticeably warm. Working with such a device becomes uncomfortable;
- The laptop is very slow. Programs stop responding to requests (freeze) - performance decreases.
- The laptop may turn off suddenly. User data may be lost due to sudden shutdown devices. It is often not possible to turn it on immediately after turning it off - it takes time for the processor and radiator to cool down.
To correctly diagnose and identify laptop overheating, some prerequisites are necessary:
- Availability minimal knowledge from the person conducting the diagnosis. You need to know and be able to correctly measure the temperature of the processor and video card of a laptop. You will also have to evaluate the degree of heating of the chipset over time, taking into account time and load - mandatory requirements. It is advisable to be familiar with the following concepts: normal temperature readings of a laptop when idle and under load;
- A program for monitoring temperature over time and recording readings;
- A program for creating a controlled load on the CPU and GPU.
Testing program
Download the AIDA64 Extreme Edition program from the link http://www.lavalys.com/support/downloads/;
Install on your laptop (the program is in Russian, free for 30 days).
AIDA64 allows you to simultaneously load CPU and monitor the dynamics of CPU warming up in real time. Sometimes you can monitor the operation of the video card (GPU) - it all depends on the type of sensor in specific model laptop.
Instructions for self-diagnosis of laptop overheating
We launch the program and check the correct operation of the sensors and the program. Temperature readings should be between 35 and 55 degrees Celsius. If the readings are very different, perhaps the sensors are not working quite correctly, or are not being read correctly by the program - this happens. In this case, you will have to find another software;

Go to the Tools -> System Stability Test tab. Click the Start button.


Under the influence of the load created by AIDA64, the central processor begins to warm up. An accurate test requires 5 to 10 minutes. There is no point in loading the laptop any more. In this case, it is worth paying more attention not even to the temperature, but to the dynamics of its growth. If growth is very rapid, most likely the laptop needs preventative cleaning from dust and replacing thermal paste. Ideally, the temperature curve should be as flat as possible. They can help us in this case too.

CPU temperature for regular laptop should not exceed 75-85 degrees - this is the maximum.
If AIDA64 is not suitable?
If for some reason it was not possible to use AIDA64 (the trial period), pay attention to a tiny utility for measuring the temperature of a laptop or computer - Open Hardware Monitor. You can download it. The program has a very small distribution size, only about 500Kb (~0.5Mb). It has a simple, intuitive and pleasant interface. The language is English, but it’s very easy to understand, since you only need to find the thermometer icon and the temperature values for the CPU. A simple and understandable tool for diagnosing possible overheating, especially since its readings and AIDA64 readings are on a relatively old Lenovo laptop The G580s converged completely.

All that remains is to find effective program to warm up the processor to the maximum possible values and work on all Windows platforms from Windows 98 to Windows 8 (the program starts with a driver error - but the main functionality is normal). A veteran program, S&M, is suitable for this role. The utility is very good at loading the CPU, does not require installation, and at the same time has a size of 150Kb. You can download the S&M program using a direct link from our website -.

For the test it is necessary to run both programs S&M and Open Hardware Monitor and monitor sensor readings. Approximate time testing - 3 - 5 minutes. To quickly complete the tests, before starting the test, it is advisable to go to the S&M settings and move the CPU Test slider to the Fast position.
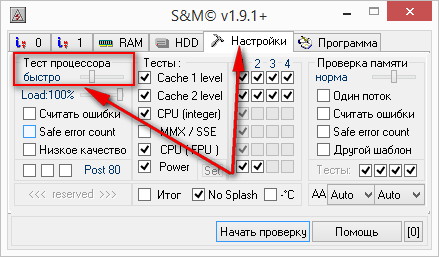
Click the Start test button and wait for the test results.

The temperature range for the central processing unit (CPU) should be between 45 and 75 degrees. Above these values - overheating.
In the same way, you can test overheating for a desktop computer. If necessary, another will be required software, the algorithm will remain the same: monitoring the node under load and correct interpretation of the received data.
If your laptop just turns off, freezes, or just sometimes lags in games, then this article is for you. This article describes how to determine whether a laptop is overheating, as well as how to deal with overheating.
Introduction
IN this manual we'll talk about overheating. In fact, this is one of the most common problems, which are found on laptops. The topic of overheating was partially raised in the article: . In this article I will try to reveal it more fully.
Let's first look at why the laptop overheats. There may be several reasons for this:
- The cooling system is poorly designed. I think it’s no secret to anyone that laptops are all different. Therefore, they have different systems cooling. For some, it is thought out very well and with a reserve, while others do not have laptops. As a result, some laptops heat up weakly, while others heat up more;
- Accumulation of dust and other debris in the cooling system. This happens very often. Dust gets clogged in front of the radiator on the fan side. In particularly advanced cases, the thickness of the layer of dust, wool and other debris reaches 5-10 mm. Naturally, the efficiency of the cooling system in this case tends to zero. So the laptop overheats;
- Loss of contact between the chip surface and the heat sink plate. This also happens. Since then, the thermal paste, which is located between the chip and the plate, has hardened. This can lead not only to a deterioration of its properties, but also to the fact that due to shock or strong vibration, the heat sink plate will simply move away from the layer of hardened thermal paste and an air gap will form. This greatly complicates heat transfer and, as a result, the chip overheats;
- Incorrect operation of the laptop. Many laptops are designed in such a way that air is drawn in to cool the internal components through holes in the bottom and/or from the keyboard side. If you place the laptop on a soft surface, the holes on the bottom will block. As a result, the laptop will simply overheat. The same applies to working with the lid closed. Some of the holes are blocked, less air enters the cooling system and the laptop overheats.
Let us now consider how overheating usually manifests itself.
Typical symptoms of an overheating laptop:
- The laptop turns off by itself;
- The laptop freezes;
- Games experience occasional stuttering. They are described in more detail in this guide: .
This happens because the overheating protection is triggered. The point is that modern processors, video cards and chipsets have thermal sensors that constantly monitor the temperature. If the temperature exceeds a certain threshold, the processor and video card reduce their frequency and supply voltage. As a result, the temperature and performance drop and the laptop begins to slow down. Also, if the laptop overheats, it may freeze or turn off. When the video card overheats, extra lines, squares and other defects may appear on the screen. When the processor overheats, the laptop freezes and turns off with a characteristic sound jam.
It is quite logical that in order to determine whether a laptop is overheating or not, you simply need to measure the maximum temperature of the processor, video card and other components. This is what we will do now.
Temperature measurement
The utility is great for measuring laptop temperatures HWMonitor. You can download it from these links: /.

This utility shows the current, minimum and maximum values temperatures since launch. We are only interested in maximum temperature values.
Now we launch a game or other application that heavily loads the laptop. We work or play for 15 minutes and see what the utility shows HWMonitor:

Important Note:The HWMonitor utility must be minimized while playing or working with an application. If you start it after you have worked or played, or while you have closed the game, then you will not get accurate data on the maximum temperature. This is due to the fact that if you remove the load, the processor and video card drop their temperature very quickly.
Now I’ll explain what is what:
- THRM- this is a chipset. During the game he was able to warm up to 74 degrees (right column);
- Core #0 And Core #1- These are the processor cores. They warmed up to 71 and 72 degrees;
- GPU Core- this is the video card chip. He was able to warm up to 87 degrees;
- HDD- this is a hard drive. It heated up to 47 degrees.
Note: if you can’t figure out what the HWMonitor utility is showing you and how bad it is, then don’t be shy and ask in the appropriate forum topic: . To message Necessarily add a window image HWMonitor.
What temperatures are normal:
- For a processor, the normal temperature can be considered 75-80 degrees under load. If it’s above 90, it’s definitely overheating;
- For a video card, the normal temperature is 70-90 degrees;
- For a hard drive, the normal temperature is up to 50-55. If it is above 60, then it is worth copying important data from the hard drive. There is a risk of losing them;
- For chipset normal temperature up to 90 degrees.
Important Note: Maximum temperatures may vary from model to model. For example for nVidia video cards GeForce 8600M GT normal temperature is 90-95 degrees. For nVidia GeForce 9500M GS - 80-85.
If your laptop does not overheat and the temperatures are significantly lower than those described above, then the cause of freezes, slowdowns and shutdowns should be sought in the operating system and drivers. First of all, you need to try updating Laptop BIOS. It is available on your laptop manufacturer's website. If this does not help, then you should reinstall the system, try other drivers, update programs and look at the recommendations from the manual:. If this does not help, then you should contact service center since the cause of laptop freezes and shutdowns may be partial failures of the motherboard (power stabilization circuits and other things). It is very difficult to fix this at home.
If the laptop still overheats, then you need to take measures to cool it.
There are the following basic ways to lower the temperature of a laptop:
- Place something under the rear end;
- Use a cooling pad;
- Clean the cooling system from dust;
- Replacing thermal paste.
Let's look at each of these methods.
1. Raising the rear end of the laptop
In most cases, the air that cools the laptop components is drawn through holes and slots in the bottom of the laptop. Some air is also sucked in from the keyboard. By lifting the back end of the laptop, we increase the gap between the bottom and the table. As a result, air circulation improves. In other words, the air that is forced through the radiator of the cooling system becomes colder. Also, by reducing the resistance of this air, more air is sucked in. As a result maximum temperature may drop by 5-10 degrees.
You can put anything under the back end, from books to rubber bands. This is what it looks like:

There is nothing complicated. Everything is simple and clear.
2. Using a cooling pad
This method is also quite simple and effective. The bottom line is that the laptop is placed on a stand with fans. These fans force air onto the bottom of the laptop. Through slits and holes in the bottom, air enters inside. As a result, the air flow increases, which blows over the internal components of the laptop and the radiator. In practice, the temperature drops by 5-15 degrees.
This is what the cooling pads look like:

They usually cost from 20-30 to 50-60 $. You can also do this yourself. The stands are usually powered from the laptop's USB port.
3. Cleaning the laptop cooling system from dust
Cleaning the cooling system from dust makes sense if 2-3 months have passed since the purchase. This period depends on the operating conditions of the laptop. After cleaning, the laptop will heat up the same way as after purchase.
This is a service operation and is often not covered by warranty. If possible, entrust this operation to a service center. For small fee Everything will be cleaned for you.
If you don’t want to give the laptop to a service center, then you can completely clean it yourself. To do this, you need to partially disassemble the laptop. Cleaning with a vacuum cleaner often does not have a serious effect.
So. Let's begin. First you need to turn off the laptop, unplug it and turn it over:

Before disassembling your laptop, you should remove the battery. This is a must!. When the battery is removed, it is worth analyzing how to get to the fan. On Acer Aspire 5920, for example, to do this you need to remove the large bottom cover. It is held on by the following bolts:

When all the bolts that hold the cover are unscrewed, we begin to remove it a little at a time:

Important Note: Often, in addition to bolts, the lid is held in place by these latches:


They must be handled very carefully so as not to break. They usually serve to more securely fix the lid.
And here is the fan and radiator that need to be cleaned:


Now you can clean both the blades and the radiator itself:

Since I clean it regularly, there is not a lot of dust and other debris there. In practice, there are cases when a thick layer of debris accumulates in front of the radiator. It is not surprising that the cooling system does not cope with its task and the laptop overheats.
You need to clean it with a dry cloth, napkin or brush.
When we're done cleaning, we put everything back together.
4. Replacing thermal paste in a laptop
This is the most the hard way laptop cooling. Replacing thermal paste requires experience and knowledge. In this case the warranty is void. If possible, entrust this operation to a service center.
The essence of this method is that laptop manufacturers usually use thick layers of thermal paste, which is not the most best characteristics. This is necessary to ensure an acceptable defect rate. If you replace that thermal paste with a more efficient one, you can lower the temperature of the processor and video card by 5-15 degrees.
More details about replacing thermal paste in a laptop are described in this material: Replacing thermal paste in a laptop.
That's it.
If you have any questions about this material, then you should first read it and then ask on the forum.
Please post all questions about laptop cooling in this forum topic: .
You can make all comments and suggestions regarding the article itself through this contact form: Please note that if something doesn’t work out for you, then you should only ask on the forum. This kind of emails will be ignored.
Detailed description how to solve hardware problems with turning on a laptop, image defects, and many other problems at home.
Are you having a problem with your laptop? You don't know what to do? Then this material is for you. The solution to the problem should start from here. Solutions are collected here typical problems with a laptop.
Good day, computer users. The topic of our conversation today worries many: how to make the cooler much quieter.
Often the main reason for the loud operation of the cooler is the presence of a layer of dust on it. This is easy to check without even removing the cover from the system unit. It is enough to give the PC a small load, and the cooler starts spinning at maximum speed (and no drop in temperature is observed).
You should clean the dust in the entire system yourself or order subscription service for your computers. If cleaning does not help, you should figure out whether mechanical damage at the cooler.
These simple steps often help reduce the noise produced, but in some situations this is not enough. If you are completely sure that the noise is not due to dust, then you are faced with a problem that needs to be solved by other methods. Most likely, the matter is in the rotation parameters, namely, in the given torque. It turns out that even with normal download PC appears loud noise, which means that the speed is high. In this article you will learn how to correctly set optimal speed fan rotation.
So let's begin.
Correct cooler speed: how to achieve it? Speed fan
Fan adjustment is done using the motherboard. Calculated required speed, based on temperature data and from those indicated in Bios settings. The motherboard independently regulates the rotation speed by changing the voltage/resistance, which allows it to control the speed based on user-specified settings. In addition, the temperature of the PC inside the case is taken into account.

But these actions do not always lead to setting the correct cooler rotation speed, despite “smart” technologies. In most cases, there is a choice of either the maximum rotation speed or the minimum. The first option causes excessive noise, the second ─ the cooler is much quieter, but the speed is not enough for normal cooling. There are at least 3 options for solving the problem:
- attempt to enter required values using Bios;
- physical impact on the operation of the cooler with the subsequent connection of various physical. devices capable of changing the rotation speed;
- installation of specialized software for speed control.
The first option may seem the simplest, but it is not suitable in all cases. No one can guarantee that all coolers are powered by motherboards. boards , which means Bios may not even be aware of their presence. This often applies to case fans. In reality it looks like this: they work on full power, for which there is no need, and are producers of unnecessary noise.

Physical intervention can help, but for this the owner must have necessary knowledge in physics and electronics, while understanding how you can change the rotation speed. And besides, there is no guarantee that your intervention will not lead to damage to the fan, and cutting the wires itself is not an easy task. Ultimately, you can end up with a cooler whose rotation speed is forced to change, and it will not be possible to increase it if necessary.

The solution may be to buy a reobass. You need to connect everything through it and easily change the rotation speed. However, this is quite expensive, and many people do not like this method because they have to change the set speed each time, which can only be done manually.
After analyzing the two methods, we smoothly moved on to the most important thing - installation special programs to adjust the speed. If you try, you can even find free programs, among which the highest quality is Speed fan. This utility completely copes with the adjustment and will become your salvation. The only problem is that this program is not English, but the interface is quite simple and you'll get the hang of it quickly. Installing a program is several times easier than installing a game.
When you launch the utility for the first time, the following window may appear:

Click on the “Do not show again” checkbox, then “Close”:

So, let's figure it out. Regardless of whether it is a new version of the program (picture above) or an old one (picture below), the principle of operation is the same. The only difference is the different value signatures.

“Cpu Usage” ─ this field with indicators shows how much the processor and its cores are currently loaded. “Configure” opens the program settings, “Minimize” minimizes it.
“Automatic fan speed” ─ it makes no sense to enable this checkbox, because then the cooler will rotate at the original speed, which will reduce the benefit of the utility to zero. It makes no sense to install a program and not change the speed. If you don’t want to waste your own time, order computer repairs in Butovo at a time convenient for you.
IMPORTANT! 100% guarantee that the cooler in your PC is installed in in the right places, therefore, when choosing CPU or Fan1 for the first time, you need to remove the cover of the system unit and observe which cooler will work slower (faster) when changing parameters in the program. This is worth dealing with from the very beginning, since the program may incorrectly read information about coolers, and they may be connected to the motherboard sockets incorrectly.
Next recruitment is underway indicators of rotation speeds of certain fans (left) and component temperatures (right) at the current moment. So which is which? Let's look at the example of rotation speed, which is measured in RPM (rpm):
- SysFan (Fan1) ─ shows the rotation speed of the fan plugged into the SysFan socket on the motherboard. A chipset cooler or any other cooler connected here by mistake can be connected here (each motherboard connector has a specific signature);
- CPU0 Fan (Fan2) ─ parameter showing the speed of the fan on the processor, provided that it is plugged into the CPU_Fan slot;
- Aux0 Fan (Fan3) ─ provides information about the current rotation speed of the cooler plugged into the AUX0 connector;
- CPU1 Fan (Fan4) ─ similar to CPU0, works if there is a second processor or a connector for a cooler labeled CPU1_Fan;
- Aux1 Fan (Fan5) ─ similar to Aux0, shows the rotation speed of the knob connected to the AUX1_Fan connector;
- PWR Fan (Fan6) ─ indicates the speed of the cooler located in the power supply? or the speed of any fan connected to the PWR_Fan connector on the motherboard.
Particular attention should be paid to the fact that these parameters completely coincide with the motherboard connectors, into which you can connect absolutely any cooler from the listed ones, and the indicator will be in the corresponding column of the utility. This is only possible if the cooler is connected via a small 3-pin connector on the motherboard. For clarity, take a look at the photo. The first photo is with the correct connector (4-pin) and socket (3-pin). Speed adjustment is allowed:


The wrong connector (power supply to the power supply) does not allow monitoring and changing the speed even using the program:

If you find on your computer this method To power the coolers from the power supply, it is better to plug the plugs into the connectors on the motherboard. This will allow you to change operating parameters using the utility.
As mentioned above, the temperature of the components is indicated on the right, but the indicators of this program are not always adequate and accurate, and this parameter is better controlled using analogues HWMonitor or AIDA64, which give the most exact values. Taking into account their readings, set the settings:


Now we have reached the most important thing - speed adjustment. This can be done in one way: opposite the inscriptions Speed (01-06) or Pwm1-3 Pwm1-3 (for newer versions) there are arrows that set the fan rotation speed. They are exactly what we need. If you press them, you can hear how the rotation speed of the coolers changes. Here you can understand what the minimum volume of your PC is.

To understand in which column the speed of each cooler is located, click on the arrows and see where the RPM will change. You cannot turn off the fans completely, as there is a risk of burning something. When adjusting, you should also monitor the temperature.
Disable/enable fan speed control in BIOS
Some motherboards and their BIOS types may block the program. This occurs because automatic or pattern-based throttling is enabled or disabled in the BIOS.
You may encounter incorrect work programs and problems that arise, or you decide to connect speed control using the motherboard. Then you will need to go into the BIOS and activate or disable the adjustment system. You can do it like this:


If Q-Fan is in the Enable position, it means automatic control enabled if Disable control is performed manually using the utility. Depending on what type of BIOS is in your PC, and the location this parameter. It may be in other tabs and have a different appearance. Sometimes you need to switch CPU Fan Profile from Auto to Manual (or vice versa).
There may be many options for the location of this tab, but it is required on every computer, and you can find it. Perhaps it will be called CPU Fan Contol, Fan Monitor, etc.
Afterword
The program has other tabs that are responsible for completely different components. This program may be exactly the utility you have been looking for for a very long time. Keep your PC productive and quiet.
The operation of fans located inside a laptop is one of the main guarantees for the operation of all devices without failures. The article will describe the program for controlling coolers - SpeedFan, its main functions and settings.
Why adjust fan speed?
Many users do not understand why manual setting, if the hardware manufacturers themselves manage the devices. However, no algorithm can be perfect and satisfy 100% of consumers.
If the CPU does not heat up much, but the screw speed always remains at maximum level, this enhances what is created by the system unit.
If the medal has reverse side. Very often, video card manufacturers lock the screw speed at 40-50%, which leads to overheating in resource-intensive applications. Of course, this does not appear immediately. First when graphics adapter just bought it, it works like a clock. But over time, the cooler wears out, accordingly, its speed decreases, and 50% of the revolutions cannot provide optimal air flow.
SpeedFan
SpeedFan is a program for controlling the cooler of a laptop or computer. Multifunctional and free. The download link is located on the official website of the developer. Fan rotation can be controlled automatically.

Installation is simple, even an inexperienced user can handle it. After the first launch, the main application window and an area with a short description will be displayed on the screen. To prevent it from appearing again, you should check the box next to "Don"t show again." After this, the utility will begin reading the parameters of the motherboard chips. As a result, a list of active coolers and their speed (RPM or revolutions per minute) will appear in the main program window. In addition, the temperatures of all major PC components, load levels and voltage data will be displayed.

The very first thing to do is click on the “Configure” button, then go to the “Options” tab, and in the “Language” area set the value to “Russian”. After this, the program for controlling the coolers of the video card, processor and other devices will switch to Russian.
Main blocks of the utility
The first and main block is located on the left. It displays fan speed values. All sensors are named the same - Fan. Only the index nearby changes. In this case, the number of sensors in the list may exceed the number of fans installed in the system unit.
Many novice users are intimidated by zero or negative numbers, which are issued by the program for managing coolers, but you simply don’t need to pay attention to them.
- The second block is located on the right side of the window. It indicates the temperature of each element of the system:
- GPU - video card.
- HD0, 1, 2, 3 - hard drives.
- CPU, Core - central processing unit.
- MB - RAM.
- Temp - devices that could not be detected.
The only and main drawback of the application is that often all elements are named Temp. Determining which string corresponds to what can only be determined by trial and error.
The third block is located at the bottom of the main utility window. It is with the help of it that computer coolers are controlled. The program names the screws as Speed1, Speed2, and so on. Values are specified as percentages.
Definition of fans
The inscriptions next to it, as noted above, are not very informative. Therefore, first you should determine which line corresponds to which cooler. To do this, you should remove the left cover from the system unit and change each Speed value one by one from the maximum 100% to 85%, at the same time the numbers next to the Fan lines will decrease. Which fan inside the computer will slow down is what you controlled in at the moment. Remember or write down which specific Speed controls and Fan sensors belong to which device.
Settings
The cooler speed control program allows you to change most of the names of its main window so that the user does not get confused in the future.

- Click on the "Configuration" button.
- Go to the "Temperatures" tab.
- Find those names that refer to active coolers.
- Click on a line to highlight it. After a few seconds, click on it again. A cursor will appear in the field; now you can independently set absolutely any name for the sensor in the program.
- Now pay attention to bottom part settings windows. It sets the desired device temperature and alarm temperature. The latter indicates how hot the component must be before turning on the maximum fan speed. Naturally, for different devices these values must also be different. To find out which ones are suitable in the best possible way, you should visit the website of the hardware manufacturer.
- After that, click on the “+” icon, this will expand the branch that sets the correspondence between the PC component and the cooler regulator. Just check the box next to what you want.
- Uncheck all the boxes next to those devices that you do not want to monitor in the main SpeedFan window.
Fans and speed
- Go to the Fans tab and rename everything required lines and here. This procedure is similar to changing the names of sensors. Also, after disabling those that do not need to be monitored, the cooler management program will no longer display them in its main window. This is very easy to do - just uncheck the boxes next to them.

- Open the "Speeds" tab. Select the line that corresponds to the required fan. If desired, you can change the name of the lines here too.
- Set two values "minimum" and "maximum". In both cases, the speed is set as a percentage of the highest. The cooler will spin slower and faster than these levels only if the temperature taken from the sensor exceeds the “Alarm” value set previously.
- In addition, check the box next to the "Auto-change" line.
After completing the settings, click on "OK". The main program window will again be located in front of you. In it, check the "Auto speed" checkbox. An inexperienced user is unlikely to be able to set the optimal configuration the first time, so he will have to experiment. At the first sign of overheating, the best solution is to disable the application.
Additional options
The described program for controlling the processor cooler has a number of other useful functions. You can read about everything on the official website or in the user manual, which opens by pressing the "F1" key. Below are the most useful of them.
Click on the "Configuration" button and go to the "Options" tab. Check the box next to "Launch minimized". As the name suggests, the application will now launch, but will not display the main window on the screen. If you do not check this box, after each download operating system will be displayed on the desktop work area tool. It should be noted that if the program does not turn on with Windows, its shortcut must be moved to the C:\Users\Account_Name\AppData\Roaming\Microsoft\Windows\Main Menu\Programs\Startup directory.
The checkbox next to "Minimize when closing" will protect the user from accidentally terminating the SpeedFan process. Moreover, after clicking on the button in the form of a cross, which is in the right top corner each window, the program for managing coolers will simply be minimized to tray.
A little about security
The "Full speed on exit" checkbox increases safety. If the program is closed, the coolers will begin to rotate at maximum speed.

When this option is not active, after turning off the utility, the speed of the screws will remain unchanged, but will not be adjusted automatically. As the load increases, this can lead to overheating if the BIOS does not take control of the coolers in time.
If the cooler (fan) on any PC device does not accelerate to maximum speed automatically, which leads to overheating, it makes sense to use the SpeedFan utility. This application allows you to set a constant speed of rotation of the screws or set it to change depending on the temperature read from the main sensors. The SpeedFan utility only works with coolers whose speed can be adjusted through the BIOS.
Brief description of SpeedFan
Overclocking program SpeedFan coolers distributed free of charge. It is suitable for changing the speed of fans installed on the video card, central processor, chipset mother card. Before installing and running the utility, you must disable automatic adjustment in BIOS. If this condition is not met, the utility may incorrectly read information about the maximum possible speed of the screws and will not be able to spin them to the maximum level in a critical situation.
For example, if during startup BIOS programs will block the rotation speed CPU cooler at 700 rpm, the SpeedFan application will take this value as the maximum. When the CPU temperature rises, the PC fan will not speed up. This will force the computer to shut down or damage the CPU.
Installation and first launch
The installation distribution should only be downloaded from official resource software manufacturer. In any case, it is advisable to check the downloaded file for viruses. In general, the installation process is standard. In the first step, you will be asked to accept. In the second, you will be able to select places to create shortcuts. On the third step, specify the directory for unpacking the utility files.

During the first launch, the cooler overclocking program will search for all available temperature sensors and fans. When this process is completed, a small help window will appear on the screen. If you do not want it to appear after each program launch, you need to tick the only checkbox and click on “Close”.
When the help window is closed, you will see the main application tab. Initially, the program is set to English localization. To switch the interface language, follow these steps:
Click on "Configure" in the upper left part of the main window.
Go to the "Options" tab.
In the "Language" menu, select the desired language. Russian localization is already built into the utility.
Main window
The blocks of the main window display basic information. On the right is information about the temperature of the main components of the computer, such as GPU video card, chipset, central processor, hard drive. In addition to the real ones, the program for overclocking coolers will also show “garbage” here. To determine indicators that you should not pay attention to, you need to use the AIDA64 utility. To do this, compare the indicators in SpeedFan and AIDA64. If the latter does not contain any values, then there is no need to take them into account.

On the left is a list of cooler controllers. The list usually shows more fans than are installed in the computer. Some of them display the speed of real coolers. Others, as in the case of temperature data, contain “garbage”. Incorrect data in blocks is the only drawback of the utility, which is included in each new edition.
Determining the correspondence between sensors and coolers
At the bottom of the program there are screw speed controls. Their names are "Speed01", "Speed02", etc. (in SpeedFan in Russian - "Fan1", "Fan2"). But before setting the speed, you first need to determine the correspondence between the regulators and coolers.
The easiest way to do this is to desktop computer. Remove the left cover of the system unit. Change the value of the first regulator by several tens of percent. Observe which cooler starts spinning - faster or slower. Also write down or remember the line in the left block where the value changed.
The easiest way for laptop users to determine compliance is using the AIDA64 utility. At the same time, AIDA64 and the program for overclocking SpeedFan coolers must be launched. After changing the value of one of the regulators in SpeedFan, track in AIDA64 which device’s page the fan speed indicator will change.
Settings
In order to change the names of sensors and speed indicators to understandable ones, click on the “Configuration” line. To do this, just select any element of the list and then click on it with the left mouse button. Here, at the bottom of the tab, you can set the desired temperature of the device and the critical temperature.

If the component heats up to a critical level, the utility will automatically spin the PC fan at maximum speed. When the device has cooled to the desired temperature, the cooler speed will be reduced. If you have difficulty filling out the form and you do not understand what specific values need to be entered in these fields, read the instructions that came with the device, or find up-to-date information on the equipment manufacturer's website.
After this, click on the “+” icon located next to the device name. In the expanded list, leave a checkmark only opposite the fan that corresponds this equipment. Any cooler (fan) can be renamed. To do this, go to the "Fans" tab.
If you want to customize automatic change cooler rotation speed, switch to the "Speeds" tab. Select the desired fan. At the bottom of the window, enter the minimum and maximum speed in percentage. Never set the upper limit to 100%, because the cooler itself will accelerate to maximum when it reaches the peak temperature specified on the main settings tab. Once entered, check the box next to the "Auto Change" text.

Conclusion
The program for overclocking coolers on a SpeedFan computer will appeal to advanced users and overclockers. Everyone else will find it difficult. It will not be easy for an inexperienced user to establish correspondence between fans and sensors and understand all the parameters. In addition, the normal and critical temperatures of devices are not always indicated on manufacturers’ websites and in instructions.