What are the parameters of a get request? POST, GET: how requests differ from each other
Last update: 11/1/2015
Unlike GET requests, the data of POST requests is transmitted not in the request line, but in its body. A common example of such requests is sending form data to the server.
The post method is used to send POST requests. Its declaration and usage are generally similar to the get method. He accepts following parameters:
url: required parameter, containing the address of the resource that the request will access
data: optional parameter containing a simple javascript object or a string that will be sent to the server along with the request
success(data, textStatus, jqXHR) : optional parameter - a callback function that will be executed when the request is successful. It can take three parameters: data - data received from the server, textStatus - the request status and jqXHR - a special jQuery object that represents an extended version of the XMLHttpRequest object.
dataType: an optional parameter containing the data type as a string, such as "xml" or "json"
On output, the post method returns a jqXHR object.
Usage example:
$.post("ajax.php", ("login":"1111", "password" : "2222"), function(data) ( $("#news").html(data); ));
IN in this case We transmit password and login as data. On the server we can receive data and send a response to the user:
Since the post request is most often used when sending form data, we use the form on the client side:
$("#loginForm").submit(function(event) ( // Prevent regular shipping forms event.preventDefault(); $.post("ajax.php", ("login":$("#login").val(), "password" : $("#password").val()), function(data) ( $ ("#result").html(data)); ));
So, the server part that the form will access - the ajax.php file - remains the same. Only in this case now for parameter data in the post method we take data from the fields on this form.
Please note that we block normal form submission (event.preventDefault();), otherwise we would have a redirect.
Serializing a FormSince forms are often not limited to two fields, it is easier to use form serialization. Serialization is performed using the serialize method and as a result creates a javascript object, where the properties correspond to the form fields. And the values stored by these properties are the same as those of the corresponding form fields.
So, let's apply serialization of the form:
$("#loginForm").submit(function(event) ( // Prevent regular form submission event.preventDefault(); $.post("ajax.php", $("#loginForm").serialize(), function (data) ( $("#result").html(data); ));
Unlike the previous example, we have two differences here. First, notice that input fields have a name attribute. When specifying the data parameter, we serialize the form data through the serialize method: $("#loginForm").serialize() . IN this method Parameters are passed to the body of the request. Moreover, the parameter names are the values of the name attributes of the input fields. And the parameter values are the corresponding values entered into the text fields.
And so using php we can extract these values: $login=$_POST["login"] .
This post is an answer to a question asked in one of my articles.
In this article I want to tell you what the HTTP methods GET/POST/PUT/DELETE and others are, why they were invented and how to use them in accordance with REST.
HTTP So, what is one of the main Internet protocols? I’ll send the pedants to RFC2616, and tell the rest in human terms :)This protocol describes the interaction between two computers (client and server), built on the basis of messages called request (Request) and response (Response). Each message consists of three parts: a start line, headers and a body. In this case, only the starting line is required.
The starting lines for the request and response are different format- we are only interested in the starting line of the request, which looks like this:
METHOD URI HTTP/ VERSION ,
Where METHOD is the HTTP request method, URI is the resource identifier, VERSION is the protocol version (for at the moment version 1.1 is current).
Headers are a collection of name-value pairs separated by a colon. The headers convey different proprietary information: message encoding, browser name and version, address from which the client came (Referrer), and so on.
The body of the message is the actual data being transmitted. In the response, the transmitted data, as a rule, is the HTML page that the browser requested, and in the request, for example, in the body of the message, the contents of the files uploaded to the server are transmitted. But as a rule, there is no message body in the request at all.
Example of HTTP interaction Let's look at an example.Request:
GET /index.php HTTP/1.1 Host: example.com User-Agent: Mozilla/5.0 (X11; U; Linux i686; ru; rv:1.9b5) Gecko/2008050509 Firefox/3.0b5 Accept: text/html Connection: close
The first line is the query line, the rest are headers; message body is missing
Answer:
HTTP/1.0 200 OK Server: nginx/0.6.31 Content-Language: ru Content-Type: text/html; charset=utf-8 Content-Length: 1234 Connection: close ... THE HTML PAGE ITSELF...
The HTTP request type (also called HTTP method) tells the server what action we want to perform on the resource. Initially (in the early 90s) it was assumed that the client could only want one thing from a resource - to receive it, but now using the HTTP protocol you can create posts, edit a profile, delete messages and much more. And these actions are difficult to combine with the term “receipt”.
To differentiate actions from resources at the level of HTTP methods, the following options were invented:
- GET - getting a resource
- POST - resource creation
- PUT - resource update
- DELETE - resource deletion
REST suggests abandoning the use of the same URI for different resources (that is, the addresses of two different articles like /index.php?article_id=10 and /index.php?article_id=20 - this is not a REST-way) and using different HTTP methods for different actions. That is, a web application written using the REST approach will delete a resource when accessing it with the HTTP DELETE method (of course, this does not mean that it is necessary to give the opportunity to delete everything and everyone, but any the application's delete request must use the HTTP DELETE method).
REST gives programmers the ability to write standardized and slightly prettier web applications than before. Using REST, the URI to add a new user will not be /user.php?action=create (GET/POST method), but simply /user.php (strictly POST method).
As a result, by combining the existing HTTP specification and the REST approach, various HTTP methods finally make sense. GET - returns a resource, POST - creates a new one, PUT - updates an existing one, DELETE - deletes it.
Problems? Yes, I have small problem using REST in practice. This problem is called HTML.PUT/DELETE requests can be sent using XMLHttpRequest, by contacting the server manually (say, via curl or even via telnet), but you cannot make an HTML form that sends a full-fledged PUT/DELETE request.
The thing is, the HTML specification doesn't allow you to create forms that submit data other than via GET or POST. Therefore for normal operation with other methods you have to imitate them artificially. For example, in Rack (the mechanism on the basis of which Ruby interacts with the web server; Rails, Merb and other Ruby frameworks are made using Rack), you can add a hidden field to the form with the name "_method", and specify the name of the method as the value (e.g. "PUT") - in this case, a POST request will be sent, but Rack will be able to pretend that it received a PUT rather than a POST.
This post is intended to explain the principles of data transmission on the Internet using two main methods: GET and POST. I wrote it as a supplement to the instructions for the shift schedule generator for those who are unlikely to be interested in the details ☺.
Go to the following address (this is for a visual explanation): http://calendarin.net/calendar.php?year=2016 Pay attention to the browser address bar: calendarin.net/calendar.php?year=2016 The main file is called, followed by followed by a question mark (?) and the “year” parameter with the value “2016”. So, everything that follows the question mark is a GET request. It's simple. To pass more than one parameter, they need to be separated by an ampersand (&). Example: calendarin.net/calendar.php?year=2016&display=work-days-and-days-off
The main file is still named, followed by a question mark (?), then a “year” parameter with the value “2016”, then an ampersand (&), then a “display” parameter with the value “work-days-and-days” -off".
GET parameters can be changed directly in address bar browser. For example, changing the value "2016" to "2017" and pressing the key will take you to the calendar for 2017.
This is a hidden transfer of data (the page address does not change); that is, you can only see what was transferred using a program (script). For example, in the following tool for counting characters in text, the original data is transmitted using the POST method: http://usefulonlinetools.com/free/character-counter.php
If you have any questions, comments and my email is at your service.
In addition to the GET method, which we discussed in the previous post, there is another method for sending a request via the HTTP protocol - the POST method. The POST method is also very often used in practice.
If, in order to contact the server using the GET method, we only had to type a request into the URL, then in the POST method everything works on a different principle.
In order to execute this type of request, we need to click on the button with the type="submit" attribute, which is located on the web page. Note that this button is located on an element that has its method attribute set to post.
Consider this HTML code:
Enter text:

If the user enters some text into the text field and clicks on the “Submit” button, the text variable will be sent to the server with the value of the content that the user entered.
POST and GET requests in simple wordsThis variable will be sent using the POST method.
If you write this in the form:
Then the data will be sent using the GET method.
If, in the case of a GET request, the amount of data that we could transmit was limited by the length of the browser's address bar, then in the case of a POST request, there is no such limitation, and we can transmit significant amounts of information.
Another difference between the POST method and the GET method is that the POST method hides all the variables it passes and their values in its body (Entity-Body). In the case of the GET method, they were stored in the request string (Request-URI).
Here is an example of a request made using the POST method:
POST / HTTP/1.0\r\n
Host: www.site.ru\r\n
Referer: http://www.site.ru/index.html\r\n
Cookie: income=1\r\n
Content-Type: application/x-www-form-urlencoded\r\n
Content-Length: 35\r\n
\r\n
login=Dima&password=12345
Thus, by transmitting data using the POST method, it will be much more difficult for an attacker to intercept it, because they are hidden from direct view, so the POST method of transmitting data is considered a more secure method.
In addition, using the POST method you can transfer not only text, but also multimedia data (pictures, audio, video). There is a special parameter Content-Type that determines the type of information that needs to be transmitted.
And finally, in order to receive the data transmitted by this method on the server, the POST variable is used.
Here is an example of processing in PHP:
In the last post, we decided on what the browser (client) sends HTTP server requests, and the server sends HTTP responses to the client. These requests and responses are formatted according to certain rules. There is something like a syntax, how and in what sequence it should be written. There must be a strictly defined structure.
Let's take a closer look at this structure by which requests and responses are built in the HTTP protocol.
An HTTP request consists of three main parts, which appear in the order listed below. Between the headers and body of the message is empty string(as a delimiter), it represents a newline character.

Empty string (delimiter)
Post and Get requests, what is the difference between them and which is better and for what purposes?message body (Entity Body) – optional parameter
Request String – Specifies the transfer method, the URL to be accessed, and the HTTP protocol version.
Headers - describe the body of messages, convey various parameters and other information and information.
The message body is the data itself that is sent in the request. The message body is an optional parameter and may be missing.
When we receive a response request from the server, the body of the message is most often the content of the web page. But, when making requests to the server, it can also sometimes be present, for example, when we transfer the data that we filled out in the form feedback to the server.
We will look at each element of the request in more detail in the following notes.
Let's, for example, consider one real request to the server. I've highlighted each part of the request with a different color: the request line is green, the headers are orange, and the message body is blue.
Browser request:
Host: webgyry.info
Cookie: wp-settings
Connection: keep-alive
In the following example, the message body is already present.
Server response:
Content-Type: text/html; charset=UTF-8
Transfer-Encoding: chunked
Connection: keep-alive
Keep-Alive: timeout=5
X-Pingback: //webgyry.info/xmlrpc.php
Untitled document
These are the messages exchanged between the client and server via HTTP.
By the way, do you want to find out if there is any point in some element on your website using the “goals” of Yandex Metrics and Google Analytics?
Remove what doesn't work, add what does and double your revenue.
Course on setting up Yandex Metrica goals..
Course on setting up Google Analytics goals..
The HTTP client sends a request to the server in the form of a request message, which has the following format:
- Query string (required)
- Heading (optional element)
- Empty string (required)
- Message body (optional element)
Let's look at each of these elements separately.
Query string
The request line begins with the method token, followed by the request URI and protocol version. Elements are separated from each other by spaces:
Let's consider this element in more detail
Request method
This element specifies a method that should be called on the server side at the specified URI.
There are eight methods in HTTP:
- HEAD
Used to get the status and header string from the server by URI. Does not change data. - GET
Used to receive data from the server at the specified URI. Does not change data. - POST
Used to send data to the server (such as developer information, etc.) using HTML forms. - PUT
Replaces all previous data on the resource with the new loaded data. - DELETE
Deletes all current data on the resource specified by the URI. - CONNECT
Establishes a tunnel connection to the server at the specified URI. - OPTIONS
Describes the connection properties for the specified resource. - TRACE
Provides a message containing a return trace of the location of the resource specified in the URI.
Request URI
URI (Uniform Resource Identifier) is the identifier of the resource to which the request is sent. The following is the most commonly used URI format:
‘*’ is used when the HTTP request does not refer to a specific resource, but to a server. Used only when the method does not need to be applied to a resource. For example,
absoluteURI is used when an HTTP request is made to a proxy. The proxy is asked to pass the request from the available cache and returns a response. For example:
absolute_path | the source is used most frequently.
Learning to work with GET and POST requestsA specific resource on a specific server is requested. For example, a client wants to receive a resource from a server via port 80. The resource address is “www.proselyte.net” and sends the following request:
Querying header fields
Header fields allow the client to pass additional information about the request and about yourself to the server. These fields act as query modifiers.
Below is a list of the most important header fields that can be used:
- Accept-Charset
- Accept-Encoding
- Accept-Language
- Authorization
- Expect
- If-Match
- If-Modified-Since
- If-None-Match
- If-Range
- If-Unmodified-Since
- Range
- Referrer
- User-Agent
If we want to implement our own client and our own web server, then we can create our own header fields.
Example HTTP request
This concludes our study of HTTP requests.
In the next article we will look at HTTP responses.
One of the ways you can send an HTTP request to a server is with a GET request. This method is the most common and requests to the server most often occur using it.
The easiest way to create a GET request is to type the URL into the address bar of your browser.
The browser will send the server approximately the following information:
GET / HTTP/1.1
Host: webgyry.info
User-Agent: Mozilla/5.0 (Windows NT 6.1; rv:18.0) Gecko/20100101 Firefox/18.0
Accept: text/html,application/xhtml+xml,application/xml;q=0.9,*/*;q=0.8
Accept-Language: ru-RU,ru;q=0.8,en-US;q=0.5,en;q=0.3
Accept-Encoding: gzip, deflate
Cookie: wp-settings
Connection: keep-alive
The request consists of two parts:
1. Request Line
2. Message Headers
Note that a GET request does not have a message body. But this does not mean that with its help we cannot transmit any information to the server.
Difference between GET and POST methodsThis can be done using special GET parameters.
To add GET parameters to a request, you need to add a “?” at the end of the URL. and after that start asking them according to the following rule:
parameter_name1=parameter_value1& parameter_name2=parameter_value2&…
The separator between parameters is the “&” sign.
For example, if we want to pass two values to the server, the username and his age, then this can be done with the following line:
http://site.ru/page.php?name=dima&age=27
When this request is executed, the data goes into the so-called environment variable QUERY_STRING from which they can be retrieved on the server using a server-side web programming language.
Here is an example of how this can be done in PHP.
The $_GET[“parameter_name”] construction allows you to display the value of the passed parameter.
As a result of executing this code in the browser, the following will be displayed:
Your name: dima
Your age: 27
We also make a request to the server using the GET method.
IN lately I am increasingly seeing questions on the main PHPClub forum on the topic of creating POST and GET requests, as well as questions on the topic: “How can I generate a POST request using the header function.” I believe that the need to dot the “i”s in the use of this technology, because novice programmers simply do not understand the principles web work, as such. So, let's begin our journey through the world of the HTTP protocol.
1. HTTP protocol. IntroductionI would like to clarify one small thing right away. The terrible word protocol is nothing more than an agreement of many people, just at one fine moment people decided: “Let's do it this way, and then everything will be fine.” There is nothing to be afraid of, everything is simply outrageous and we will now reveal this disgrace. So, what is the HTTP protocol and what is it used for?
1.1 Client and serverThere are no miracles in the world, and especially in the world of programming and the Internet! Accept this as an unshakable truth. And, if the program does not work or does not work as desired, then, most likely, it is either written incorrectly or contains errors. So, how does the browser ask the server to send it anything? Yes, very simple! You just need to relax a little and start enjoying the process :-)
1.2. Writing our first HTTP requestIf you think that everything is too complicated, then you are mistaken. Man is designed in such a way that he is simply not capable of creating something complex, otherwise he himself will get confused in it :-) So, there is a browser and there is a Web server. The browser is always the initiator of data exchange. A Web server will never simply send anything to anyone so that it sends something to the browser - the browser must ask for it. The simplest HTTP request might look like this:
GET http://www.php.net/ HTTP/1.0\r\n\r\n
- GET (translated from English means “get”) - a type of request; the type of request can be different, for example POST, HEAD, PUT, DELETE (we will look at some of them below).
- http://www.php.net/ - URI (address) from which we want to receive at least some information (naturally, we hope to learn the HTML page).
- HTTP/1.0 is the type and version of the protocol that we will use when communicating with the server.
- \r\n is the end of the line, which must be repeated twice; why will become clear a little later.
Let's look at what an HTTP request consists of. Everything is quite simple. Let's start with the fact that an HTTP request is a completely meaningful text. What does it consist of in the general case? We will consider the HTTP 1.0 protocol. So:
Request-Line [General-Header | Request-Header | Entity-Header ]\r\n[ Entity-Body ]
- Request-Line - request line
- Method - the method by which the Request-URI resource will be processed, can be GET, POST, PUT, DELETE or HEAD.
- Request-URI - a relative or absolute link to a page with a set of parameters, for example, /index.html or http://www.myhost.ru/index.html or /index.html?a=1&b=qq. In the latter case, the server will receive a request with a set of variables a and b with the corresponding values, and the “&” sign - an ampersand - serves as a separator between the parameters.
- HTTP-Version - version of the HTTP protocol, in our case "HTTP/1.0".
Format: "Method Request-URI HTTP-Version\r\n"
We are extremely interested in GET and POST processing methods. With the GET method you can simply pass parameters to the script, and with the POST method you can emulate form submission.
For the GET method, the Request-URI might look like this: "/index.html?param1=1¶m2=2".
- General-Header is the main part of the header.
Format:
Can only have two parameters: Date or Pragma. Date - Greenwich date in the format "Day of week, Day Month Year HH:MM:SS GMT", for example, "Tue, 15 Nov 1994 08:12:31 GMT" - date of creation of the request. Pragma can have a single no-cache value, which disables caching of the page. - Request-Header - part of the header that describes the request.
Request-Header can have the following parameters: Allow, Authorization, From, If-Modified-Since, Referer, User-Agent.
In this chapter, we will not consider the Authorization parameter, since it is used to access private resources, which is not needed very often. You can learn how to create an authorized access header yourself at www.w3c.org. - Allow - specifies acceptable processing methods.
Format: "Allow: GET | HEAD\n".
The parameter is ignored when specifying the POST processing method in Request-Line. Specifies acceptable request processing methods. Proxy servers do not modify the Allow parameter and it reaches the server unchanged. - From - e-mail address who sent the request.
Format: "From: adderss\r\n".
For example, "From: [email protected]\r\n". - If-Modified-Since - indicates that the request has not been modified since such and such a time.
Format: "If-Modified-Since: date\r\n"
Used only for the GET processing method. The date is specified in GMT in the same format as for the Date parameter in the General-Header. - Referrer - an absolute link to the page from which the request was initiated, i.e. a link to the page from which the user came to ours.
Format: "Referrer: url\n".
Example: "Referrer: www.host.ru/index.html\n". - User-Agent - browser type.
For example: "User-Agent: Mozilla/4.0\n" - Entity-Header is the part of the header that describes the Entity-Body data.
This part of the request specifies parameters that describe the body of the page. Entity-Header can contain the following parameters: Allow, Content-Encoding, Content-Length, Content-Type, Expires, Last-Modified, extension-header . - Allow - a parameter similar to Allow from General-Header.
- Content-Encoding - Entity-Body data encoding type.
Format: "Content-Encoding: x-gzip | x-compress | other type\n".
Example: "Content-Encoding: x-gzip\n". The "|" character means the word “or”, that is, this or that or that, etc.
Another type may indicate how the data is encoded, for example, for the POST method: "Content-Encoding: application/x-www-form-urlencoded\n". - Content-Length - the number of bytes sent to the Entity-Body. The Content-Length value has a completely different meaning for data sent in MIME format, where it acts as a parameter for describing a part of the data - "external/entity-body". Valid numbers are integers from zero and above.
Example: "Content-Length: 26457\n". - Content-Type - type of transmitted data.
For example: "Content-Type: text/html\n". - Expires - The time when the page should be deleted from the browser cache.
Format: "Expires: date\n". The date format is the same as the date format for the Date parameter from General-Header. - Last-Modified - time of the last modification of the sent data.
Format: "Last-Modified: date\n". The date format is the same as the date format for the Date parameter from General-Header. - Extention-header is part of the header, which can be intended, for example, to be processed by a browser or other program that receives the document. In this part, you can describe your parameters in the format "ParameterName: parametervalue\n". These parameters will be ignored if the client program does not know how to process them.
For example: "Cookie: r=1\r\n" - sets well-known cookies for the page.
And now, after such terrible words, let's try to calm down a little and understand what we need? Naturally, we will understand with examples.
Let's imagine that we need to get a page from the site by passing Cookies, otherwise we will simply be sent as uninvited guests, and moreover, it is known that you are allowed to access this page only after you have visited the main page of the site.
2 GET methodLet's write our request.
GET http://www.site.ru/news.html HTTP/1.0\r\n
Host: www.site.ru\r\n
Cookie: income=1\r\n
\r\n
This request tells us that we want to get the contents of the page at http://www.site.ru/news.html using the GET method. The Host field indicates that this page is located on the www.site.ru server, the Referer field indicates that we came for news from the main page of the site, and the Cookie field indicates that we were assigned such and such a cookie. Why are the Host, Referer and Cookie fields so important? Because normal programmers, when creating dynamic sites, check the data fields that appear in scripts (including PHP) in the form of variables. What is this for? In order, for example, to prevent the site from being robbed, i.e. they didn’t set a program on it for automatic downloading, or so that a person visiting the site would always get to it only from the main page, etc.
Now let's imagine that we need to fill out the form fields on the page and send a request from the form, let there be two fields in this form: login and password (login and password) - and, of course, we know the login and password.
GET http://www.site.ru/news.html?login=Petya%20Vasechkin&password=qq HTTP/1.0\r\n
Host: www.site.ru\r\n
Referer: http://www.site.ru/index.html\r\n
Cookie: income=1\r\n
\r\n
Our login is "Petya Vasechkin" Why should we write Petya%20Vasechkin? This is because special characters can be recognized by the server as signs of the presence of a new parameter or the end of a request, etc. Therefore, there is an algorithm for encoding parameter names and their values in order to avoid error situations in the request. Full description of this algorithm can be found, and PHP has rawurlencode and rawurldecode functions for encoding and decoding respectively. I would like to note that PHP does the decoding itself if encoded parameters were passed in the request. This concludes the first chapter of my acquaintance with HTTP protocol. In the next chapter we will look at building requests like POST (translated from English as “send”), which will be much more interesting, because exactly this type requests is used when sending data from HTML forms.
3. POST method.In the case of an HTTP POST request, there are two options for transferring fields from HTML forms, namely, using the application/x-www-form-urlencoded and multipart/form-data algorithm. The differences between these algorithms are quite significant. The fact is that the first type of algorithm was created a long time ago, when HTML language have not yet provided the ability to transfer files via HTML forms. So, let's look at these algorithms with examples.
3.1 Content-Type: application/x-www-form-urlencoded.We write a request similar to our GET request to transfer the login and password, which was discussed in the previous chapter:
Host: www.site.ru\r\n
Referer: http://www.site.ru/index.html\r\n
Cookie: income=1\r\n
Content-Type: application/x-www-form-urlencoded\r\n
Content-Length: 35\r\n
\r\n
Here we see an example of using the Content-Type and Content-Length header fields. Content-Length tells how many bytes the data area will occupy, which is separated from the header by another line break \r\n. But the parameters that were previously placed in the Request-URI for a GET request are now in the Entity-Body. It can be seen that they are formed in the same way, you just need to write them after the title. I would like to note one more important point: nothing prevents, simultaneously with the set of parameters in the Entity-Body, placing parameters with other names in the Request-URI, for example:
POST http://www.site.ru/news.html?type=user HTTP/1.0\r\n
.....
\r\n
login=Petya%20Vasechkin&password=qq
As soon as the Internet world realized that it would be nice to send files through forms, the W3C consortium set about refining the POST request format. By that time, the MIME format (Multipurpose Internet Mail Extensions - multi-purpose protocol extensions for creating Mail messages), therefore, in order not to reinvent the wheel, we decided to use part of this message generation format to create POST requests in the HTTP protocol.
What are the main differences between this format and the application/x-www-form-urlencoded type?
The main difference is that the Entity-Body can now be divided into sections, which are separated by boundaries (boundary). What's most interesting is that each section can have its own header to describe the data that is stored in it, i.e. You can transfer data in one request various types(as in Mail letter You can transfer files simultaneously with text).
So let's get started. Let's consider again the same example with the transfer of login and password, but now in a new format.
POST http://www.site.ru/news.html HTTP/1.0\r\n
Host: www.site.ru\r\n
Referer: http://www.site.ru/index.html\r\n
Cookie: income=1\r\n
Content-Length: 209\r\n
\r\n
--1BEF0A57BE110FD467A\r\n
Content-Disposition: form-data; name="login"\r\n
\r\n
Petya Vasechkin\r\n
--1BEF0A57BE110FD467A\r\n
Content-Disposition: form-data; name="password"\r\n
\r\n
qq\r\n
--1BEF0A57BE110FD467A--\r\n
Now let's understand what is written. :-) I specially highlighted some \r\n characters in bold so that they do not merge with the data. If you look closely, you will notice the boundary field after Content-Type. This field specifies the section separator - border. The boundary can be a string consisting of Latin letters and numbers, as well as some other symbols (unfortunately, I don’t remember which ones). In the body of the request, “--” is added to the beginning of the boundary, and the request ends with a boundary, to which the characters “--” are also added to the end. Our request has two sections, the first describes the login field, and the second describes the password field. Content-Disposition (the data type in the section) says that this will be data from the form, and the name field specifies the name of the field. This is where the section header ends and what follows is the section data area in which the field value is placed (no need to encode the value!).
I would like to draw your attention to the fact that you do not need to use Content-Length in section headers, but in the request header you should and its value is the size of the entire Entity-Body, which appears after the second \r\n following Content-Length: 209\ r\n. Those. Entity-Body is separated from the header by an additional line break (which can also be seen in sections).
Now let's write a request to transfer a file.
POST http://www.site.ru/postnews.html HTTP/1.0\r\n
Host: www.site.ru\r\n
Referer: http://www.site.ru/news.html\r\n
Cookie: income=1\r\n
Content-Type: multipart/form-data; boundary=1BEF0A57BE110FD467A\r\n
Content-Length: 491\r\n
\r\n
--1BEF0A57BE110FD467A\r\n
Content-Disposition: form-data; name="news_header"\r\n
\r\n
Example news\r\n
--1BEF0A57BE110FD467A\r\n
Content-Disposition: form-data; name="news_file"; filename="news.txt"\r\n
Content-Type: application/octet-stream\r\n
Content-Transfer-Encoding: binary\r\n
\r\n
And here is the news that lies in the file news.txt\r\n
--1BEF0A57BE110FD467A--\r\n
IN in this example the first section sends the news title, and the second section sends the news.txt file. If you are attentive, you will see the filename and Content-Type fields in the second section. The filename field specifies the name of the file being sent, and the Content-Type field specifies the type of this file. Application/octet-stream indicates that this is a standard data stream, and Content-Transfer-Encoding: binary indicates that this is binary data, not encoded in any way.
A very important point. Most CGI scripts are written smart people, so they like to check the type of the incoming file, which is in Content-Type. For what? Most often, uploading files on websites is used to receive images from the visitor. So, the browser itself tries to determine what kind of file the visitor wants to send and inserts the appropriate Content-Type into the request. The script checks it upon receipt, and, for example, if it is not a gif or jpeg, it ignores it this file. Therefore, when creating a request “manually”, take care of the Content-Type value so that it is closest to the format of the transferred file.
In our example, a request is generated in which text file. A request for transferring a binary file is generated in the same way.
4. Postscript.I think that it is not worth talking in detail about sending requests to the server. This is a matter of pure RHP technology :-). It is enough to carefully read the section on functions for working with sockets, or on the functions of the CURL module in the official PHP documentation.
From the above, I hope it is now clear why the question is: “How can I generate a POST request using the header function?” - meaningless. The header(string) function adds an entry only to the request header, but not to the request body.
There is another type of request - Content-Type: multipart/mixed, I hope after reading this article you will easily understand this type yourself. You can study it in detail
You may have noticed that on most sites you can see the following addresses:
Http://site/index.php?blog=2
Here, even without knowing php, you can guess that we are accessing the index.php file. But few people know what comes after the question mark. It's quite simple: ?blog=2 is a declaration of the global variable "$_GET["blog"]" with the value "2". Thus, I pass a variable into the script that is responsible for displaying information from the database. Let's write a small script in which you can clearly see everything:
We use the if() condition operator and the following line is used as a condition:
Isset($_GET["blog"])
isset() allows you to find out whether the variable specified in brackets exists, that is, the condition that I described in the code sounds like this: If the variable $_GET["blog"] exists, then display the contents of this variable on the screen. Here's what happened:
I think it’s clear. A global variable $_GET is created with the identifier that we declared in the address bar ( in this case with the identifier “blog”)
Now I want to clarify one point. Suppose we need to declare two variables, how to do this? The first variable is declared after the question mark "?" The second variable is declared after the “&” sign ( To be honest, I don’t know what this sign is), here is an example declaration of three variables:
Http://site/index.php?a=1&b=2&c=3
Here is the output code:
The condition sounds like this:
If there is a global variable $_GET["a"] and a global variable $_GET["b"] and a global variable $_GET["c"] then display them on the screen, here is the result:

Before we move on to post requests, we need to understand what forms are? Why is it necessary? Because the global variable $_POST[""] is created through forms. What is form? These are fields for the user to enter some information. There are one-line fields, large fields, and also radio buttons and check boxes. Let's take everything in order...
The form is a tag:
form elements
The form has attributes, I will list the most common ones:
Let's create a form:
form elements
I set the test.php file as a handler file since this is where I write examples for you. I set the sending method to post because these are the methods used in 99.9% of cases. I also gave our form a name - form
Now let's plunge into the world of form elements. First of all, you should understand that almost all elements are a tag, the only difference is in the type attribute of these tags. Let me list the form elements used:

I’m sure you’ve seen such fields more than once, so here’s what they say: “no comments”
Now let's create a small training questionnaire, which we will work with further. Our task is to create a small questionnaire that will tell us the name of the person filling it out, gender, what country they are from, favorite color and a text field where the user can add something about themselves. Here's what I got:
Your Last Name First Name Patronymic:
Your gender:
M
AND
What country are you from?
Russia
Another country
Favorite color(s):
Black:
Red:
White:
Another:
About myself:

Please note that almost every tag has a value attribute, what is it for? It records the data that you are going to transfer to another page. I hope it's clear
Now if we run this code in the browser, we will see the following:
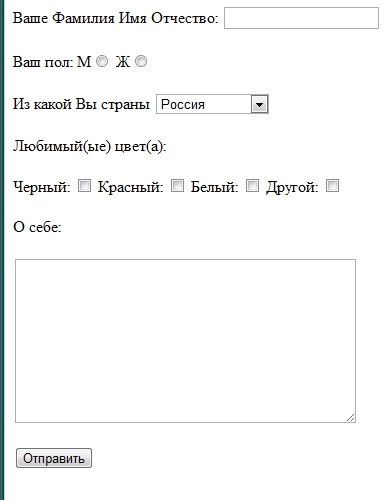
For the form, I used the action attribute with the value test.php, which means, as I already said, that the data from the form will be transferred to the test.php file.
POST requestNow let's write php code which will allow us to see the information we entered. Where is the data stored? In the case of the get request, our data was in the global variable $_GET[""]. When making a post request, the data will be stored in the global variable $_POST[""]. IN square brackets, it is necessary to register, as in the case of the global variable get, an identifier. The question is, where can I get this identifier? That's why we need the name attribute on form elements! It is these names that serve us as the key to global array post. Well, let's start describing the script:
The if condition we wrote says: If there is a global variable $_POST["submit"] then we display the data on the screen. This global variable is created if we click on the submit button, which is why the name attribute is needed in the button in this example. You may well be wondering why the button's name attribute is optional? It's quite simple. Typically, the programmer does not monitor the button press, but rather monitors the data sent. For correct operation, for example, contact forms, it is necessary to track not the click of a button, but the correctness of entering information, and find out whether this information was entered at all. In our example, we did not check the sent data, but simply tracked the button press, to simplify the example... This is what we got:

Well, today we looked at two methods of transferring data between scripts, and we also got acquainted with forms. I really hope that this information will be useful to you at least somewhere. If you have any questions or thoughts, write comments. Good luck to you, that's all for today!
P.S.: Would you like to computer games became even more realistic? directx 11 for windows 7 can be downloaded for free on windows in! Enjoy wonderful graphics!