Home Web - setting up a local network in Windows 10
Just fifteen years ago there was only one computer in the family and the question of creating a home local network simply did not arise. Nowadays a PC, a couple of laptops, tablets, and smartphones can easily coexist in one apartment. Routers have become available and cost no more than a carton of cigarettes. Sooner or later the question arises: how to combine all this machinery into one network? After all, you want to share a printer, a disk drive and play online games. On Windows 10, setting up such a grid is not that difficult.
How to create a local network in Windows 10 - magic, a router and some wires
As funny as it sounds, when computers were slower and more expensive, building a local network was cheaper and easier. To connect several computers, all that was needed were network adapters and cheap coaxial cable (much like the cable used to connect television antennas). The connection topology was a “ring”, so a router was simply not needed. But such networks were slow, the maximum speed achieved could not exceed 10 MB, and as new clients connected, the speed dropped exponentially.

The “ring” connection topology has long been outdated
The “ring” was replaced by the “star” topology, on which all modern networks are built. Here, the router is in the center, and the clients are at the ends of the rays of an imaginary star. The beam can be either a wired connection or a WiFi connection. Almost all home networks are built as a star. The network that we will set up is no exception.

A star connection topology using a router is much more efficient than a ring LAN
The router is a key player in the home (and any other network). The incoming Internet channel, client machines, and peripheral devices (printers and disk storage) are connected to it. 99% of home routers are equipped with a WiFi module, so they can connect clients over the air. If you don’t have a router, you’ll have to buy one, and it’s advisable not to skimp on the purchase, because the speed and comfort of your home network depends on the performance and stability of the router. The router must be equipped with at least two antennas and USB ports for connecting peripherals.
Avoid using routers that are “gifted” by your ISP upon connection or installed “for free.” As a rule, these are the simplest and cheapest devices, the performance of which is enough to connect 2-3 smartphones to the Internet together. A home local network is an enormous burden for such a unit: it will often freeze, overheat and ultimately fail.

The router (Internet center) Zyxel Keenetic transmits 300 Mbit over the air, has a USB port, built-in file and multimedia server
If you live in a multi-apartment high-rise building, it would be a good idea to buy a 2-band router operating in the frequency ranges 2.4 GHz - 5 GHz. The 5GHz band has many more channels and fewer routers, so your network will be less affected by nearby routers. The illustration shows how routers configured to operate in adjacent channels interfere with each other. The result is a decrease in speed and response.

The WiFi Analyzer program will help you select a free channel in the operating range
It would also be a good idea to limit the transmitter power to a value that ensures stable reception throughout the entire house, and other networks will not be visible. This configuration can be done both from the router side through the web interface, and from the client computer through the device manager.

DD-WRT firmware provides the user with flexible configuration of the WiFi module power
Setting up the router is quite simple and in most cases you will need to configure the incoming Internet connection (login and password will be provided by the provider) and the wireless network: come up with a name for it, select an encryption algorithm (WEP, WPA or WPA2) and the most hack-resistant password. If necessary, enable the DHCP server to distribute addresses. After this, you can begin connecting home network clients (hereinafter referred to as DS).
When creating wireless connections, do not use encryption lower than WPA2. The network password should contain lowercase, uppercase letters and numbers and look chaotic. Date of birth, dog's name or girlfriend's name as a password is a bad idea. On the Internet you can find a lot of programs for hacking WiFi that do not require any special knowledge.
Connecting a DS client using a cable
If the laying of cables around the apartment is carried out by specially trained cable elves, the task is greatly simplified. If not, then you can do it yourself, although you will have to work with your hands.

Connecting a DS client using WiFi
Despite the obvious advantages of the cable (highest speed, absence of interference and harmful radiation), not everyone is ready to put up with the fact that a computer or laptop is connected by a wire. In addition, for a number of devices (tablets, smartphones, transformable netbooks), connecting to the network using WiFi is the only possible option.
First of all, you need to enable the WiFi interface in the router, create a network name (SSID), select the encryption type and come up with a password:

You need to configure your wireless network settings through the settings of your router.
On your computer, select yours from the WiFi networks available for reception, enter the password and connect to it.

Connecting your computer to your router's WiFi network takes just a few minutes
Setting up LAN in Windows 10
You connect to the router with a cable or over the air - make sure that the network card (adapter) has received TCP/IP and DNS server addresses from the router:
- Open “Network Connections” and find there the network card through which the computer is connected to the router.
- Expand the properties of the adapter, and in them - the TPC / IP protocol.
- Make sure that all values are obtained automatically.

All adapter parameters must correspond to those shown in the picture
Next, you need to make sure that all Windows devices connected to the network have the same workgroup selected:

Working with Homegroups
For an unprepared user, the simplest solution in which all users will have shared access to each other’s resources is to create a Homegroup. In earlier versions of Windows, HomeGroup was unstable and limited. In Windows 10, setup has become simple and straightforward, and the Homegroup mechanism works like a clock.
Creating a Homegroup in Windows 10 is a process that is as simplified as possible. Follow the instructions and prompts of the system, after checking the necessary settings. In this case, access will only be granted to shared OS folders. If necessary, you can change the composition of the Homegroup, enable or disable the types of resources that will be available, or leave the Homegroup.
Before creating a Homegroup, you should make the folders that will be accessible in this group public. By default, the home group includes the so-called user files: “video”, “music”, “documents”, as well as “printers and devices”. If you don't want to bother with extras. settings, you can simply place documents for sharing in these folders. And if you need to ensure accessibility of folders in other places on the hard drive, you will need to tinker a little.
Creating a home network
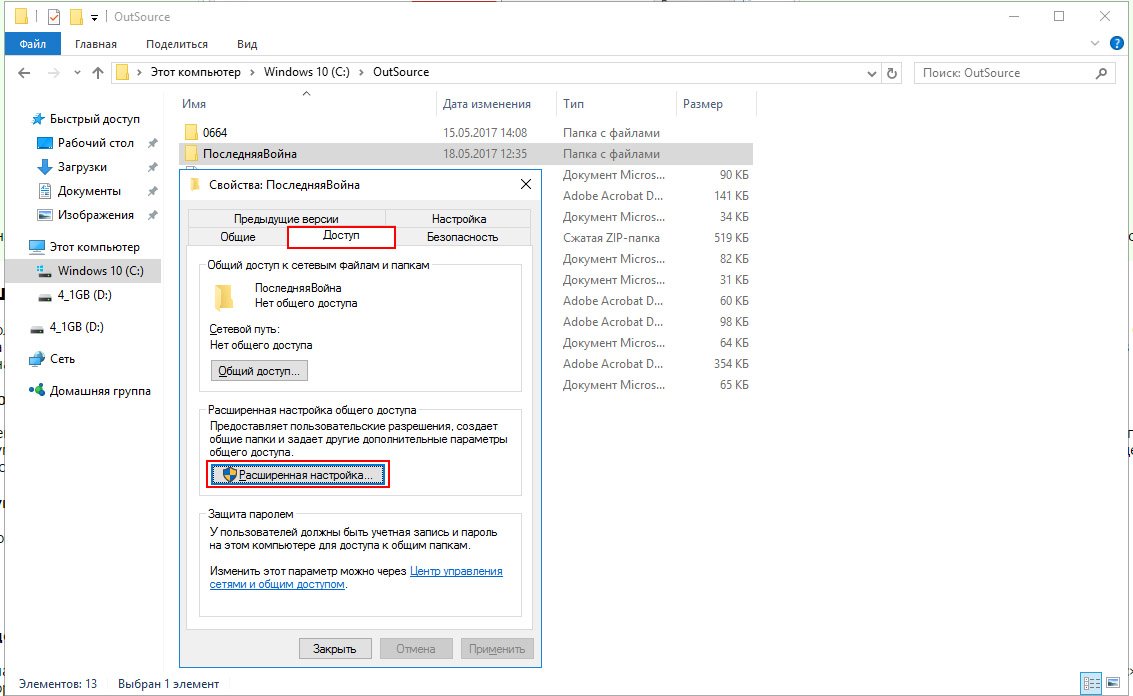
Settings
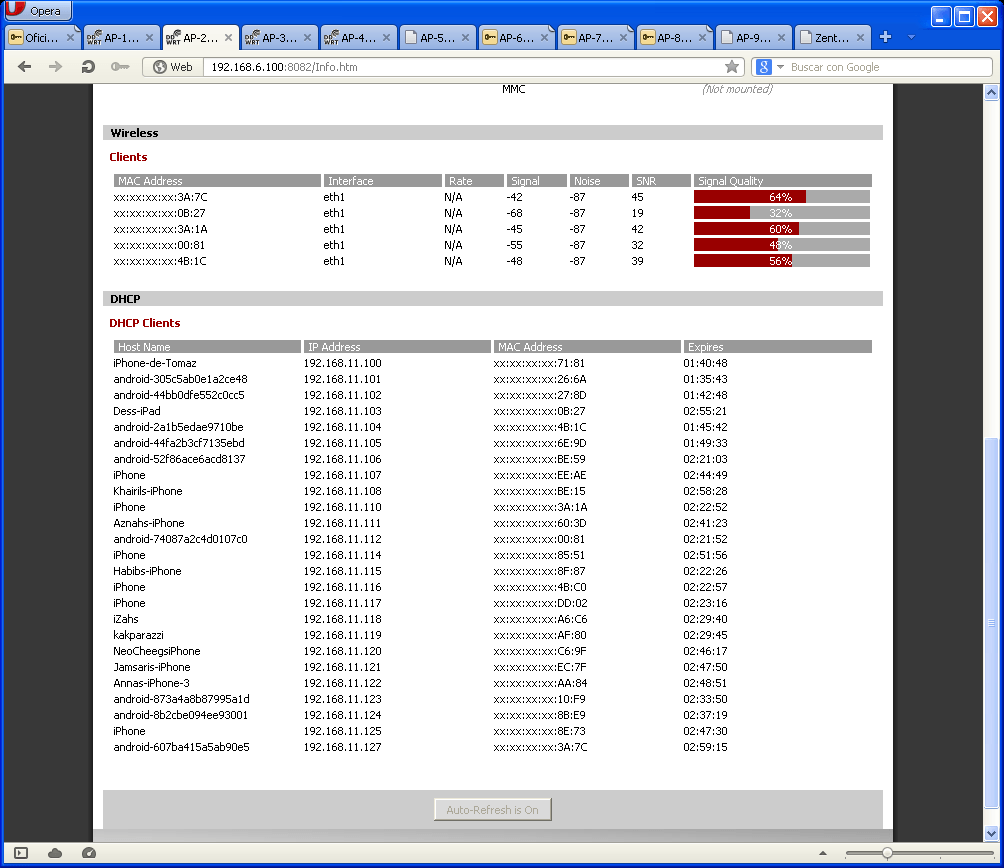
Thanks to the efforts of Microsoft, the process of creating a network has become as simple and straightforward as possible. If you follow the instructions, no problems will arise.
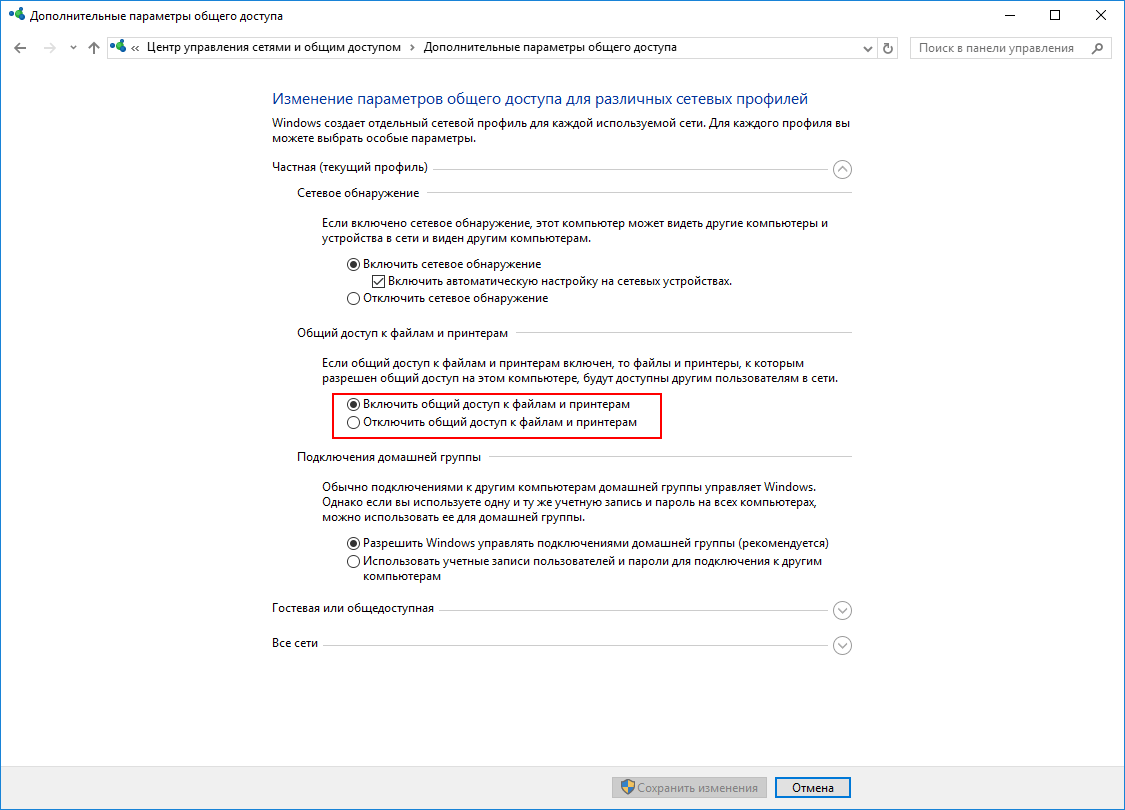
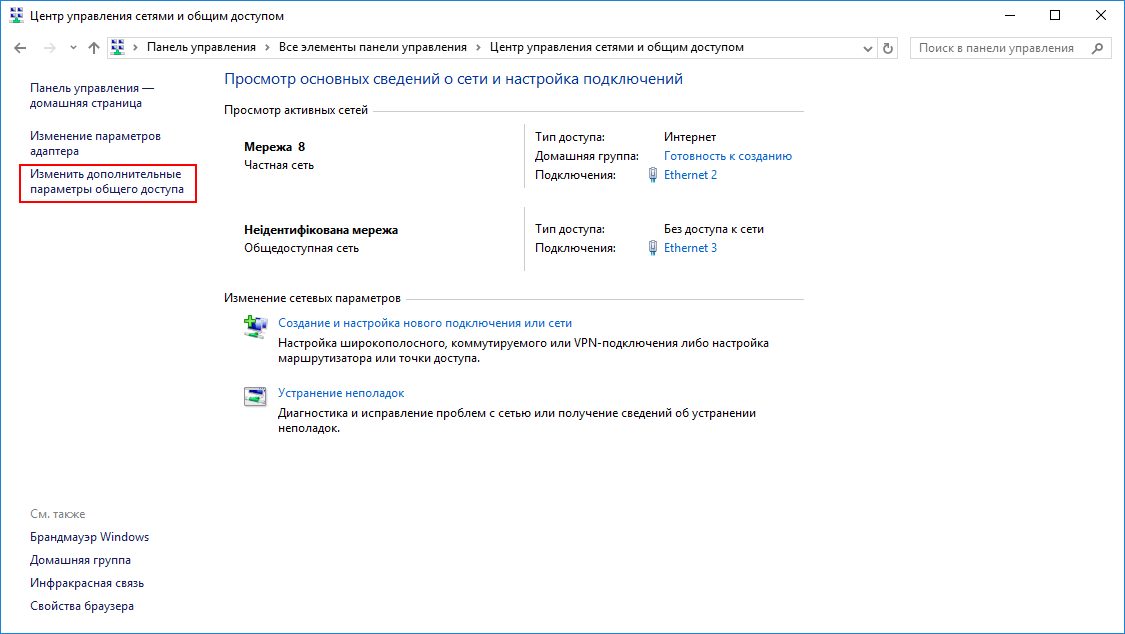
- In the Home Group window, go to Change advanced sharing settings, and then click the Private tab.
- Enable “Turn on network discovery” and “Turn on file and printer sharing” options.
- Then open the “All Networks” tab and turn on the “Enable sharing. Users on your home network will then be able to read and write files in the homegroup shares.
- To prevent users from having to enter passwords, enable the “Turn off password protected sharing” option.
- Save your settings changes.
In the “Home Group” window, select “Create a Home Group”, and in it specify the folders to which access will be shared. The list of available folders will already include standard Windows 10 user folders, as well as folders to which you have configured access separately.
Once you complete the Home Network Setup Wizard, your computer will generate a password that other network users will need to enter to access shared folders. If password access is disabled, users can simply open folders as if they were located on their local drive.
Disabling password access to folders makes your home network vulnerable to external Internet attacks. If your network router is connected to the Internet, be sure to configure your firewall to exclude external requests to home network resources.
Connecting to a homegroup
Open the “Control Panel”, in it turn on the “Categories” display mode, in the “Network and Internet” group open the “Home Group” item, and in it - the “Join” item.
Delete a homegroup
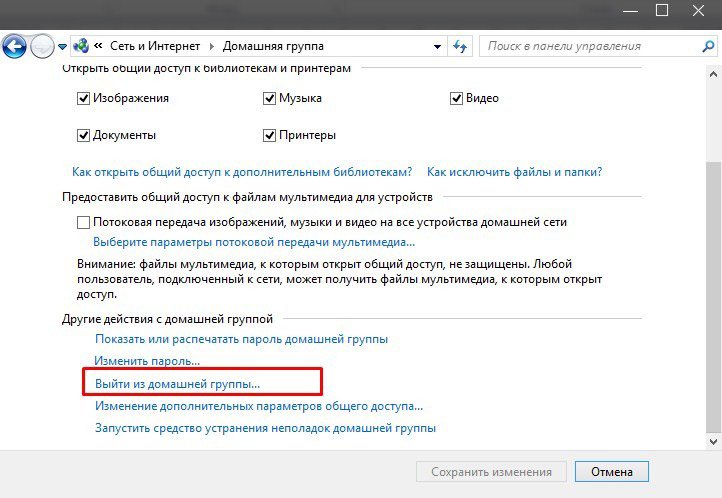
Now the home group will not appear in the control panel settings and will not work.
Video: how to create a local network on Windows 10
Adding a device to the local network
Let's look at how to add a device (not a computer/laptop) to a local network using the example of an ordinary printer. There are several possible algorithms for sharing a printer on a network. Depending on the interfaces of the printing device, it can be connected directly to the router or to one of the client computers with shared access configured.

A modern workgroup printer carries all the interfaces for integration into a local network
Sharing an Ethernet Printer
Typically, a wired network interface is present on color and monochrome laser printers for small workgroups and offices. These are rather large, high-performance devices, so they are rare guests at home. But if by chance such a printer came to you, setting up shared access to it is not difficult at all:
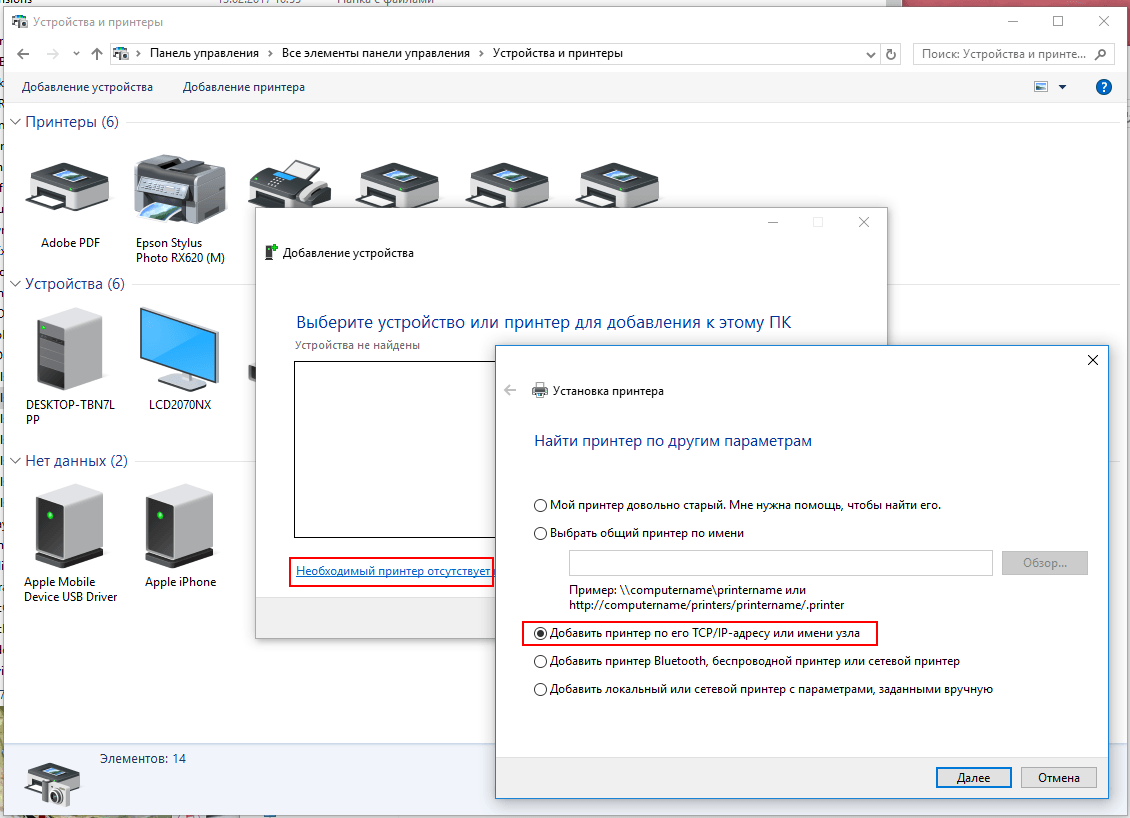
After installing the drivers, the printer is available for sharing.
On each computer on your home network, steps 3–7 of the instructions must be repeated. It doesn’t matter how the clients are connected, the TCP/IP protocol is supported in both cable and wireless connections.
Sharing a Wi-Fi Printer
Wireless interfaces can now be found even in inexpensive inkjet printers and MFPs. Manufacturers have tried to make the installation process as simple and straightforward as possible.
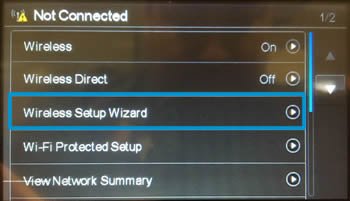
Printing on a wireless printer will be available only to those network clients that are connected to it via the WiFi protocol. Wired clients will not be able to print directly to such a printer. If you share this printer on a computer with WiFi, everyone can print.
Sharing a printer connected to a network client
This type of connection is the simplest. The printer connection interface does not matter. All you need to do is configure shared access to it:
Do not forget that printing on such a network device will only be possible when the client computer to which the printer is connected is turned on.
How to remove LAN in Windows 10
This question is very relevant for laptop owners who often connect to public networks. Each time you connect to a new location, the OS creates a new local network called “Local Network N”, where N=1,2,3... There is no simple removal mechanism through network settings, so here is a step-by-step removal guide.
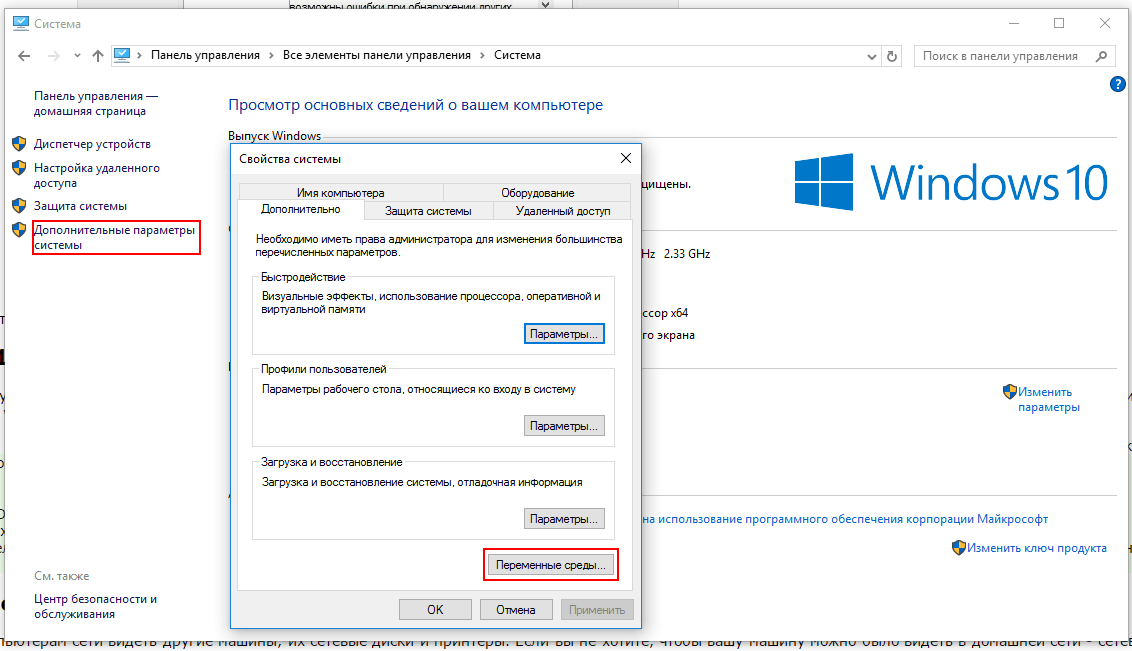
How to disable network discovery
Network discovery is a mechanism that allows computers on a network to see other machines, their network drives and printers. If you don't want your machine to be visible on your home network, it's best to turn off network discovery.
Home network does not work: causes and diagnostics
The network is both a technically and programmatically complex organism, equipment that ensures round-the-clock uninterrupted operation and costs a lot of money. In the home segment, the class of equipment is lower and it is prone to failures and malfunctions. All this leads to loss of network functionality. Let's take a quick look at the main mesh problems and how to fix them.
Router malfunction
Most home routers are made in compact plastic cases. Electronic components operate in a very severe thermal regime, almost “to the limit”. The hot season adds 10–15 degrees to the temperature of the device and the router freezes. Along with it, the entire home network loses its functionality. Symptoms include the inability to log into the router’s web interface and lack of access to the Internet and network resources. To restore the network, you need to turn off the router and let it cool down, but this is a palliative measure. A radical solution to the problem would be to improve the heat transfer of the router by creating additional ventilation holes and installing a fan for airflow.

Installing additional fans will help your router overheat significantly less and work longer
Operating a router in severe thermal conditions not only makes the network unstable and glitchy, but also reduces the lifespan of the router itself by 3–4 times.
Damage to the network cable
Pets, curious children, or just a wife with a mop can instantly render a network segment inoperable by damaging the wire that connects the computer to the router. If only one client has lost access to the network, the problem is most likely in the cable. Disconnect the connectors, carefully inspect them and the wire itself. If the RJ-45 plugs are damaged, you can cut them off and crimp new ones. If the wire itself is mechanically damaged, you need to replace it entirely. Twisted or soldered connections will lead to network errors and a drop in speed to a snail's pace.

Inexpensive twisted pair UTP is designed for installation in protected cable boxes. If the cable is laid along the baseboard and is poorly secured, it can be easily damaged
Damage to WiFi antennas
External antennas of a router or network adapter connected to a computer can be easily damaged by children or careless users. In inexpensive home devices, antenna connectors are held in place only by soldering, without additional fastening. Mechanical impact on the antennas leads to the formation of cracks and loss of contact. It is easy to diagnose such damage - if at a distance of a meter and a half there is a connection between the router and the computer, but at 5–6 meters there is no longer any connection - the antenna is damaged. The fix requires opening the device and soldering it. If you do not have the skills for such repairs, contact a service center.

The SMA antenna connector is the weak point of the router. Impact or lateral force leads to connector breakage
Operating a router for a long time with a damaged antenna can result in device failure. Try to fix the problem as quickly as possible.
So, the home local network has been created: the router’s LEDs are blinking merrily, network clients go online and exchange files, the printer rustles with sheets of paper. The network works, but not everything has been done yet: you will need to install anti-virus software, configure a firewall in the router, protect the connection from external virus attacks, create a blacklist of sites so that children do not find “movies for adults” on the network. Test the network for errors in data transmission and measure the speed of operation. However, this is the topic of the next material. Stay with us!
