How to start the wireless network service. Setting up work with wireless networks (Wi-Fi) in Windows Server
From time to time it becomes necessary to connect a Windows server operating system to a wireless network. At first glance, the task is simple: connect the adapter, install the driver... However, its practical implementation can cause serious difficulties. We are already ready to hear the usual complaints addressed to Microsoft, but in fact everything is quite simple and logical, the only thing that can be reproached by the developer is the uninformative behavior of the system in this situation; in our opinion, it would be quite possible to add hints or reflect the event in the logs.
Let's start with the fact that the task indicated in the title for server systems is quite atypical, but sometimes such a need still arises. It can also be solved simply by purchasing the necessary wireless adapter. In general, everything goes quite normally, until you try to connect to a wireless network. At this moment it turns out that the server does not see more than one network, and the adapter itself is in a state Disabled.

An attempt to turn it on does not lead to success; the adapter tries to turn on, but immediately goes into the disabled state again. In this case, the system does not issue any messages and does not make any entries in the event logs.
Outwardly, the situation looks like some kind of incompatibility and you can spend a lot of time searching for a “suitable” driver or, deciding that the problem is with the adapter, even buy a new one, with the same effect. Therefore, do not rush to waste time and money, let's better understand the situation.
As we already said, this task is not typical for server use, therefore, following general trend development of server operating systems Microsoft systems, this opportunity was designed as a separate component, which is not installed by default.
In general, this decision of the developers is logical and correct, less unused services- fewer resources consumed, fewer possible vulnerabilities. On the other hand, it would still be worth adding some hints or logging an error event, otherwise the situation looks quite ambiguous to an untrained user.
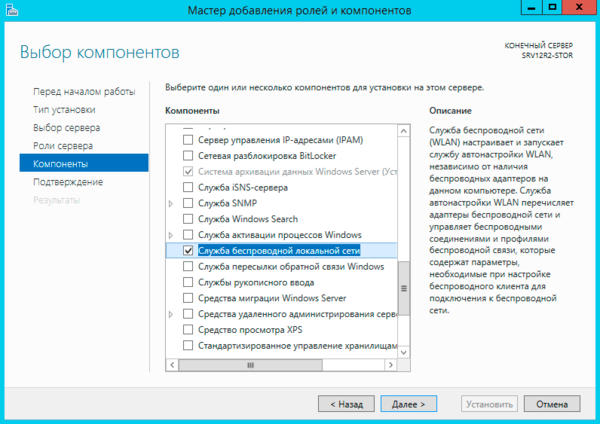
In order to Windows Server could work with wireless networks component should be installed Wireless service local network , after which the server will need to be rebooted.
 It would seem that the problem has been solved, but there is no need to rush. After reboot WLAN AutoConfig Service does not start automatically, although its settings are set to automatic start.
This situation is not an error and is described in the documentation, although this behavior of the service is not clear. You will need to start the service manually or reboot the server again. After this, you can turn on the wireless adapter and connect to the desired network.
Interestingly, if you insert a new adapter after the first reboot, the service will automatically start when the driver installation is complete. Perhaps for this reason, some online manuals recommend that after adding components, remove and reinstall the adapter driver.
The same result can be obtained much faster using PowerShell, to do this, run just one simple command:
Add-WindowsFeature wireless-networking

After which you will also need to reboot the server and start the service manually. You can quickly do this with another command:
Net start wlansvc
As we see, for successful Windows administration Server, contrary to popular belief that everything is done intuitively and with the mouse, it is still advisable to know the structure and basic principles system devices, which will save you from wasting time and money.
Sometimes a virtual wireless network is added in Device Manager for some users after automatic installation drivers. Here's exactly how to remove the Microsoft that appears Virtual Wi-Fi Miniport Adapter, and will be discussed below.
Virtual network
Before considering removal methods, it is worth explaining why the adapter is needed and why it is removed. Let's look at this with a specific hypothetical example.
It is to solve such situations that it is created virtual adapter. Simply put, the aforementioned tunnel module simply allows the laptop to become a Wi-Fi access point.
In most cases, a virtual network does not create any problems for the system and does not interfere with the performance of the operating system. But it also happens a little differently: between software and hardware wireless adapters a conflict is created that does not allow any of the existing devices to function fully.
Removal methods
There are a great many of them, but here we will consider two of the simplest and most effective at the same time:
- Via the command line.
- Manipulating settings.
By and large, this is one method, but it is the implementation methods that significantly distinguish these approaches from each other. In the first case, it is necessary to set commands that the system itself will execute. In the second, you will have to do everything manually.
For implementation this method you will need to call her first. To do this, you need to press the +[R] key combination on your keyboard. The first is a button with the Windows logo. After clicking, a small window will appear on the screen, which will allow you to run the program with administrator rights.
In the only available column, enter “CMD” and press .
After which it will appear on the screen command line, which is a window with a black background and the ability to set commands to be executed.
Here you should type or copy (only using right button) the following phrase: “netsh wlan set hostednetwork mode=disallow”. All parts should be typed only in small letters, and spaces should only be between blocks. They are not needed before or after the “=” sign.
After entering the information, all you have to do is press , wait for the notification of successful completion and reboot the device. After rebooting, the system will no longer show the Microsoft Virtual Wi-Fi Miniport Adapter in Device Manager.
Through settings
Some consistency is required here. Since if you do everything in any order, success is not guaranteed. First, we remove the emulated network, and after it, the adapter itself.
First of all, you need to find the icon in the tray (notification area in the lower right corner, between the date and current language display panel) network connection. Right-click on it and launch “Network and Sharing Center” shared access».
On the left side of the window that opens, find and click on the words “Change adapter settings.”
Here we find the virtual network and use the right button to delete it.
Now the network has been removed and you can begin removing the device.
Right-click on the “My Computer” icon and click on the “Properties” button.
Nowadays, it is difficult to imagine our existence without access to the Internet, be it at home, work, cafe, dacha, train station, exhibitions, etc. Everywhere we have, in most cases, access to global network Internet. Accessed using either cable internet or with the help wireless transmission data via WI-FI. During the evolution of Wireless Local Area Network - WLAN has undergone big changes, new levels of security are available, signal coverage range, data transfer speed, but the main principles of wireless networks remain the same.
Networks can operate in two main modes:
Point to point- this is when 2 or more devices are connected to each other;
or connection via Access Point (AP).
The first type of connection has less popularity and the scale of the network infrastructure, since a small number of users can connect and use the wireless network. You have to use this type of network if it is not possible to connect through a router.
In the second mode using an access point, (infrastructure mode) - infrastructure mode is usually used using a router, which in turn is connected to the Internet.
In our case, we will consider the use of wireless networks using virtualization, which gives us some additional features and extensions. Microsoft calls this virtualization concept Virtual WiFi. There is also a similar concept from Intel called Intel My WiFi.
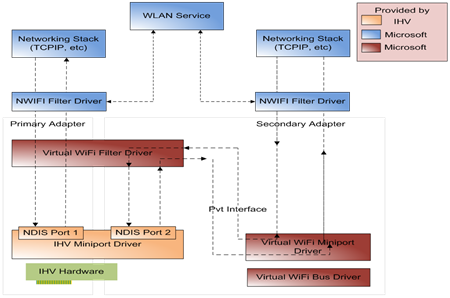
Virtual Wi-Fi technology.
Using technology Virtual WiFi we can create some kind of software layer between network card And software, that is, we create a virtual adapter. This virtual adapter can be configured separately and can connect to different networks, but one physical wireless adapter will still be used.
Do you think why this connection technology is needed? There are several examples, for example, you urgently needed to connect your PDA, WI FI printer, camera, laptop or other device to exchange information. All this can be done using technology Virtual WiFi. Your computer or laptop will act as a repeater at this moment, thereby increasing the coverage area of the wireless network.
Using Virtual WiFi in Windows 7.
Included in Windows 7 OS this technology was already built in initially at the kernel level, even moreover, work was done to simply implement a software access point (Software Access Point - SoftAP). That is, you have the opportunity to create a virtual network in access point mode, and WPA2-PSK/AES encryption will be used. Also prerequisite to create and support Virtual WiFi, there will be support for the adapter drivers themselves. To manage all this miracle technology, Microsoft has added new operations to the network shell:
- netsh wlan set hostednetwork allowed|disallowed– Allow or deny network use.
- netsh wlan set hostednetwork <идентификатор_SSID> <парольная_фраза>persistent|temporary — Configure hosted network parameters, where SSID is the SSID of the network; Key—user security key used by the network; keyUsage – indicates whether the security key is permanent or temporary
- netsh wlan show settings– Shows network properties and status.
- netsh wlan show hostednetwork settings=security– Displays the security parameters of the hosted network. (Shows, among other things, the password specified in key when netsh setup wlan set hostednetwork)
- netsh wlan start hostednetwork— Launch a hosted network.
- netsh wlan stop hostednetwork— Stop the hosted network.
What is required to create and configure Virtual WiFi in practice? any laptop or regular PC with a wireless device running on operating system WINDOWS 7 and adapter drivers that support Virtual WiFi technology. Press Win+R and type CMD, then paste the following command:
netsh wlan set hostednetwork mode=allow ssid=»MY Virtual WiFi» key=»Password for virtual wifi» keyUsage=persistent
In this example, the wireless network name is "MY Virtual WiFi" and the password is "Password for virtual wifi". Of course, you should set these parameters at your own discretion.
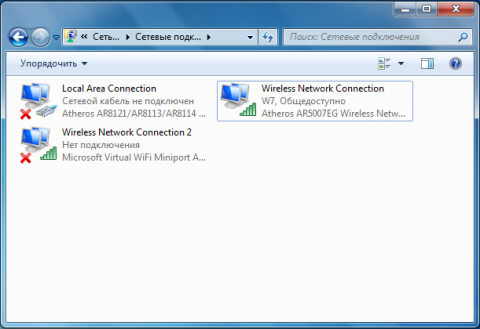
After performing this operation in your network adapters, a virtual network adapter Microsoft Virtual WiFi miniport adapter.

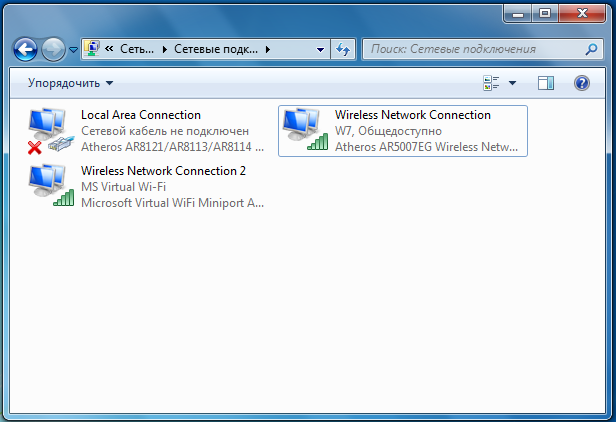
If you go to Control Panel - Network and Sharing Center - Change adapter settings, then we will see a new connection called Wireless Network Connection 2, which will have the status - no connection.
Therefore, to start our network you will need to enter one more command:
netsh wlan start hostednetwork
Now the software access point (SoftAP) has started and is working, you can check this by going to Control Panel / Network and Sharing Center.
In order to provide full access to the Internet to others wireless devices, you will need to go to the Control Panel tab - Network and Sharing Center - Change adapter settings and in the properties of the connection through which the laptop receives the Internet (in our case, this is a WiFi connection, but it can be anything: ethernet, 3G, WiMax and etc.), in the Access tab, check the box Allow other network users to use the Internet connection of this computer, and in Connection home network and select the network adapter to which you will provide Internet access, in our case it is Wireless Network Connection 2,
From the client side, you will see several networks, including the access point we created; when connecting to it, our client will receive network address with internal DHCP and will be separated from the external network by NAT (Network address translation). 
You can check the network status using the command
netsh wlan show hostednetwork
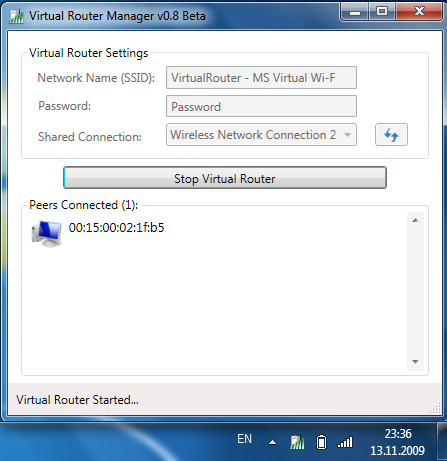
The peculiarity is that you can connect no more than 100 clients to this network, from a practical point of view this figure is unattainable, but in Intel technologies the number of clients is limited to 8. In addition this method creation virtual network WIFI , there are a few more third party utilities having GUI entitled Connectify And Virtual Router Manager, in which your actions are also minimal, you need to enter the wireless network password and start the network. At the same time, these programs can display current connections to your network.