How to set up a network scanner. TWAIN@Web - Scan documents over a network
Instructions
Download RemoteScan 5 to share the scanner over the network in Windows. You can download it here http://www.remote-scan.com/. Install the server version of the program on the computer to which the scanner is connected. Install the client version of the program on other computers on the network. When installing the latest version, the program will display a message saying that the scanner is , don’t worry, this is normal. After installing the server version, a program icon will appear in the tray. Right-click on it and go to “Settings” to connect the scanner to the network. Select the scanner and configure the ports. The scanner may not be able to detect it right away; it will take from one to three minutes.
Open your firewall/antivirus and allow access to port 6077, if you have NOD 32 antivirus, go to your personal firewall, go to interactive mode in the settings and create a separate rule for the RemoteScan program. After this, install the client versions on other computers. Network installation on Windows is complete.
Set up a network scanner in Ubuntu OS. Go to the terminal, enter the command #apt-get install and enter the name of the desired package - sane-utils, then open the scanner configuration file, which can be located in the /etc/sane.d/ folder with the name saned.conf, add the address to the end of the file the computer to which you want to share the scanner. Edit the file #nano /etc/inetd.conf, add the line sane-port stream tcp nowait saned:saned and specify the following path /usr/sbin/saned saned.
Create a Scanner group: #groupadd scanner. Add users to this group using the following command: # #usermod -aG scanner “Username”; usermod -aG scanner saned. Edit the file 40-libsane.rules, located in the nano /lib/udev/rules.d/ folder, and find your scanner there. Make the line with the name of the scanner look something like this: # “Name of the scanner”; ATTRS(idVendor)=="03f0", ATTRS(idProduct)=="4305", ENV(libsane_matched)="yes", MODE="664", "Group name"="scanner".
Set up the client computer: install the sane-utils package using the standard package installer apt-get install, edit the net.conf file located in the nano /etc/sane.d/ folder, add the address of the computer with the scanner to the end of this file. The scanner's network connection is complete.
Sources:
- network scanner
In contrast to Windows, which is easy to install and configure, Linux has become a symbol of the complexity and complexity of installation, which can scare away anyone who does not consider himself a command line virtuoso and a high-class programmer capable of independently writing the missing driver for an unfamiliar device.
However, installing and configuring ubuntu, the most popular Linux distribution among beginners, is no more difficult than any other operating system. This distribution is ready to run immediately after installation and includes everything you need for work: a client for communicating via the ICQ protocol, an email client, a tool for working with photos, an audio and video player, and the OpenOffice office suite. In addition, it implements a mechanism for tracking software changes, eliminating the need to monitor the release of new versions.
3. In the menu that appears, select “Install ubuntu”
4. You will need to select the language for communication again during the installation process and specify the time zone.
1. Connect and configure the router. This process is quite simple and accessible to any user. Follow the instructions provided in the documentation for your model. We only note that if this is possible, then it is better to make the distribution of IP addresses automatic. This will simplify the procedure for logging into the network for new equipment.
2. Configure each computer to work on a wireless network. Most have a built-in wi-fi adapter, but for a desktop computer you may need a network adapter, which will need to be purchased separately. Setting up a wireless network is not much different from setting up a regular network. The only thing you need to do additionally is to enter a special secret network code generated by the router. The code will allow you not to worry about unauthorized users being able to connect to your wireless network.
3. To connect to the wireless network of your pocket computer, the easiest way is to use the built-in utility iPAQ Wireless or similar, depending on the model of your pocket computer or. Here you will also need to specify the network secret key.
After you have managed to set up Wi-Fi, you can not only access the Internet from each device on the wireless network, but also use the network: share folders, share a printer and scanner, etc.
Video on the topic
Related article
Surely you are familiar with the situation when you have two or more personal computers at home. The exchange of information between them, the use of one printer or scanner, as well as other peripheral devices, requires the existence of a network. But PC users require not only access to local resources, but also to the vastness of the global network. In view of this, you should figure out how to configure exit V Internet from general modem.

You will need
- Personal computers, modem.
Instructions
After restarting the PC, open the Control Panel, click on the “Network Connections” item and select the “Local Network” properties.
Video on the topic
note
When assigning an IP address to each computer on the local network, check them carefully to avoid duplication, since the same IP address of electronic devices can cause them to conflict and, as a result, make it impossible to work on the same network.
Helpful advice
On the “Main gateway”, that is, the modem, enter the first address (for example, 212.120.0.1), and select the IP address for personal computers included in the local network from the range 212.120.0.2 - 212.120.0.255. The subnet mask for all devices will be the same.
Several PCs in an apartment or office does not mean that you need to connect to each of them scanner or the printer separately. To make scanning and printing devices available to everyone, connect office equipment via networks.

You will need
- - Several computers;
- - scanner;
- - driver;
- - the local network.
The Internet is replete with articles on the topic of setting up shared access to printers, but finding good instructions on the topic “How to set up shared access to a scanner on a local network” is quite difficult, which is why novice users encounter problems when solving the problem on their own.
The main feature in setting up shared access to a scanner is its drivers, which control the operation of the device. The user and the operating system interact with the scanner through drivers, so they must contain a mechanism to support shared access to the scanner for remote use.
To make sure that interaction occurs at the driver level, try launching a scan from a third-party application, be it the operating system's Fax and Scan tool or a graphics editor. Be sure to get into the proprietary utility from the scanner developers. Therefore, if this point was not taken into account at the stage of writing software for the scanner, which is important for older devices that are not supported by the manufacturer, then public access to such a scanner cannot be organized.
The technical documentation for the MFP should contain all the necessary information regarding the use of the peripheral device, including over a local network. If there is no such data or it is difficult for the user to understand it, this instruction will come to the rescue. It shows, using an example, how to connect and configure a scanner in the Windows operating system in order to scan documents over a network.
In our case, we used a PC with Windows 7 and an HP scanner. XnView and Blind Scanner were used as accompanying software to open public access to the scanner.
What is a network scanner?
Note that there are two methods to “share” the scanner on the network. The first is to connect the device to one of the computers on the network and configure it accordingly. The second is to connect the scanner to the network as an independent device and make the appropriate settings. The connection methods differ in that in the first case the device will not have its own identification number (IP address) by which other network users will access it. Requests will occur through the mediation of the computer to which the scanner is connected. We will focus on this switching method due to its prevalence and ease of implementation. The second case requires a special device that is equipped with an integrated network card for individual operation on a computer network, or a hybrid scanner. It can work either separately from a PC on a local network or connect to a computer via USB or Bluetooth.
The ability to use the scanner over a network requires that the computer controlling it be turned on and connected to the network.
Let's start setting up public access on the server
First of all, you should connect the multifunction device or scanner to the computer via USB and supply power to it, provided that the drivers are installed in the system. Otherwise, download them from the developer or device support website and install them. Then you should restart your computer and scanner.

Now you should install a utility with the option of scanning documents, if the system does not have one. You can use, for example, XnView.
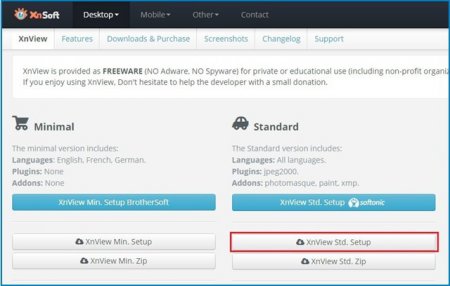
Installing the application is very simple, so any beginner can follow all the instructions.
Client machine configuration
Then we switch to the computer from which we will perform network scanning and install the BlindScanner program on it, taking one point into account: in the component selection window, move the checkbox to the “BlindScanner Pro TWAIN driver (Client)” position.
Using the scanner over a network

As a result, we will receive a digitized document.

In this article I want to tell you how to turn a simple scanner into a network scanner. The Remotescan program will help us with this.
Let's say your office has one printer with a built-in scanner and copier (MFP), and about 10 users use this device. Any document flow is accompanied by scanning documents and converting them into electronic form. And so the poor accountant, connected to a computer with an MFP, constantly jumps and is distracted from his work, because he is constantly asked to scan a document and put it in the exchange folder. Agree, the accountant’s nerves will begin to fail within a month, and the management, when asked to buy another MFP, will say that there is no money. Common situation? In order to save the nerves of the user to whom the MFP is connected, the Remotescan program was developed.
In this article I will not go into details of installing and configuring the MFP itself; let’s say you have already done this. Now let's move on to installing and configuring the Remotescan program.
Remotescan installation
First we need to download this program. By the way, it is paid, but if you download it here, it will turn into free, and even the crack will be in the archive. Magic!!!
This program is installed in two ways; where the scanner itself is connected, we must select the “server” installation option during installation.
Unzip to any location convenient for you and go to this folder. There you will see two files,

For now we are interested in the file called “setup.exe”, let’s run it:

Select English and click the “Next” button.

Here we click on the “Next” button, the following window will appear:

We agree to the license agreement and click the “Next” button.

Click the “Next” button again and the following window will appear:

And here it gets more interesting, we need to select the installation type, server or client.
- Client – if you install the program on the computer with which you want to use the scanner in the future, then select this item.
- Server – if you install the program on the computer to which the scanner is physically connected (by wire), then select this item.
We install it on the computer to which the scanner is connected and therefore select the second installation type “install Server Software”. Click the “Next” button.
Attention.
You can choose both options, but if you are not a confident computer user, you may have difficulties in the future when specifying the server.

We select where the program will be installed, you can leave it as default, click the “Next” button:

Here you are asked: “Do you want to start the remotescan server after installation”, check the “Yes” box and click on the “Next” button:


Click on the “Install” button. During the installation process you will see this window:

This will create an allowing rule on your firewall, check the box indicated by the arrow and click on the “Allow access” button.

The installation is complete, now click on the “finish” button.
We go to our folder that we unzipped:
And run the file “RemoteScan_client_rusificator”, everything is simple here, first click on the “Accept” button, and then “Extract”.
- Then we restart the computer.
After you restart your computer, the RemoteScan program will launch automatically, and the program icon will appear next to the clock.
We click on this icon, which appeared in the tray next to the clock with the right mouse button, you will see a context menu in which we select the topmost item (choose a scanner / select a scanner). Select your scanner from the list; you can see its name on the top cover of the device. This completes the server setup. You have worked on this computer, continue to work, and continue to scan as you did before.
- Installing the client part
Let's move to another computer and start installing the client part. I will not repeat the installation process; we do the same as when installing the server part, only in this window:

You need to select the “install Client Software” checkbox. This completes the installation process of the client part.
No shortcuts will appear either in the tray or on the desktop, so you don’t have to look. Just open the program in which you are scanning, and there should be a “select scanner” field in any case, and an item called “remotescan(TM)(TWAIN)” should appear there, I’ll show you how it looks using the example of the program “ FineReader".
So, I launch the program in which I usually scan some documents.

In the window that appears, in the upper left corner there is a “File” button; if you click on it, a context menu will appear, in which there is an item “Select scanner”, click on this item and the following window appears:

In this window we see this line that interests us: “remotescan(TM)(TWAIN)”.
The program can be downloaded here.
It happens like this =)
That's probably all! Thank you all for your attention, don’t forget to actively comment on my posts and add yourself as a friend on VKontakte =)
27sysday.ru
How to set up a scan to a printer
Article created: 2014-11-02. updated: 2016-03-07
What is a scanner
A scanner is a device that helps translate a variety of documents, including texts. spreadsheets and photographs in electronic form. Scanner models are improving every year. Their prices are becoming more affordable. More and more people are finding use for this modern technology.
In order to take advantage of all the capabilities of your scanner, you must configure this device correctly. Of course, with the advent of Plug and Play technology, which allows you to automatically configure and connect various devices to a personal computer, it has become much easier. Accordingly, the device can be simply connected to your computer. But in other situations, you may need to perform a series of installation steps in the following sequence.
How to set up a scanner
- Connect the scanner to your computer. In this case, the operating system installed on your computer will try to recognize the connected device, configure and install it.
- In the Control Panel menu of the Start button, find the Scanners and Cameras folder. In the folder you will see all the imaging devices that are already paired with your computer. If the connected scanner is in this list, then this device is connected automatically. If it is not in the folder, then you need to run the scanner installation wizard.
- In manual mode, find the model name of your device. If your model is not in the list, then you need to install the disk that came with the scanner. When inserting the disc into your computer's drive, select the "Have from disc" command. Then you need to select the path where the scanner driver is located. Typically, the installation driver is placed in a folder that contains the name of your device model. If there are no driver disks, download them online from the manufacturer's page of the scanner you are installing. In this case, you need to specify the path to the folder where you will save the downloaded drivers.
- Next, the installation wizard will ask you to specify the port to which you are connecting the device. When in doubt about choosing a port, select the "Automatic port detection" command.
Finally, you need to give a name to the device in the system. Now the device can work with any of the image processing programs.
Additional information on the topic
This article describes in an accessible form how to set up a printer without calling a wizard.
elektronikss.ru
How to make a scanner over a network in Windows XP, 7, 8, 10

Comments on this post: 19
Hi all! Today I encountered the following problem: how to make a scanner over a network in Windows? The printer is easy to add, because... Windows has a built-in print server, but no scanning.
How to set up a scanner over a local network?
After a little searching, I found a program that makes a scanning server and, accordingly, can share a usb printer over the network!
Now see how it works:
1. Install this program on the computer to which the scanner is connected. Install as a server.
2. Now on a computer that does not have a scanner, install the program in Client mode.
3. To scan a document, select RemoteScan as the device.
1. Install as a server
I won’t explain to you how to install, everything is simple further, further, but most importantly, install as is and when installing, check the server box.

When starting, select the scanner through which scanning will be performed. We select the scanner so that the program can share the scanner over the network.

All. The server is minimized to tray and will start when the computer starts. There is no need to turn it off. If necessary, you can change the scanner in the tray if you have several of them.
2. Install the scanner as a client
Now we install the scanner on the computer where you will scan.
The installation is similar, only during installation you need to select the Client checkbox.

After installation, if the firewall asks, again select which networks you will use it on.
All. Now how to scan.
3. How to scan over a network via USB
Now select the program to scan. If you don't have it, you can download it in my article about free scanning programs. I took the second one, which can scan several pdf pages into one file.
Select RemoveScan as scanner

And we scan as usual) This is how you can scan over the network using a USB scanner!
Many people may need to connect a printer to a virtual machine, I’ve attached a video for this)
AlexZsoft.ru
How to set up a scanner in an MFP on a computer if the printer is working and connected
Connecting an MFP via WiFi
Connecting the MFP to a computer
Setting up the MFP
- You need to open the device settings and go to the “Fax Settings” menu, where you need to fill out all the fields. You must specify the number and disable the “Error Correction” option.
- Then you need to configure the settings for copying and saving pages.
- If the multifunctional device is used in the office, and there is a PBX, then you need to update the device software. This is done on the official website of the manufacturer of this device. After downloading the firmware file, you need to run it by first selecting your device and specifying the file.
Now you know everything about how to connect an MFP to a personal computer, as well as a wireless device using WiFi. This will help you quickly set up work if you move or buy a new device. In this case, you don’t have to wait for a specialist or spend money on calling him.
elektronikss.ru
How to set up a scanner on a computer if the printer in the MFP is working and connected
An MFP or multifunction device can print, scan, and make copies of documents simultaneously. This is possible because this device combines a printer, built-in scanner and fax. Many users encounter various problems associated with setting up and connecting such equipment. The methods for connecting an MFP to a laptop or computer are no different from the methods for connecting conventional printers. If the MFP will be used to work over a network of several computers, then it is worth purchasing network MFPs, because all functions of both the printer and the scanner will be available on all computers. Such devices should have WiFi connectors, this will make setting up a wireless connection easier.
Connecting an MFP via WiFi
Typically, this device is connected via WiFi only through a special access point. Especially when connected to a laptop. You can connect a printer or MFP via Wi-Fi directly to a laptop only using a USB cable.
- Before connecting the MFP via WiFi, you first need to set up an access point.
- After that, you need to configure WiFi on the device itself and then connect to the access point. Next, drivers for the MFP or printer are installed on the computer and the printer or MFP is connected to the network.
- You need to turn on the MFP and enter a number of parameters. After that, you need to select the next item to connect the MFP via a WiFi wireless network and click “YES” in the dialog box.
- Next, you need to select “Quick setup”.
- When the device detects a suitable network, you will need to enter the encrypted Wi-Fi network code, which is set in the Wifi router settings.
- Then you need to check and confirm the entered network code. When the multifunction device is connected to a Wi-Fi access point, the indicator should turn blue.
Connecting the MFP to a computer
When connecting the printer to a computer, you must use specially installed drivers. Before you connect the MFP to your computer, you need to install drivers for the fax and scanner. Otherwise, installing a printer and MFP is similar.
- Before installing the device, it must be connected to the electrical network and, accordingly, to the computer. Then the device driver is installed. If the printer or MFP is new, then, according to the instructions, it is necessary to remove the yellow or orange transport tapes; they are clearly visible.
- Then you need to turn off the device and connect it to the computer’s USB port using a USB cable. After that, turn on the device.
- The computer will detect the MFP or printer, and the operating system will display the message “New hardware found” in a new window at the bottom right, with the specified device name. Then the New Hardware Installation window will open - “Found New Hardware Wizard”, which will further indicate how to install the MFP. Namely, you need to click the “Next” button, naturally after inserting the driver disk into the drive.
- After you install all the necessary drivers, you need to open the Start menu. There you need to go to the “Printers and Faxes” tab. This can also be done in the “Control Panel”, where in the “Printers and Faxes” window you will see whether the MFP has been installed. If there is a problem, the device will not appear at all.
- If the installation was successful, you need to check the print quality. To do this, right-click on the name of the device or printer and call “Properties”, which opens from the drop-down list. Then, in the dialog box, click the “Test Print” button.
- It is possible to install the software and MFP driver directly from the disk included with the device. To do this, you need to insert the disk with the driver software into the drive. After the disk autoruns, a menu should open where you need to activate the installation of programs and drivers by clicking on the inscription or the corresponding button.
- In addition, device drivers can also be installed from the “Printers and Faxes” section. To do this, double-click on “Install a printer.” After this, the Device Installation Wizard starts and the corresponding dialog box opens. In this window, you must click “Next” and in another dialog box, click “Local printer connected to this computer.” If you want the OS to find the connected device on its own, then you need to check the box next to the item “Automatically detect and install a PnP printer.” After this, the search for the device and installation of its drivers begins. The driver disk is in the drive.
- If there are no drivers suitable for the device, then you need to visit the website of the MFP manufacturers and from there download the driver corresponding to your OS or version of Windows. To do this, you need to type the name of the equipment manufacturer in the address bar of your browser, preferably in English, indicate after the dot “ru” and then press “Enter”. Thus, you will be taken to the Russian-language version of the manufacturer’s website. Drivers for download are usually presented in the form of a self-extracting archive that automatically starts the installation. Thanks to this, there will be no difficulties during installation.
Setting up the MFP
Before setting up the MFP, you need to familiarize yourself with the operating parameters.
Today we'll talk about network scanning. Is it possible, of course it is possible. As you know, most MFPs do not have network scanning capabilities. That is, the scanner can only be used by one user sitting at the computer to which the MFP is connected. To be honest, in my practice, I have not seen an MFP that has the ability to scan over a network. But in large organizations network scanner or it would be more correct to say that a network scanner is simply necessary.
I came across networked MFPs that connect to the network, but they do not have the ability to use the scanner from several computers. And using standard means it will not be possible to achieve the ability to scan documents from several computers, and this is sometimes very necessary. Let's consider this situation: in some department where there are, say, three or four computers and MFPs. Setting up printing for all computers is not difficult.
But to do it network scanner so that every computer has the ability to scan documents will not work. Installing a scanner for each user is not very convenient, and it is also a costly affair. I myself came across a situation where I needed to make a scanner accessible over the network. I scoured the entire Internet and tried a bunch of programs. Most of them are paid, but they did not give money for purchase. After a long search I came across the BlindScannerPro program. With this program you can make a network scanner.
In order to configure the scanner to work on a network, you will need to download the BlindScannerPro program. The installation process should not cause you any problems, but just in case I took a few screenshots.

We agree to the terms of the license agreement and click next


Selecting disk space for the program

Here we choose whether to install a server or a client; we install the server on the machine where the scanner is connected.


After launching the program, you will need an activation key; you can download it at the end of the article. The client needs to be installed on those machines where the scanner is not connected. Next, we need to install the server, everything is the same, we just select the server and install it on the computer to which the scanner is directly connected. There are no special settings there, so I won’t write anything. Now you have network scanner. After you have installed the server and client, go to the computer with the client and launch ABBYY FineReader. There we click Service - Options, then go to the Scan/Open tab and select the BlindScannerPro driver and click OK. Next, click scan as usual. The BlindScannerPro Client window appears. Click on the plus sign and write the IP address of the server, that is, the computer to which the scanner is connected. A little lower from the drop-down menu, select the scanner that is installed on the server and click Scan.

In this article I want to tell you how to turn a simple scanner into a network scanner. The Remotescan program will help us with this.
Let's say your office has one printer with a built-in scanner and copier (MFP), and about 10 users use this device. Any document flow is accompanied by scanning documents and converting them into electronic form. And so the poor accountant, connected to a computer with an MFP, constantly jumps and is distracted from his work, because he is constantly asked to scan a document and put it in the exchange folder. Agree, the accountant’s nerves will begin to fail within a month, and the management, when asked to buy another MFP, will say that there is no money. Common situation? In order to save the nerves of the user to whom the MFP is connected, the Remotescan program was developed.
In this article I will not go into details of installing and configuring the MFP itself; let’s say you have already done this. Now let's move on to installing and configuring the Remotescan program.
Remotescan installation
First we need to download this program. By the way, it is paid, but if you download it, it will turn into free, and even the crack will be in the archive. Magic!!!
This program is installed in two ways; where the scanner itself is connected, we must select the “server” installation option during installation.
Unzip to any location convenient for you and go to this folder. There you will see two files,

For now we are interested in the file called “setup.exe”, let’s run it:

Select English and click the “Next” button.

Here we click on the “Next” button, the following window will appear:

We agree to the license agreement and click the “Next” button.

Click the “Next” button again and the following window will appear:

And here it gets more interesting, we need to select the installation type, server or client.
- Client – if you install the program on the computer with which you want to use the scanner in the future, then select this item.
- Server – if you install the program on the computer to which the scanner is physically connected (by wire), then select this item.
We install it on the computer to which the scanner is connected and therefore select the second installation type “install Server Software”. Click the “Next” button.
Attention.
You can choose both options, but if you are not a confident computer user, you may have difficulties in the future when specifying the server.

We select where the program will be installed, you can leave it as default, click the “Next” button:

Here you are asked: “Do you want to start the remotescan server after installation”, check the “Yes” box and click on the “Next” button:


Click on the “Install” button. During the installation process you will see this window:

This will create an allowing rule on your firewall, check the box indicated by the arrow and click on the “Allow access” button.

The installation is complete, now click on the “finish” button.
- Installation of the cracker.
We go to our folder that we unzipped:
And run the file “RemoteScan_client_rusificator”, everything is simple here, first click on the “Accept” button, and then “Extract”.
- Then we restart the computer.
After you restart your computer, the RemoteScan program will launch automatically, and the program icon will appear next to the clock.
- Setting up RemoteScan
We click on this icon, which appeared in the tray next to the clock with the right mouse button, you will see a context menu in which we select the topmost item (choose a scanner / select a scanner). Select your scanner from the list; you can see its name on the top cover of the device. This completes the server setup. You have worked on this computer, continue to work, and continue to scan as you did before.
- Installing the client part
Let's move to another computer and start installing the client part. I will not repeat the installation process; we do the same as when installing the server part, only in this window:
You need to select the “install Client Software” checkbox. This completes the installation process of the client part.
- Using Remotescan
No shortcuts will appear either in the tray or on the desktop, so you don’t have to look. Just open the program in which you are scanning, and there should be a “select scanner” field in any case, and an item called “remotescan(TM)(TWAIN)” should appear there, I’ll show you how it looks using the example of the program “ FineReader".
So, I launch the program in which I usually scan some documents.

In the window that appears, in the upper left corner there is a “File” button; if you click on it, a context menu will appear, in which there is an item “Select scanner”, click on this item and the following window appears:

In this window we see this line that interests us: “remotescan(TM)(TWAIN)”.
It happens like this =)
That's probably all! Thank you all for your attention, don’t forget to actively comment on my posts and add yourself as a friend on VKontakte =)