How to make an ISO image from files. Creating ISO images
Good afternoon.
I’ll say right away that this article is in no way aimed at distributing illegal copies of discs.
I think that every experienced user has dozens, or even hundreds of CDs and DVDs. Now storing all of them next to a computer or laptop is not so important - after all, one HDD, the size of a small notebook, can accommodate hundreds of such disks! Therefore, it’s not a bad idea to create images from your disk collections and transfer them to hard drive(for example, to an external HDD).
The topic of creating images when Windows installation(for example, to copy the installation Windows disk to an ISO image and then create from it bootable USB flash drive). Especially if you don’t have a disk drive on your laptop or netbook!
Creating images can also often be useful for game lovers: discs become scratched over time and become difficult to read. As a result of intensive use, the disc with your favorite game may simply become unreadable, and the disc will need to be purchased again. To avoid this, it’s easier to read the game into the image once, and then launch the game from this image. In addition, the disk in the drive makes a lot of noise during operation, which annoys many users.
And so, let’s get down to the main thing...
An image of such a disk is usually created from disks that are not copy-protected. For example, discs with MP3 files, discs with documents, etc. To do this, there is no need to copy the “structure” of the disc’s tracks and any service information, which means the image of such a disc will take up less space than the image of a protected disc. Usually an ISO image is used for such purposes...
CDBurnerXP
Very simple and multifunctional program. Allows you to create data discs (MP3, document discs, audio and video discs), in addition, it can create images and burn ISO images. This is what we will do...
1) First, in the main program window, you need to select the “Copy disk” option.
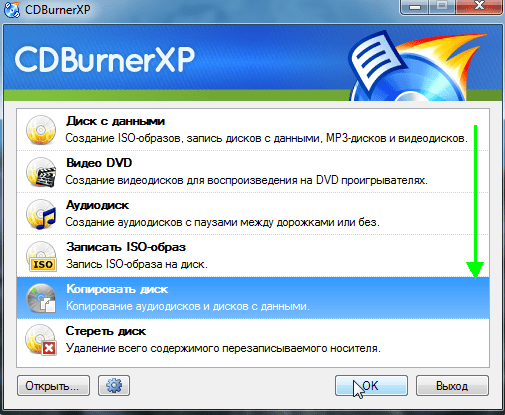
The main window of the CDBurnerXP program.
Drive: CD-Rom where the CD/DVD disc was inserted;
A place to save the image;
Image type (in our case ISO).

Configure copy settings.
3) Actually, all that remains is to wait until the ISO image is created. The copying time depends on the speed of your drive, the size of the copied disc and its quality (if the disc is scratched, the copying speed will be lower).

Disc copying process...
Alcohol 120%
This is one of best programs for creating and emulating images. By the way, it supports all the most popular disk images: iso, mds/mdf, ccd, bin, etc. The program supports the Russian language, and its only drawback, perhaps, is that it is not free.
1) To create an ISO image in Alcohol 120%, in the main program window, click on the “ Creating images«.

Alcohol 120% - creating an image.
2) Then you need to specify the CD/DVD drive (where the disc to be copied is inserted) and click the “next” button.

Select drive and copy settings.
3) And last step... Select the location where the image will be saved, and also indicate the type of image itself (in our case, ISO).

Alcohol 120% is a place to save your image.
After clicking the “Start” button, the program will begin creating the image. Copy times can vary greatly. For a CD, this time is approximately 5-10 minutes, for a DVD - 10-20 minutes.
Ultra ISO
I couldn’t help but mention this program, because it is one of the most popular programs for working with ISO images. As a rule, one cannot do without it when:
Installing Windows and creating bootable flash drives and disks;
When editing ISO images (and it can do this quite easily and quickly).
In addition, UltraISO allows you to create an image of any disk in 2 mouse clicks!
1) After starting the program, you need to go to the “Tools” section and select the option “ Create CD image...«.

2) Then all that remains is to select the CD/DVD drive, the location where the image will be saved and the type of the image itself. What is noteworthy, besides ISO creation image, the program can create: bin, nrg, compressed iso, mdf, ccd images.

2) Creating an image from a protected disk
Such images are usually created from game discs. The fact is that many game manufacturers, protecting their products from pirates, make it so that you can’t play without the original disc... That is. To start the game, the disc must be inserted into the drive. If you don't have a real disk, then you won't run the game...
Now imagine a situation: several people are working at a computer and each has their own favorite game. Disks are constantly rearranged and over time they wear out: scratches appear on them, reading speed deteriorates, and then they may no longer be readable at all. To do this, you can create an image and use it. Just to create such an image, you will need to enable some options (if you create a regular ISO image, then when you start the game, it will simply give an error that there is no real disk...).
Alcohol 120%
1) As in the first part of the article, first of all, launch the option to create a disk image (in the menu on the left, first tab).

2) Then you need to select the disk drive and set the copy settings:
Ignores read errors;
Advanced Sector Scanning (A.S.S.) factor 100;
Read subchannel data from the current disk.

3) In this case, the image format will be MDS - the Alcohol 120% program will read the subchannel data of the disk into it, which will subsequently help launch a protected game without a real disk.

By the way, the size of the image during such copying will be larger than the actual disk space. For example, based on a game CD of 700 MB in size, an image of ~800 MB in size will be created.
Nero
Nero is not just a disc burning program, it is the whole complex programs for working with disks. At help Nero you can: create any discs (audio and video, with documents, etc.), convert videos, create covers for discs, edit audio and video, etc.
Using NERO 2015 as an example, I’ll show you how an image is created in this program. By the way, for images it uses its own format: nrg (everyone reads it popular programs for working with images).
1) Launch Nero Express and select the “Image, project ...” section, then the “Copy disk” function.

2) In the settings window, pay attention to the following:
On the left of the window there is an arrow with additional settings- turn on the checkbox “ Read subchannel data«;
Then select the drive from which the data will be read (in in this case drive where a real CD/DVD disc is inserted);
And the last thing you need to specify is the drive source. If you are copying a disc to an image, then you need to select Image Recorder.
Setting up copying of a protected disc in Nero Express.
3) At the start copy Nero will prompt you to select a location to save the image, as well as its type: ISO or NRG (for protected disks, select the NRG format).

Creating a system image Windows 7. You have no idea how many times this image helped me out serious falls system and various troubles, and how much time he saved me. Hope you can apply successfully this information in practice.
Note: Friends, this article was written two years ago, read our more full article on this topic - with the help standard means archiving on DVDs, or on a portable hard drive USB and how to recover from these images, you will also learn how to connect a disk drive to your laptop or netbook SATA interface, IDE or old hard drive and store your backups on it.
We also have an article - or another hard drive using the tools built into the operating system.
Creating a system image
Sometimes, due to our own erroneous actions on the computer or a virus attack, it is not possible to download Windows 7 by any means. Or it will be possible to load the operating system, but working in it can be simply unbearable, due to serious problems and malfunctions, and if you imagine that there is not one computer, but ten. There are also many friends who, unfortunately, also have computers and in the evenings you have to solve their problems, such a life would truly seem like a nightmare if such a tool as Creating a system image.
This image may be useful if none of the remedies did not help you, and therefore all our previous articles did not either. First I will describe how create a system image Windows 7 using the Computer Data Backup tool, then we will restore our Windows 7 from the image. Below are examples of recovery from an image: separate files your data.
- It is important to know that when Windows recovery 7 from the system image, all information from the hard drive partition to which you are deploying the image will be deleted and replaced with the contents of the image. By the way this operation can be done using the program.
Creating a system image
Start->Control Panel->Backup computer data->Create a system image.
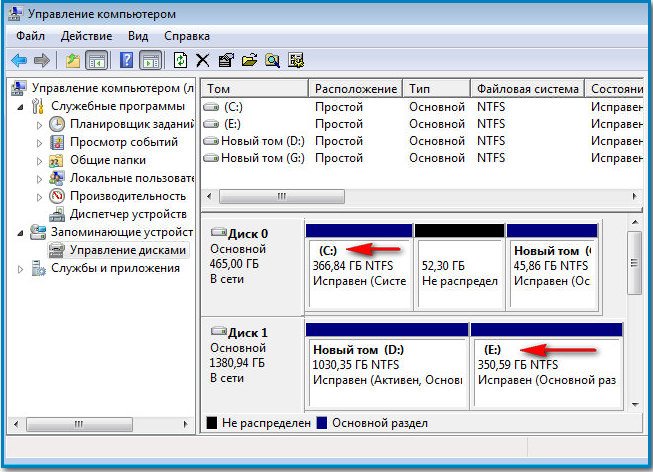
In the dialog box that appears in front of us - Where should the archive be saved? The operating system will give us a hint, for example in mine Windows case 7 chose Local disk(E:), with a capacity of 339.19 GB, located on the second hard drive (I have two hard drives), one contains the system itself, and the second contains Windows 7 system images made using our Computer Data Backup tool. If you have one hard drive, then the system image needs to be created on a free partition.

Just in case, I am attaching a screenshot of the Disk Management window on my computer.
Important Note: Ideal for storing system images - portable USB hard drive or a specially purchased SATA hard drive. If you choose DVD discs, you will need a lot of them; this option, in my opinion, is the most inconvenient; you can also store images online, but this method deserves a separate article. You also need to know that, unlike the archives of our data, the system image can only be saved on a disk with the NTFS file system.
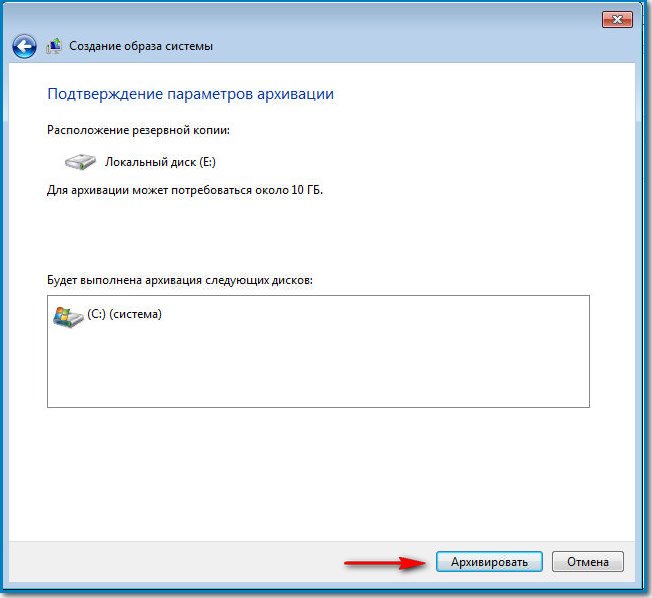
Which partitions of your hard drive should be included in the backup? By default, the Local disk with the operating system will always be selected. Windows system 7, in our case (C:). You can additionally choose to include in the system image any disk with your personal data or all disks, this means that the System Image you create will contain all the information stored on your computer, as long as there is enough space on the media where you are creating the image. Click next.

We confirm the archiving parameters, we see a warning that to create a system image in my case you will need 9.42 GB, your requested space may be more. Click Archive, the process of creating a System Image will begin, which may immediately result in an error if we do not have enough space to store the image.

At the end of the process, you are prompted to create
In this article we will tell you how to correctly create an ISO disk image. Major difficulties usually do not arise during this process, although many people do not have the slightest idea what an ISO image is and how to create it correctly. In addition, they are afraid of doing something wrong and damaging their computer. It is these reasons that prompted us to write detailed instructions for actions that will help you create an ISO disk image quickly and without problems.
It is worth saying that an ISO image is much more convenient to use in your work than interacting with files and folders copied from an optical disc. Moreover, thanks to the creation of an image, the necessary operating systems and diagnostic programs contained on the original optical disk will always be stored on your PC. You just need to write all the information onto a blank medium or mount it using a virtual drive. But about everything in detail.
Create an ISO image using the CDBurnerXP program
Let's first define what is meant by ISO image?
ISO image is a slang, even "jargon" term for an optical disc image. It stores the entire file system ( ISO standard 9660), and therefore this term can be attributed to absolutely any such image. In other words, this is a simple file, just like the usual Word file, only it has more complex structure and mounted using special programs.
Imagine: you have a disk with notes on it program files. However, you cannot simply copy information from it to your computer and then write it to another disk. Or rather, this can be done, but most likely this program will not be able to work without failures or will not start at all, especially since some files in it are protected from emulation. The created ISO image will exactly repeat the structure of the desired disk.
Or imagine another situation: you borrowed a disc with a game from a friend for a while, but the hour of “reckoning” has come: you need to give the game back, but you haven’t opened all the locations yet. What to do? I can't copy the game to my computer because after transferring it from the disk it doesn't want to start. The computer urgently requires you to provide “optics”, which must be inserted into the drive. This is where a program that helps you create a virtual CD/DVD/BD drive will come to your aid. You play for fun and don’t worry about anything!
You are also familiar with the situation in which optical discs, to the great regret of PC users, cannot be stored for a long time. Creating a exact copy disk as an ISO image. To do this, you will need a special program designed to create an ISO image. We have already written to you about one of them, which is called Daemon Tools Lite. It not only records the image, but also helps you protect it with a password later.
Such programs are both paid and free. Now we will look at the most affordable option- multifunctional free program CDBurnerXP, which creates and burns ISO files. It can burn bootable discs and check all folders after creation, converting them if necessary nrg files and bin in iso, can independently divide data from disks into parts and “scatter” them across several media. In addition, using CDBurnerXP you can burn both CD and DVDs, even if they are two-layer. For a program that is provided to the user free of charge, it has rich functionality and dozens of well-deserved awards.
The latest version of this program is available for download on the official website of the developer: http://cdburnerxp.se
First, we need to take a closer look at how you can create an ISO image from files and folders in this program.

When the program starts, select the first menu item that appears on the screen: Data disk. Click OK.

Search and then add everything necessary files to the created project. This is necessary in order to mount the ISO image.

Select a team by clicking the button File from the top menu. Then click along the chain Save project as ISO image. All that remains is to name the ISO image and then click on the button Save. As we promised, there are no difficulties in this process.
Let us consider in detail how the program we have chosen copes with this process.

Launch the program, then select a function Copy disc and press OK.
To create an ISO disk image V in the required format, you need to select the settings necessary for this in a new window. If your PC has multiple drives, mark the one where optical disk was installed.
In Read Attempts, the optimal number of them is selected by default, so there is no need to change anything here. The checkboxes located below, or scientifically called “checkboxes” - Ignore unreadable data, Disable hardware error correction - are not currently activated. Do not change this condition because otherwise the resulting image will not work. It is necessary to activate checkboxes only when absolutely necessary, when it is impossible to create an image without their participation.
Decide for yourself where exactly you want to burn a copy of the disc: on another optical device or on your hard drive as an ISO image. If your computer has only one disk drive, you can select it as Source, and in quality Receiver. When these conditions are met, the CDBurnerXP program creates temporary file with the image directly on your hard drive. When the original media is created, it will eject from the drive automatically. Just insert into the drive blank disk to write information to it.
As an example, let's try to create an ISO image of a disk by saving it on the hard drive. Just switch it to Hard Drive, then select a folder and name your file, simply checking the type you want. In our case, it is worth noting the ISO type.

Click: Copy disc.

As soon as the computer completes the received task, an ISO image of the disk will appear on the PC’s hard drive in the specified folder. If necessary, you can burn it to disk using the CDBurnerXP program.

Unfortunately, with all the advantages of CDBurnerXP, it is not able to equip an ISO image in virtual drive. However, even this small drawback cannot overshadow the rich functionality of this free application, especially considering that there are a large number of such programs on the Internet.
Create an ISO image using the UltraISO program
In order to be honest in our “investigation,” let’s look at paid utilities that allow you to create ISO images. UltraISO in this regard will be an excellent choice, since it can work with other types of files, edits their “internals” (both from CD and DVD images), creates a virtual drive and even writes these images to real media.
This miracle utility understands and identifies images created in other programs, such as: Alcohol 120% or; independently emulates disks for loading information, edits files and folders contained within the images, and also creates images both with USB drives, and from hard and optical disks.
You can download the latest version of the program on its official website.
If you doubt the versatility of this program or are afraid to buy it, just work with it in the test version. Decide whether UltraISO is suitable for your computer and whether it is convenient for you to work with it. The only limitation for the trial period is the inability to create an image larger than 300 MB.
After downloading the program, you will need to install it on your PC. Then click on the shortcut created on the computer desktop, and then working application will “show” you its welcome window.

The screenshot shows that now manufacturers are offering you to buy this program through the introduction registration code. You can also, as mentioned above, run the utility in a trial period.
We suggest for starters create ISO image from files. It's simple: find, select and add the necessary files to your project using the button Add(or by dragging and dropping the desired files and folders).

Save the process as an ISO image: select File, located in top menu, and then in the list that appears, click on the line Save as...Name the project, specify the ISO type, and then save it.

When the computer completes the process, the desired ISO image created from files and folders will be saved on your PC.
You can also create an ISO image from laser disk. To begin, insert into the drive the disk from which you want to make it. Click Create CD Image. In the window that appears, select the area in which it will be saved. By the way, in the same window you can select the extension you need (.NRG, .MDF/.MDS, .IMG/.CCD/.SUB)

Press the button Do, thereby starting the workflow.
At the end of its work, the UltraISO utility will offer to open the file that you just created.

That's all, dear PC users. The technology for creating an ISO image is not as scary as frightened users say it is. We hope that this article was able to debunk myths and overcome your fears associated with programs that help you create virtual images optical disks. Good luck with your work!
An ISO image is created to compactly combine several files and folders into a single file. By using special applications it's not difficult to do. This instruction offers an introduction to only some of them. Their advantage is that they are free access, have proven themselves positively and are easy to use. You can create an image while saving file system, boot sectors disk.
Users create an ISO disk image when they want to increase the life of a CD. He is not great - external drives wear out quickly. To be on the safe side, you can save the necessary data by making a copy of the disk. Service information, for example, copy protection is not included in the image. The image itself can be created, mounted, and protected with a password using applications that have different versions– free and paid. CDBurnerXP is a program with great functionality, access is free on its official website. Helps create an image boot disk, split voluminous information into a number of disks. After burning, it analyzes the result and writes to any CD/DVD disc, including double-layer ones. Works in all Windows versions, has many awards. Minus – it doesn’t work with a virtual drive. After installation, run the program to create an image from the selected files. In the window, select top point“Data disk”, click “Ok”. For the project, select the files, folders that you want to include in the image. Go to the “File” menu, here click on the line “Save project as ISO image...”. Enter the name of the future image in the “File name” field below. Finally, click “Save”. That's it, the image from the selected files is saved under given name at the specified location. Similarly, you can create a copy of the entire disk. Select "Copy disc" from the main menu. If there is one drive in the computer, it is used as a “Source” and “Sink”. A temporary image will be created on the hard drive, then copied to the destination disk after it is installed. The “Source” disk is ejected automatically; you should replace it with a clean one. To save the image on the hard drive as a destination, specify “ISO” as the file type, and set the switch to “Hard Disk”.


Extract files from image if missing special utility Can WinRar program as from regular archive. Before creating a disk image, be sure to check its functionality, as well as the state of the destination disk, otherwise the process will fail.
Every computer user sooner or later begins to wonder: “How to create a disk image?” This is quite simple to do, moreover, the process does not take much time. But for this it is recommended to read this article, since here is step by step instructions, which will help you understand the issue in more detail.
General provisions
There are several ways you can create a disk image yourself. In any case, we will have to work with special software, which significantly speeds up the process and makes it much easier. It is worth saying that the image that can have ISO extension, This regular file, stored on your hard drive. The only difference is that it has a size significantly smaller than the original one, and is also launched using special programs. You've probably noticed that most often the image is created for games, service files, taking up a lot of space. ISO opens too different programs, and in this article we will look at which ones. By the way, the extension does not have to be exactly like this, but it is used most often. It is impossible not to draw your attention to the fact that great value has the integrity of the files, it is advisable to check them with an antivirus before starting work. After this, we proceed to the practical part.
What's good about the image?

First, let's look at a simple example. For example, you have a game disc, you need to use an optical drive to run it. If one is missing or faulty, then this already indicates that the image is for you - great solution. The same applies to damaged disks. Old computers and laptops often have a faulty laser, so writing or reading a disc is quite problematic. In addition, if you have a good Internet connection, you can download images from the Internet, you don’t even need to buy anything, you just need to find what you need. Another example is installing an operating system from a flash drive or disk, which is extremely convenient. The image will unpack quickly enough and without errors. As noted above, if the file weighs 11 gigabytes, and you have a 4.5 GB disk, then the only way to write the document to existing media is to make an image of it. This way you can achieve the volume you need.
Working with Daemon Tools
One of the most popular and simple programs to create images. It is completely free and constantly updated, supports most modern extensions, which is why it is used in great demand. First we need installed program and a disk inserted into the drive, it is its image that we will learn to create. Most often the icon Daemon Tools appears in the tray (lower right corner on the desktop). Click right click mouse and see a pop-up menu, there you should select “Create a disk image”. A menu will open in front of you. Here we can find the disk drive, the place where the image will be saved. You will also need to select an extension. ISO or IMG is recommended, but if you are interested in a specific format, then choose that one. The name of the image is also indicated here. After that, select “Save”. Click "Start" and wait for the process to complete. Upon completion, close the window and go to the folder where we saved the file.

Creating a hard disk image: introduction
It’s one thing to simply learn how to write to a flash drive or disk, and quite another to be able to create backup copies. For this we will use free software, a program called Acronis. Although it is worth noting that this is far from the only option that allows you to work with hard drive. If you use the Windows 7.8 operating system, then there are built-in tools that allow you to create an image hard drive. If it's a laptop, then there's also standard utility called Recovery. It is worth saying a few words directly about Acronis, which was designed specifically to create backups hard drives, download them or restore them. It should be noted that the utility works when other programs are powerless, for example, even in cases when operating system won't load. Well, now let's move on to the practical part of the question.

How to create a hard disk image using Acronis Images?
First of all, go to the program menu. Here you will see the line “Backup and Restore”, which is what we need. Click and go to another section, where you need to select the “Backup disks and partitions” item. Pay special attention to disk management. You will be able to watch as many as 4 sections. Each of them is responsible for something. One of them, usually the biggest one, is where you have your operating system installed. The section called System contains recovery information. Recovery is the place where the factory settings of a computer or laptop are stored, and the untitled section is of a system nature. So, select disk 1, also known as My Passport, our backup copy will be located here. The program will prompt you to make a copy of all partitions of your computer or laptop. It’s worth noting right away that nothing needs to be changed, we create a complete backup copy all sections. It is advisable to perform the setup first; to do this, go to disk mode, check the box next to the hard drive and select the location where to save the image.

We continue to work with Acronis
After we have done all of the above, we move on to the next stage, where we need to get down to business, and since creating a disk image is not very difficult, it will take no more than 10 minutes. It is best to use a flash drive or portable hard drive. This is where you should create and save a backup copy. Although it may be hard section disk, just not the one where the operating system is installed. Then you can click “Archive”, although before that it is better to configure the settings backup. Go to “Advanced” and check the box next to “Archive in sector-by-sector mode.” We also select “Check the backup after it is created.” Exit this menu and start archiving. When finished, go to the folder and see if our file is saved.
What to pay attention to
It should be noted that you must create bootable media. Since you already know how to create a disk image, let's jump straight into next point. This is necessary in case any emergency arises. For example, the computer does not turn on due to errors. For this we use the same Acronis. In the main menu, select “Create bootable media.” Next, follow the instructions, and then insert a flash drive or disk into the port. The connected device will appear in the window. In the menu, check the boxes next to all the lines that you see. Click “Next” and select the device, after which we begin creation. A window with the process will appear, upon completion you will see a dialog box confirming successful creation bootable media. If you need to restore the system, you can do this either directly from a running system or through the BIOS. In the main menu, select “Restore” and follow the prompts.

Conclusion
I would like to say that creating an ordinary image and image of a tough disks are somewhat similar. In principle, there is nothing complicated here, but there is one “but”, you need to use only those programs that you understand or have at hand detailed instructions. If you do something wrong, then there is a chance that you will have to take the hard drive to a service center, where they will charge a considerable amount to restore its operation. After reading this, you should have a complete understanding of how to create a disk image: both hard and regular. The main thing is to follow the instructions and not be nervous if you fail to do something on the first try.