Tools for checking the functionality of computer hardware. Step-by-step instructions for fully testing your computer
Many modern users do not know that at one moment, absolutely suddenly, their computer can turn off forever, and this can happen to absolutely any PC. It is worth noting the fact that quite often various problems arise due to the fact that even a completely new computer stops functioning normally.
The worst thing is when such problems arise completely unexpectedly for the user. In such situations, it is important first of all to correctly identify the problem, because quite often you can solve everything on your own, without the need for physical repairs. It is in this case that it is extremely important that the user knows how to diagnose the computer. For the average person, this problem is solved with the help of specialized utilities, which are selected depending on the type of diagnostics you need.
In this article, we will try to consider several utilities so that the user can independently determine which computer diagnostic program is suitable for him. It should be said right away that, if necessary, you can select several programs.
Why is diagnostics needed?

Nowadays, not all users correctly understand that in fact it is not in any case necessary to contact qualified specialists who will physically repair the drive. In most situations, problems can be solved independently using programs that are freely available. However, unauthorized actions in some cases can only bring harm, and therefore, in order to understand whether it is possible to start “treating” the computer on your own, the computer must initially be diagnosed for malfunctions.
As you know, if a computer is operated in unfavorable conditions or in a dusty room, then over time it begins to work slower and slower, as the condition of certain elements in its design deteriorates. Thus, among the most common causes of malfunction of modern computers are the following:
- Dust on all kinds of connectors or microcircuits and, as a result, their overheating.
- Excessive oxidation of contacts.
- Overheating of components due to strong cooling.
- Burnout of contacts or components due to too strong a power surge.
- Unstable operation of the installed power supply.
- Incorrect grounding.
Why are programs needed and what do they do?

A very useful thing is a program for diagnosing a computer, obtaining complete information about its condition and the characteristics of all installed equipment. Carrying out PC diagnostics, as well as identifying emerging faults, is an extremely important element in the operation of any PC, because it determines how effectively and timely the user can respond to various problems that arise during the operation of his hardware.
Let's consider situations when a computer diagnostic program can be useful.
Upgrade/sale
If you need to upgrade your own personal computer in the near future, carry out a major overhaul, update certain components, or, conversely, sell the device, you will need to know everything about your computer and make sure that it does not have any faults.
Functionality check
Computer diagnostics allows you to determine all sorts of problems, system failures, and, more importantly, the cause of the problem. Determining all possible causes of a malfunction in most cases is quite difficult; the only way out in such a situation may be the use of diagnostic utilities.

If you initially make sure that the computer diagnostic program is separately recorded on a special disk, then even if your operating system is rolled back, you will be able to independently determine which specific component malfunctions led to such malfunctions.
It is worth noting that quite often the program that will be used to diagnose the computer will not only be able to inform the user about what components are used in his PC and what condition they are in, but also check individual elements for the presence of possible causes of future malfunctions. Among other things, some utilities not only diagnose the computer, but also give certain advice on working with it.
In this regard, in order not to suffer from the fact that the “iron friend” suddenly began to work too slowly, suddenly turn off, function unstably, or exhibit any other vagaries, timely diagnostics and repair of computers must be carried out.
Comparison
Certain utilities initially contain the characteristics of reference systems, so the user, if necessary, can compare whether the results of testing the performance of his personal computer match the ideal results. After the on-board computer or PC is diagnosed, the user independently decides whether it is necessary to further upgrade certain components, buy any new equipment, update software, or perform other actions.

Helpful information
Many people who do not know how to diagnose a computer miss a lot of necessary and useful information that is useful for its efficient operation. In particular, quite often diagnostic utilities notify the PC owner that, for example, certain drivers installed on his computer are outdated, since the developer has released a more modern version.
In this regard, it is best to carefully study the functionality of the programs you download, since the utility you choose will directly determine how effective and useful diagnostics of your computer for malfunctions will be.
Diagnostic programs
Below we provide a list of necessary utilities, each of which has its own functionality and purpose:

What to use?
As mentioned above, if necessary, you can use more than one program. Diagnosing a computer for malfunctions is an extensive procedure; it is not enough to carry out only a specific action, because the computer consists of a number of components.
As you can see, different programs have completely different, not similar functionality. It should be said that in most cases it is better to install several utilities that specialize in monitoring the operation of a specific element of your computer than to simply install some universal software that will simultaneously monitor everything. Not only the reliability and effectiveness of diagnostics depends on this, but also your awareness.

It is for this reason that in the vast majority of cases, qualified specialists use several programs simultaneously, one of which monitors the video card, the second monitors the processor, etc. Particular attention should be paid to choosing a program that will monitor the activity of your hard drive.
Why a hard drive?
Few people know that the hard drive is the most complex and fragile component of a personal computer. Despite the fact that various components such as a processor or video card look like an ordinary thin board, and the hard drive outwardly appears as a large and externally protected unit, in fact it is a fragile element, inside of which there are miniature magnetic heads. At the same time, the drive is susceptible to both software and physical malfunctions. And even if the computer vibrates during operation, the hard drive may be completely broken.
Special programs, also called utilities, will help you find out what hardware is inside your laptop. There are quite a lot of them, let’s look at the most popular ones.
AIDA64 (or "Everest")
AIDA64 (or “Everest”) - providing information not only about hardware, but also programs and fan characteristics and much more.
In addition to information about computer components and monitoring their operation, Everest can also do tests (like SoftwareSandra). They are produced during an upgrade (modernization). There are several versions of the program (4). AIDA64 Extreme Edition is suitable for a home computer .
You can download the program (Russian language) from. The program is not free - it needs to be registered after 30 days (This “split” version is on the trackers - verified. http://rutracker.org/forum/viewtopic.php?t=4749469). Download the installation file and run it. After installation and launch, the interface appears. 
Click on the appropriate links and everything will be shown. For example, by clicking on the “System Board” on the left, icons of the board’s devices open, which, when clicked, will provide detailed information. 
A small utility called “Speccy” (4.9 MB) allows you to identify components inside your computer. For example, you can find out the type of processor, what motherboard is installed, video card, and so on.
After downloading the Speccy utility (free), install it on your computer in a folder, for example, Program Files. To do this, an executive file with the extension “exe” is launched. After installation, Speccy itself starts. Then you need to change the interface slightly - turn on the Russian language. This is done in the "Options" window. There is a “General” tab with a “Languare” item.  It has a Russian-language version of the interface.
When installing, carefully look at what else is offered to install CCleaner. 
Click on the radio button “No thanks...” and click the “Next” button. After installation and launch you will see a window. 
Speccy will give detailed information about:
- Operating system.
- Random access memory.
- System board.
- Graphics devices.
- Data storage.
- Optical drives.
- Sound cards and devices.
CPU-Z
A special utility for laptops, BatteryinfoView, provides extensive information about the battery and all its characteristics. Download, for example, from this. 
SISoftwareSandra is considered the most informative program about computer hardware and its characteristics. It is distributed free of charge for now.
We can talk about the Sandra program for a long time. It is installed on the computer.
When you start, your eyes widen at the sight of the program's capabilities. It provides all the information about the computer's hardware and tests them.
 Not all features are available, although the program is free. Some of them can only be obtained by activating a paid license. You can, of course, find the key to it on the Internet. SISoftwareSandra will show the compatibility of the hardware with the current operating system and complete information about it. Using the program comes down to selecting the required function with the mouse arrow, then launching it. Sandra acquired the Price Engine in the 2011 version, and in 2015 new improvements and fixes.
Short video
Problems with your desktop computer can have various causes. By following our advice, you can quickly fix any problem.
PC failure can manifest itself in different ways. For example, after pressing the power button, the machine shows no signs of “life”. Or the computer turns on, but some components do not function. The first step is to figure out what actually works and what doesn’t. Are the motherboard LEDs on? Are the fans spinning? Is the monitor receiving an image signal? Are BIOS messages displayed? Based on these observations, most problems can be classified into six categories (see below). For each category, we provide instructions consisting of sequential steps with which you can eliminate the possibility of simple faults, so that you can then proceed to more complex diagnostics. If you are not successful at any step, move on to the next one until you solve the problem. Even if you stop at some step, the results of your testing will subsequently become a good help for the service center employees.
1. No signs of life
If the computer does not respond in any way when you press the power button, you should first check the power supply or the button itself. We will help you localize the problem.
1.1. VISUAL INSPECTION. First of all, check that the power cord is well connected and that the surge protector is turned on. It is possible that the power supply button on the back of the computer is in the “Off” position.
1.2. CASE CONNECTORS. Open the PC case and check that the connectors are securely connected and that the cable is not damaged in the area between the switches and LEDs of the case and the motherboard - perhaps some connector has come loose from the plug. If one or more cables are disconnected, open your motherboard manual and check to see if the cables are properly connected to the plugs.
1.3. POWER BUTTON. If the case connectors are connected correctly or reconnecting them does not bring results, disconnect all connectors from the motherboard. Then short the two contacts labeled "Power Switch" using a paperclip. If the computer turns on, there are two options. The first is a faulty power button on the case. In this case, you need to connect both connectors labeled “Reset Switch” to the contacts labeled “Power Switch” on the motherboard. From this moment on, the PC will be turned on using the reset button, and the power button will no longer perform its function. Another reason for such a malfunction may be a short circuit in the reset button: a regular button in this case will not work, and starting the PC will only be possible by shorting two contacts on the motherboard. This assumption will be confirmed by the ability to start a PC with the reset button disabled. In this case, leave the power button connected and disconnect the reset button. After all these steps, your PC will most likely turn on again without any problems. If even when using an office paper clip the computer refuses to “start”, then you should check the power system.
1.4. MOTHERBOARD POWER SUPPLY. Check that all power supply connectors are correctly connected to the motherboard. We are talking not only about a wide ATX connector with 24 pins, but also an additional four-pin P4 connector for powering the processor.
1.5. POWER UNIT. Next, you need to exclude the possibility of failure of the power supply. To do this, connect a working power supply to the PC - for example, from a second computer. Connect the 24-pin ATX connector and the four- or eight-pin P4 connector of the working computer to the motherboard of the faulty PC and try to start it. If after this it turns on, then the whole problem is in the power supply, which will need to be replaced.
1.6. MOTHERBOARD. If all the measures described above did not help, then most likely the motherboard has failed, which is best replaced, since repairs not covered by warranty are usually not worth it. One way or another, replacing the motherboard means completely disassembling and reassembling your PC. But it is recommended to proceed with this procedure only if other possible malfunctions have been excluded.
2. PC works, but no image
After turning on, the screen remains black, although the power supply, CPU and video card fans are running and the LEDs on the motherboard are lit.
2.1. CHECKING THE MONITOR. The first thing you need to do is rule out a trivial malfunction by answering the question: does the monitor turn on? If not, there may be a power problem: the cable is unplugged from the display or wall outlet, or the screen has a switch that is set to the Off position. If the monitor turns on, open the OSD menu and check if the input source (VGA/D-Sub, DVI, HDMI) is selected correctly.
2.2. SOUND AND LIGHT SIGNALS. If the monitor is not receiving an image signal, the motherboard will often let you know by sending beeps or lights to help you figure out what the problem is. Consult your motherboard manual to determine what the signals mean. One of the typical defects that are reported in this way may be faulty or incorrectly installed RAM modules, which the motherboard, depending on the model, warns about with an audible signal or illuminated LED lamps.
2.3. RESET BUTTON. A short circuit in the reset button may also be the cause of these symptoms. Perform the check (point 1.3).
2.4. BIOS. Sometimes the cause of such startup problems can be incorrect BIOS settings. To reset the BIOS settings, locate the Clear CMOS jumper on the motherboard. We are talking about three contacts, two of which are connected by a jumper. Remember the initial position of the jumper, then pull it out and connect another pair of contacts with it, wait at least ten seconds. After this, set it back to its original position. If the system board has a reset button, press it. If the computer turns on, check the BIOS settings. In most cases, you need to select the correct operating mode of the SATA controller, which, starting with Windows XP, is “AHCI” and not “IDE”. After this, the problem should disappear. One of the possible reasons for lost BIOS settings may be a dead motherboard battery - this will be discussed in paragraph 3.1.
2.5. RAM. Most motherboards indicate faulty memory using sound or light (LED) signals (see paragraph 2.2). However, we recommend checking the functionality of the RAM modules without waiting for a warning signal. There must be at least two modules installed in the computer - remove one and try to boot the computer with it. If the PC does not turn on with this module, try starting the system with another module installed. If the computer starts with only one memory module, this usually means that the other one is faulty.
2.6. VIDEO CARD. Among PC components, the problem should first of all be looked for in the source of the image signal - the graphics card. If your computer has an integrated graphics card, remove the discrete card and test the system with the integrated GPU. Otherwise, check if the PC works with a different graphics card. If yes, then your discrete or integrated video card is faulty.
2.7. CPU. A faulty processor can also be the reason why the computer works but does not produce an image signal. Therefore, if possible, test the performance of your PC with another compatible processor before the next very difficult step.
2.8. MOTHERBOARD. Since all other possible sources of problems have now been ruled out, the last “suspect” remains the motherboard. The problem here could be, for example, in the CMOS chip in which the BIOS is stored, or in the PCIe bus to which the video cards are connected. Troubleshooting in most cases does not pay off, so the best solution would be to immediately replace the motherboard.
3. BIOS stops working
The BIOS's job is to prepare the computer to boot into the operating system. If problems arise during the BIOS operation, then, as a rule, error messages appear, with the help of which you can localize them.
3.1. BIOS SETTINGS. With computers released four or five years ago, situations often occur when they suddenly refuse to boot. The reason lies in the BIOS settings. In this case, the message “Please enter Setup to recover BIOS setting | CMOS Date/Time Not Set." You can usually enter the BIOS using the “F1” or “Del” button when you turn on the PC. After this, you need to restore all the basic settings - for example, the date, the sequence of boot devices, or such an important parameter as the operating mode of the SATA controller (AHCI). After restoring the settings, there should be no problems booting the PC. However, the reason that the settings were lost most likely lies in the following: there is a round flat-plate battery on the motherboard, which is an “emergency” power source for the CMOS chip so that the latter does not lose the settings. If this battery is discharged, it must be replaced, otherwise the BIOS settings will be lost every time the PC is turned off.
3.2. BOOT DEVICE SEQUENCE. If the BIOS reports that it cannot find bootable media, there could be several reasons. First, check the boot device sequence in the settings. In modern motherboards, this requires two operations. In your boot options, you'll find a "Boot priority" option, which lists components such as hard drives, removable media, or optical drives. The hard drive must have the highest boot priority.
3.3. DISK FAILURE. If the drive does not appear in the media selection menu in the BIOS, open the PC and check that the power cables and interface cables of the corresponding media are securely connected. If the problem is not resolved, test the drive with a different cable, in a USB HDD enclosure, or in another computer. If this does not help, then most likely the media has failed as a result of damage to the controller. In this case, most likely only a specialist will be able to recover the data at a considerable cost. If you regularly create system images and backup data, then you will only need to replace the drive and copy the data. Otherwise, you will have to completely reinstall the system.
3.4. LOAD SECTOR. If the boot device appears in the BIOS and you can view its contents when connected to another PC, then the boot sector is most likely damaged. This quite often happens when an attempt to reallocate disk space fails or when Linux is uninstalled as a second operating system. To resolve the error, boot from the installation DVD or rescue disc. During the boot process, select “Repair your computer” or “PC recovery options”, then click on “System Restore”, and then follow the wizard’s instructions. If this does not solve the problem, then try restoring manually. Boot your PC again as described above, and in the system recovery settings, open a command prompt window. Enter the following commands in it:
bootrec /fixmbr bootrec /fixboot
bcdedit ;/export C:\bcd_1 c: cd boot attrib bcd -s -h -r ren bcd bcd_2 bootrec /RebuildBcd
After this, Windows should boot. If you still have difficulties, follow the instructions below.
4. OS cannot boot (Windows logo appears, but system does not start)
Your computer starts to boot, but freezes just before the user interface appears. With such symptoms, you can rule out many problems with the hardware and BIOS.
(to be continued)
Have you ever encountered such a situation - the computer starts to malfunction or turns off completely? What is the problem? It turns out that you don’t always need to contact a service center. Try using specialized software. The use of programs is useful not only in cases of malfunctions. Let's look at the best programs for identifying computer hardware and when to use them.
Why do you need such software?
Have you ever encountered situations where you need to know some PC specifications? And this is not the only reason to use such software. Iron detection software is useful if:
- Drivers are updated;
- To find out the temperature of the HDD or CPU;
- When the system slows down and freezes.
Sometimes it is necessary to know the hardware model or version. Users do not remember such parameters. They may not be in the documentation. Let's consider what software is needed in such situations.
Speccy
Official website of the program: filehippo.com/download_speccy. On the main page there will be a link from which we download the “exe” file with the program. Installation is simple and will not cause any difficulties even for beginners. Shows information about RAM, sound devices, CPU and motherboard temperatures. Works on all versions of Windows.

The utility window displays equipment models and small icons indicating the temperature. By double-clicking on them, see the changes that have occurred in five minutes. The utility will not be released by the developers as a professional monitoring tool, but you can find out when it’s time to change the thermal paste on your video card using the program.
Speccy characteristics:
- Shows detailed information about the characteristics of the PC and its devices;
- Uses system tools for diagnostics.
Program for determining computer hardware Aida64
Download the program from the official Internet project: aida64.com/downloads/latesta64xe.

Previously called Everest, but was renamed by the developers to AIDU. Shows detailed information about the system and what is installed. Aida64 is configured for advanced diagnostics of PC operation. Has tests for RAM, CPU, video, HDD.
Important! When checking out your computer, or before purchasing a new one, take a stress test. If the device worked for at least fifteen minutes and no blue screen appeared, everything is fine.
Characteristics of AIDA 64:
- Shows information in real time;
- Generates a detailed report;
- Completely in Russian.
Aida can:
- Edit programs in startup. It is because of them that the PC begins to work slower;
- A section displaying all connected devices. This will help determine its model and find the correct driver. Shows a link from where to download it.
HWInfo
Official website of the utility: www.hwinfo.com. Among the features, we note the ability to download the program installer, and the presence of a portable version. Once launched, HWInfo displays general information about the PC.
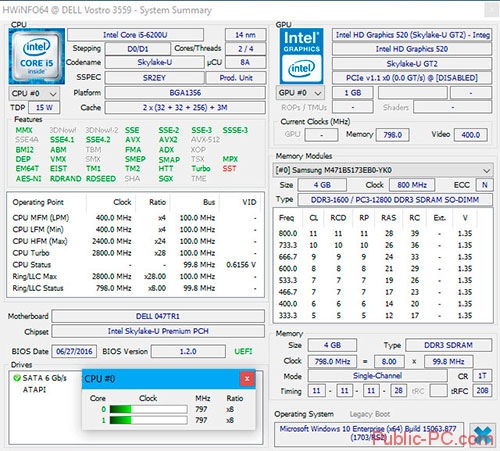
Small but powerful program. If you look at the temperature sensors, then in addition to the current indicators, the program will show the maximum permissible parameters for the equipment. If they are close to the maximum, think about it. Works with all versions of Windows.
Important! It is convenient to update drivers, since the utility publishes a link to the manufacturer’s website.
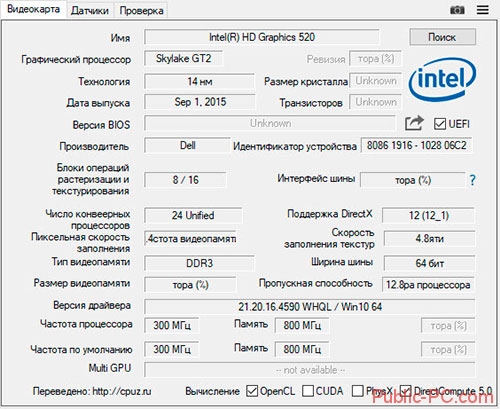
GPU-Z
If your video card is malfunctioning, pay attention to this application. It supports most existing video adapters. Shows information about frequency, RAM resource usage, load. Determines memory timings and BIOS version of the motherboard. Download it from the site cpuz.ru/gpuz_download.htm
Peculiarities:
- Works only with a video card;
- The main feature is monitoring of the main quantities of the device;
- Minimum settings.
CPU Thermometer
Download it from cputhermometer.com

Suitable for those who know what normal CPU temperature is. Performs one function - shows the percentage of processor cores loaded. Minimizes to the system tray and launches along with the OS.
CPU-Z
Official website of the program: cpuid.com/softwares/cpu-z.html

The utility will measure the CPU temperature, evaluate its efficiency and resistance to overloads. The creators have introduced many important features into the application. In addition to testing, the utility receives information about the motherboard, each stick of RAM and GPU. Creates a report exported to txt or html format.
Peculiarities:
- Shows CPU temperature;
- Detailed information about hardware;
- Benchmark (solution to a problem to determine performance) CPU;
- Works on Windows and Android.
Monitor your temperature with Core Temp
Download the program from: alcpu.com/CoreTemp/

Receives information from PC temperature sensors. Checks whether the system is using a lot of CPU. A special feature of the program is the overheat protection function. She will report this and take certain actions. Will put the PC into sleep mode, or turn it on (can be configured as desired).
Shows CPU core values, frequency and voltage on the chip. It differs from similar programs in the ability to display the maximum heating temperature depending on the processor model. Even if you are a novice user, by looking at the minimum and maximum values you will understand whether the temperature readings are normal.
Advantages:
- Consumes few system resources;
- Clear interface;
- Protects the system from overheating;
- Ability to search for new drivers;
- BIOS update;
- Advanced diagnostic settings;
- Free.
Open Hardware Monitor
Located at: openhardwaremonitor.org/downloads/

Dwaremonitor connects to sensors on the motherboard, so it shows accurate and detailed information. The window displays the current and maximum temperature readings. By looking at the values, it will become clear whether the equipment has a tendency to overheat.
Main characteristics:
- Reports an increase in temperature;
- The results are recorded in a log;
- Support for all existing processors, information about which comes from special online databases;
- Compatible with all versions of Windows.
SpeedFan
The utility is located on the website speedfan.ru.softonic.com/

Displays the temperature of the CPU, SMAPT drive and other parts of the PC. A distinctive feature is the regulation of the cooler rotation speed. This is what it will be used for. SpeedFan prevents overheating and helps reduce noise levels.
Important! To get the settings right, try different options. The main thing is to monitor the temperature.
Peculiarities:
- Information about the temperature is shown in the system tray (near the clock);
- The number of fan revolutions is set in the menu.
Conclusion
Of the programs listed above, use Core Temp and Hardware Monitor in combination. The first will protect against overheating. The second will show detailed information about other parameters. To reduce noise or optimize cooling, use SpeedFan. AIDA and CPU-Z are suitable for testing hardware. Compared to their analogues, they show the most truthful results. If you don't like complex software, use the minimalist CPU Thermometer.
Hi all! Many PC owners often catch themselves thinking that their machine is not working fast enough, or “freezes,” so to speak.
In this case, it is worth testing your “iron friend” and identifying the reason for this behavior. Today I will tell you how to check the speed of your computer. But first, let's decide why we need to do this.
Why is verification needed?
You should spend valuable time on tests for a number of reasons:
- Testing will allow you to understand which tasks your computer can perform easily and which are difficult for it.
- If you are going to purchase a new PC or laptop, then using the results of the check, you can choose the most suitable model that will meet all your needs.
- You'll know which components are slow and can replace them during the upgrade.
- You can compare the characteristics of your computer with the PC of one of your friends and find out whose PC is the most powerful.
How to do it?
Well, checking speed is a very necessary and important thing, but how can you find out the speed, how can it be measured? In order to find out the speed of your computer, you will need a PC with Windows installed on it, the usual set of applications for this OS, and my instructions, which I will describe below.
You can check using three simple methods:
- using the Windows Experience Level Index;
- using the Windows Task Manager, which should already be familiar to you;
- based on the use of special programs.
Let's look at each of them in detail.
First way
Windows has a very useful utility called " Performance index" This application takes measurements of your PC, shows you a score for each, and, of course, evaluates overall system performance. In this case, the size of the overall indicator does not exceed the smallest indicator among the elements.
In versions 7, 8 of Windows and Vista, in the Control Panel you need the “Performance Counters and Tools” section (in Windows xp you cannot check performance in this way).

If we talk about the 7th version: the maximum score is 7.9, the average is from 3.5 to 5. If the performance level index is more than five, then you don’t have to worry about anything. However, if the scores are below the “3.5” rating, then your PC should either be replaced with a new one or upgraded to the old one (which will be much cheaper).
In Vista the maximum is 5.9, and in 8 it is 9.9.
In Windows 8.1 and 10, performance testing is done using PowerShell. To open it, write “PowerShell” in the search bar on the start screen, right-click on the icon of the found utility in the search results and select “Run as administrator” in the context menu.
In Windows PowerShell, type winsat formal and press Enter. As a result of these actions you will see the following:

There is one small feature: if you are doing the test on a laptop, it must be connected to a 220V network, otherwise the program will generate an error.
The whole process may take a few minutes, and the result will be saved here:
C:\Windows\Performance\WinSAT\DataStore\...Formal.Assessment (Recent).WinSAT.xml.
You cannot test the system in Windows PowerShell without administrator rights; you can only view the performance ratings from the previous test. To do this, write down "Get-CimInstance Win32_WinSAT" and press Enter. As a result you will see:

Second way
If you want to have an extremely accurate idea of what the speed of your system is, then this method will be most convenient for you. Its main advantage over the above is that it is able to demonstrate not only how fast the computer itself is, but also how fast its individual elements are.
To determine the quality of work using this method, you must perform the following steps:
- Press the Alt, Ctrl, Delete keys simultaneously.
- Click on “Task Manager”.
- In the task manager, select the tab called “Performance”.
In “Performance” you will see how well your computer is functioning. If the level of quality of its work is insufficient, then you can try to upgrade your machine.

The graphs allow you to determine what is causing the slow operation of your PC: processor load or lack of RAM. The green line indicates excellent work, the yellow line indicates an acceptable level, but if the line is red, then urgent action must be taken.
Third way
This method involves using special programs. There are special applications that are created specifically to collect data about the state of the computer.
There's just a ton of all kinds of tests, numbers and information. With these products you can get the most comprehensive data about the performance of your PC. What kind of programs are these? Here is a list of those that I have used at least once:
Everest. It was created primarily for analyzing PC configurations, but it provides a large number of different tests.
SiSoftware Sandra. At the moment, the best option if you want to test the level of performance.
3Dmark. His main specialization is testing computer video cards. Consists of a huge number of different texturing tests, working with 3D modeling, etc. There is also a comprehensive testing option, reminiscent of a video game that is played not by you, but by the program. During its work, it evaluates the stability of the video card during heavy loads and measures the frame rate.
PCMark. This is lightweight software intended for limited use. Serves only to check performance. Allows you to perform integral testing of any PC component. The main feature is the ability to compare the performance of your own computer with the world average.
You can download these programs from the official Internet resources of their developers online.
Well, that’s all, dear friends! In the end, I would like to tell you about a training course, the effectiveness of which I was able to “test” on myself. We are talking about the course Secrets of successful computer work».
What distinguishes this course from a huge number of other similar courses is primarily the author’s high professionalism and simplicity of presentation. All the intricacies of working on a PC are explained so simply and clearly that even elderly people, who, as we know, shy away from modern technology, turn into experienced users in a couple of months of training.
I wish you to be computer literate people, and I and my blog will help you become so. Therefore, do not forget to subscribe to updates and follow the release of a new article.
Share information on social media. networks, see you!
Sincerely! Abdullin Ruslan