Ready android image for virtualbox. Installing Android on VirtualBox
It turns out that many people do not have the opportunity to purchase a smartphone running on the Android OS. However, in some cases, without mobile platform It's unlikely to work out. We are talking about a variety of services and portals that involve the use of the Android OS for secure authorization and many other features.
For example, service computer games Steam (a platform for selling computer developments) is recommended to be used in conjunction with a mobile application, which not only allows you to quickly carry out all operations, and even without the need for access to a PC, but also allows you to ensure the highest possible data security today. The situation is such that without a smartphone now it’s really not entirely comfortable, especially if a person regularly uses various modern services.
Fortunately, for quite a long time, the VirtualBox program has been available to all users, which allows you to run a virtual mobile system directly on your personal computer. It must be said right away that this is not the most practical idea, since almost all the features implemented on the Green Robot are optimized for touchscreen mobile devices.
Features and running Android in VirtualBox
It’s worth saying right away that VirtualBox is not the most advanced software, so you need to keep in mind that full spectrum There will be no opportunities available to smartphone owners here.
Despite this, the very necessary minimum is present here.
Ultimately, after starting the virtual machine, the OS will be isolated from other systems, thereby the user has access to an independent system on which applications can be installed and fully used file system.
It's also worth noting that many people use virtual machine to test the system. For example, if a new version of the Android OS is released, you can test it via a PC. You can also study many other aspects of the system, including running multiple virtual machines at once and making certain comparisons of functionality.
Installing VirtualBox for Android
- First of all, you need to go through your browser to the download page and download the Oracle VM Virtualbox installation package to your PC. Next, the program is launched as an administrator. It is also important to note that the launch should be carried out exclusively through your account.


- Immediately when you start the installation, you will see a warning that indicates that there will be a brief network outage during installation. In the event that work is not carried out in a network environment, there simply should not be any problems. Thus, click “Yes” and go to next point installations.

- Now, based on Oracle VM VirtualBox, you need to install Android OS. To do this, you need to launch the Oracle VM VirtualBox Manager, through which you can set the path to the distribution. This could be a CD or just a current hard drive.


- When you first launch the utility, the program will offer to create a new virtual machine. It is worth keeping in mind that along with creation, a directory with virtual machine files will appear on the PC’s hard drive (most often the path is as follows: C:\Users\User\VirtualBox VMs\). Of course, if necessary, you can easily change the file storage path.


- Next, the program will ask you to select the operating system required for installation. To install Green Robot, you must select Linux. As for choosing the OS version, it is best to select Oracle (32bit).


- Having passed, the program will then ask you to allocate resources for optimal operation of the virtual machine. Most often it is suggested to choose 512 MB of RAM. In addition, next comes the choice of hard drive space (about 12 GB). It is worth keeping in mind that the choice of these parameters largely depends on what capabilities we need to use the mobile system. For example, if sufficiently advanced games and applications are tested, then random access memory you will need much more than 512 MB.

- It is worth keeping in mind that the hard disk of the virtual system will be a file of a special format in the file Windows system. Accordingly, the disk itself can be either dynamic or fixed. A dynamic disk uses all of the allocated memory and can be expanded as needed. A fixed disk is more different fast work, but at the same time it takes up a lot of free space.


- The first time you start the virtual machine, the program will suggest a boot device. By default, this is the physical drive where the file should be located (android-x86-4.4-r2.iso or something like that). When you click the “Continue” button, the installation of the system will begin. On the initial screen you will need to create logical partitions virtual disk, after which sections will be available, for one of which you will need to select the “Write” item. You will also need to allow grub installation, then simply press “Enter”.

- Next, a menu familiar to many Android smartphone users appears, allowing you to install a mobile system. After this, you can configure the virtual system more flexibly and make it more convenient for active use.


Sooner or later, you may want to install the Android operating system on your personal computer. This may be necessary when developing, testing or debugging all kinds of Android applications. I needed the Android operating system on my computer to test the BiP Android application from lifecell. In today's article I will tell you how to prepare the environment VirtualBox virtualization to install Android on it.
For information! It is not necessary to install Android on a personal computer in the VirtualBox virtualization environment. The installation can be done in the same way as installing Windows, on a real hard drive. I decided to conduct experiments with the Android system on a virtual machine, because I think this is a more flexible solution.
First of all, install the virtualization software product Oracle VM VirtualBox, having previously downloaded it from the developer’s website. I'm using version 4.3, although at the time of writing this article there is already version 5.0.
There shouldn't be any problems with the installation; VirtualBox installs like a regular Windows application.
After installation, launch the application via a shortcut on the desktop.
Now we need to configure and create a virtual machine on which we will install Android.
At the time of writing, I had already created two Windows virtual machines, let’s ignore this and create a new machine using the “ Create».
Virtual machine name: Android
Select the type: Linux
Version: Linux 2.6/3.x (32 bit)
Click " Forward».
Select the amount of RAM, 512 MB is enough, click “ Forward».
Create a new virtual hard disk, click " Create».
Leave the default type " VDI" and click " Forward».
Select " Dynamic virtual hard disk" and click " Forward».
We indicate the name of the virtual disk, in the example it is “ Android_PC" By default, the hard disk will be created on the drive " WITH:", in a special VirtualBox folder. If you need to place it on another physical medium, you need to use the icon pointed to by the arrow and select a new path.
You also need to select the size of the virtual disk with the slider, set the size at least 8 GB.
Click " Create».
If everything was done correctly, the virtual machine will appear in the VirtualBox manager. We still need to make some settings, so click on the “ Tune».
Go to the section " Carriers" Here we need to specify the drive from which we will install our Android. Select " Controller: IDE» - « Empty"and click on the icon optical disk. Select " Select optical disk image...».
For the image, select the Android image, which is intended for installation on a PC. We first download the image and place it in comfortable spot on disk.
The list will contain a USB flash drive connected to a real computer, in my case it is “ JetFlash..." Select the flash drive and it will be added to “ USB device filters».
Now you can click " OK", the settings are completed. In the second part we will install Android on a computer in the VirtualBox environment.
Jan 29, 2018 22:48
Personal Computer It has long ceased to be just a means of obtaining information, a tool for performing complex operations. Android installation on Virtual Box will allow you not only to plunge into the gaming world, but also to master the popular OS.
First, let's look at the phenomenon of a “virtual machine,” or more precisely, what it is.
Virtual Box software, emulating popular operating systems. The technology is used for “remote” work with MS Windows, Linux, macOS and other operating systems.
Today we will install the Android platform using the capabilities of the tool mentioned above.
"Screwing" is a delicate matter
To complete the task, we need a pre-installed virtual machine. Let's look at the set without which it will be impossible to install the Android system. We will need:
- A functioning emulation program (the distribution is freely available).
- Installation disk image with ISO extension. We use the most stable version of Android OS – 6.0 x86.
- Sufficient internal storage for correct operation You will need at least 8 GB.
It is important to know!
Before starting installation activities, check the virtualization settings found in the BIOS. Otherwise, the Android virtual machine will not start.
Preliminary activities
For ease of understanding, we provide an example of installing the software in the form of step-by-step instructions.
Direct installation
We act according to the previously defined narrative scheme. Let's look at the process of installing the system on a virtual machine for Android emulation:

Android OS setup process
After restarting the PC, we see the welcome window of the new operating system. through easy manipulations, the following is set here: language, account, date and time, user name.
The process of installing Android through a virtual machine is fraught with certain difficulties. They can be avoided by using profile Windows emulators, providing access to popular software from other platforms.
Instead of a conclusion
Any user with a certain level of training can install and configure an emulating program, download the installation file of the required OS, initiate and complete the installation process. Today's article gave clear example accessibility and ease of manipulations performed.
It is impossible to install Android on a virtual machine in its original format, and the developers themselves do not provide a ported version for PC. You can download from a site that provides various Android versions for installation on a computer, .
On the download page you will need to select the OS version and its bitness. In the screenshot below yellow marker Android versions are highlighted, and files with bit depth are in green. To download, select ISO images.

Depending on the version you choose, you will be taken to a page with direct downloads or trusted download mirrors.
Creating a virtual machine
While the image is downloading, create a virtual machine on which the installation will be performed.

Setting up a virtual machine
Before starting, configure Android:

The rest of the settings are at your discretion.
Android installation
Start the virtual machine and install Android:
- In VirtualBox Manager, click on the button "Run".

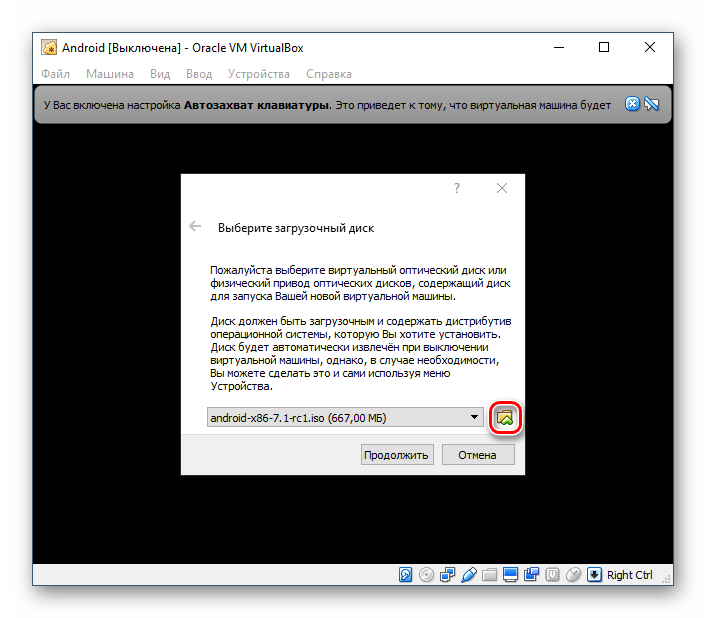
- As the boot disk, specify the Android image that you downloaded. To select a file, click on the folder icon and find it through system Explorer.
- The boot menu will open. Among available ways select “Installation - Install Android-x86 to harddisk”.

- The installer will begin to launch.

- You will be asked to select a partition to install the operating system. Press "Create/Modify partitions".

- Reply to the suggestion to use GPT "No".

- The utility will load cfdisk, in which you will need to create a section and give it some parameters. Select "New" to create a partition.

- Set the section as the main one by selecting "Primary".

- At the stage of selecting the volume of the partition, use the entire available one. By default, the installer has already entered all the disk space, so just click Enter.

- Make the partition bootable by giving it the parameter "Bootable".

This will appear in the Flags column.

- Apply all selected options by selecting the button "Write".

- To confirm, write down the word "yes" and press Enter.

This word is not displayed in its entirety, but is written in full.
- The settings will begin to apply.

- To exit the cfdisk utility, select the button "Quit".

- You will be taken to the installer window again. Select the created partition - Android will be installed on it.

- Format the partition to a file system "ext4".

- In the formatting confirmation window, select "Yes".

- When prompted to install the GRUB boot loader, respond "Yes".

- The Android installation will begin, please wait.

- When the installation is complete, you will be prompted to start the system or reboot the virtual machine. Select the desired item.

- At launching Android you will see the company logo.

- Next, the system needs to be configured. Select your desired language.

Controls in this interface can be inconvenient - the left mouse button must be held down to move the cursor.
- Choose whether you want to copy Android settings from your device (smartphone or cloud storage), or whether you want to get a new, clean OS. It is preferable to choose option 2.

- The update check will begin.

- Login to Google account or skip this step.

- Adjust the date and time if necessary.

- Please enter your username.

- Customize the settings and disable those you don't need.

- Set up Extra options, if you want to. When you're ready to finish with initial setup Android, click on the button "Ready".

- Please wait while the system processes your settings and creates your account.

After successful installation and setup, you will be taken to the Android desktop.

Launching Android after installation
Before subsequent launches of the virtual machine with Android, you must remove from the settings the image that was used to install the operating system. Otherwise, instead of starting the OS, the boot manager will load each time.
The process of installing Android on VirtualBox is not very complicated, but the process of working with this OS may not be clear to all users. It's worth noting that there are dedicated Android emulators that may be more convenient for you. The most famous of them is this one, which works more smoothly. If it doesn't suit you, check it out.
I want you to exult in how easy it is to setup KitKat in VirtualBox.
Click the blue New button in Virtualbox, name the new VM Droid, change the Type to Linux and change the version to Linux 2.6 / 3.x.
Crank the Memory up to 1024MB and click Create.
Android KitKat 4.4 in VirtualBox
On the Create Virtual Hard Drive screen, change the File Size to 6 GB, leave the Hard drive file type at VDI but change the Storage on physical hard drive to Fixed size.
Create Virtual Hard Drive in VirtualBox for KitKat
Now back in the image list, double click your tasty KitKat build. You should see a Select start-up disk window poof onto the screen.
Click the tiny manila folder icon to find the Android .ISO file you downloaded earlier and then hit the Start button. VirtualBox choose your Virtual Optical Drive
VirtualBox attempts to boot off the ISO and immediately displays the Android-x86 Live & Installation CD test screen.
Keep hitting the arrow keys until you select the Installation option – then hit Enter.
Android-x86 Installation KitKat
The first thing we need to do is Create a new Partition.
Think of a partition as an isolated section of your hard disk. In this case, we’re going to set aside the entire virtual hard disk to Android but we need to create it first.
Select Create/modify partitions and keep moving.
Create/Modify partitions
This next screen may look daunting at first but it’s pretty straight forward when you think about it. The top section shows various drive facts such as:
Drive name: /dev/sda
Size: 6,442MB (6 Gigs)
The middle section shows that there are currently no partitions.
Hit the right arrow key to highlight the option along the bottom the screen, then press Enter.
Create a new KitKat partition in Virtualbox
Press enter again to make it a Primary Partition.
To be honest, I don’t think it matters if you pick the Logical Partition; however, the Primary partition makes the most sense to me so go with that.
If you’re curious about the differences between Primary and Logical partitions, just think of a Primary partition like a container which can comprise one or more logical partitions.
KitKat Virtualbox Primary Partition
Press enter again to confirm the size. Here I’m confirming the 6440.39 MB partition size.
Android 4.4 Kitkat Primary Partition Size Confirmation
Alright, now we need to make the partition bootable so make sure is highlighted below and press Enter. Make KitKat Virtualbox partition bootable
When you press enter it places the word “Boot” under the column called Flags between Name and Part Type. Now – keep pressing the right arrow key until you highlight .
Go for it, you’ve got this my friend.
VirtualBox KitKat Bootable Write in VirtualBox
Hit enter and you’ll see a confirmation warning about destroying all the data on your disk. Remember, this is your virtual disk not your real disk.
In other words, we’re about to nuke the Guest OS hard drive which is currently empty so this is perfectly safe and necessary. Type yes and hit Enter.
Erase KitKat data on bootable partition
When it finishes it’ll take you back to the previous screen. Just keep hitting the right arrow until you highlight .
Press enter so we can finish up. You should find yourself back in the Choose Partition screen; however, this time you should see your newly created Partition in the list.
Since we now have a place to park the KitKat installation we can start installing it. Select sda1 Linux and hit Enter. Choose Partition in VirtualBox for KitKat
Change the filesystem to ext3 and press Enter.
The other filesystems are for different purposes. ext2 is better suited for removable media such as USB flash drives and memory cards; however, the main advantage of ext3 is that it offers journaling.
Journaling file system s are ideal because they track file system changes in a log called a journal. This means that journaling file systems can recover faster from crashes and are less likely to get corrupted.
You definitely want this.
Choose Virtualbox Android Filesystem as ext3
You'll get a warning about losing all your data. This is fine because we have no data in the Guest OS.
Choose Yes and continue.
Virtualbox confirm format from sda1 to ext3
Install GRUB and hit Yes.
GRUB will give us the flexibility to boot up different Linux installations at startup.
Install Grub in Virtualbox for KitKat
Now hit Yes to install the /system directory as read-write.
Install /system directory as Read Write in Android KitKat Virtualbox
We're on the home stretch now baby!
Installing Android 4.4 Kitkat in Virtualbox Yay!
When you hit the finish line, in the VirtualBox menu bar, click Devices, go to CD/DVD Devices and choose Remove disk from virtual drive.
You might get a terrifying error about unmounting the disk. Don’t worry, just click Force unmount and choose Run Android-x86!
Run Android x86!
If it doesn't start up right or it freezes, press Ctrl+ r to manually restart the virtual machine.
In a few seconds it should boot up the GRUB loader. Just leave it alone for a few seconds and it’ll finish starting up.
VirtualBox GNU GRUB loader for KitKat
Now you can set it up just like a new tablet
Android welcome screen
By the way, if the mouse doesn’t work you may need to click Disable Mouse Integration from the Machine menu in the upper left corner of the Virtualbox window. This will keep the mouse gliding over the VirtualBox menu instead of getting trapped inside it.
On the Select Wi-Fi screen just click Skip. Virtualbox will use your host computers network card for data connectivity.
Select WiFi Network KitKat
And that's it!
Now you can download Google apps, setup Gmail and have a ball without fear of destroying a precious tablet.
Android 4.4 KitKat home screen
ancient article, working...
Detailed installation guide for Android-x86
Development for Android*
The emulator that comes with Android SDK, not very bright.
The main idea is to use VirtualBox + Android X86 to overcome performance problems.
What we need:
Eclipse + Android SDK development environment here,
as well as VirtualBox.
Below the cut there are a lot of pictures and the installation process, as well as some useful tips.
Create a Virtual Machine:
Name: Android-2.2-Generic
Operating system: Linux
Version: Linux 2.6
Memory: 512 MB
Hard disk: 3GB
In Machine Settings:
Properties->Network
Adapter 1 - NAT (in a virtual machine it will be visible as eth0, for the Internet).
Adapter 2 - Virtual adapter host (will be visible in the virtual machine as eth1, for ADB management).
Connect the image to the virtual machine.
And so let’s check the parameters of the car.
Starting the virtual machine
Control is performed by arrows left, right, up, down
Step by step how to install Linux:
In the bootloader, select the menu item
1. Installation - Install Android-x86 to harddisk
We create sections.
2. Create/Modify partitions
Select -> -> Size (in MB) 3216 press
Choose
Select confirm recording changes yes
Exit
Selecting a partition for installation
3. Select partitions to install Android-X86
File system selection
4. Please select a filesystem to format sda1
Confirm formatting Yes
Installing the GRUB boot loader
5. Do you want install boot loader GRUB?
Confirm Yes
You want to make /system read-write
6. Do you want to install /system directory as read-write?
Confirm Yes
This image contains many examples of Snake, NotePad from Eclipse it will not be possible to install your own, at the very bottom of the article there is a utility to solve this problem.
The installation process is complete
7. Android-x86 is installed successfully.
Create an SD card
size 2000 MB
disable CD-ROM
Reboot the system
Reboot
Hotkeys:
esc, right button mouse back
menu button between right ctrl and alt, missing on some laptops
alt+f1, alt+f7 switch between consoles
alt+cursor left, alt + cursor right
f6 Mode selection, airplane mode, shutdown
, overload
win key home
If your mouse cursor does not work.
Go to Machine->Disable mouse integration host + i (default host key is right ctrl).
Unlock the screen by pulling the arrow up
Network configuration
By default, the emulator cannot work with two network adapters - no problem. We need internet + internal address for debugging.
Let's go to launch applications
Selecting an application
Settings -> Configure Ethernet
Set eth0 dhcp and select save.
Reboot the Emulator.
When the machine boots, switch to the text console alt+f1
Magical order
root@android:/ #
#netcfg
# netcfg eth1 down
# netcfg eth1 dhcp
*action "dhcp" failed (invalid argument)*
*without this command the address was not allocated at all*
# netcfg eth1 up
#netcfg
Everything looks something like this.
Remember the eth1 address; it will be needed for adb.
Steps to set up a network with the console, unfortunately, must be done every time you start the emulator again.
Now on the computer go to the folder where the Android-SDK is located, on your system there may be a different folder
C:\Program Files\Android\android-sdk\platform-tools\
We use the adb command eth1 address, mine was 192.168.56.101
The output will be similar:
C:\Program Files\Android\android-sdk\platform-tools>adb connect 192.168.56.101
* daemon not running. starting it now on port 5037 *
* daemon started successfully *
connected to 192.168.56.101:5555
Let's run Eclipse.
An example of a working application.
What to do if I want to install NotePad, Snake and other examples
can be supplied this utility SystemApp_Remover_4_19.ap.
The installation process will look something like this.
C:\Program Files\Android\android-sdk\platform-tools>adb install c:\temp\SystemApp_Remover_4.19.apk
Then remove from the list of system applications what Eclipse conflicts with
p/s Switching video modes.
In the Boot Menu press e
Another menu will appear
kernel /android-2.2/kernel /quiet root ....
Press e again and add vga=ask at the end of the line separated by a space
To boot, press enter b, and then select the desired mode from the list.
p/p/s This is my first post on Habré, don’t judge strictly.
- Forward >