How to install a network adapter? How to install, update or remove Wi-Fi (wireless network adapter) driver.
Today we will deal with the question, how to set up internet on a computer or laptop. As a rule, the Internet is set up by an employee of the provider at the moment when you enter into an agreement with him for the provision of services - after all, correct access to the World Wide Web is an indicator of the completion of this service. However, later, when you reinstall Windows or purchase new computer Internet settings may go wrong, and here we will be faced with a dilemma - call technical support or do everything ourselves. In fact, this task is not at all difficult, so by reading this article to the end, you can save money more than once.
The most common type of connection is cable - they run a wire into your apartment with a special LAN connector at the end, which is inserted into the network card in the PC case. However, depending on the provider, there are several types of network connections. How to properly set up the Internet and how the connection to the World Wide Web occurs should be specified in the contract papers that were given to you when the employee initially set up the Internet. There are several of them - automatic IP, static IP, PPPoE, L2TP, with filtering by MAC address. Let's look at them in order.
Internet setup automatically
I called this type automatic, because if your provider connects you using this type, then you are lucky - you don’t have to configure anything at all. With it, the computer obtains an IP address on the network “by itself” - that is, we simply plug in an Ethernet cable and use the Internet. If it doesn’t work, then make sure that all configurations are reset - to do this, go to “Start > Control Panel > Network and Internet > Network and Sharing Center > Manage network connections > Change adapter settings”, right-click on “ Local Area Connection” and go to “Properties > Internet Protocol version TCP/IP v.4”. Here all values should be set to “Automatic”, as in the picture
Connecting to the Internet on a computer with authorization
In this fairly common type, or rather types, because there are two of them, you will have to work a little and manually create a connection and enter your username and password to set up an Internet connection. If every time you access the Internet, you click on the desktop icon, a connection window opens in which you click on a button - this is your case.

PPPoE
PPPoE - connection to the provider’s servers occurs only using a login and password. If you suddenly reinstalled Windows, then to restore the ability to log out, do the following:
- Go to “Start > Control Panel”

- further in “Networks and Internet”

- and in the “Network and Sharing Center”

- Here somewhere on the page (in the left column for Windows 7 or in the main window in Windows 8 and 10) we see the menu item “Set up a connection or network” - click on it

- Here we select “Connect to the Internet” and click “Next”

- Select “High-speed (PPPoE)” and move on

- We enter the login and password issued by the provider - they are usually specified in the contract.

- After that, we return to the “Network Center” and find the “Change adapter settings” link in the menu - click on it.

- We find “High-speed connection” - now it is in the “Disabled” state.

- Double-click on it and a login window will open. Click the “Connect” button and rejoice! For convenience, this “High-speed connection” can be dragged with the mouse to the “Desktop”, creating an icon with a quick link.

L2TP
L2TP is another type of Internet setup with authorization. To activate it, we do everything the same as in the previous method, up to and including step No. 4.

Connecting a laptop to the Internet with a static IP
The next type will not ask you to enter your login and password and click on the icons to connect each time, but it does require manually entering the IP address settings to connect to the provider’s equipment. For settings, we go through the chain “Start > Control Panel > Network and Internet > Network and Sharing Center > Manage network connections > Change adapter settings”, right-click on “Local Area Connection” and go to “Properties > Protocol” Internet version TCP/IP v.4".
And enter into the IP address and DNS server fields the values provided by the provider.

Filtering by MAC address
And finally, the provider can apply filtering by MAC address to any of the above types. This means that you can connect to the Internet only on the computer that is registered with the provider. Insert the cable into another one and the Internet will disappear. This problem usually appears at the moment when you bought a new computer (or network card), brought it home, but the Internet does not work. To be honest, I don’t even understand why some of our “friends” do such garbage, but if this is the case, then you can only activate network access by calling the support service and saying that you bought a new PC.
That’s all for today - I’m sure that you now know exactly how to connect the Internet to your computer and can 100% do it yourself!
The network adapter is a printed circuit board that fits into a slot on the motherboard. It can also be integrated into the motherboard or connected to a computer via a USB connector. There are other options, but the ones listed are the most common. You can distinguish the adapter by its characteristic connector designed for connecting a network cable connector. Adapters for network connections using Wi-Fi technology are becoming increasingly common. The latter are distinguished by the presence of a radio antenna. The purpose of any type of network adapter is the physical connection of the computer and the transmission medium, as well as the preparation and transmission of data from one device to another.
Installing and configuring the network adapter
Before installing the network adapter, pay attention to its brand; it will be required during the setup process. To physically connect, you need to access the motherboard. To do this, you need to disconnect the cover from the system unit.
Next, find the slot on the motherboard for installing the card. Often, this requires removing the closing metal plates from the rear panel of the system unit in order to expose the external interface of the adapter. Install the module into the slot, make sure that the cable connector is accessible, and screw the board to secure it. Then install the cover back on the system unit. Connect the network cable.
Turn on your PC. After the system boots, a message will appear indicating that a new device has been found. For correct operation, you will need to install a driver that matches the system and brand of network adapter. It is better to download it from the manufacturer’s official website. After this, reboot the system. The network connection icon should appear on the taskbar.
Right-click on the icon and select “Network and Sharing Center.” This is where all network connection settings are made. In particular, go to the “Change adapter settings” menu, after which all available network connections will open.
To change properties, right-click on the icon of any of them and select “Properties” in the context menu. In addition, the status of each connection is visible here: “Enabled” or “Disabled”. Connections that are enabled but not working for some reason are crossed out with a red cross. You can also enable or disable the connection (software control of the adapter) through the context menu.
This article will help you quickly answer any questions you may have. You can also study the entire material to get a complete understanding of network setup in Windows 7.
Introduction.
Purchasing an operating system Windows 7, the user must be prepared for the fact that sooner or later he will be faced with the task of setting up a network in the operating system. For some, this task is not difficult at all. Typically, installing and configuring a network in Windows 7 is the next step immediately after installing Windows 7 ( If you have not yet installed Windows 7 and are not entirely sure of the necessary steps, then you should read this section: Installing Windows 7).
The network setup phase is required for the following steps after installation:
- downloading current antivirus software distributions from the Internet;
- downloading the latest versions of video player, web browser;
- if necessary, downloading drivers from the network for some devices on your computer (if they were not downloaded and installed automatically, or if installation disks are missing);
- use of an XBOX console;
- exchange of documents and quick access to shared resources of several computers or laptops. In this case, to use the Internet, you need to set up a wired or wireless network. As a rule, one computer or laptop serves as a kind of Internet distributor for all other pieces of computer equipment.
The same is true with MAC addresses and subnet masks. All these settings remain the same, they have long been familiar to users. Some changes only affected the interface of the Control Panel and its items through which network parameters are accessed. Everything else is without significant changes. This is another undoubted advantage of Windows 7. Users who previously used Windows XP will be able to understand the new operating system quite easily. As a rule, setting up a local network in such popular operating systems as Windows Vista, Windows 7, Windows Server 2008/2008 R2 begins with a component for configuring network properties such as “”.
This properties configuration tool allows the user to select a network location, set up printer and file sharing, and view a network map. You can also monitor the status of all your network connections. It is very convenient and practical.
How and where to open the Network and Sharing Center component.
Before you can use the full functionality to create network parameters, you need to find and open it. One of the following actions of your choice will help you open the active window correctly " Network and Sharing Center»:
As you can see, if you are careful and read everything, then you should not have any problems finding the “Network and Sharing Center” component. It should be noted that to expand the ranges of used IP addresses in Windows 7, in addition to the previously existing IPv4 protocol, a new one was added - IPv6. True, providers have not yet activated it, and when this will happen is currently unknown. Most likely, the creators of Windows 7 were ahead of the curve.  Figure 1. The illustration shows the Network and Sharing Center window.
What does the network location of a computer mean?
Understand what " Network location", you need before you start working with this important component. For all computers, this setting is set automatically the first time they connect to the selected network. This also applies to the firewall and security settings of the network selected for connection. All of them are also configured automatically when you first connect your computer or laptop to the network.
The Windows 7 operating system supports several active profiles at the same time. This allows you to use multiple network adapters that can be connected to different networks with the greatest security.
By the way, Windows Vista uses the strictest firewall profile for all network connections. This may be why Vista is not as popular as Windows 7.
There are four main types of network locations:
| The first type is a home network. From the name itself it is clear that this network location is intended for a computer used at home. It is also used in networks in which all users know each other well. Such computers can not only create, but also join home groups. Typically, for the convenience of users when using home networks, network discovery is automatically turned on. Home networks provide all computers with high-quality network access. | |
| The second type is a network of an enterprise or organization. This type of network location also allows you to find the network automatically. The difference from a home network is that on an enterprise network it is not possible to join or create a computer to a home group. The network is intended exclusively for professional activities in an enterprise, organization or office. This type is called for short (SOHO), that is, it is used in a small office network. | |
| The third type is a public network. Cafes, airports, train stations and other public places - this is where computers use the third type of network location. By default, the ability to join home groups is disabled in this location. Network discovery is also disabled. Without exaggeration, we can say that this is the most strict arrangement. | |
| The fourth type is a domain network. The domain type of network location is almost no different from the work network. Except that in the domain type, the configuration of Network Discovery and Windows Firewall is determined by Group Policy. This also applies to the network card. In order for an existing network to automatically receive the “Domain” network location type, the computer just needs to be joined to an Active Directory domain. Only in this case can the network become a domain network. |
 Figure 2. Selecting the network location of the computer.
Network map.
In order to see the location of all devices included in a specific local network, a network map is used. This is a graphical representation of the devices included in the network and the diagram by which they are connected to each other.
The network map can be seen in the same “Network and Sharing Center” window. True, only the local part of the network card is displayed here. Its layout directly depends on the available network connections. In the upper left corner you can see a display of the computer on which the map is being created. On the left you can see a display of the remaining computers included in the subnet.
 Figure 3. Example of a network map.
You can view the network map at any time. True, only for locations such as “Home Network” and “Enterprise Network”. If the user gets curious to view the maps for the Domain Network or Public Network locations, he will see a message that the network message is disabled by default by the administrator. A network administrator can enable mapping using Group Policy.
In Windows 7, not one, but two components are responsible for the operation of the network map. This Link Layer(Link Layer Topology Discover Mapper – LLTD Mapper). It is this important component that requests devices on the network to be included in the map.
Network connections.
In the window " Network connections"You can see the entire set of data that the user needs to connect the computer to the Internet, local network or any other computer from the home network.
This data is available for viewing only after installing all the necessary drivers for each network adapter on Windows 7 and after automatically configuring all network connections on a specific local computer or laptop.
There are several simple and accessible ways to easily and quickly open the “ Network connections»:
- Open the window " Network and Sharing Center" and follow the link " Change adapter settings"(see Figure 4);
 Network and Sharing Center"." href="/upload/nastroika-windows-7/windows-7-nastroika-seti-img-7.png">
Figure 4. Open the window “ Network connections" through " Network and Sharing Center».
Network and Sharing Center"." href="/upload/nastroika-windows-7/windows-7-nastroika-seti-img-7.png">
Figure 4. Open the window “ Network connections" through " Network and Sharing Center».
- Click the “Start” button and when the menu opens, enter “View network connections” in the search field. In the results found, select the “View network connections” application ( very convenient way);
- You can also use the classic keyboard shortcut Win+R. As a result, the “Run” dialog will open. In the "Open" field, which is located in the "Run" dialog box, you must enter the following command: ncpa.cpl or control network connection. Having done this, you need to click the “OK” button.
 Figure 5. Network Connections window
Window " Network and Sharing Center» similar to the Windows XP window. All detailed information about the network connection can be obtained by selecting the “Properties” option for a specific network adapter (see Figure 6). In Windows 7, to set up a network connection in the Properties window, you need to select Internet Protocol Version 4. In the same window, you can also make the necessary settings for gateways, subnet masks, DNS servers, IP addresses, etc. All this information can be obtained from the provider that provides Internet access services.
 Figure 6: Network connection details.
Rename the network adapter.
The developers of Windows 7 made sure that by default the operating system itself assigns all network connections the names “Local Area Connection” or another option - “Wireless Network Connection”. If the user has more than one network connection on the computer, the system also assigns a number to the connection. There are three ways to rename the name of any of the connections you create.
- First way. Select the network connection and click on the “Rename connection” button located on the toolbar. After entering a new name, press the key Enter;
- Second way. Using the key F2: press, enter a new name and save using the same key Enter;
- Third way. To rename a network connection selected from the list, right-click on it, select the “Rename” command from the context menu that appears, rename and save the changes using the familiar key Enter;
Network status.
In addition to the ability to rename the connection, in this window you can also find out about the network status. Using this window, which is called “Network Status,” at any time you can not only view any data about the connection network, but also find out details such as MAC address, IP address and much other useful and interesting information.
There are providers that allow users to access the Internet using the MAC address of the network card. If for some reason the network card is changed or the entire computer is replaced, the MAC address will also change and Internet access will cease. For a new connection to the Internet, you must set the required physical address (MAC address).
How to see the MAC address of a network card in Windows 7?
To view the current MAC address, as well as complete information about the connection, you need to right-click on the local network connection, and then select “Status” in the context menu that opens (see Figure 7). Figure 8. How to change the MAC address of a network card (network adapter).
Network diagnostics.
If a situation arises where unexpected errors or failures occur in your network connection, you can eliminate them using connection diagnostics. The diagnostic tool can be found in the Network Connections window.
Select the window " Troubleshooting", which, analyzing the connection status, offers a choice of possible faults and troubleshooting methods. To start diagnostics, you need to right-click on the network connection and select the “Diagnostics” command in the context menu.
 Figure 9. Opening the Local Area Connection Troubleshooting Wizard.
The second way to start checking your network connection parameters is to select the desired network and click on the “Connection Diagnostics” button. The button can be seen on the toolbar.
In the dialog box that opens, to diagnose the connection, just follow the steps of the wizard to troubleshoot errors and problems. Nothing complicated.
Disabling a network device (network adapter).
Sometimes situations arise when network connection problems are resolved not with the help of an error resolution wizard, but by simply disconnecting the network adapter from the computer. This can be easily done by doing one of the following:
- Select a network connection and click on the “Disable network device” button located on the toolbar;
- Right-click on the network connection and select “Disconnect” in the context menu that appears;
Conclusion.
The article details how to configure, connect and diagnose network connections.
If you have any doubts about your own network setup and connection capabilities, it is better to seek help from specialists, or carefully read the article again.
How to install a driver on a network card in Windows 7 10 XP? In the modern world, not a single user can do without access to the Internet, so a properly configured network plays an important role.
For the network to work correctly, you first need to install the correct driver on the network card of your personal computer, and we will look at how to do this later.
When installing the operating system, the network card driver may be installed automatically; to check this, you need to go to the “Device Manager” and open the desired network branch.
Call the context menu to do this by right-clicking on the “My Computer” icon and selecting “Properties” from it. In the window that opens, click on “Device Manager”.
Go to “Network adapters” and see if there are exclamation marks or question marks there. If any are present, then you need to install the driver.

Next there are several options. The simplest one is when the driver disk comes with the motherboard or network card; here you just need to insert it into the drive and install the required driver.

In Device Manager, go to our network card, right-click to open the context menu, select “Update driver” and the next step is to search on this computer.

Next “Browse” and indicate our drive with the installed disk, click Next... Next... and wait for the driver to install.

But what to do if there is no drive, or the driver disk itself. The first step is to find out the model (brand) of the network card we are using; for this, the AIDA64 program will be useful. We launch the program, in the menu on the left we go to “Devices”, in it we select “Windows Devices”, in the window on the right we select “Network adapters”, and in them our network card. When we select it, the program will show us its make and model.
Next, we need a device that is already connected to the Internet. We go to the manufacturer’s official website, download the driver we need (by specifying the network card model in the search). Transfer it to your computer and start the installation.
If the driver is loaded in the form of libraries without an executable file (usually setup.exe), then we use the first method only in the “Browse” field, instead of specifying the folder where the driver was written (it must first be extracted from the archive).

After installation is complete, you must restart your computer.
How to install a driver on a network card without the Internet?
In this article we will look at several ways to solve this problem.
Installation disk
Typically, motherboards, network adapters and other hardware are sold along with a disk containing drivers and installation instructions. Look among the disks lying around, maybe you will find a disk with the necessary drivers.
Found it? Insert it into the drive. Now you need to go to “Device Manager”. In Windows 10, you can right-click on “This PC” -> “Manage” and find the manager there. Find the network adapter among all devices and select “Update driver” in the context menu. In the window that appears, click “Search for driver software on this computer” and select the drive. The driver installation will start and soon you will have Internet access.
Download the driver using another computer
If the installation disk is lost, you can download the driver through another computer that has access to the Internet. But for this you need to know the exact model of the network adapter. Perhaps you still have the box from the network card, or a warranty card, which may indicate the model. If not, let's try to find out programmatically.
In the same device manager, right-click on the network card -> Properties -> Information and select “Hardware ID” in the “Property” drop-down menu. Copy the value and enter it into Google. The search engine will find many sites where you can download the appropriate driver for this device.
Previously, we wrote about how to check system stability using the Aida64 program. This feature-rich program can show all the devices connected to the motherboard. Launch Aida64 and go to Network -> Windows Network. There you can find out the manufacturer and model of the network card. Download the driver from the Internet.
Installing the driver from the .exe file should not cause any difficulties.
Creating a Backup
Before reinstalling Windows, it is better to back up your drivers. This will help restore the functionality of all devices in a few clicks. Windows has a built-in utility called DISM.exe. In fact, DISM.exe provides many options, but we will use the function of creating a driver backup.
Run Command Prompt as Administrator. To do this, right-click on Start and find this item there. In newer versions of Windows 10, it is called Windows PowerShell (Administrator).
Enter the command:
dism /online /export-driver /destination:E:Backup
E:/Backup - folder where to save drivers. Create it in advance. You can also save drivers to other media, such as USB flash drives. The export of drivers to the specified directory will begin. Wait until the process is completed, and only then proceed to reinstall Windows.
When you have a “clean” OS in front of you, it’s time to restore all drivers. Just like with the installation disk, you need to open the device manager, find the network adapter and start the driver installation from your computer, selecting the folder where you saved the backup copy.
3DP NET program
There is a wonderful program that can install drivers on a network card without the Internet. This is a utility that contains many drivers specifically for network adapters. And with a 95% probability, the driver for your adapter is also there.
Download the current version of 3DP NET from the Internet in advance. I specifically do not provide a link, because the program is constantly updated, drivers are added for new devices. Launch 3DP NET. The drivers will begin unpacking into the specified folder. Then the program will automatically detect your network adapter and in 1 click you can install the driver. I strongly recommend recording this program on a flash drive so that you can install the driver at any time.
Select “Search for drivers on this computer.” If you don't have a driver disk? When might you encounter a problem installing a network device driver? If a driver is already installed on a network card or Wi-Fi adapter, they are displayed in the Network adapters section with the appropriate names. The network device driver code looks like this: PCI/TECH_xxxx&DEV_xxxx&SUBSYS_xxxxxx. 2) There is a driver, but Wi-Fi does not work.
Advice! We recommend downloading all the necessary drivers (not just the network one) to a separate directory on your hard drive and/or flash drive. This will avoid situations where, after installing the operating system, you will need to look for a drive or PC (tablet, phone) to download drivers from disk or the Internet. The first line will be the full name of the ID equipment. After we have found out the equipment identifier, we should copy its name (right-click - copy) and enter it into the browser search field.
Installing the network driver
Similar actions will occur if you update the network driver. We go to the directory into which we recently downloaded everything we need, using the “Browse” button, click “Next” and wait for the driver installation process to complete.
Important! To remove an already installed driver, you need to go to “Device Manager”, select the network adapter, right-click and select “Delete” in the context menu. Next, you should restart your computer and go to Device Manager again.
3. Installing and updating the driver for the Wi-Fi adapter
Setting up automatic search and installation of updates now automatically updates all devices. Get the correct drivers from the official websites, everything is correct there, you just need to know exactly the specifications of the device, the OS and everything will work out.
If this is a regular desktop computer, then the wireless network adapter (Wi-Fi adapter) is connected separately. There could be, for example, a USB adapter such as TP-LINK TL-WN721N, or an internal PCI adapter. It doesn’t matter what Wi-Fi adapter you have and on what device. We need it to work stably and not have any problems with connecting and working with Wi-Fi networks. I don’t remember exactly, but it seems to me that I have not yet seen a case where Windows 7 itself installed the driver on the Wireless Network Adapter.
You can install it from the disk that comes with the kit, or download the driver for the Wireless Network Adapter from the manufacturer's website. Just look for a driver for a specific laptop model, USB adapter, etc. Below in the article, I will show in more detail how to install the driver for a Wi-Fi adapter.
We check whether the Wi-Fi adapter is turned on, whether there are available networks to connect to, there may be a problem with the router, etc. If everything has been checked, then you need to try to reinstall (update) the driver.
As I already wrote above, the driver can be found on the disk that came with the device. Only this method has one drawback. The driver located on the disk may already be out of date. And on the website of the manufacturer of your device, there may already be a new version of the driver and it would be good to download and install the new driver. But if it’s not possible, or you don’t want to look for it, then the driver from the disk will also work.
We find the official website in the search results and go to it (we get to the page of our device). Or you can go to the website of your device and search the site, specifying the model. If necessary, indicate for which operating system the driver is needed. That's it, we have the driver on our computer. If you just want to install, and not reinstall (update) the driver, then unpack the archive (if the driver is in the form of an archive) into a folder and run the installation file. Follow the instructions.
If you want to reinstall the driver, then I advise you to first remove the old one. That's it, the driver has been removed. You should see an unknown device (Network Controller) appear. After installing the driver, usually Wi-Fi should work even without rebooting. And I hope it will work stably. Specify the path to the driver folder and click Next. The driver installation should begin. If Windows reports that “The most suitable software for this device is already installed,” then try installing using the first method (from the installation file).
It didn’t help at all, my Wi-Fi adapter was ordered from Aliexpress. There is no disk included, the adapter does not have a name, the XP operating system does not install the firewood itself. Good afternoon After reinstalling the OS from XP to 7, the network adapter on the laptop constantly turns off completely and disappears at intervals of 1-1.5 hours. At that time, other devices work normally. The idea is that modern operating systems automatically find all the equipment and install the necessary drivers.
In order to download the driver you need an Internet connection. Remember where the driver disk that you were given in the store when you bought a computer is collecting dust. Create a backup copy of your drivers in advance, for example with Driver Magician Lite or any other program responsible for this function.
In the menu that opens, select “Properties”. Find your Network Adapter. Next, from a working computer (connected to the Internet), download the driver we need. Anticipating difficulties with the Internet connection, we download the program, “well” for example such a powerful and world-famous driver installation manager as DriverPack Solution. They call it 3DP Net. According to the developers, with one click of a button you can install drivers on network cards (including wireless ones) without access to the Internet.
But this is understandable. The utility includes network card drivers, which can be found for almost all adapters. In practice, it means only one thing: probably new network cards are not presented there. I suggest for informational purposes (who knows, maybe it will help someone) to get acquainted with this utility.
1. How do I know if the driver is installed on the Wi-Fi adapter?
It's like the hero of the occasion is 3DP Net. So is the second 3DP Chip utility. But let’s not clutter up the pages and see everything that the second utility can do in the video clip. After 3DP Net has completed its useful work, and as you remember, we only need drivers from it for a network card without Internet access, the 3DP folder located in the root of the drive (C:) can be deleted.
Driver update program DriverPack Solution
Where the HOME tab and the network card are important to us. Unless, of course, 3DP Net detects it. By clicking once on the network card, the installation of the drivers we need will begin. Basically that's all. After the reboot and the Internet appears, you can download the second 3DP Chip utility and understand its advantages.
Another way to install a driver for a Wi-Fi adapter
Without this driver, it is impossible to start either a wireless or wired network. If you have the disk, there are no problems, just install the program. And if it is missing, you need to find, for example, a mobile phone/tablet with a connected network in order to download the driver.
The driver is the link between the operating system and the internal components of the computer, that is, this program connects the OS with the motherboard, video and network cards, and office equipment. These programs are developed by the same companies that produce PC equipment and electronic office equipment, which is what a personal computer interacts with.
In the next window, click “Browse this computer for driver software.” To do this, go to Device Manager (how to do this is written at the beginning of the article) and right-click on the Wireless Network Adapter device.
Drivers are usually supplied with devices on CDs or, now very rarely, on floppy disks. Insert the disc into the CD drive. When prompted by the system for search and installation parameters, click “Browse” and specify the network path for the drivers. Click Next. After installation is complete, agree to restart your computer.
Make sure the drivers are installed correctly. To open the context menu, right-click on the “My Computer” icon and select the “Properties” option. Go to the “Hardware” tab, click “Device Manager” and expand the “Network Cards” list. Right-click on the name of your adapter and activate “Properties”. On the General tab, under Device Status, there should be a message saying “Device is working normally.”
If you have installed a network adapter on the motherboard, but do not have drivers for it, go to the manufacturer’s website from another computer and download the drivers from there to a floppy disk or flash drive. Copy to a folder on your hard drive with a distinctive name so you can easily remember the network path, for example, D:DriversNetwork.
Go to "Device Manager", expand the "Network Cards" node and right-click on the name of the network card. Select the "Update Driver" command. When asked by the Hardware Update Wizard about connecting to the Internet, answer “no, not this time.” To continue, click “Next”. In the next window, check “Install from a specified source” and select “Next”.
Select the checkbox next to "Include the following search location" and use the "Browse" button to specify the network path to the desired drivers. Click “Next” to continue. After installation is complete, agree to restart your computer.
Network drivers for Windows XP
Quite often, many users of personal computers and laptops have to deal with the problem of installing the necessary drivers. Especially this problem often appears when it is necessary to configure a network adapter so that it can work with the network. Let's take a closer look at where you can download drivers for the network card for the Windows XP operating system.
The easiest way: use the DrivePack program. to update all drivers automatically and get rid of the problem.
What is a network driver
Network drivers are software that enables full operation of a network card. These drivers provide access to the Internet, local network, and Wi-Fi.
How to find out the type and name of a network card
Useful information about this can be found by following this link.
How to find out the system capacity
Typically, the network drivers for 32-bit and 64-bit systems are different. This, of course, is taken into account by driver developers who offer different drivers depending on the bit depth.
To find out the bitness of Windows XP. necessary:
Having found out the name, type and model of the network card, you can start downloading the necessary driver. The best way to do this is from the manufacturer's website.
By going to the site, find a driver that matches the bit size of your system and install it according to the instructions provided by the developer. After installation, restart the system.
Depending on the network card model, you can update drivers in several ways. The first method is suitable if you have a built-in network card. That is, you did not purchase a separate, more functional network card than the one already integrated into the motherboard.
Right-click on the “My Computer” shortcut and select “Properties” from the context menu. A menu will appear with the characteristics of your computer. Select the "Device Manager" tab. Find the line "Network equipment". Click on the arrow next to this line. A line with the name of your network card will open. Click on it with the right mouse button. In the context menu that appears, select the “Update driver” command. Next to the “Use Internet connection” line, check the box. The automatic update process via the Internet will begin. Upon completion, you will be informed that the driver update was successful.
The second option should be used if you bought a separate network card in addition to the one that was already integrated into the motherboard of your computer, because it is the one that works as the main one on your PC.
Look in the technical documentation for the model name of the network card. Write it down or remember it. Go to the website of the manufacturer of this network card and select the “Files” section. Next, select “Network Cards”. A list of network cards from this manufacturer will appear, including your model. Select the desired network card model. You will be prompted to select your operating system. Select your operating system. The driver download process will begin.
After saving the driver folder on your computer, open it. Find the "Setup" file. The driver installation wizard will start. Use its prompts to install the driver. The driver has been updated.
you need to find out which network card is on your computer. To do this, open the Start menu and select Control Panel. In the window that opens, select “Administration” – “Computer Management” – “Device Manager” – “Network Adapters”.
You can get similar information using the command line. To do this, open the Start menu and enter “Run” in the search box. Open the result that appears. In the small dialog box, type “cmd” without quotes and press Enter.
A command prompt will open. Type the following command without quotes: “ipconfig /all” and press Enter.
Once the driver is downloaded, double-click it to launch the Installation Wizard. Install drivers in the same way as any other program. Once the installation process is completed successfully, be sure to restart your computer.
So, you have finally concluded an agreement with a new provider, and a cable with a plug has been installed in your apartment - a real window to the world. All you have to do is connect it to your computer - and the Internet is at your service. However, if it was enough to insert the plug into the socket, you would not need to read this article.
Let's look at how to connect the Internet to a computer via cable, in the simplest case. Let's say you have only one computer, and you will use it as a router (if you suddenly need it or a tablet). Or (alternatively) you are planning to do so later, so you turn off the router to make remote access easier.
Let's say you have a network card on your computer (it doesn't matter whether it's separate or built into the motherboard), and you've just connected an Ethernet cable to its input. We assume that you are using the most current Windows 10. Although for the correct settings of Windows 8/8.1 or even 7, these instructions are also suitable: the principle is the same.
Of course, you can always call a professional to do all the necessary work for you. But specialists are not always free. In addition, you will not only save money on calls on your own, but also learn how to set up the Internet on your computer via cable. In our world, such knowledge can come in handy at any time.
Dynamics vs. Statics
Now check with your provider what kind of connection they offer on your tariff plan: dynamic or static.
With dynamic connection your IP address may change depending on your ISP settings (and if you intend to subsequently connect to your workplace remotely, this may interfere with you). But manipulations with entering parameters are reduced to a minimum: the provider sets the IP address, subnet mask and default gateway independently. In this case, just insert the cable into the computer and that’s it, you will have access to the Internet.
Static connection provides a static IP address assigned to your computer (or router, if you choose to connect through one). In this case, you will have to manually enter the IP address, subnet mask and default gateway in the connection settings. Usually all these incomprehensible numbers and letters are included in the access agreement or in an appendix to it. If necessary, you can clarify them with the technical support service by providing your details.
In some cases, access also requires a login and password (do not confuse Internet access as such with access to your personal account on the provider’s website - data is required for your personal account).
How is the connection made?
Let's look at the procedure step by step.
- Insert the plug of the Ethernet cable brought into the apartment into the corresponding port of the computer. Even if you have never done this before, you will not be able to confuse this type of connector and plug with something else.

- Right-click on the “Start” button and find the “Control Panel - Network and Internet - Network and Sharing Center” section. In the left column, select the “change adapter settings” tab. A list of your adapters will appear in the main window (more precisely, in our case, one “Local Area Connection” adapter). Again, use the signature “right-click” technique and select “Properties”.
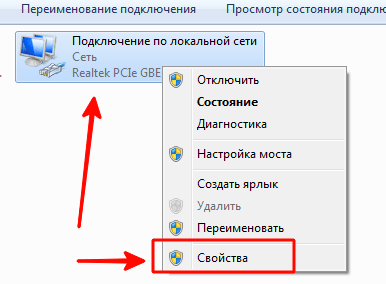
- A small pop-up window contains a whole column of different strings with properties. Select the line “IP version 4 (TCP/IPv4)”. While it's selected, click the Properties button below the list box.
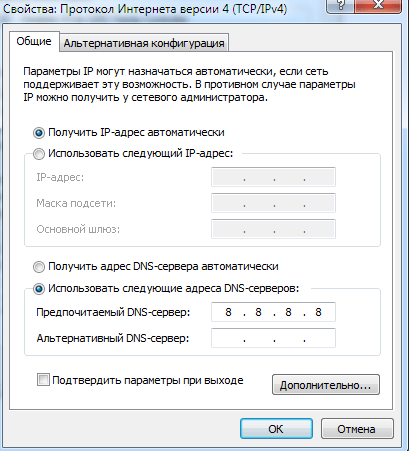
Now our instructions branch out. Have you checked with your provider what IP is provided to you? If not, check now.
- If dynamic, then trust the automatic selection in the IP address and DNS server settings.
- If it is static, you will have to enter the values manually. As a rule, you need to specify “IP address”, “Subnet mask”, “Default gateway” and “DNS server”. When you have completed entering your data, click OK to save your selection.
Important points:
- If the connection requires a modem, enter its default address as the IP address; this is usually 192.168.1.1. If the modem has a different IP (which is rare), it is indicated on the bottom of the modem itself or in its instructions.
- Usually the ISP provides the DNS server details, but sometimes this is omitted. Then you can use the universal ones:
1) Public DNS from Google: 8.8.8.8 or 8.8.4.4 - a universal solution, usually suitable for all computers
2) OpenDNS – 208.67.220.220 and 208.67.222.222
3) Yandex DNS with its own anti-virus filter - 77.88.88.88 or 77.88.8.2 - if you trust the Yandex anti-virus policy (although sometimes it may consider a completely decent site unreliable)
4) Yandex DNS with a filter for pornography and other obscene content - 77.88.8.7 or 77.88.8.3 - although it depends on what you actually need from the Internet, hehe.
- Let us repeat: if remote access is important to you, make sure that your provider’s support ensures that your IP will not change.
If your ISP offers L2TP access, this may require some additional steps on your part. Usually the provider provides instructions for setting up this specific type of connection, but it wouldn’t hurt to duplicate it on our part either.

So, to configure L2TP, you need:
- Go to the already known section “Network and Sharing Center” and select creating a new connection
- Unlike previous options, here you should go to “Connect to your workplace”
- When the system prompts you to create a new connection, select this item
- Select "Use my connection"
- Enter the server address provided by your provider. You should not select the immediate connection option. You can assign a name that you like.
- In the next window, enter the username and password provided to you. Don't forget to check the box next to "Remember password"
- Connect now when the system prompts you to do so
- Return to “Adapter Properties” (as discussed above) and select the “Security” section
- In the VPN Type drop-down options, select L2TP IPsec VPN. Below is the line “Data Encryption”, here you need to select “Optional”
- Under the "VPN Type" line, click the "Advanced Options" button
- Enter this same key in the “Key” field. You must have it from your provider.
- That’s it, you can click “OK” with peace of mind and use the connection.
This instruction works for Windows 7 and newer versions.
Why all this complexity? - you ask. This solution has advantages: for you - increased connection security (compared to a regular LAN), for the provider - simplification of the billing system.
Setting up PPPoE
Before setting up the Internet on your computer, check with your provider about the type of access it offers. Access via PPPoE requires not only correct settings, but also authorization using a login and password. You will need this connection method if you do not use a modem or router, but insert the cable from the provider directly into the connector on the computer, without intermediaries.
To do this, you again go to the “Network Control Center” and select there and use it to create a new connection.
In the wizard that launches, you select the first item - “Connect to the Internet” - and click “Next”. Then in the window that appears, you must select “High Speed (with PPPoE)”.
The final step remains. In the final window, you need to come up with a name for the connection and enter the login and password issued by the provider. If your computer is used by several people (for example, family members), each under their own account, and you want to give them all access, then check the box “Allow other accounts to use this connection.”
Now make sure your Internet connection is working. And if so, then hello world!