Clear the folder with temporary files. Temporary Files: what are they and how to remove them
Temporary files in Windows 10 are created almost constantly when you work on a computer, install games or programs, update drivers or operating system. Unfortunately, they do not always resolve themselves, thereby causing operational problems, such as freezing or slowing down of the OS. The so-called Temporary files in Windows 10 are located in folders C:\Windows\Temp and C:\Users\Username\AppData\Local\Temp, from where they can actually be deleted manually. The truth is, before doing this, it is best to go to the “Control Panel” -> “Folder Options” -> at the very bottom, check the box for “Hidden files, folders and drives”, then click “Apply” and “OK”. The procedure can be completed without fear of subsequent problems with your computer.
You can delete unnecessary files and folders either manually (for example, as described above or below), or using special programs, such as Ccleaner. In addition, it doesn’t bother to check for empty folders. And finally, clear the Windows cache.
Deleting temporary files in Windows 10
The new operating system introduces a tool for analyzing the contents of laptop or computer disks. And of course cleaning them. This know-how is called “Storage” and is located in the “Start” menu (you can use the hotkey combination +I) -> “Options” -> “System”.

All connected hard drives are reflected here, and to be precise, their partitions. If you choose any of the options provided, you can find out what it is filled with.
For example, take Disk “C” (or the one on which your operating system is located). Click on it and scroll down the information provided. As shown (highlighted) in the screenshot below, you can see the amount of disk space taken up by unnecessary documents.

Click on the numerical value and get the following data in a new window that opens.

Here you can either delete what you don’t need by using the appropriate button, or view the contents of the “Downloads” folder and, if necessary, clear it, which users constantly forget to do, thereby cluttering the system with old and unnecessary information. And empty the Trash.
What I want to note is that the cleaning procedure itself will not be shown to the user in any way, but there will simply be an inscription with characteristic content. Why and why this was done is not known.
Program for cleaning drive "C"
In 10k, the developers have already installed a cleaning application, as well as in earlier versions. And yet they should not be neglected either, but even taken as a rule and constantly used.
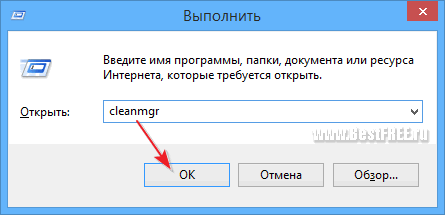
It is launched using the hot keys +R and entering
Windows and many applications create temporary files. The temporary file contains data that the application does not want to store in RAM due to its instability. At the same time, unlike the documents you create using the application, this data is not intended for long-term storage. Thus, temporary data is something in between - it is necessary, but only for a short time. The problem is that some temporary files exist longer than originally intended. Often the application that created them is to blame.
Before you start searching for temporary files to delete them, close all applications you can. It may be that running applications use temporary files for short-term data storage or other needs. Deleting a temporary file in this case may lead to data loss and other undesirable consequences.
Using the Command Prompt Instead of Explorer
While File Explorer doesn't detect all temporary files (just most of them), it has a great interface, and the ability to see files before deleting makes cleaning much safer than using command line utilities. All you need to do after detecting temporary files to permanently delete them from the system is select and press the Shift+Del keys.
There are two command line utilities that provide an alternative to Explorer - Del and Erase. However, I recommend caution when performing them. Make sure you have a full system backup and close as many open applications as possible (keep only the Command Prompt window if possible). The Del and Erase utilities operate in the same way, so we will consider only the Del utility as an example. To delete a file, enter the following command at the command prompt:
Del filename
This method does not imply the possibility of recovery, so you will not find deleted files in the Recycle Bin. The Del utility keys are listed below.
- /A- deletes files with the specified attribute. An attribute is specified by adding a letter identifying it: A (archive), H (hidden), R (read-only), and S (system). The attribute may contain a - (minus) sign, indicating that files with this attribute, on the contrary, should not be deleted. For example, to delete files for reading without a system attribute, you should specify two keys - /AR and /A-S.
- /F- deletes read-only files. By default, Del ignores them because deleting such files requires changing their status. Never use this key when deleting temporary files. If you find a temporary file with a read-only attribute, find out why it was installed. This may be due to problems with the application that created the temporary file.
- /R- instructs the Del utility to display a confirmation request when deleting a file. Use this key if you are in doubt about the need to delete all files based on a given criterion. Although this method will take you some time, it is better than making the mistake of deleting useful files.
- /Q- this key is the most dangerous, since it disables the display of deleted files. If you do not want to see the files, then a better solution is to redirect the screen output to a file. For example, to delete all files starting with a ~ (tilde) character and redirect the output to the MyDeletions.TXT file, enter the command:
Del /S > Deleted_files.TXT

The list of files will not appear on the screen, but will be saved for later analysis.
- /S- deletes all files that meet the specified criteria in the current folder and all its subfolders. When used in the root folder, this key allows you to delete files of a certain type on the entire replaced hard drive. You should use this function with caution - there may be files in subfolders that meet the deletion criteria that, in fact, need to be saved.
The advantages of the Del utility are its high performance and completeness. Unlike Explorer, it does not skip files and works much faster. With it, you can clean your hard drive in seconds, while using File Explorer takes minutes.

Removing files starting with a tilde
Perhaps the “most” temporary files are those whose names begin with the ~ (tilde) symbol. Windows and many applications use files that begin with a ~ (tilde) character and have no extension, primarily to store bits and pieces of information. However, neither Word nor other applications make adequate efforts to delete these files.
When provided with an extension (such as files created by Microsoft Word), a temporary file represents an intermediate form of the document you are working on. However, if the Word window is not open and you see similar files on your hard drive, this usually indicates that Word did not exit correctly. In this case, temporary files can be used to recover lost document data. Unfortunately, temporary files are not deleted after recovery, so it may make sense to delete them manually. The general idea is that a file with an extension is usually a temporary version of the document and should not be deleted without making an informed decision.
No matter how many applications you close when cleaning your hard drive, several files starting with the ~ (tilde) character will still remain open. Both Explorer and Del will display messages indicating that these files are in use and will refuse to delete them under any circumstances. Just leave these files alone.
Don't be surprised that some temporary files are 0 bytes in size (in other words, they have no information). Some of these files are really empty, and some hide their information using so-called data streams. However, they should be removed to free up directory entries for other applications. Sometimes there are no directory entries left, resulting in system instability.
Destruction of TMR and VAK files
Typically, you can remove TMP files from your hard drive by closing all applications. Windows may leave 1-2 files open, but the TMP file never contains data that will be useful to you in the future. Deleting TMR files is completely safe and certainly useful.

Similarly, BAC files (backup files) contain old copies of documents that you are working with. After closing the application, the VAC file is no longer used, and you can safely delete it. I typically save .vac files before backing up the hard drive, and delete them during the subsequent cleanup process. A .vac file is a temporary backup copy of data; You can use it to recover data lost due to application crash.
Not all applications assign the VAK extension to files; for example, Microsoft Word uses the WBK extension instead of VAK. The purpose of these files is the same, it’s just that the development company is doing everything possible to confuse users. Temporary file extensions should be specified in the application's user guide, but sometimes, to determine them, you need to create the file and save it several times, and be sure to modify it between save sessions. The temporary file is located in the same folder as the original one, has the same name, but uses the extension allocated by the application for backup files.
Searching for LOG files
LOG files are typically text documents that describe the results of a procedure, such as installing an application. If an error occurs, the LOG file reports the error and sometimes offers possible solutions to correct it. Windows creates LOG files when updating, indicating the names of the updated files and describing its actions. In short, LOG files are useful logs of system activity.
Unfortunately, neither Windows nor applications ever delete LOG files, and this should not be blamed on the vendor company or the programmer who created the application. You are expected to review the contents of the LOG file and, following your agreement with the company, delete or archive it. Sometimes the application itself notifies you about the LOG file and the actions to take. In most cases, the application does not even report the generation of a LOG file. Finding out about the moment of its creation and determining its location is entirely your task.
An interesting fact is that sometimes you may come across applications that use LOG files constantly. In these cases, you should not delete LOG files, of course. For example, the UPS applications I use use a LOG file to report power events such as power surges. The LOG file also contains information about the last time the diagnostic procedure was run and other actions performed. However, if I delete this file, nothing bad will happen to the UPS application - it will simply “forget” past events.
LOG files that you can safely delete are located in the application folders and in the \Windows folder. As a general rule, you should not delete LOG files from folders such as \Windows\System32 etc. You can start by removing LOG files from the folder \Windows, having previously read or archived them. After that, search for the remaining LOG files of the system. LOG files located in application folders should be read to determine if they are being used by an application. If it turns out not, you can safely delete them.
Temporary file- a file created by a specific program or operating system to save intermediate results during operation or transfer data to another program. Typically, such files are deleted automatically by the process that created them.
Some operating systems have additional capabilities when working with temporary files - the ability to get the name of a temporary file (and one that will be unique - that is, it will not coincide with the name of an existing file); the ability to specify a special parameter when creating (opening) a file, instructing the file to be deleted immediately after recording
But not all programs delete temporary files. Over time, the folders where temporary files are stored grow and take up a lot of space on your hard drive. You can, of course, clean these folders manually, but then you will have to clean temporary files located in several places, since the system provides its own temporary folders for each user.
- C:\Windows\Temp
- C:\Users\Vladimir\AppData\Local\Temp
- C:\Users\All Users\TEMP
- C:\Users\All Users\TEMP
- C:\Users\Default\AppData\Local\Temp
Settings
How to set up automatic cleaning of temporary files in browsers is described in my article " Removing temporary files and cookies in browsers. Clearing the disk cache. ". To configure automatic deletion of all temporary files, you need to define one temporary folder for all users. Open system properties Control Panel - System - Advanced system settings - Environment variables. Change variables TEMP And TMP on C:/Windows/Temp. To change, for example, a variable TEMP, select it and press the button Change. Enter the value and OK
When both variables have been changed, you can configure automatic cleaning of this folder Temp

Open Notepad or any text editor and copy this code
pushd %TEMP% && rd /s /q . > nul 2>&1
pushd %WinDir%\TEMP && rd /s /q . > nul 2>&1
We save the file under any name, but with the extension .cmd in a folder, for example, of a user with administrator rights.

Now launch the Group Policy Editor: Start - Run and enter the command gpedit.msc Open Computer Configuration - Windows Configuration - Scripts (startup/shutdown). In the right half of the window, open the parameter properties Shutdown. Button Add and specify the path to the saved file
Click OK, then Apply and OK. Now we do the same in the section User Configuration. That's it - setting up automatic cleaning of temporary files is complete. When you shut down, temporary files will be deleted. You can check the deletion of temporary files by opening the folder C:/Windows/Temp, reboot and open this folder again. If there are no files, then everything is done correctly.
Temporary files aren't a big deal, but they take up extra space on your hard drive, so they need to be deleted periodically.
Do you have a lot of RAM on your computer? Some may find it difficult to answer, but some will proudly say a figure like 16 or even 32 gigabytes! The majority of users today usually have from 2 to 8 gigabytes. Of this, approximately 1 GB is consumed by the operating system itself, and the rest is given over to installed programs.
Why all this arithmetic? And in order to show the importance of the technology that will be discussed in today’s article - temporary files.
Why are temporary files needed?
Let's continue our calculations. Let's assume that you only have 2 GB of RAM. There is only 1 gigabyte (or even less) left for running programs. With such modest amounts of free memory, you would hardly be able to work with voluminous documents, images in graphic editors or video files. The fact that you can open all this is largely due to temporary files.
Temporary files allow you to save data that you are working with at a specific point in time in a specific program. Their sizes, in principle, are limited only by the free space on the hard drive, which is much larger than RAM. This allows you to store quite large amounts of information in them for subsequent processing and use in the necessary programs.
Temporary files can be of several types and considered in different contexts:
- System temporary files. As a rule, they are small files (several kilobytes) that are created by the system itself for temporary storage and transmission of various parameters. They may have a special reserved name extension.tmp or other extensions (most often .ini, .log, etc.). Such files are usually stored in the "Windows\Temp" folder.
- Temporary program files. One of the largest and most common types of temporary files. They are created by various programs installed on the computer and store data necessary for processing the current information with which the user is working. Typically, temporary files of this type are stored in the user's folder in the "AppData\Local\Temp" directory (for Windows XP - "Local Settings\Temp").
- Temporary backup files. A type of temporary files created by programs. They differ from the previous ones in that they store a complete copy of the document currently being processed, while the original remains unchanged until it is saved. Such temporary files are usually created by most office packages, graphics and video editors. They are stored in the same folder as the open document.
- Specific temporary files. This group includes temporary files that have special significance. For example, this can be called a systemic swap file, which can store data when free space in RAM runs out. Another example is the browser cache, which saves some resources of web pages on the hard drive and, when repeatedly requesting these pages, allows you not to re-download all the media data attached to it, but to open them from a local copy, which significantly speeds up the page rendering process.
As you can see, temporary files are a very useful thing. They store a lot of data that simply would not physically fit in the RAM of your computer and, ideally, are deleted immediately after they are no longer needed. However, for a number of reasons, not everything is deleted and not always. Therefore, sometimes the question arises of how to delete temporary files that remain as dead weight on the hard drive.
Manually deleting temporary files
If you do not take into account temporary backup files, which are usually visible and can be deleted by the user from the working folder with documents, system and program temporary files still need to be found. In principle, there is nothing difficult about this if you know in advance where to look.
In all versions of Windows system temporary files are stored in the path C:\Windows\Temp. Since the drive letter may not necessarily be “C”, in order to be sure to open the desired folder, you can use the %systemdrive% system variable, which automatically determines the drive with the OS. Accordingly, in the "Run" menu (WIN+R) or in the address bar of Explorer, it will be enough to insert the command " %systemdrive%\Windows\Temp" (without quotes):

All contents of the opened folder can be safely selected (CTRL+A) and deleted (DEL). It is possible that during the deletion process some files “will not want to be deleted”. You can remove them either after a reboot or in Safe Mode (enter by holding the F8 key when starting the computer). Yes! In Windows 7 and higher, to remove you will need Administrator rights.
Some programs sometimes create an additional "Temp" folder in the root of the system drive. You can check its existence by going to the disk through the “This PC” snap-in or using the command “ %systemdrive%\Temp" (without quotes). The contents of this folder (if it exists) can also be deleted completely:

Finally, there is a third path along which temporary program files for each specific user. They are located along a path that looks something like this: “C:\Users\Username\AppData\Local\Temp” (for Windows XP: “C:\Documents and Settings\Username\Local Settings\Temp”). Instead of "Username", of course, you should indicate the name of the owner of the profile that you want to clear.
To quickly navigate to the folder with temporary files of the current active user in Windows, as a rule, there is a registered system variable %temp%. Simply by typing it into the address bar or the “Run” line, you will immediately see all your temporary files (this method is not suitable if you need to view the temporary files of another user).
Similar to the previous case with system temporary files, the Temp folder of the current user can also be completely cleared. By the way, if the %temp% variable is not set for you (or opens the wrong directory), I recommend reconfiguring it. This can be done in the snap-in (This computer - RMB - Properties - Advanced system settings - "Advanced" tab - "Environment Variables" button):

Finally, it is worth mentioning one more important thing that can also be cleaned - browser cache. Is it worth doing? After clearing the cache, you will have to reload all the pages you need from your favorite sites, which may take longer than usual. But on the other hand, too many unnecessary fragments of pages may accumulate in the cache, which you may never open again, and they will take up space.
Therefore, not too often, but I think it still won’t hurt to clear the cache. This can be done from the browser settings or, again, manually. Since each web browser stores its caches in different paths, here are typical paths for the most popular ones:
| Browser | Path to cache |
|---|---|
| Google Chrome | C:\Users\Username\AppData\Local\Google\Chrome\User Data\Default\Cache C:\Users\Username\AppData\Local\Google\Chrome\User Data\ProfileName\Cache Windows XP: From:\Documents and Settings\Username\Local Settings\Google\Chrome\User Data\Default\Cache |
| Mozilla Firefox | C:\Users\UserName\AppData\Local\Mozilla\Firefox\Profiles\ProfileName\cache2\entries Windows XP: From:\Documents and Settings\Username\Local Settings\Mozilla\Firefox\Profiles\Profilename\cache2\entries |
| Opera | C:\Users\Username\AppData\Local\Opera Software\Opera Stable\Cache Windows XP: From:\Documents and Settings\Username\Local Settings\Opera Software\Opera Stable\Cache |
| Internet Explorer | C:\Users\Username\AppData\Local\Microsoft\Windows\INetCache\IE C:\Users\Username\AppData\Local\Microsoft\Windows\Temporary Internet Files\ Windows XP: From:\Documents and Settings\Username\Local Settings\Temporary Internet Files\Content.IE5\ |
| Edge | C:\Users\Username\AppData\Local\Packages\Microsoft.MicrosoftEdge_8wekyb3d8bbwe\LocalCache C:\Users\Username\AppData\Local\Packages\Microsoft.MicrosoftEdge_8wekyb3d8bbwe\LocalState |
System cleaning products
If you wish, you can clean all temporary files manually. As we have already seen, there is nothing complicated about this. However, Windows has tools that allow you to automate cleaning your computer and reduce it to a couple of clicks (or even to running a single command, but more on that later).
The standard tool for deleting temporary files in Windows is called "" and it is called from the "Run" line (WIN+R) with the command " cleanmgr" (without quotes):
Once launched, we will need to select the drive that requires cleaning (usually Disk C), wait for the scanning process to finish and select options for cleaning. First of all, you need to select the “” item (actually, the contents of the user’s Temp folder). You can also select Temporary Internet Files, which will clear the Internet Explorer cache. In addition, you may have additional partitions with a name starting with the words “Temporary files”. They can also be cleaned:

Well, now about the second automatic cleaning method I promised. It involves launching a previously created with commands for deleting data from your folders with temporary files by simply double-clicking. In its simplest form, the contents of such a file will simply include a listing of all Temp folders with a command to delete them and then create them:
RD C:\Temp /s /q
RD C:\Windows\Temp /s /q
MD C:\Windows\Temp
RD C:\Users\Username\AppData\Local\Temp /s /q
MD C:\Users\Username\AppData\Local\Temp
As you can see, in the previous script we delete folders with system and program temporary files (the \s and \q keys are needed to delete all nested subdirectories and without requests for deletion, respectively) and immediately create them again. If desired, the list can be supplemented with browser cache directories, image cache directories, and other similar paths. You just need to remember three important points:
- To execute such a BAT file, you must have Administrator rights(you need to run it through the context menu using the "Run as Administrator" command).
- If the folder path contains spaces (for example, the path contains a folder named something like "Documents and Settings"), the entire path must be enclosed in double quotes (example for clearing the temporary files folder in Windows XP: RD "C:\Documents and Settings\Username\Local Settings\Temp" /s /q).
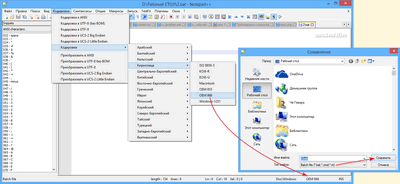
- If the path to the folder contains Russian letters (for example, a user name), the BAT file cannot be saved with regular Notepad. To do this, you will need an advanced Notepad with support for various text encodings. In our case, we need to save in DOS encoding (aka OEM 866 in various text editors).
The method described above is as simple as a stick, but not universal, since it requires making changes to the paths of all directories that relate to specific users. And deleting a folder, although a working method, is not entirely elegant. Therefore, you can complete our script for cleaning temporary files using the DEL command, file masks, variables and a cycle of searching through all subfolders so that it does not delete the folder itself, but only its entire contents:
DEL %SYSTEMDRIVE%\Temp\*.* /f /s /q
for /d %%x in (%SYSTEMDRIVE%\Temp\*) do @rd /s /q "%%x"
DEL %WINDIR%\Temp\*.* /f /s /q
for /d %%x in (%WINDIR%\Temp\*) do @rd /s /q "%%x"
DEL %TEMP%\*.* /f /s /q
for /d %%x in (%TEMP%\*) do @rd /s /q "%%x"
The above BAT file can be supplemented with various checks for the existence of environment variables and their correspondence to temporary file folders. However, if you first check everything yourself, you can easily use this code without any changes.
Programs for deleting temporary files
If you yourself are afraid to delve deep into your system disk or are not very familiar with the Command Line, then you can use numerous specialized and complex programs to clean the system of unnecessary temporary files. Fortunately, there are quite a lot of similar software and among them there are quite good free solutions.
And the first thing that comes to my mind (and, I think, to many other users) is the well-known utility for comprehensive system cleaning -:
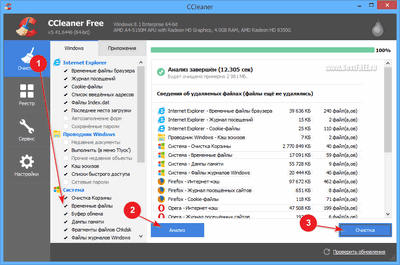
This program already contains data about many system paths along which various temporary files are stored, so with its help you can easily select those that are relevant for you, click the "Analysis" button and after scanning is complete, click one button " Cleaning" remove all debris at once.
There are many alternatives to CCleaner. For example, a package or system optimizer cleans up temporary files well. However, it is quite possible that you will not have to install anything additional, since disk cleanup tools are available in many antivirus programs today. An example of this is the free 360 Total Security:
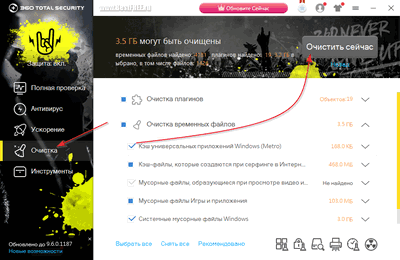
Just open the antivirus window on "Cleaning" tab, mark the required actions and start scanning. At the end of it, all you have to do is simply check the list of found garbage, check off everything that needs to be deleted, and click "Clear Now" button.
conclusions
Is it worth deleting temporary files in Windows at all? On the one hand, there is nothing wrong with them. Even if for some reason they were not deleted after the completion of a particular program, there is nothing particularly terrible about their presence. However, there are cases when erroneously saved temporary files interfere with the correct operation of programs or they begin to take up gigabytes of space on the system disk. If this is the case for you, then cleaning will clearly benefit your PC.
Finally, let's deal with one more question. If you still need to clear temporary files, then at what frequency is it best to do this? Unfortunately, it is impossible to give a clear answer here. It all depends on how intensively you use your computer and the programs that create unnecessary garbage. Some users accumulate a couple of gigabytes of temporary files in a month, while others do not accumulate a gigabyte in a year! Therefore, according to the principle “it’s better to be safe than sorry,” I would recommend cleaning monthly.
I wish you stable computer operation and less file junk!
P.S. Permission is granted to freely copy and quote this article, provided that an open active link to the source is indicated and the authorship of Ruslan Tertyshny is preserved.
During the operation of the Windows 7 or Windows 10 operating system, temporary files inevitably accumulate. And if they are not deleted from time to time, they will take up quite a significant amount of free space on the disk.
In this material, we will look at three ways to delete temporary files in Windows 7 or Windows 10. The first two methods will be based on using tools built into Windows, and the third will be based on using third-party programs.
Deleting temporary files in Windows 7 or Windows 10
The easiest and at the same time effective way to delete temporary files in Windows 7 or Windows 10 is to use the “” tool. This tool is built into the Windows operating system and allows you to delete temporary Internet files, downloaded program files, system error reports, thumbnails, files in the Recycle Bin, and other types of temporary files.
In order to delete temporary files using Disk Cleanup, you need to open the My Computer window, select the drive on which the operating system is installed, and open its properties.
After this, you just need to click on the “Disk Cleanup” button and wait while the system analyzes the disk and finds all temporary files that can be deleted.

After this, a window will open with a list of temporary files on the disk. Here you need to select which files you want to delete and click on the “Ok” button. If you want to free up as much space as possible, you can mark all temporary files found.
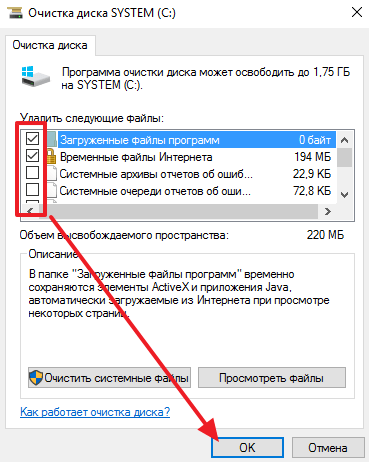
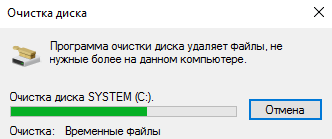
After selecting temporary files and clicking the “Ok” button, the deletion process will begin; it may take several minutes.
Also in this “Disk Cleanup” window there is a “Clean up system files” button.

If you click on this button, the system will repeat the search for temporary files, but taking into account system files. This function allows you to delete temporary files that remain. For example, if you recently upgraded Windows 7 to Windows 10, then using the Clean up system files button you can find up to 20 GB of temporary files that can be deleted without any problems.
Finally, we note once again that the Disk Cleanup tool is available in both Windows 7 and Windows 10.
Deleting temporary files in Windows 10
If you use the Windows 10 operating system, then another tool is available to you to delete temporary files. In order to access it, you need to open the new “Settings” menu (this can be done using the Windows-i key combination or using the Start menu) and go to the “System - Storage” section.
In the “System - Storage” section you will see a list of partitions available for your operating system. Here you just need to click on the system partition.

And then scroll to the end of the list and select “Temporary files”.

As a result, a window with settings for deleting temporary files in Windows 10 will open. Here you need to mark which temporary files you want to delete and click on the “Delete files” button.

Once again, we note that the Settings menu is only available in Windows 10. In Windows 7, you can only delete temporary files through Disk Cleanup.
Deleting temporary files using CCleaner
The tools described above do an excellent job with temporary files that were created by the operating system itself or are located in standard folders for temporary files. But, if a program saves its temporary files in its own folder, then they will remain on the disk.
This situation can be corrected using special programs designed to delete temporary files. Perhaps the best of these programs is CCleaner from Piriform. This program works with both Windows 7 and Windows 10. Moreover, it is completely free and can be downloaded.
CCleaner is very easy to use. To delete temporary files, you need to launch CCleaner and open the “Cleaner” section. There are two tabs: Windows and Application. Explore the programs listed on these tabs and highlight those whose temporary files you would like to delete.
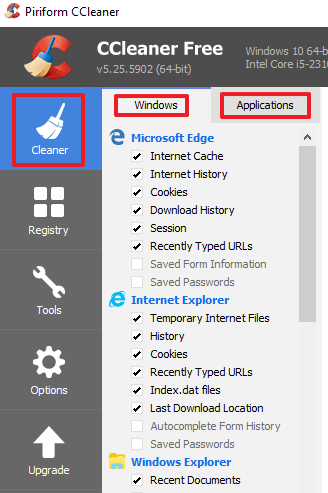
After selecting the programs you need, simply click on the “Run Cleaner” button.

After this, CCleaner will warn you about deleting the selected files. In order to continue, you need to click on the “Ok” button.
