Basic gpt. How to convert GPT disk to MBR without losing data? Converting disk partitions in various ways
Good day!
If you have new computer(relatively:)) with UEFI support - then during installation new Windows You may find yourself needing to convert (convert) your MBR disk to GPT. For example, during installation you may receive an error like: “On EFI systems, Windows can only be installed on a GPT disk!”
In this case, there are two solutions: either switch UEFI to Leagcy Mode compatibility mode (not good, because UEFI shows higher performance. The same Windows loads faster); or convert the partition table from MBR to GPT (fortunately, there are programs that do this without losing data on the media).
Actually, in this article I will consider the second option. So, …
Converting an MBR disk to GPT (without losing data on it)
For further work you need one small program - AOMEI Partition Assistant.
An excellent program for working with disks! First of all, it's free for home use, supports Russian language and runs on all popular OS Windows 7, 8, 10 (32/64 bit).
Secondly, it has several interesting wizards who will do the entire routine process of setting up and setting parameters for you. For example:
- disk copy wizard;
- Partition Copy Wizard;
- Partition Recovery Wizard;
- OS transfer wizard from HDD to SSD (relevant in Lately);
- bootable media creation wizard.
Naturally, the program can format hard disks, change MBR structure to GPT (and vice versa) and so on.
So, after starting the program, select your drive that you want to convert (you need to select the name “Disk 1” for example), and then right-click on it and select the function “ Convert to GPT"(as in Fig. 1).

Rice. 1. Convert MBR disk to GPT.

Rice. 2. We agree with the transformation!
Then you need to click the “Apply” button (in the left top corner screen. For some reason, many people get lost at this step, expecting that the program has already started working - this is not the case!).

Rice. 3. Apply changes to disk.
Then AOMEI Partition Assistant It will show you a list of actions that it will perform if you give your consent. If the disk is chosen correctly, then just agree.

Rice. 4. Start conversion.
Typically, the conversion process from MBR to GPT is quick. For example, a 500 GB drive was converted in a couple of minutes! During this time, it is better not to touch the PC and not interfere with the program doing its job. At the end, you will see a message indicating that the conversion is complete (as in Figure 5).

Rice. 5. The disk was converted to GPT successfully!
Pros:
- quick conversion, literally a few minutes;
- conversion occurs without data loss - all files and folders on the disk are intact;
- no need to have any special skills. knowledge, you don’t need to enter any codes, etc. The whole operation comes down to a few mouse clicks!
Minuses:
- It is impossible to convert the disk from which the program was launched (i.e. from which Windows was loaded). But you can get out - see. below:);
- if you have only one disk, then in order to convert it you need to connect it to another computer, or create bootable USB flash drive(disk) and convert from it. By the way, in AOMEI Partition Assistant There is a special wizard for creating such a flash drive.
Conclusion: Overall, the program copes with this task perfectly! (The given disadvantages - can be converted to any other similar program, because it cannot be converted system disk, from which the download was made).
Converting from MBR to GPT during Windows Setup
This method will unfortunately delete all data on your storage device! Use it only when there is no valuable data on the disk.
If you are installing Windows and an error appears in front of you that the OS can only be installed on a GPT disk, then you can convert the disk directly during the installation process (Attention! The data on it will be deleted, if the method is not suitable - use the first recommendation from this article).
An example of the error is shown in the figure below.

Rice. 6. Error with MBR when Windows installation.
So, when you see an error like this, you can do this:
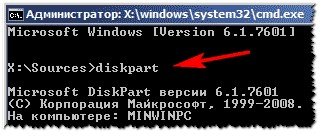
1) Press the Shift+F10 buttons (if you have a laptop, then maybe you should try Fn+Shift+F10). After pressing the buttons, the command line should appear!
2) Enter the Diskpart command and press ENTER (Fig. 7).
3) Next, enter the List disk command (this is to view all the disks that are in the system). Note that each disk will be labeled with an identifier: for example, “Disk 0” (as in Figure 8).
Hello friends, today's article will be devoted to conversion hard drive. I wrote an article about the fact that. The solution to the problem turned out to be quite simple, it was necessary to convert GPT to MBR. We did this using the utility dispart Unfortunately, the disadvantage of this method is that the data on all partitions is completely destroyed. Recently I received a question: how to convert GPT to MBR without losing data? Today we will do this.
As it turned out, this transformation can be done, but only with the help of third-party software. IN in this case we need to take advantage software Paragon Hard Disk Manager. I want to say that the program only works in operating systems, therefore, I do not advise you to remove the OS by formatting the partition with the system. First, do the disk conversion, and then perform the operations you need, whatever you want.
Download this program you can from the official website. It is paid, but there is also trial version, which is quite enough for us. In order to download the program you need to register, a download link will be sent to your email. Install the program and launch it.
The following window opens before our eyes:

In this window we see all connected disks that are converted to GPT and MBR. As a test disk, I took a regular flash drive converted to GPT. I'll show you how to convert it to MBR. You can do this with anyone hard drive.
So, there are files on this disk (flash drive), and they will remain after conversion.

To produce this operation you need to right-click on the disk. It is the disk, not the partition. A context window will pop up in which we select "Convert base GPT to base MBR".

A window will appear in which you need to click the button "Convert".

Once you do this, you need to apply the changes. To do this, click the button at the top of the program window "Apply".

Sometimes when switching from Windows 8 to Windows 7, a problematic situation arises. This most often happens on new laptops. If you came to this article, it means you want to find out how to convert GPT to MBR, and this screen is familiar to you.

When you decide to change the operating system, when you select a partition for installation, Windows displays the following message "" and installation of the system is not possible in the selected partition.
In order to install the OS on this particular partition, it must be converted to a partition style called MBR. And in this article I will tell you how to do this without using the command line, and also without losing data on your hard drive.
First way
To convert GPT to MBR without losing information, we will need some kind of multi boot disk, which will contain a very valuable program - Paragon Hard Disk Manager. Not all multiboot discs have such a program, but I know for sure that Alkid Live DVD and Lex Live CD definitely have it. Personally, I'll use a Live CD from Lexa.
Before we start, I'll show you that on drive D I have a folder called Music.

Well, let's go. We boot the PC from a multiboot disk and select our Paragon Hard Disk Manager program.

The program has started and now we need to select a Basic GPT disk.

We get to the section " HDD" and in the menu that appears, select "Convert to basic MBR disk".

After that, find the green checkmark on the left side of the program and click on it.

The conversion process has begun. This usually takes about 3-5 minutes.

When the conversion process is completed, click on “Close”.

This is how we converted GPT to MBR in a couple of clicks. Now you can repeat the process of installing Windows 7 on this hard drive.
And now we see that Windows 7 OS can be installed easily and without problems.

When I installed the OS, I go back to my own D drive and see the same “Music” folder that was before hard conversion GPT disk to MBR. This is how you can quickly and easily eliminate the seemingly complex problem. You can also convert your hard drive using popular program Acronis.

Second way
There is another way to fix the error " Installation on this disk impossible. The selected disk has a GPT partition style"We don't need multiboot disks here. However, using this method, be aware that all data on the hard drive will be erased. Therefore, move yours in advance personal files and documents on any external media.
When selecting a partition, we need to launch the command line. This can be done by pressing "Shift+F10" at the same time.

Now in the command line that opens you need to enter diskpart in order for the program to start working with hard drives.
That's all, now you can install any operating system on this hard drive.
Many users are faced with a situation where Windows installations, the installation wizard does not skip through the drive selection screen. We point to a blank partition, but a window appears stating that the selected disk has a GPT partition style and installing Windows on this disk is impossible. See how to solve the problem?
Hard drive can be formatted in GPT or MBR style. You may have already heard about these structures, especially the last one. These formats are responsible for the way information is stored in partitions - they determine where partitions begin and end on the disk.
During Windows installation, a message may appear that the specified disk is formatted in GPT format and installation of the system on this partition is impossible. Why does the error message appear? What to do?
What is the difference between the formats and why do they affect Windows installation?
Both of these formats store information about how the disk is divided into partitions, set their boundaries, and manage them in completely different ways. MBR is an old format, until recently it was used on every media in Windows 95, 98, XP, Vista and 7. GPT is a new style, which overshadows the MBR, popular on new computers with Windows 8 and support for UEFI (BIOS successor).
MBR supports drives with a maximum capacity of up to 2 TB. They can be divided into a maximum of 4 sections - more is possible, but then the system can be “deceived” using so-called extended partitions.
GPT format has no such restrictions - you can install hard devices with a capacity of 3, 4 and 6 TB and divide them into any number of partitions.
Users often ask why not format all hard drives installed in the PC to GPT format. Unfortunately, there is one thing that is very difficult to get around - if the computer does not have UEFI support on the motherboard, then do not install the OS on a hard drive formatted in GPT (GUID) format. Of course, these drives will be visible in a system that does not support UEFI (using BIOS), but only if they are connected as an additional one. That is, as a drive for storing data, and not as a system drive on which the operating system is installed. Without UEFI support, Windows can only be installed on an MBR-formatted drive.
Therefore, if a message appears during operation Windows installer If the system cannot be installed on a GPT partition, this means that there is no UEFI support or it is disabled in the computer settings. There are two ways to solve this problem - enable UEFI (if the PC supports it) or convert the disk from GPT to MBR to install the system.
Make sure your computer/laptop has UEFI support
If we have a new computer or laptop, then perhaps motherboard has support for the new interface and it can be disabled in the PC settings.
To enable it you need to go to the BIOS/UEFI settings. Unfortunately, the procedure for entering settings is not the same for all devices, since each computer or laptop has its own UEFI/BIOS depending on the manufacturer. When you turn on your computer, pay attention to the first screen. Information about the key that is responsible for entering settings (SETUP) is displayed here. For example, the information “Press F2 to enter SETUP” or “ Press DEL to enter settings".
So, when the login information appears on the first screen, press the corresponding key. Then in the BIOS/UEFI settings you need to find the parameter responsible for EFI or UEFI. It should be in advanced settings under " BOOT Mode”, in which there are three options to choose from. Set it to “UEFI”.
In other versions, this item may be named “EFI BOOT” or similar. In this case, there is no choice as such, only an ON/OFF switch. Enable it so that the system boots with support for this standard. Now you can easily install the operating system on a partition formatted in GPT, without having to convert it to MBR.
How to convert partitions to another format?
If your computer or laptop is not equipped with the above function and has old BIOS, it will be impossible to install the system on a GPT partition. In this case, you need to convert the disk to MBR format. This can be done in two ways - with complete loss of data on the entire disk (and not just on the selected partition) and without losing it. The second option requires the presence or access to another PC with Windows installed, to which you will need to connect the hard drive and convert it AOMEI program Partition Assistant.
Conversion via Windows Installer
Before we begin, we warn you that using this method will delete all data. To convert to MBR, simply delete all partitions in the installer so that only unallocated space remains. We mark the partitions on the disk, and then with available functions select “Delete”. We do this for each partition (if you have several disks, you should be careful not to accidentally delete partitions of other drives).
When there is no partition left, only "unallocated space" will be displayed. Mark it and click “Next”. The system will automatically format the corresponding media in a compatible MBR format, create system partition to install the system.
Pros: You can do the conversion directly when installing Windows, even when the OS is not installed on the computer.
Cons: We lose all data. With this method of conversion to MBR, all data and partitions on the hard drive are lost.
How to convert to MBR without data loss
What to do if you have a lot of information stored on your PC? important information and you don't want to lose it. To convert GPT to MBR without data loss, we will use the AOMEI Partition Assistant program.
After installing and logging into the program, with right side A list of all hard drives will be displayed. Right click Click on the GPT disk and select “Convert to MBR”.
The action will be added to the list of operations to be performed, which is displayed on the left side of the program window. Then click on the “Apply” button. The drive will be converted without losing data and now we can install the system.
Advantages of this method: All data and sections will remain intact and, thus, we will not lose any information.
Cons: There is no way to convert the currently used disk to GPT - we can only convert other drives installed in the computer. In other words, if you only have one drive installed, then in order to convert using this program, you need to remove it and install it as a second drive on another computer.
How to convert when installing Windows using Diskpart
Let's look at the reverse conversion using the wizard Windows installations using the Diskpart function.
If during OS installation a message appears that Windows can only be installed in GPT section, and there is no way to go to old version OS and use the above or another similar program, it is possible to convert it directly during the installation wizard. But in this case, we lose all the data on this hard drive.
Press combination Shift keys+ F10 to go to the command line. Note that this key combination brings up a command prompt anywhere during the Windows installation process. Launch the disk partition tool using the “diskpart” command.
Then enter “list disk”. A list of hard devices installed on the computer will be displayed - each of them is assigned a number (0, 1, 2, 3...).
Now select the one you want to convert. Enter "Select Disk #", where # is the disk number.
Then it needs to be cleaned. Enter the “Clean” command. Finally, enter “Convert GPT” to start the conversion.
Now we can close the window. When trying to install Windows error won't appear again.
For many users, converting GPT to MBR when installing Windows 7 is necessary procedure.
Recently, it has not been as easy to reinstall a hard drive as it used to be.
The fact is that simultaneously with the start of production, hard drives with a new style of partitions began to appear on the market.
The difficulty is that to install such a disk, the style must be converted to the usual MBR.
This can be done quite simply in several ways.
general information
In fact, this conversion procedure can be useful in different situations. But – the most common and popular of them.
Often, having purchased a laptop with a pre-installed G8, the user wants to exchange the updated and changed OS for the familiar G7.
And he is faced with the fact that it is impossible to do this.
How are these formats different?
- MBR– standard and familiar hard format disk. All users worked with it until the operating system came out Windows system 8, which became fundamentally different. Therefore, previously there were no problems with reinstallation;
- GPT– a fundamentally new and unusual format for placing partition tables on a hard drive. For the first time, discs of this style appeared during the transition to new type BIOS - UEFI. The format is used on relatively new operating systems - “eight”, “ten”. Therefore, reinstalling and replacing with an older OS can be difficult.
The need for such a conversion arises at several stages of working with a hard drive. But during reinstallation - most often.
The GPT format is much preferable in work. If it is present, the operating system loads faster, external and internal storage even very large volumes. The system works faster. However, some users still need to convert the disk format. It should be taken into account that everything positive sides GPTs will be lost.
Problem
What is the essence of the problem? On initial stages installation no differences from standard procedure the user does not detect.
He inserts a disk into the drive or inserts a memory card, and boots from them. After this, the language selection menu appears, where you can also freely select the system language.
The user then specifies the partition where he wants to install.
The standard user reaction to such a notification is to delete partitions and format the disk. But these actions do not bring results.

The essence of the problem
Decide this problem there is only one way - transformation outdated format to the new one. This is not difficult to do. No additional software or special abilities are required. The only thing required for this is installation disk with a new one operating system.
Command line
One of the most simple ways conversion. In order to carry it out, follow the following algorithm:
- Run the installer again;
- Insert the installation disc;
- Boot from it;
- Select the system language;
- When the window for selecting partitions for installing a new OS opens, hold down Shift and F10 at the same time (without selecting a partition);
- This action launches the command line;
- Enter the command diskpart, this utility helps to cope with many problems that arise during OS installation;
- Enter the command list disk, as a result of which a list of disks will open, each of which will be assigned a number;
- Remember the number of the disk you want to convert;
- Now enter the command into the command line select disk#, where # is the number that tough one disk (according to the list) that will be converted;
- The next step will delete all existing data on the hard drive - something to keep in mind!
- Type into the command line clean command, which will completely clear the specified disk of any information;
- You can save data from disk only to external storage, if they are moved, for example, to drive D, this will not bring results (they will still be deleted);
- Wait a while for the cleaning to complete and proceed directly to the conversion;
- Dial convert mbr on the command line;
- The process of converting the outdated format to the updated one will start;
- Wait for the notification about the end of the process (usually it appears almost instantly).
As soon as this process was completed, the hard drive acquired its usual format. You need to exit the converter utility. To do this, type exit on the command line. It is not advisable to go out in another way, for example, by turning off the computer.
After that, connect the installation disk again. Complete the installation as usual. Now there will be no problems at the partition selection stage.

Work with command line
You may be interested in:
No data loss
In some cases, losing data stored on your hard drive is unacceptable. At the same time, transfer them to removable media, and then back to the computer - a long time.
Sometimes data volumes do not allow this, or removable storage of a suitable size is not available at all.
- Buy boot Live disk CD|DVD. Carefully study its assembly, since to convert to mandatory you will need the Paragon Hard Disk Manager utility. Not every disk assembly has it, but without it it is not possible to convert partition formats;
- Install a boot disk or memory card into your computer. Download and run the system from it. Wait until the desktop appears in front of you;
- Standard way open the Start menu and find the section there HDD Utilities and USB. Click on it and select from the list Paragon program HDM 2010 Pro;
- Launch the program;
- After launch, a program window will open, which will display all hard drives. Select the base GPT and click on it once with the left key;
- Now click on the “Hard disk” button, which is located at the top, in the header of the program window;
- A small menu will open in which you need to select a section "Convert to MBR". Click on the command. After this, we confirm the process by clicking on the green checkmark in the pop-up window;
- A window with parameters and settings will open conversion. You cannot change anything in it (sometimes this option is present). Just click on the button "Convert" at the bottom of the window;
- The conversion process has now started. In the window that opens, you can monitor the progress of the process based on the filling of the gray bar green. The process is not as fast as in the first case. Typically, this type of conversion takes a few minutes.