How to remove the page number from the last sheet. Differences between versions
Sometimes when working with documents, the user has a question about how to remove page numbers in Word.
Most often we are talking about the beginning and end of the text - the title page and a place for reviews, signatures or seals, although there may be other options.
There are several basic rules for removing unnecessary numbering that everyone who works in a Microsoft text editor should know.
A document created and already saved by a user or another person may contain page numbers that are not needed for either word processing or printing.
It’s not difficult to remove them from the text or even delete a page, although there are certain nuances associated with using different versions of Word, from 2003 to 2013.
For older versions
For Word version 2003 or earlier, you need to first open the “View” menu, then the “Header and Footers” command and go to the appropriate menu.
Now, if the sheet number is located at the top, the transition will occur automatically.
With the bottom (most common) placement of numbers, you will have to navigate using the “Header/Footer” icon.
The same method is suitable for removing any other headers and footers (signatures, company logos, etc.).

For Microsoft Word 2007
In the menu of modern editors Word 2007, 2010 and 2013, the mechanism for deleting numbers is simpler.
The necessary icons are located on the “Insert” tab - at the bottom of the “Page Number” menu. The command to remove numbering is also located here.
With its help, just one click ensures the removal of numbers from each sheet of the document.

For any version of Microsoft Word
You can simplify your work and not pay attention to which version of Word you have to use if you delete the number from the first to the last page with just a couple of clicks of the left mouse button.
To do this, you will have to carefully click on the place where the number is located and first select the header (a menu of the same name may appear), then the number, and erase.

If a frame does not appear when you try to select a header and footer, then you clicked in the wrong place. The same goes for numbers.
For front and title pages
Most often, the first sheet numbers in a document are deleted, since neither thesis, nor in other important documents they are used for title.
There is, of course, the option of creating a separate title page, but it is only used by users who are unfamiliar with the following technique:
- Having opened the document, go to the “File” menu;
- select “Page Options”;
- open the “Paper Source” tab and check the box here separate numbering for the first page.

Now the number of the title or just the first page is not visible. And the sheets, starting from the second, remain numbered.
At using Word 2010 the same actions are performed, except that the right command look not in the “File” menu, but on the “Page Layout” tab.
If you know that the number of the first sheet will not be needed, you can reduce the time and not set it initially.
To do this, when setting the numbering, uncheck the “Number on the first page” item.


The difference for Word 2013 or 2007 is the choice of command is not on top panel, and in the “Insert” / “Header and Footers” tab.
Now the first sheet is not included in the numbering. It will not be possible to do the same with the second sheet in the same way.
Although the rules of the document usually do not impose special requirements on the second and third sheets.
When working with text documents, there is often a need to number pages. Numbering allows you to create a correct table of contents and simplifies navigation through the document.
In text Word editor Page numbering is enabled using the “Page Number” button on the “Insert” tab. Most users know about this and usually there are no problems with it. However, sometimes page numbering needs to be adjusted to the specifics of a particular document, for example, removing numbering from the first page, and not everyone can cope with this task.
Now we will consider just such a problem. The material will be relevant to users modern versions Word. Such as Word 2007, 2010, 2013 and 2016.
To remove page numbers from the title page, first make a simple page number that will appear on all pages of the document, including the first. After that, go to the “Page Layout” tab. Here you need to click on the small button, which is located in the lower right corner of the “Page Options” button block.
After clicking this button, the “Page Settings” window will open. Here we go to the “Paper Source” tab and turn on the “Distinguish between first page headers and footers” option.

Then close the “Page Settings” window using the “OK” button. With this simple manipulation we removed the numbering from the first page Word document.
But there is one important point, now there is no number on the first page of the document, but on the second page there is a number “2”. If this numbering option suits you, then you can finish here. If you want the numbering on the second page to start from number “1”, then you need to go to the “Insert” tab, click on the “Page Number” button and open “Page Number Format”.

The result will be small window with numbering parameters. In order for the number “1” to appear on the second page of the document, here you need to enable the “Start with” option and set the value to “0”.
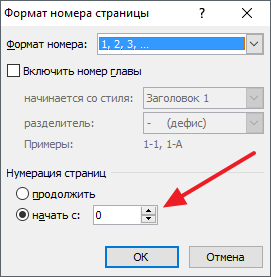
Thus, after saving this setting, Word will begin numbering pages not from one, but from zero. This means that on the second page we will get not “2”, but “1”, as needed.
It should be noted that this method removing numbering works fine only for the first page of a Word document, but if you need to leave the first two pages or more without numbering, it will not work. In this case, the document must be separated using section breaks. You can read about how this is done.
Not every document needs page numbers. Therefore, when users get their hands on typed text, many of them begin to be interested in the question: how to remove page numbering in Word.
There is nothing complicated about this. And after reading this article, you can be convinced of this.
Typically, page numbers are placed in the header and footer area. Therefore, to remove page numbering in Word, you need to go to header and footer editing mode.
If the document is numbered at the top or bottom of the page, move the mouse pointer over the page number so that it becomes an arrow and double-click on it with the left mouse button. The header and footer area will be delimited by a blue dotted line with the text on the left side: "Page header" or "Footer".
Select the page number and press the “Delete” or “Backspace” button on your keyboard.
If the numbering in the document is placed in the page margins, then clicking on it will not switch to the header and footer editing mode. To remove this type of numbering, open the “Insert” tab and click on the button "Page header" or "Footer". Select from drop down menu "Change footer".

The header and footer editing mode will open. Select with your mouse the area that limits the page number and press “Delete” or “Backspace”.

To exit the header-footer editing mode and return to working with text, double-click on the text with the left mouse button.

There is another way that will help remove automatic numbering pages in a document. To do this, open the “Insert” tab and in the “Header and Footers” group, click on the button "Page number". Next, from the drop-down menu select "Remove page numbers".
Page numbers in the document that appear at the top, bottom, or in the margins of pages will be removed.

To remove numbering from the first two pages in Word, do the following. Go to header-footer editing mode: double-click on the number at the top or bottom of the page with the mouse. Next on the tab "Working with headers and footers"– “Designer” check the box "Special footer for the first page". Exit header and footer editing mode.

After this, place the cursor at the end of the text on the first page of the document. Go to the tab "Page layout"– “Breaks” and select from the menu "Next page".

As a result, the numbering from the second page in Word will be removed.

Now you should not have any questions about how to remove page numbering in Word 2007, Word 2010 and later versions. In addition, we figured out how to remove numbering from the first page or from the first two pages in a document.
Rate this article:Beginners or inexperienced users may have difficulty editing a Word document. Most often, difficulties arise with deleting page numbers. To ensure that this question does not arise again, we advise you to read the instructions below.
For convenience, we have described how to remove page numbering for each Word versions. In addition, in the article you will find information on how to remove numbering only from the first or from some specific page. You can also watch the video, which shows how to remove page numbers in Word 2010.
How to remove page numbers in Word 2003, 2007, 2010
Word 2003
If Word 2003 is installed on your PC, then editing the page numbering in the document is carried out as follows:
If you numbered the sections using the “Insert” - “Page Numbers” menu tab, then in this case:
- Point the cursor at the page number to make a frame appear.
- Then click on the frame and activate the “Delete” key.
Word 2007, 2010
Owners of Word 2007 and 2010 can remove numbering using these methods.Another way is to remove the numbering manually:
- Hover your mouse over the page number.
- Double-click.
- After this, Word will advise you to edit the page.
- Next, when you activate the “Backspace” key, erase the numbering.
- Exit the header and footer mode by pressing "Escape" or by double-clicking on an empty field.
How to remove the first page number?
Design of some text documents requires numbering to start from the second page. This is accomplished by a certain sequence of actions (let’s look at Word example 2010):
How to remove a number from a specific page in a Word document?
Some printed texts require numbering to begin again with new sections. In Word, this is feasible if you perform the following step-by-step actions:
You can remove a page break by following.
Removing numbering from all pages
It is possible to eliminate all page numbers in a Word document by following these steps:
Or:
- Open the Insert menu.
- Select the "Page Numbers" section.
- Check the “Remove page numbers” box.
Video instruction
The following is a video instruction that visually explains how to remove page numbers from a Word document:
When typing text in the Word editor, it is automatically divided into pages (sheets) in the background. However, their numbers are not visible by default.
Regular numbering
To display regular sheet numbers in a document, follow the following steps step by step.

As a rule, the numbering of documents and books starts from the second sheet. The first number is not displayed. To hide its number (including from the title page), check the box next to the “Special header for the first page” tool. As you can see in the screenshot, the numbering of the second and subsequent sheets is preserved.

Other numbering methods
After automatic transition On the “Working with Header and Footer” tab in its left section “Header and Footer” three tools are duplicated – “Header”, “Footer” and “Page Number”. We saw them before on Insert. Consideration of other numbering possibilities can be continued here, without returning to this tab.
Separate numbering of even and odd pages
In documents with double-sided text printing, it is customary to align the numbers of even sheets to the left, and odd sheets to the right. Separate numbering Implemented by a small adjustment of the headers and footers.

Start numbering with an arbitrary number
Sometimes it is convenient to divide a multi-page document into several sections with continuous numbering. To start it with an arbitrary number, you should open the “Page Number” list in the “Header and Footers” section of the “Insert” tab, and activate the “Page Number Format” in it.

In the new window you need to select the last line “Start with” and enter desired number. The result is clearly visible in the following screenshot (in the red oval).

Removing numbering from arbitrary pages
How to remove page numbering in Word? The answer to this question is obvious from the previous screenshot. The last line of the list will allow you to completely remove page numbers.
At times it may be necessary to remove numbering from some pages, for example, from the first or last. The simplest and convenient way, which also does not make changes to the structure of the document - direct removal of the number in the header and footer area. To do this, just double-click next to the number and, after the cursor appears, delete the number.
Selecting number formatting
At the top of the “Page Number Format” window of the last screenshot, the user has the opportunity to select the original number format. By opening the “Number Format” list, instead of the usual Arabic numerals, you can select Roman or letter designations, and also add a chapter index (if, of course, the document is divided into chapters).
Video: How to remove page numbering in Word?
Text editor versions
The above page editing was considered in Word 2010. In Word 2007 it is required similar actions. The situation is different in the 2003 version. Its interface differs from older editions. The section for editing headers and footers in Word 2003 is located on the “View” tab, where you should go.