Trial keys for node 32 are fresh. Fresh keys for nod32
If you have reached this page, it means you have decided to reinstall Windows 7 and need help with the installation. Below I will tell you in detail all the stages, starting with loading Windows on your computer and ending with Activating Windows and a short introductory video. And so let's get started. The first thing you need to do is download the Windows 7 image itself; there are two types: 32x and 64bit. How to understand what bit depth you need, very simply in the computer properties there is information about your hardware, we are interested in the RAM line (installed memory). If you have 4 GB or more installed, you need a 64-bit version, everything below is 32-bit.
When we have already decided on the bit depth, we proceed to download the Windows 7 image. Click on the green button “Download Windows 7 Ultimate” and a torrent file called ru_windows_7_ultimate_with_sp1_x86.iso.torrent will be downloaded to your computer. We launch it to proceed to downloading via torrent program. If the file asks you to open it through any program, then uTorrent is not installed. follow the link to download it.
While Windows is in the process of downloading, we will download and install the UltraISO program. Using it, we will write the image to a disk or flash drive.

After installing UltraISO and loading Windows, let's start recording to a disk or flash drive. Launch UltraISO and perform the actions as in the screenshot:

Open the image with the program and perform recording.


We wait for the process to complete and close the program window. Now your flash drive or disk is ready to start outside the system.
Well, now the most interesting thing is, we need to tell the computer to start from our media; for this we need to call the BOOT MENU. Usually these are the DEL or F8 keys, but there are exceptions, it all depends on the manufacturer of your motherboard - below are the buttons from which you can call the BUTMENU from various motherboards.

If you did everything correctly, you will see a type of menu with a boot selection, control using the arrows and the ENTER key.

After selecting the BOOTHMENU, it will begin copying the “loading in Windows file” files to start installing Windows 7. In the first installation window, you must select a language and click Next.

In the next window, click Install.

Selecting the installation type, click “Full installation (advanced options)

And here is the most important window, selecting the partition on which the installation will be performed. For proper installation, you must format the system C drive where your old Windows is located. Ideally, it is better to delete it and also the partition where the MBR is stored; it usually weighs 100 MB. To do this, select the section and click Delete. “Unallocated disk space” will appear. Click “Create”, specify the disk size or leave it unchanged and click “Apply”

Now it’s a matter of time, as soon as you click Next, copying files to install Windows 7 will begin. You can remove the flash drive or disk after the first reboot and watch the installation process until the Select user name window appears. Enter any desired name and click Next.

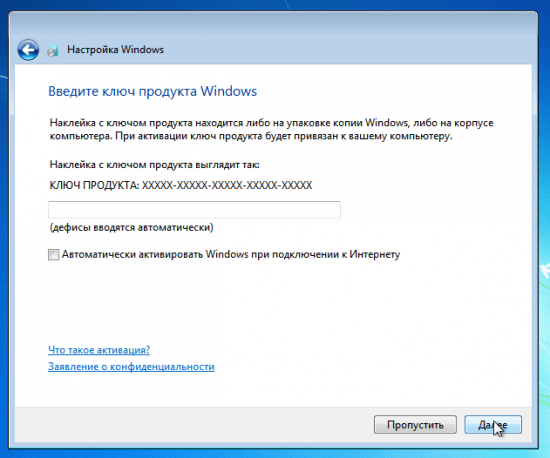
In the Windows product key entry window, uncheck the “Automatically activate Windows when you connect to the Internet” checkbox and click Next.
That’s the whole simple installation process, a familiar desktop will appear in front of you - which means that Windows 7 Ultimate is installed.
Another important and mandatory process is Windows activation. On the desktop, find a shortcut called “Activator”, launch it and do everything as shown below in the screenshots.
Hello! This is the first article on this blog and I decided to devote it to installing the operating system (hereinafter simply OS) Windows 7. The era of the seemingly unsinkable Windows XP OS is coming to an end (despite the fact that about 50% of users still use this OS), which means a new era is coming - the era of Windows 7.
And in this article I would like to dwell on the most important, in my opinion, points when installing and first configuring this OS on a computer.
And so... let's get started.
1. What should I do before installation?
Installing Windows 7 begins with the most important thing - checking the hard drive for the presence of important and necessary files. You need to copy them to a flash drive or external hard drive before installation. By the way, perhaps this applies to any OS in general, not just Windows 7.
1) First, check your computer for compliance system requirements this OS. Sometimes I see a strange picture when they want to install a new version of the OS on an old computer, and they ask why there are errors and the system behaves unstable.
By the way, the requirements are not so high: 1 GHz processor, 1-2 GB of RAM, and about 20 GB of hard drive space. More details - .
Any new computer on sale today meets these requirements.
2) Copy* all important information: documents, music, pictures on another medium. For example, you can use DVDs, flash drives, services (and similar ones), etc. By the way, today you can find on sale with a capacity of 1-2 TB. Why not an option? The price is more than affordable.
* By the way, if your hard drive is divided into several partitions, then the partition on which you will not install the OS will not be formatted and you can safely save all the files from the system drive on it.
3) And one last thing. Some users forget that many can be copied programs with their settings so that they can later work in the new OS. For example, after reinstalling the OS, many people lose all their torrents, sometimes hundreds of them!
To avoid this, use these tips. By the way, you can save the settings of many programs in this way (for example, when reinstalling, I additionally save the Firefox browser, and I don’t have to configure plugins and bookmarks again).
2. Where to get the installation disk
The first thing we need to get is, of course, a boot disk with this operating system. There are several ways to obtain it.
1) Purchase. You get a licensed copy, all kinds of updates, a minimum number of errors, etc.
2) Often such a disk comes with your computer or laptop. True, Windows, as a rule, presents a stripped-down version, but for the average user its functions will be more than enough.
3) You can make the disk yourself.
To do this, you need to buy a blank DVD-R or DVD-RW disc.
2.1. Burning a boot image to a Windows 7 disk
First you need to have such an image. The easiest way to do it is from a real disk (or download it online). In any case, we will assume that you already have it.
1) Launch the Alcohol 120% program (in general, this is not a panacea; there are a huge number of programs for recording images).
2) Select the option “burn CD/DVD from images”.
3) Specify the location of your image.
5) Click “start” and wait for the process to complete.
In general, in the end, the main thing is that when you insert the resulting disc into the CD-Rom, the system starts to boot.
Important! Sometimes, the CD-Rom boot feature is disabled in the BIOS. Next, we will look in more detail at how to enable booting into Bios from a boot disk (sorry for the tautology).
3. Setting up Bios to boot from CD-Rom
Each computer has its own version of bios installed, and it is unrealistic to consider each of them! But in almost all versions, the basic options are very similar. Therefore, the main thing is to understand the principle!
When the computer boots immediately press the Delete or F2 key (By the way, the button may differ, it depends on your BIOS version. But, as a rule, you can always recognize it if you pay attention to the boot menu, which appears in front of you for a few seconds when you turn on the computer).
And yet, it is advisable to press the button not just once, but several times until you see the Bios window. It should be in blue tones, sometimes green predominates.
If your BIOS does not look at all like what you see in the picture below, I recommend that you read the article about, as well as the article about.
Control here will be carried out using arrows and the Enter key.
You need to go to the Boot section and select Boot Device Priority (this is the boot priority).
Those. This means where to start booting the computer: for example, start booting from the hard drive right away, or check the CD-Rom first.
So you will add a point in which the first thing will be to check the CD for the presence of a boot disk in it, and only then move on to the HDD (hard drive).
After changing the Bios settings, be sure to exit it, saving the entered options (F10 - save and exit).
Please note. In the screenshot above, the first thing to do is boot from a floppy (nowadays floppy disks are becoming less and less common). Next, it checks for the boot CD-Rom, and the third thing is to load data from the hard drive.
By the way, in everyday work, it is best to disable all downloads except the hard drive. This will allow your computer to run a little faster.
4. Installing Windows 7 - the process itself...
If you have ever installed Windows XP, or any other OS, then you can easily install 7. Here, almost everything is the same.
Insert the boot disk (we already recorded it a little earlier...) into the CD-Rom tray and restart the computer (laptop). After a while you will see (if you have configured the BIOS correctly) a black screen with the words... See the screenshot below.
Calmly wait until all the files are downloaded and you are prompted to enter installation parameters. Next, you should see the same window as in the picture below.
I think there is no point in including a screenshot with the OS installation agreement and acceptance of the agreement. In general, you proceed calmly to the step of marking the disk, reading everything along the way and agreeing...
You need to be careful in this step, especially if you have information on your hard drive (if it’s a new drive, you can do whatever you want with it).
You need to choose hard drive partition, where Windows 7 will be installed.
If there is nothing on your disk, it is advisable to divide it into two parts: one will contain the system, the second will contain data (music, films, etc.). It is best to allocate at least 30 GB for the system. However, here you decide for yourself...
If you have information on the disk- act extremely carefully (it is advisable to copy important information to other disks, flash drives, etc. before installation). Deleting a partition may make it impossible to recover data!
In any case, if you have two partitions (usually system drive C and local drive D), then you can install a new system on system drive C, where you previously had another OS.
After selecting the partition for installation, a menu will appear in front of you, which will show the installation status. Here you need to wait without touching or pressing anything.
On average, installation takes from 10-15 minutes to 30-40. After this time, the computer (laptop) may be rebooted several times.
Then, several windows will appear in front of you in which you will need to set the computer name, specify the time and time zone, and enter the key. You can simply skip some windows and configure everything later.
Selecting a network in Windows 7
Completing the installation of Windows 7. Start menu
This completes the installation. All you have to do is install the missing programs, configure applications and get on with your favorite games or work.
5. What needs to be installed and configured after installing Windows?
Nothing... 😛
For most users, everything works right away, and they don’t even think that they need to additionally download, install, etc. There, I personally think that at least 2 things need to be done:
2) Create a flash drive.
3) Install drivers on the video card. Many people then, when they don’t do this, wonder why they start games or why some don’t start at all...
Interesting! In addition, I recommend that you read the article about after installing the OS.
PS
This completes the article about installing and configuring the seven. I tried to present the information in the most accessible way for readers with different levels of computer skills.
Most often, installation problems are of the following nature:
Many people are afraid of Bios like fire, although in fact, in most cases, everything is simply configured there;
Many people burn the disc from the image incorrectly, so the installation simply does not start.
If you have any questions or comments, I will answer... I always take criticism well.
Good luck everyone! Alex...