How to change geolocation on Android and iOS. How to set up your current location for Google Plus Locations
As mentioned earlier, an IP address is a kind of identifier for a working machine that allows a person to exchange information with other clients and nodes on the Internet.
It must be said right away that to change it on the local network, you just need to open the network settings and manually specify the new value. This is necessary for the virtual space to work properly.
But changing this setting for Internet access will be a little more difficult. The fact is that such information is provided to each workplace by the provider - a company that provides access services to the World Wide Web. This IP address is called external. It can be dynamic or static.
The latter indicates that the user connects to the Internet, always having the same IP. The dynamic one changes with each new connection to the “web”. At the same time, under one such address, usually not one subscriber enters the global network, but several at once.
Most often, changing the IP is necessary for users who want to hide their location. These may be those who have been denied access to certain portals.
How to change the IP address on the local network?( )
We will look at the example of Windows 7 and the following.
How to change your IP address on the Internet?( )
There are several ways to quickly change your address
Anonymizers
Browser extensions
Special programs
The meaning of the first two is that before entering the global network, all traffic reaches a remote node, and then is transmitted to portals. The site server receives data about an artificial proxy server, and not a real one.
Anonymizers( )

increase
Anonymizer is an online page that offers you to anonymously visit a particular portal. To do this, you simply need to enter the desired URL in the desired address bar and click the appropriate button.
There are many such pages on the World Wide Web. Among them you can find both free and paid ones. Some even give you the opportunity to choose the country from which you are supposedly entering.
I’ll show you an example of the hideme anonymizer, which I use myself and recommend to everyone! Unfortunately, the service is paid, but believe me, it’s worth it, it also allows you to use the demo version for 1 day, so I’m going to use it now.

Browser extensions( )

increase
They are small internal additions to a particular browser. There are many similar programs that have the ability to change IP. To install, you need to select the appropriate add-on through the menu of the browser itself (extension store) and install it.

increase
After this, only the browser will connect through a special proxy server. All other programs use the real IP at this time. This is convenient when there is no need to hide your location from all network programs. Most of these add-ons offer to select in advance the desired state from which to exit.
Special programs( )
There are many applications that allow you to change your computer's address. Most of them are paid, but there are some free programs. The most common are Hotspot Shield and SafeIP.
Agree, it’s convenient when you don’t have to explain “on your fingers” where you are now - send your interlocutor a message with a mark on the map and you’re done. We have already written about this option. But how can you change your location in Viber if someone really wants to know where you are, but doesn’t want to share the information? It’s very simple: deceive the messenger. How - read below.
Changing geolocation
As you already understand, you cannot change your location in Viber. The application does not have the necessary functionality. However, you can take advantage of the fact that for its positioning it uses the data it receives from the smartphone. But it is very possible to force a mobile device to produce false data.
This is done using third-party programs that can be downloaded from the app store. Examples of utilities: SpoofMe - Fake GPS location, Fake GPS Location Donate, Fake GPS Location PRO (download to iPhone via AppStore). You can search by words from the names given here. There are many applications in the list, you can look through and select the ones that suit your parameters. We will tell you how to send a false location in Viber using the example of Fake GPS location – Hola.
Download the program:
- When you first start, you will be asked to buy the paid version or use the free one. Click "Free". By the way, paid versions of such programs are inexpensive, but have wider functionality. For example, they allow you to choose which applications to issue false coordinates to and which not.

- And now on the “Satellite” and “Go!” button.
- Select "Settings". After this, the system will redirect you to “Developer Options”.
- “Simulate location” button - select “Hola Fake location”.


How to deceive the location
Now, in order to deceive the location in Viber, you need to go to the smartphone settings. Here do it like this:
- For Android - “Settings” - “Google” (in orange icons) - “Location” - “Detection method” - “GPS only”.
- For iPhone it’s the same, only the wording of the button names will be different.
To set the desired location in Viber, you need to change the coordinates in the deception program. They will be displayed when sending your location via Viber and social networks. You open the program, move the map so that the mark is above the desired location and press “GO”. The application will run in the background. To turn it off, touch the “Stop” button. You can choose any coordinates, even Africa or the North Pole.
Good day to all! In this topic we will write you a method that does not require root rights on your Android device and you can easily replace GPS coordinates. Why do this? The fact is that some applications on an Android device request your location, but not all of these applications work, for example, in your city. A popular game on Android, Pocemon Go, this mobile application requests and works with your GPS, but for example, in my city the game does not work or simply does not connect due to the fact that it cannot connect to satellites. Previously, in order to change GPS coordinates, you had to install root rights, but a very large number of people do not know what this is, not to mention how to get them, so this method is especially for those who do not have root rights on their device. For further work we will use the application " Floater".
First of all, you need to pick up your smartphone or tablet or other device running Android. Next, go to Google Play and in the search column write the name ““Floater”. Then, as usual, download and wait for installation. If you are too lazy to write or search, follow this link “Fake GPS Location - Floater”.
Next, go to the device settings and enable developer mode. For those who don’t know: We pick up the device, go to the device settings and go down to the very bottom. We are looking for the section " About the phone". Go to it and click on " about 5 quick times Build Number". The message you have become a developer should appear. Next, go to the settings and there at the very bottom you should see a new item. Go to it and move the lever to the on position.

All configuration and installation of the program is completed. Now let's launch the program. After launching, you will see an icon with your application in the upper left corner and if you open it, a window with a map should appear in front of you.
Select any location you like by clicking on the green dot, and then on the play button, which is located in the bottom panel of the program or window

By clicking the pause button, the entire process will be stopped. That's all, thanks for your attention. Add a smile emoticon and don’t forget to share the article with your friends on social networks. If you still have questions, you can ask them below.
Nowadays, many people are looking for a way to change the GPS location on their iPhone. Since Apple released iOS10, no official tool can support jailbreaking iOS10 at this time. Because a ready-made content management tool for iOS devices and iTools can now help iOS users change GPS location easily.
iTools can manage the content of iOS devices. It can also transfer and copy almost everything on iOS devices including music, photos, contacts, files, videos, apps. iTools is compatible with all iOS devices, including all iPhone models, iPad and iPod. And it can be installed on both Windows and Mac computers. iTools has accompanied the progress of iOS devices since the advent of the iPhone3. It has helped over 10 million iOS users manage their iOS devices easier and smarter.
iTools now has a "virtual location" feature for both Windows and Mac versions. This is really good news because no matter you are using a Windows computer or a Mac computer, you can download the appropriate version of iTools and use it to change the GPS location on iPhone.
Many iOS users love to use iTools to change GPS location as it is very practical in daily life. For example, you can get to know a place better before you go there; Sometimes you may fool your friends or colleagues with a fake location; Some people use this feature for work at work; Others use it to play games like Pokemon Go.
Download a trial version of iTools (iTools for Windows, iTools for Mac). If you feel good about iTools, please feel free to buy a license from our official website.
How to change GPS location on iPhone using iTools?
After successfully connecting your iPhone to iTools on your computer, you will see the interface below:
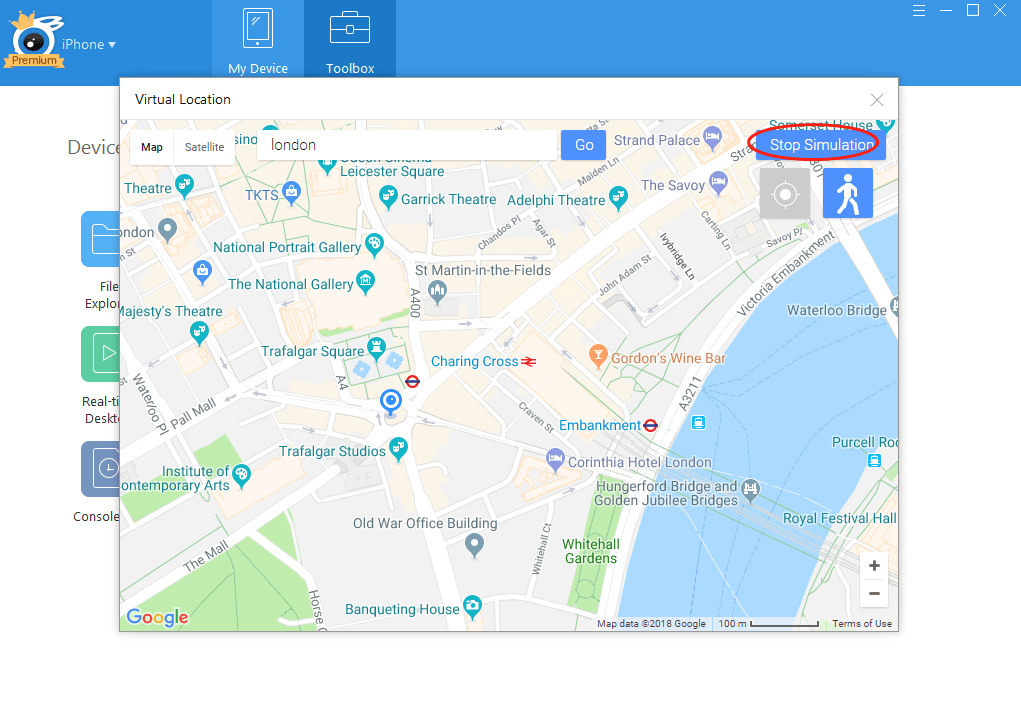
Click "Toolbar" on the menu bar, you will see a "virtual location" button on the interface:

Click the "Virtual Location" button. Enter a location in the text frame, click "move here" and you will be taken to that location.

You can even simulate walking in this place after clicking walking mode.

If you need to end the virtual location and return to your real location. Click "stop simulation".
To sum it up, iTools is a simple and fast way to change GPS location on iPhone. No matter what you want to do with these iTools virtual layout features, it can definitely satisfy you. Moreover, iTools is also being discontinued as an ideal content management tool for your iOS device. You can use it to backup or transfer content from your iOS to computer easier and smarter. Please share it with your friends who also need iTools if you feel good about our iTools.
Any other problems for iTools during your operation, please go to our for solutions.
Learn more about thinkskysoft and iTools, please click.
- Allow the site to track your location - click the Allow button.
- Block requests to determine your location from this site - click the Block button.
- In the Location block, set the switch to the desired position:
- Click Finish.
You can reset access settings in the following ways:
In the address bar
Click the icon → Reset settings.
The setting will be reset when the page is refreshed.
In browser settings
- In the upper right corner of the browser, click the button → Settings.
- Click the Show advanced settings link (at the bottom of the page).
- In the Personal information section, click the Content settings button.
- In the Location block, click the Manage exceptions button.
- Select the line with the name of the site and click the icon.
- Click Finish.
yandex.ru
Geolocation settings in Mozilla Firefox - General questions - Yandex.Help
When a site asks for information about where you are, a warning appears at the top of the page:
Define geolocation parameters:
- Allow the site to track your location - select Always report location.
- Allow the site to track your location until you restart the browser - click the Report location button.
- Prevent a site from tracking your location until you restart your browser - click the icon.
- Block requests from the site to determine your location - select Never share your location.
- Postpone decision - select Not now.
To set general geolocation settings for all sites and programs:

- Go to the website.
- If the browser menu is not visible, press the Alt key.
- Select Tools → Page Info.
- On the Permissions tab, select the Know your location settings.
yandex.ru
Change location on Windows 10 computer
Hello! We continue to disassemble the Windows 10 operating system! Today you will learn how to change the location on your Windows 10 computer. You will be able to change the default location of your computer. To change the location, open the Start menu at the bottom left of the screen. In the window that opens, in the list of all applications, at the bottom of the list, open the “Windows System” tab. In the list that opens, click on the “Control Panel” tab.


Next, the “Region” window will open. Here you will be able to change the primary location or location of your computer. Select a location in the Primary Location field. Then click on the OK button.
Note! Changing your location may affect the display of additional local information, such as news and weather forecasts.

Still have questions? Write a comment! Good luck!


 Change location on your Windows 10 computer updated: March 8, 2017 by Ilya Zhuravlev
 info-effect.ru
Geolocation settings in Internet Explorer - General questions - Yandex.Help
When a site asks for information about where you are, a warning appears at the bottom of the page:
Define geolocation parameters:
- Allow the site to track your location - select Always allow.
- Allow the site to track your location until you restart the browser - click the Allow button once.
- Prevent a site from tracking your location until you restart your browser - click.
- Block requests from the site to determine your location - select Always block and do not tell me.
To set general geolocation settings for all sites and programs:
- Click the icon → Internet Options → Privacy.
- In the Location block, allow or block sites from detecting your location.
- Click Apply → OK.
- Click the icon → Internet Options.
- On the Privacy tab, click Clear sites → OK.
yandex.ru
Online security: Hiding your location or how to hide your IP address | LiNX – solutions from professionals
Our company has been contacted more than once by users asking how safe the Mac OS operating system is? Are there viruses for it? Is it possible to track which resources were visited?
This article is the first in a series on Mac OS security, in which we will describe the basics of Internet security, prevent sites from recording “strange data” on our computer and prevent us from tracking our location.
In order to have fewer questions about why and what is being done, we will start with the theory, but we will not delve too deeply into it, since in some places it can be complex and confusing, so we apologize to experienced administrators and users for the occasional rather crude simplifications.
So: each computer on the network has its own identifier, the so-called IP address. This address contains service information without which our computer will not access the Internet. Roughly speaking, the entire Internet rests on these IP addresses. But, as we all know from school, any information can be used both “positively” and “negatively”.
Your ID will change depending on your location. For example, at work you have one IP, at home another, at the dacha a third, but one thing remains unchanged - using your IP you can determine your location. For example, you went to wikipedia.org. The creators of Wikipedia immediately know from which address you came, which means they know the approximate, or even the exact location. Wikipedia is a reliable site that has been proven over the years and has more than one million users, but what to do with the other hundred sites that you visit per day? How do they use this information?
For those who like experimenting, we offer laboratory work: Go to the website 2ip.ru - a service whose main function is to show the IP address and other data.
What you will see:
- your ip
- provider
- operating system
- browser
- browser version
This is information that the owners of the sites you visit already know at least about you. What can you do with this information?
Almost the key indicator is the “Where are you from” field. Clicking on it will show us our approximate location.

By the way, if he didn’t show it accurately, as in my case, then you can’t relax, because there is always another way - the human factor. An attacker can go to your provider and for a certain, insignificant amount of money, ask the administrator on duty for information at which address your IP was provided at such and such a time.
Also pay attention to the “History” item on the already favorite website 2ip.ru. By clicking on it, it shows which ips were previously accessed from:
How does he know this? It's all about the so-called cookies. They were invented by the creators of the first browser, Netscape Navigator. Cookies are small files that are stored on our computer. These files contain data about:
- What sites did we go to?
- What pages on this site were visited?
- The site we visited assigns a unique identifier to our computer, for example 8jladwuuuee9283cnenhceiqj8910 and writes it to us in cookies
- Other service information
How can this harm us? As stated above, any site that we go to assigns us a unique identifier, and at the same time that it knows our ip and location, we can track almost all the places we visit, provided, of course, that we go to this site .
To make it clearer, let me give you an example: I love reading articles on Wikipedia. I go to the site from the office to read the meaning of some words, from home to watch the filmography of Bruce Willis, and sometimes I go from the dacha to see the best way to grow hybrid tea roses. Accordingly, Wikipedia knows 3 of my locations and we can assume that:
- First this work because I was looking for the meaning of the word "baseDN"
- The second one is my home address because I came in at 21:30 and was looking for entertainment material
- And the third is my country house, because I was looking for material over the weekend, from a different address, information about roses.
By the way, Wikipedia is almost the only site that does not write cookies to our computer, and the most intrusive company in this regard turned out to be Google, which records not only when you visited their site, but also through other resources on which the cookie is located. For example, search from Google or a plugin for the social network Google +

The consequences, I think, are not worth describing. Any owner of the site you visit can determine where you are.
So what to do? How to hide your location? First, we will teach our browser not to record cookies and caches. To do this, before surfing the Internet, open the Safari browser and activate the “private browsing” function by clicking in the upper left corner of the Safari->Private browsing screen.

Thanks to this simple button, the browser forcibly cuts off all attempts to write cookies and caches to your computer. But, as always, there is a fly in the ointment - your browsing history, website passwords, and search history will not be saved either. What the program will immediately warn us about when we enable this function

If you did everything correctly, then when you go to the 2ip.ru website you will not see the “History” item.
The next step to protect against attackers is to change your real IP. To do this, we need the free Hotspot Shield program. Follow the link, download and install the free version of the program. In the future, if you use it often, the program can be purchased for $29.95, which will make pages load faster.

After installing the program, in order to replace your IP, we just need to launch Hotspot Shield from the program folder on your computer.
It will automatically make the necessary settings and establish a connection with an external server.

PS: To prevent the window from permanently hanging on the screen, you can minimize it by clicking on the yellow button in the upper left corner of the window.
Let's go back to the 2ip.ru website and make sure that our IP and provider are now completely different. And our “address” has changed accordingly.
Uncheck all the boxes except “Delete all website data” and click “Reset”
Thanks to the manipulations described above, we have made it much more difficult for attackers to try to find our location, and we have also learned how to replace our IP and enable private access mode in Safari so that the browser does not record files that could harm us.